VacuumFormer
Quick links: Usage • Troubleshooting • Maintenance
| Nickname | Make | Model | Where | Manual | Issue Tracker | Status |
|---|---|---|---|---|---|---|
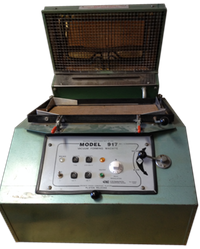
| "Victor" | C R Clarke & Co. | Model 917 | [[Alcove | Rooms#alcove]] | TBC | Tool: Vac-Former (Victor) |


See full safety information below
This machine takes a plastic sheet and moulds it over a physical object, known as a "buck".
Why would you want to do this? Some examples:
- Prototyping product design (youtube vid)
- Shrink wrapping, making moulds (youtube vid)
You create a buck out of something that won't melt or cause fumes when hot, then place it on the wooden bed in the vacuum former. Next, you cover it with your plastic sheet and close the lid of the vacuum former - this causes the machine to suck the air out, which makes the plastic sheet snugly hug your buck, and then a heater element in the lid of the machine cures the plastic sheet (makes it solid) so it retains the shape of the buck.
TO-DO
CR Clarke & Company was founded by Chris Clarke, in 1974, after being approached by a former colleague to build a simple heating machine to use with plastics in school workshops. Production started in the outbuildings of the family home, and by 1977 a small range of strip heaters and vacuum forming machines had been developed - including the Model 917.
To use this machine, you'll need to:
- Follow safety precautions
- Create stencil object
- Obtain plastic sheets
- Mould plastic over stencil
- Trim unwanted plastic
Let's get started...
When in use, the heated roof of the vacuum former gets very hot, and remains hot for a while after the machine has been turned off. Likewise, the buck and formed plastic will be very hot prior to and during forming, and will take a while to cool once formed.
The stencil object can be made however you choose - just make sure it doesn't melt or release fumes when heated during the forming process.
- See Section 5 in Vacuum Forming Guide
- You could probably use one of our milling machines, such as the Proxxon or Arcitype, to create bucks out of metal or wood.
- Suppliers include: Hindleys and Technology Supplies
- Some guides that might help:
For background information, see:
Instructions specific to the Clarke Model 917:
- Place the buck onto the wooden platform
- Lower the platform as low as it will go by pulling out the round black knob at the bottom of the control panel
- Take the plastic sheet and place it over the hole
- Lower the black metal frame and use the orange handled clamps to lock it down tight onto the plastic
- Lower the heater over the top and turn it on full
- Watch through the side:
- As the plastic heats up it will begin to sag - this usually takes 6-12 minutes, depending on plastic used
- It is ready to form when it sags between 30 - 45 degrees down into the hole
- If you notice the plastic bubbling at the corners reduce the heat a little
- When the plastic is ready, turn the vacuum on and raise the platform hard up into the plastic
- Lift the heater up, but keep the vacuum on until the plastic cools into shape
- Unclamp the metal frame and lift the plastic off
- Blowing can help release the plastic from the buck
- You can use a flathead screwdriver and/or some baby oil to help release the buck
You'll now have a moulded piece of plastic in the shape of your buck, surrounded by a flat sheet of plastic that needs trimming away.
- See Section 6 in Vacuum Forming Guide
DO NOT use to cook pizza.
Have fun and don't be upset if the first one doesn't work - its like making pancakes, you have to get a feel for it first.
DO NOT use to cook pancakes.
- Avoid: Please try and make useful stuff so as not to waste plastic
- Reduce: The plastic sheet has to cover the whole hole in order for the vacuum to work - if your buck is small, try putting multiple bucks in the tray at the same time so a single sheet of plastic will form over several bucks
- Reuse: It's possible that larger pieces of plastic could be cut in to shapes on a milling machine.
- Upcycle: Think of alternate uses for your formed plastic objects - could they be used as a desk tidy, flower pot, something else?
- Recycle: Depending on the plastic used, the trimmings can be recycled in the bins near the kitchen.
- Disposal: For any remaining waste, please put it in the workshop bin.
- General: Waste, recycling and cleaning up
If the advice below doesn't solve the problem, see Section 7 in Vacuum Forming Guide for solutions to general problems experienced when vacuum forming. If all else fails, please create a new issue to let us know.
- Material is too hot - lower temperature or reduce heating time
- Insufficient vacuum - check the plastic sheet completely covered the hole, check the vacuums and fuses
- Poor mould design - see Section 5 in Vacuum Forming Guide
- Material or mould too cold - heat for longer
- Insufficient vacuum - check the plastic sheet completely covered the hole, check the vacuums and fuses
- Air pockets between buck and plastic sheet - consider making some air holes in the buck so air can be sucked out when forming
- Plastic sheet too thin - use thicker plastic
- Sheet cooled whilst forming - no idea what this means
- Mould design with insufficient draft angles - no idea what this means
- Pre-stretch required - no idea what this means
- Plug assist required - no idea what this means
- If using Hygroscopic material, it needs to be pre-dried before forming
- Overheating of the plastic - reduce temperature or heating time
- Mould or plastic sheet too dusty - use clean sheet
- Mould not fixed on wooden board - is this valid for our machine?
- Insufficient draft - no idea what this means
- Mould undercuts - no idea what this means
- If the machine is broken or needs maintenance, create an issue in the issue tracker (link in Troubleshooting above)
- Label the issue:
Tool: Vac-Former (Victor)as applicable - If broken, add
Brokenlabel (this triggers various systems to flag the machine unavailable) - If maintenance required, add
Maintenancelabel (the machine is working, but needs TLC) - If parts or consumables need purchasing, add
Shoppinglabel
- Label the issue:
- Hindleys sell plastic sheet consumables
- Technology Supplies sell spare parts, and also plastic sheet consumables (the Cambridge Makespace used their food-grade plastic to make Easter Egg moulds)
- Kevo a small vacuum former you can use at home