Embroidery Machine Fred
Threaderic, or Fred to his friends, is a Brother Innov-is NV800E embroidery machine. He can be used, in conjunction with stabiliser and thread, to machine embroider designs onto fabric of various types.
Online manuals here - there are hard copies in the Fibre Arts room.
Fred can be used with the (expensive) Brother software, but he can also be used with Inkscape and the Inkscape extension Ink/Stitch which are both free and do a very good job. There is a learning curve for both (if not already familiar with Inkscape) so the best bet is to do some experimenting and see what works and what doesn't. Save the resultant file with one of the Brother extensions made available by Ink/Stitch and use a USB stick to take it across to Fred.
Inkscape requires you to export your files into PES format. Inkstitch can deal with simple objects and automatically export them into the desired format however if your design is complicated then you may come across an overlap or fill error. These two steps will solve most common problems:
- Find the error
a. Note the Object ID identified (to be used in the following step)
b. Edit > Find&Replace (Ctrl + F) > tick 'search in - properties'
c. Either create a space between the overlapping lines or go to Extensions> Inkstitch > Fill Tools > Break Apart > Simple > Click Apply. See Ink/Stitch website for more details and other options.
- Re-apply the Embroidery command i.e. export to PES format. i.e.
Extensions > Inkstitch > Visualise and Export > Embroider... > Apply
There are different types of stabiliser you can buy and use with Fred. Stabiliser helps keep the fabric in one place while it's being stitched. It's important to remember that each and every stitch warps the fabric slightly; sometimes that has to play into the way you design things.
The most commonly used stabiliser is simple tearaway (looks like a roll of kitchen roll), which you can carefully rip off the back of your design at the end. There are some alternatives, including some that will dissolve in water. Again, research and experimentation are your friend, but be careful to buy stabilisers that are rated for machine embroidery as hand-embroidery is not the same and isn't as hard on the fibres involved.
We have a vast selection of thread specifically for machine embroidery, in a clear plastic box. The thread you use with Fred must be suitable for machine embroidery, and be 100% polyester. Cotton or other natural fibres will release fluff, which will ruin your embroidery and will leave deposits of floof inside of Fred.
Threads with a blue spool are bobbin thread, which is of a different thickness. Using upper thread on the bobbin will not work properly.
We have some thread nets, which are little lengths of plastic netting that expand massively to pull over spools and keep the thread tidy. They're in the plastic box, and look like this:
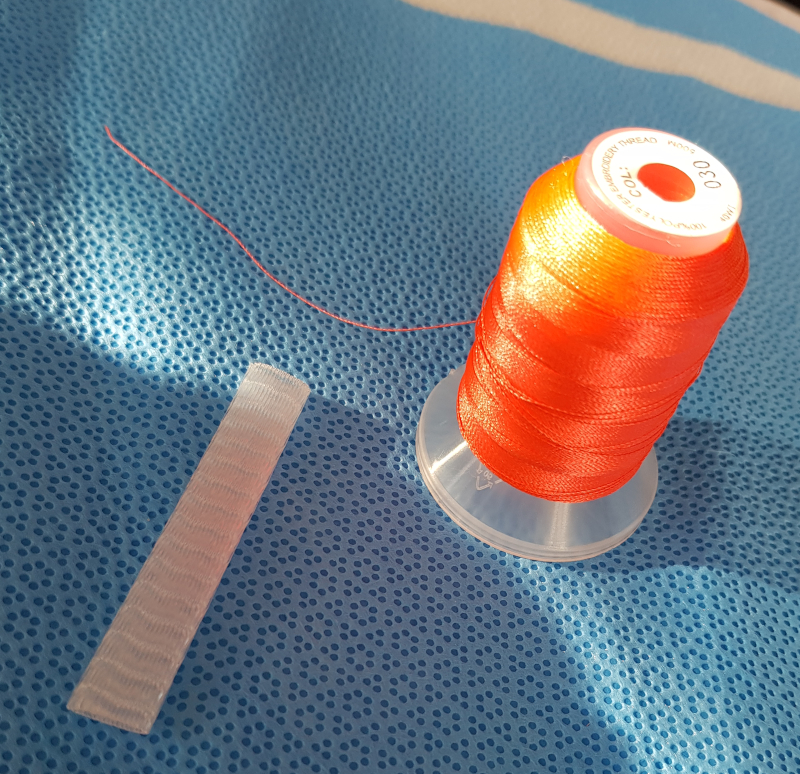
To use them, simple pull open one end, and slide it over the spool of thread. Try and keep the thread neat and tidy below, to avoid knots for the next person.
Fred comes with various hoops of various sizes, and has a maximum embroiderable surface area of 160 x 260 mm. This is a little misleading as it can be difficult or impossible to fill the hoop completely; experimenting to find what works for you is best, again. The outer hoops have a small rectangular protrusion to the left-hand side, which is used to clamp the hoop to the machine's moving arm. This protrusion has a ridge on one side, which is the top. There is an arrow embossed on the hoop, which matches an arrow on the inner hoop. Use these to make sure you're assembling the hoops correctly.
To put fabric on the hoop, undo the screw at the base of the hoop, and put the smaller centre hoop aside for now. Place a piece of stabiliser (which must be big enough to go generously across the hoop in at least one direction) across the larger outer hoop, and place your fabric on top of it. Next, put the smaller centre hoop on top, and press it down into the larger one so the fabric and stabiliser are sandwiched in between. You may have to undo the screw a bit more, especially if using thicker fabric.
Once the hoops are together, you can pull at both the fabric and the stabiliser (separately and/or at the same time) to make them as taut as possible within the hoop. Tighten the screw as you go, and aim to have a tight, flat expanse of fabric in the hoop.
Fred has some buttons along the front, which I will talk about now. Aside from the start/pause button, these should never be pressed while embroidery is active.
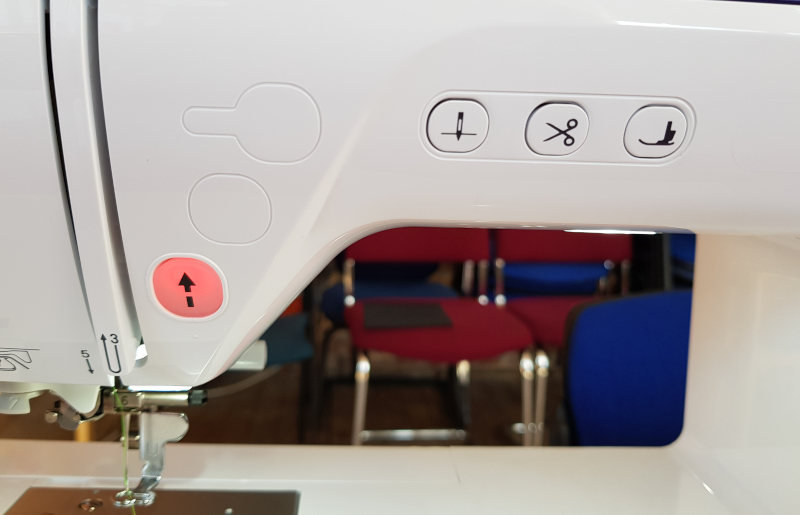
Starting from the left, the lit-up button which is red in the picture, is the start/pause button. It is red when the machine can't start (for example, because the foot is in the "up" position), orange when it's in bobbin-winding mode, and green when ready to embroider. This is the only one of these buttons you can safely press while the machine is operational.
The next button along, which has a drawing of a threaded needle on it, lifts the needle up or puts it down.
Next is the thread wiper; the button depicting scissors will cut both the top, and the bobbin thread at once. At the end of a colour, or at the end of a piece, the machine will automatically cut both threads. However, for example if you need to wind new thread onto the bobbin or if you want to remove the piece to sort some broken top thread, you can press this button to ensure both threads are tidily snipped.
The final button operates the presser foot, which needs to be up to add or remove a hoop, or down to start embroidering.
Again, the bobbin must be wound with bobbin thread, which is the thread on the blue spools. You can choose either white or black, it often doesn't matter which but it can happen that a small amount of the bobbin thread peeks through, so if you're using very light or very dark fabric/colours, it's worth matching the bobbin thread accordingly.
In order to thread it, remove the clear plastic cover in the base of the machine, below the needle, by pressing the grey button on the right in towards the clear plate.
Take the bobbin out, and place it on the bobbin winding post at the top right of the machine (with the top cover open). Next, either place a spool of bobbin thread on the thread spindle, or use the weighted spindle for larger spools (currently we only have larger spools of bobbin thread) and then follow the threading guide with the black circles surrounding white numbers.
Once you've threaded the new bobbin thread across to the bobbin, wind it around the bobbin a couple of times and pull it down past the integrated thread cutter. Next, press the bobbin gently towards the right until it clicks over. At this time, the start/pause button should be lit up in orange; if you press it, it will begin winding the bobbin. Keep an eye out; the bobbin will stop winding when it is full, but the machine will keep humming. Press start/pause to stop it, cut the thread, press the bobbin back to the left, and remove it from the post.
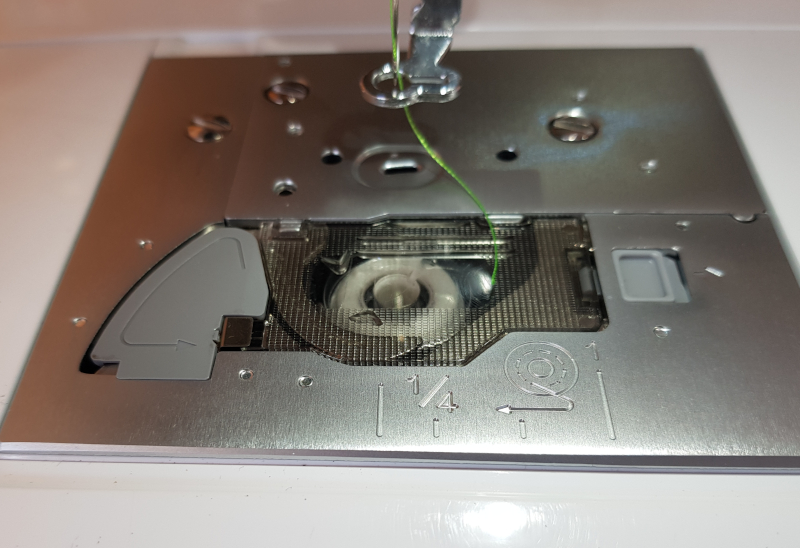
To return the bobbin to its place in the machine, pay attention to the threading guide around the bobbin case.
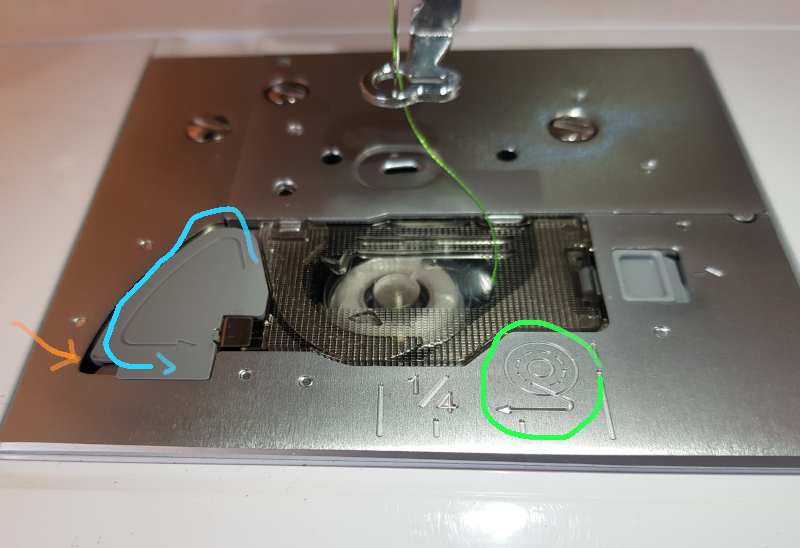
Drop the bobbin back in with the loose end facing the correct way as per the guide (green circle), and follow the arrow to pull the thread around the grey panel (blue arrow). Once the bobbin is in place and the thread has been cut using the built-in cutter (orange arrow), place the end of the bobbin plate into the left-hand side and press the right side down until it clicks.
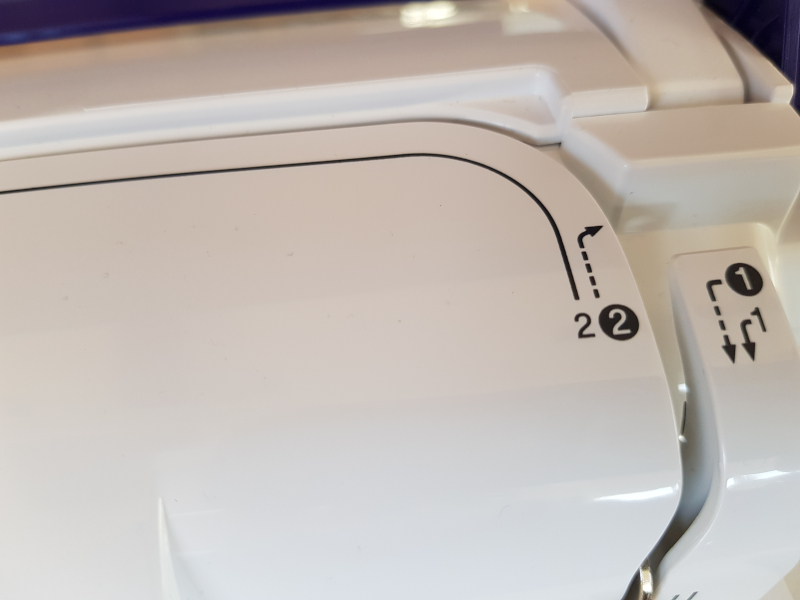
The top thread is just as easy as the bobbin. Simply place the spool on the spindle at the top, and follow the numbers without a black circle. Be careful with step 4, drawing the thread all the way to the top and back down, touching the sides of the loop in a counterclockwise motion.
To finish threading the machine, from step 6 becomes a little lairy and I will take more photos and add more explanation next time I'm in. For step 6, you want to pull the thread behind the little metal bar, and then for step 7 you pull it around the round protrusion and then around the little hook at the end of the machine, which conceals a thread cutter. To thread the needle, at this time, you simply pull down the hook at the end of the machine with a firm, smooth movement. Ensure the end of the thread is completely free of the needle before starting to embroider.
Turn on the machine, using the power button on the right end of the machine. Touch the screen once it shows random neutral embroidery imagery, and allow the machine to calibrate by moving the arm around. To do this, there can't be a hoop inserted, and Fred will tell you to remove it if there is.
Fred's moving arm has a lever which can be pointing toward the user (locked) or toward the ceiling (unlocked). Unlock this lever, then slide the hoop's protrusion into the now-exposed slot with the ridge facing up (see "Putting Fabric on the Hoop"). Once it is fully inserted, lock the lever.
Insert the USB stick into the USB slot. Press the USB symbol on the touchscreen to access it, and pick the design you want to embroider. Press the Set button at the bottom right of the touchscreen. You can now make some changes to where the design is within the hoop, or to the size or rotation of the design.
Once you're done, press Embroider at the bottom right of the screen. The software side is now ready to go, and the screen will show the number of stitches each colour will require to be finished. The machine will stop automatically when you need to thread a new colour, and will show you a small, simplified depiction of your design to let you see which colour you need next. It does match these to a colour chart, but you can obviously put in any colour you want.
Ensure the machine and the needle are threaded correctly, and that the presser foot is down. I like to make sure the tail of thread isn't too long, so the end is tucked entirely into the piece instead of partly sticking out, but you'll get used to the ideal length as you get used to working with Fred.
The most common issue you'll have is either the top thread will break, or the bobbin will run out of thread, in the middle of a piece. To fix these, ensure you run the thread wiper (scissors button) so the remaining thread is cut, and either rewind the bobbin or cut the frayed end off the top thread and rethread the machine.
Now the problem you have, is that the stitching may be a bit ragged where the problem occurred. Luckily, Fred is prepared to help you in a quick and easy way.
Once the machine is ready to go again, all the thread sorted and the hoop back in place with the presser foot down, locate this button on the bottom right of the touchscreen:
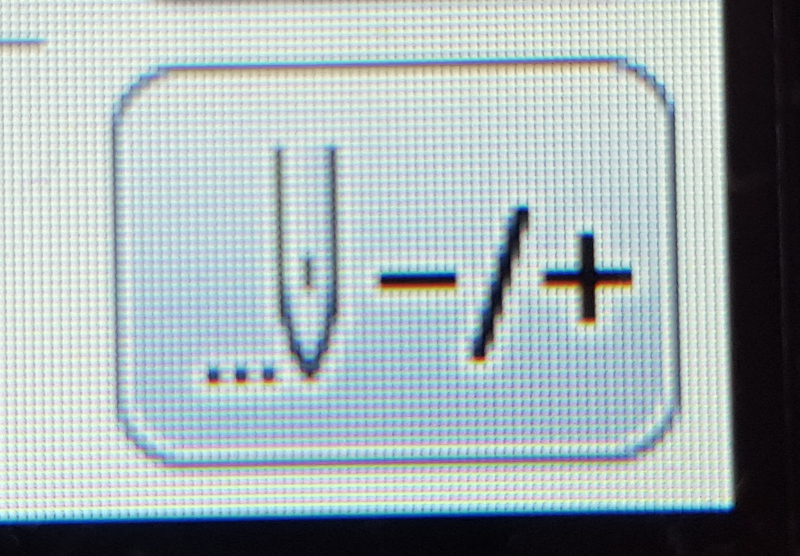
This button will take you to a menu in which you can skip to past or future stitches:
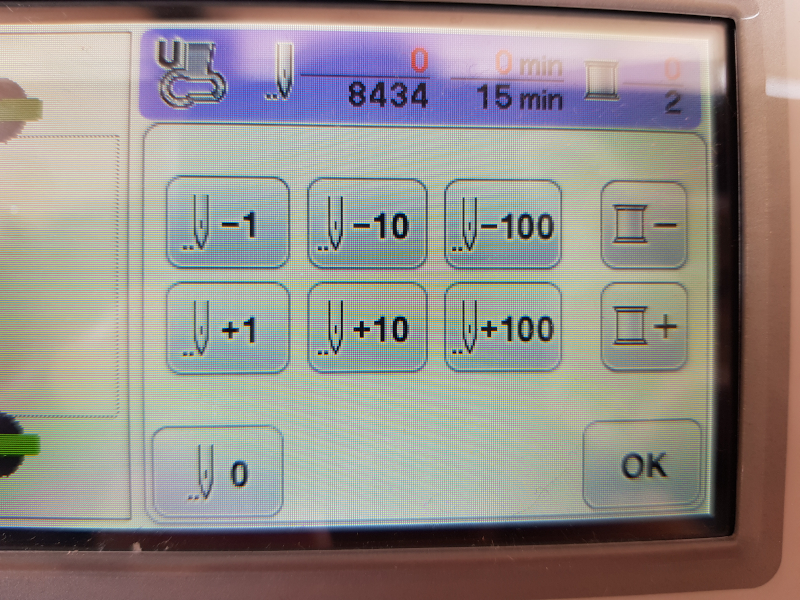
To skip back to before the problem occurred, press any of the buttons with a - in front of the number. The hoop will move to place the needle where it will pick back up, so you can check if you've gone to the right spot. If you overshoot, simply use any of the + buttons to correct. It is better to go too far back, than not far enough.
The machine actually contains a built-in menu for the important procedures. If you press the button depicting Fred, from the start of the touchscreen menu, you'll come here:
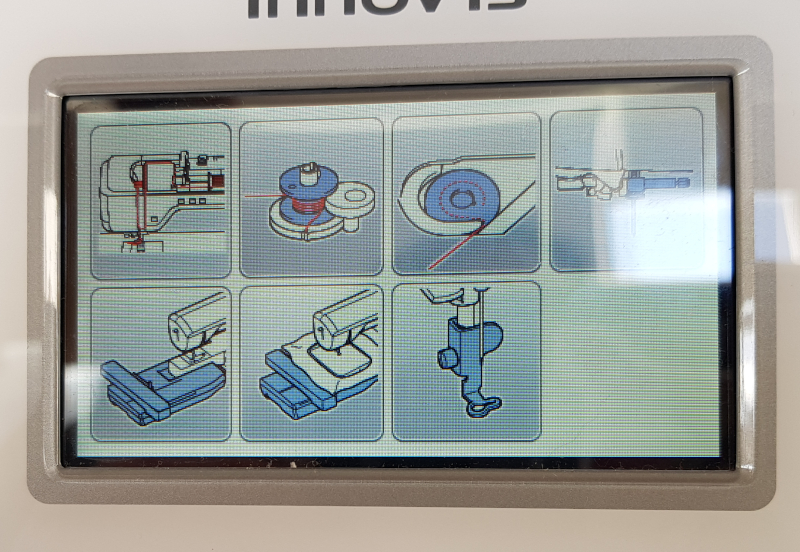
While it's always brilliant to ask for help, it's always good to know Fred has your back, too.