Vagrant
VMs are configured to display in UTC, but you can display the time by modifying ~/.post_bivio_bashrc:
echo export TZ=America/Denver >> ~/.post_bivio_bashrc
. ~/.bashrcNOTE: VirtualBox 7.0 does not work with vagrant so install 6.1
There is a known permission issue for VirtualBox install so follow these instructions to do the install. Open System Preferences then Security & Privacy, and when the install fails, you'll need to allow Oracle, and reinstall.
sudo mkdir -m 755 /etc/vbox
sudo vi /etc/vbox/networks.conf
add line: `* 10.0.0.0/8 192.168.0.0/16`
sudo chmod 644 /etc/vbox/networks.conf- Apply vagrant-monterey-patch.txt
- mkdir ~/v
- vagrant_dev_no_nfs_src=1 radia_run vagrant-sirepo-dev
You need to apply this patch to fix this bug.
The easiest way to get a Sirepo development environment on a Mac is:
curl https://radia.run | bash -s vagrant-sirepo-devYou still have to install Vagrant and VirtualBox. The script will create the VM and install a number of (not all) codes required by Sirepo. It will workaround a number of problems with time syncing, audio, etc. It wil
You should install the vagrant-vbguest plugin. Once vagrant is installed, run:
vagrant plugin install vagrant-vbguestIf you want to run X11 applications (e.g. RadTrack), you will need to install an X11 server:
You need to download and install the following (in order):
If you want to run X11 applications (e.g. RadTrack), you will need to install an X11 server:
You'll need to reboot and start vcxsrv manually.
If you are just booting a new machine, use this:
Vagrant.configure(2) do |config|
  config.vm.box = "radiasoft/beamsim"
  config.vm.hostname = 'v'
  config.ssh.forward_x11 = false
  config.vm.synced_folder ".", "/vagrant", disabled: true
end
You'll need to install guest additions to match your host so use bivio_vagrant_ssh, which will be faster in any event, because it caches the ssh command.
To add a private network, add this to your Vagrantfile and vagrant reload:
config.vm.network "private_network", ip: "10.0.0.2"The host will take IP address 1 so don't use that.
If you see this:
==> default: Setting hostname...
The following SSH command responded with a non-zero exit status.
Vagrant assumes that this means the command failed!

service network restart

Stdout from the command:

Restarting network (via systemctl):  [FAILED]

Stderr from the command:

Job for network.service failed. See "systemctl status network.service" and "journalctl -xe" for details.
Clear your arp cache. On Linux and Mac OS X:
sudo arp -a -dOn the Mac, the time synchronization will happen with the VirtualBox guest additions. The curl installer should configure these properly. If the time is correct, you are done with this section.
Sometimes guest additions fail with new versions of VirtualBox. The easiest way to check if they are running is to ask systemd:
$ systemctl is-active vboxadd
active
If it doesn't say active, you've got a problem, and you will need to
reload VirtualBox with vagrant reload.
Another problem might be that chronyd or timesyncd is started by
systemd via a system update. Check to make sure they aren't running:
$ systemctl is-active systemd-timesyncd
inactive
$ systemctl is-active chronyd
inactive
If either of these are active, you need to disable them:
$ sudo systemctl stop systemd-timesyncd
$ sudo systemctl disable systemd-timesyncd
Removed /etc/systemd/system/multi-user.target.wants/systemd-timesyncd.service.
$ sudo systemctl stop chronyd
$ sudo systemctl disable chronyd
Removed /etc/systemd/system/multi-user.target.wants/chronyd.service.
If the time is still not synchronizing, it could be that the VirtualBox configuration is wrong. On the Mac, in the VM directory, run:
$ VBoxManage guestproperty get $(<.vagrant/machines/default/virtualbox/id) /VirtualBox/GuestAdd/VBoxService/--timesync-set-threshold
Value: 5000
$ VBoxManage getextradata $(< .vagrant/machines/default/virtualbox/id) VBoxInternal/Devices/VMMDev/0/Config/GetHostTimeDisabled
Value: 0
If these values are not the same as the above, run:
$ VBoxManage guestproperty set $(<.vagrant/machines/default/virtualbox/id) /VirtualBox/GuestAdd/VBoxService/--timesync-set-threshold 5000
$ VBoxManage setextradata $(< .vagrant/machines/default/virtualbox/id) VBoxInternal/Devices/VMMDev/0/Config/GetHostTimeDisabled 0
Do not run this command:
timedatectl statusIt will start NTP which is not something you want with VirtualBox so you will need to disable systemd-timesyncd
On Windows, you need to run timesyncd. See if it is active:
$ systemctl is-active systemd-timesyncd
active
If it is not active. you'll need to add this configuration:
sudo su -
mkdir -p /etc/systemd/system/systemd-timesyncd.service.d
echo -e "[Unit]\nConditionVirtualization=" > /etc/systemd/system/systemd-timesyncd.service.d/allow_virt.conf
systemctl daemon-reload
systemctl enable systemd-timesyncd.service
systemctl start systemd-timesyncd.serviceCommands run as root:
yum-config-manager --add-repo http://download.virtualbox.org/virtualbox/rpm/rhel/virtualbox.repo
yum makecache fast
yum install kernel-devel
yum install VirtualBox-5.2
usermod -a -G vboxusers <you>
yum install https://releases.hashicorp.com/vagrant/2.1.5/vagrant_2.1.5_x86_64.rpmvboxmanage showvminfo 'my_vm'The default syncing mechanism is slow. You can switch to NFS on Mac (not Windows). Here's what you'll need to do on the Mac (assumes NFS is already running):
touch /etc/exports
chmod 644 /etc/exports
Vagrant needs to read this file as an ordinary user.
Edit the Vagrantfile:
config.vm.synced_folder ".", "/vagrant", type: "nfs", mount_options: ["nolock,vers=3,udp"]Note that locking doesn't seem to work. I gets this error:
mount.nfs: rpc.statd is not running but is required for remote locking.
mount.nfs: Either use '-o nolock' to keep locks local, or start statd.
mount.nfs: an incorrect mount option was specified
service nfslock is started, and no amount of fiddling seemed to fix this.
When you reload, you'll be prompted to sudo on the host so that it can modify /etc/exports.
List the interfaces:
vboxmanage list hostonlyifsCreate the host-only interface:
$ vboxmanage hostonlyif create
0%...10%...20%...30%...40%...50%...60%...70%...80%...90%...100%
Interface 'vboxnet5' was successfully createdSet the IP address (netmask defaults to /24):
vboxmanage hostonlyif ipconfig vboxnet5 --ip 10.10.10.1Setup the network adapter (nic2, because nic1 has to be NAT):
vboxmanage modifyvm my_vm --hostonlyadapter2 vboxnet5
vboxmanage modifyvm my_vm --nic2 hostonly
Then you have to modify your network config to be static. We have DNS
hostnames z1.bivio.biz (host), z2.bivio.biz (first guest), etc. This allows you
to setup SSL with *.bivio.biz cert.
I'd recommend using a block, say, z10, z11, and z12 to setup a cluster associated with one application
that way you can have different blocks (up to z50 right now) for the different hosts. You can also use these
IPs for Docker, which is why they are zN and not vN.
Little arrow in the lower left to get to Apps

PC Settings under P:

Control Panel in lower left:

View network status and tasks:

Ethernet 2 (double click):
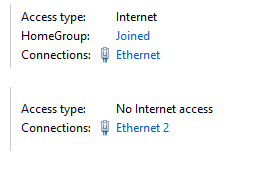
Properties (button):

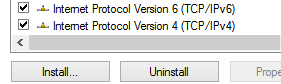
Internet Protocol Version 4 (TCP/IPv4) (double click description):
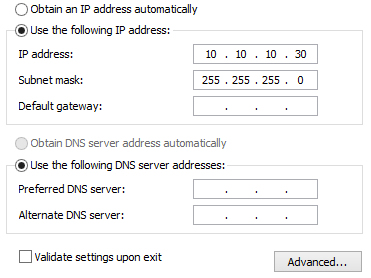
Use the following IP address (check):
IP address: 10.10.10
Subnet mask: 255.255.255.0
Also check "Use the following DNS server addresses.
Ta Da! You can connect to another vagrant box on 10.10.10.20 (z20.bivio.biz):

You might get the error message you can't load "guest additions". vboxvfs isn't loading so you need to reload the guest additions on the VM. Here's what you do:
On your the host, run this command. It will update the kernel, reload, and then apply latest guest additions:
curl https://raw.githubusercontent.com/radiasoft/devops/master/bin/fixup-docker.sh | shAlso see VirtualBox-Disk-Recovery to mount a virtual box disk in another VM.
Sometimes vagrant screws up and deletes the files in .vagrant in the vagrant instance directory. The VM
is still there in VirtualBox, you just have to reattach it.
It wasn't too hard to figure out if the machine is still there. Do a netstat -an and look for listening on ports like 2222 (and up). You can ssh manually to it:
ssh [email protected] -p 2224 -o Compression=yes -o DSAAuthentication=yes -o LogLevel=FATAL -o StrictHostKeyChecking=no -o UserKnownHostsFile=/dev/null -o IdentitiesOnly=yes -i /Users/nagler/.vagrant.d/insecure_private_keyYou can find your lost VM with VBoxManage, too:
VBoxManage list vmsThis list is in order of creation. Make sure you pick the first one, because vagrant up (which
probably destroyed your .vagrant directory) may have added a new entry. Here's an example entry:
"bdev_default_1413228406337_54539" {47d5386a-2004-40f5-859c-13ff9945f012}The key bits are the id which is 47d5386a-2004-40f5-859c-13ff9945f012 and the first ten digits in the box
name (1413228406) are used by Vagrant.
You are then going to have to edit ~/.vagrant.d/data/machine-index/index.
This JSON file contains "index_uuid" values. Here's the entry for the lost machine:
"2e88f6eed0f94ba49e9c95d0426f7895": {
  "local_data_path":"/Users/nagler/vagrant/bdev/.vagrant",
  "name":"default",
  "provider":"virtualbox",
  "state":"running",
  "vagrantfile_name":null,
  "vagrantfile_path":"/Users/nagler/vagrant/bdev",
  "updated_at":null,
  "extra_data": {
    "box": {
      "name":"bivio-centos6",
      "provider":"virtualbox",
      "version":"0"
    }
  }
}
If there is no such entry, you can just create a long number for the index_uuid (see below) and create the
entry. However, it's likely the entry is there, because vagrant wrote over it. You can use the uuid that's in
there.
The index_uuid that Vagrant creates is 2e88f6eed0f94ba49e9c95d0426f7895 in this example.
If your machine is still running, you'll need to update this file to change state to running. You can
tell if a machine is running by:
VBoxManage list runningvmsYou now need to create the files in .vagrant/machines/default/virtualbox/. With the above example data,
here's the script:
cd ~vagrant/bdev/.vagrant/machines/default/virtualbox
echo -n 47d5386a-2004-40f5-859c-13ff9945f012 > id
echo -n 1413228406 > action_set_name
echo -n 1.5:47d5386a-2004-40f5-859c-13ff9945f012 > action_provision
echo -n 2e88f6eed0f94ba49e9c95d0426f7895 > index_uuid
You should now be able to see the status:
cd ~vagrant/bdev
vagrant status
Resize the VBox disk:
cd '/Users/nagler/VirtualBox VMs/Win8.1'
VBoxManage modifyhd Win\ 8.1.vdi --resize 51200
"Dynamic" disks are not dynamic in that sense. They just allocate blocks for the guest on the host lazily. There doesn't seem to be a performance difference between static and dynamic disks even though some people say there are.
On Windows, press "Right Windows Key + R" and enter diskmgmt.msc. Right click on the main Windows partition (NTFS), select Extend Volume, and accept the defaults for the rest of the wizard items.
Not sure what's going on yet (robnagler):
Ignoring connection 'System eth1' / device 'eth1' due to NM_CONTROLLED=no.
https://github.com/openshift/training/issues/193
Manually starting ifup eth1 works.
Turn off audio if you have a Thunderbolt Display, e.g.
  config.vm.provider "virtualbox" do |vb|
    vb.customize ["modifyvm", :id, "--audio", "none"]
  end
See how to do this after the fact from the command line.
If you upgrade to Catalina you may see this problem:
vagrant up
...
==> default: Mounting NFS shared folders...
The following SSH command responded with a non-zero exit status.
Vagrant assumes that this means the command failed!

mount -o vers=3,udp,rw,vers=3,tcp,nolock,fsc,actimeo=2 xxx.xxx.xxx.xxx:<Mac folder> <VM directory>
...
Stderr from the command:
mount.nfs: access denied by server while mounting xxx.xxx.xxx.xxx:<Mac folder>
Afterward vagrant will be up, but the shared folder not mounted.
To fix, take the following steps:
vagrant halt- Update MacOS, VirtualBox, and vagrant to the latest versions if needed
- Update guest additions:
vagrant plugin install vagrant-vbguest - Follow the steps from the accepted answer here (edit
/etc/exportshowever you like, no need to usenanoof course) vagrant up
The shared folder should mount successfully. You can remove nsfd from Full Disk Access afterward.
This thread contains other workarounds.
(The origin of all this is a change to the file system; see here)