-
-
Notifications
You must be signed in to change notification settings - Fork 0
Installing MAIDENS on macOs
MAIDENS is an unsigned application. For this reason, you will likely be prevented from simply installing it, the classical way. The exact message that you will be receiving depends on your macOS version, but essentially it will state that the application cannot (or must not) be installed, and you need to move it to the Bin. This is due to Gatekeeper, a security feature introduced in OS X Mountain Lion (version 10.8), which aims to enforce code signing and discourage inadvertently installing malware.
The steps outlined below will guide you through successfully and safely bypassing Gatekeeper for MAIDENS (while keeping it enabled, so that the overall security of your system does not suffer).
- Download the
maidens-disk-image.dmgfile. Let it download to the default path (usually/Users/<your user name>/Downloads); - Open your terminal (to do so:
CMD + Space, then type "Terminal", wait, then press Enter when the first result appears). In your Terminal type (or copy/paste, then Enter) these commands:
cd ~/Downloads
xattr -c maidens-disk-image.dmg
This removes the quarantined status of the file you just downloaded.
- In Finder, go to your Downloads folder, locate the
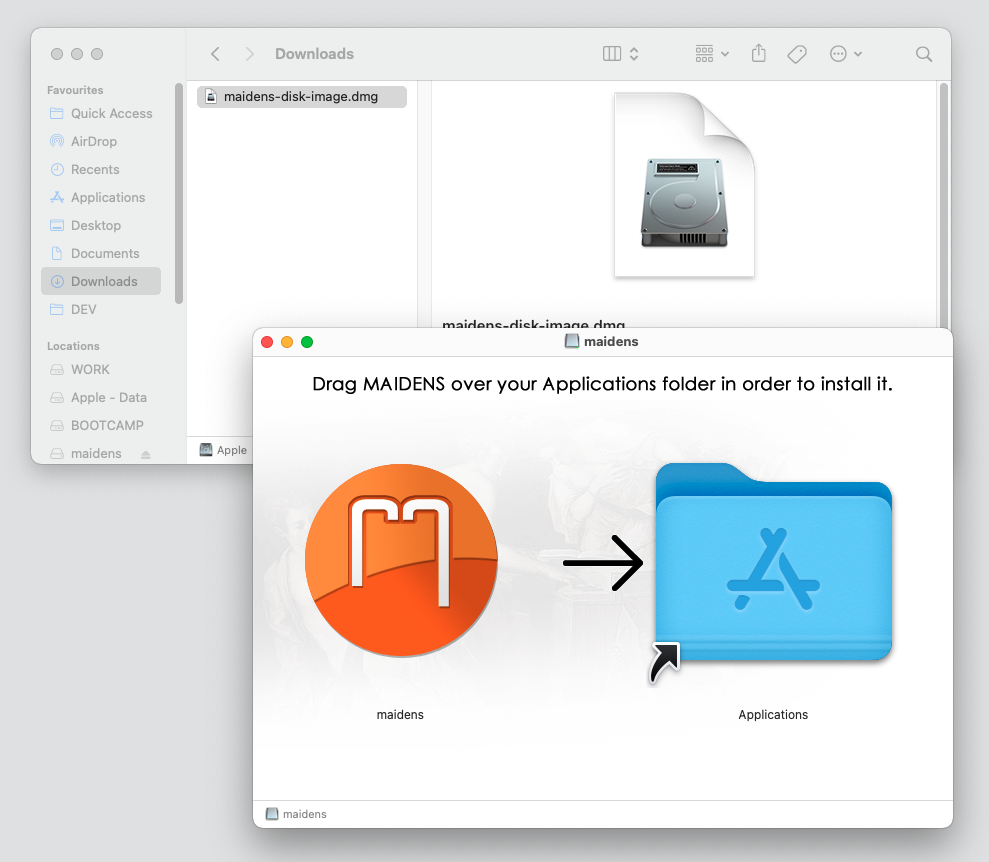
maidens-disk-image.dmgfile and double-click it. It should open a folder-like window, with a "maidens" icon on the left, and an "Applications" icon on the right.

Drag maidens over Applications, as indicated. Wait a couple seconds, then close the window.
- Return to your Terminal, and type (or copy/paste, then Enter) these commands:
cd /Applications
xattr -c maidens.app
This removes the quarantined status of the maidens.app application itself (you essentially repeated what you have done for the downloaded package, only this time for the content it held).
- Go to your Applications folder (open Finder, then click on Applications in the left side-bar). Locate and right-click on maidens. Click on Open.

-
The MAIDENS application should open. Right-click on its dock icon, and select Options -> Keep in Dock, then (optionally) drag the icon to a position that better suits you inside the dock.
-
Inside MAIDENS, go to File -> Save as; navigate to your Desktop, enter "tmp" and click OK (this creates a
tmp.maidfile on your desktop). Close MAIDENS now. -
Right-click the
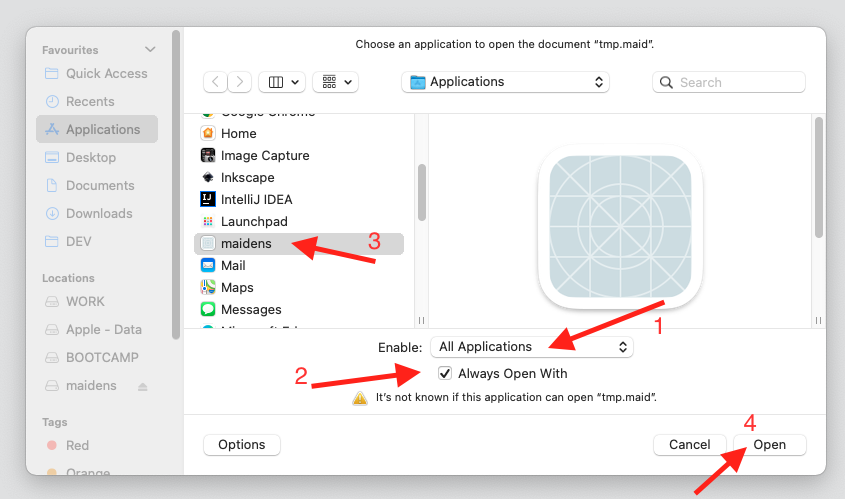
tmp.maidfile on your Desktop, and select Open With -> Other. In the window that opens, change Enable: to All applications and check Always Open With. Then locate maidens on the left (you can also search for it). Select it, then select Open.

MAIDENS will open, displaying the tmp.maid file. This way, you essentially registered MAIDENS to automatically open files of type .maid when double-clicked. You can test it by closing MAIDENS, then double-clicking tmp.maid on the Desktop: the file should open again in MAIDENS. Close it for now.
-
If you were paying attention, you probably observed that files already on your desktop weren't listed by MAIDENS' file browser. This is because MAIDENS, as an unsigned application, cannot access your harddrive, except for the Public folder. Let's fix that. Open Security & Privacy (to do so:
CMD + Space, type or paste "Security & Privacy", wait, then press Enter when it shows as selected in the list of results). -
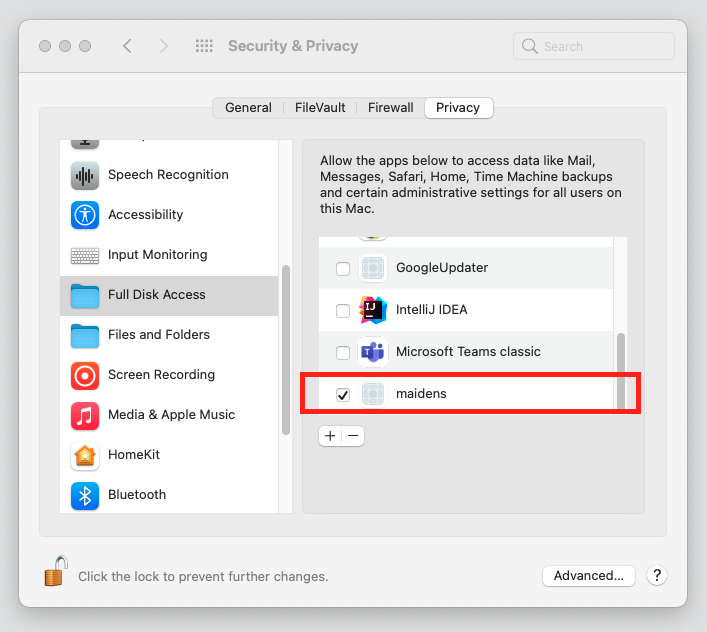
In the window that opens, Select the tab Privacy, then on the left, locate and select Full Disk Access. Click on the padlock icon near the bottom left, and enter your password when prompted. Click on the + button.

- Again, in the window that opens, locate and select maidens then click Open.

Back to the initial window, if you scroll down the list on the right you should observe that a new entry, "maidens" has been added there, and is checked.

You can click the padlock icon again if you want (to lock it back), then close the window.
- Test your changes by opening MAIDENS again (from your dock). Then go to File -> Open..., and navigate to your Desktop, using MAIDENS' own file explorer. You should see that the
tmp.maidfile you created earlier is there.
That's all. You can start using MAIDENS normally now.
P.S.: there is probably a "file" left on your Desktop, named "maidens". That is the disk image that was automatically mounted when you double-clicked on maidens-disk-image.dmg. You can right-click it, then select Eject "maidens". Then, you can go to your Downloads folder and safely Move to Bin the maidens-disk-image.dmg file you previously saved there.
- MAIDENS — Machine Aided New Sounds
- The Project Hierarchy
- Project Node
- Generators Node
- Generator Node
- Score Node
- Section Node
- Part Node
- Measure Node
- Voice Node
- Cluster Node
- Note Node
- Introducing Generators
- Getting to Know the User Interface
- Score UI
- Editor UI
- Project UI
- Menu UI
- Toolbar UI
- Notifications UI
- Picker UI
- Navigator UI
- Configuration UI Legacy
- Configuration UI (New)
- Presets Manager
- How to Edit the Score
- Add a Note, Rest or Chord
- Edit or Remove Notes, Rests or Chords
- Add, Edit or Remove Measures
- Add, Edit, or Remove Instruments
- Use Second Voice
- Use Tuplets
- Use Sections
- Use Copy/cut/paste
- Use Undo/Redo
- Use the Macros
- How to Generate Music
- Limitations in 1.5.5
- Prospects