-
Notifications
You must be signed in to change notification settings - Fork 0
ZG SWTOR Objects Tools
Tools useful when modifying SWTOR objects for "prettification" or for porting to other apps and engines (such as turning them into single mesh bodies, smoothing them with Subdivision modifiers, auto-weighting additions to their armatures, etc.). You can see some of their uses in the Tips and Tricks section of the wiki (which needs some tender loving care 😓).
NOTICE: some of these tools interact with the new features of the .gr2 Importer Add-on, which are explained below.
WARNING: Blender 4.1 introduced some new ways to handle mesh auto-smoothing with sharp edges. We still have to test the Merge Doubles tools against it and higher versions more thoroughly.
- Interactions with the new .gr2 Importer Add-on.
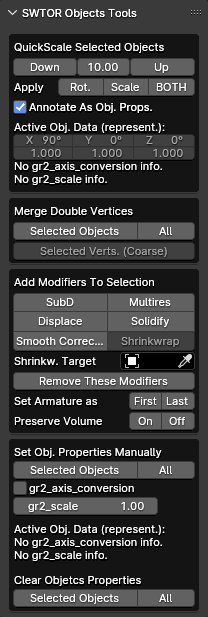
- Quickscaler.
- Merge Double Vertices.
- Modifiers Tools.
- Set Objects' Custom Properties Manually.
If the .gr2 Importer Add-on's new features' settings are left to their default values (or returned to them via their Preferences window's "Neutral" preset), it behaves as previous versions did, objects import-wise, and there's nothing we need to pay attention to.
If we want to modify them, the most impactful ones are exposed in the ZG Tools' Status panel. Modifying them there is the same as modifying them in the .gr2 Add-on's Preferences window.
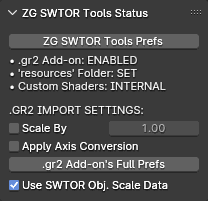
The new version of the .gr2 Importer Add-on, objects-wise, comes with these new features:
-
It's able to scale objects, and convert them to Blender's axis order, at the mesh level.
SWTOR uses decimeters as its distance unit instead of meters (that solves some precision issues typical in the videogames world). It also uses a "y-is-up" coordinate system.
Blender favors meters or feet as its scenes' distance units, instead, to the point that some processes, such as cloth simulations and automatic weighting from bones, will break or fail if the objects involved don't have reasonable real world sizes in those units (at least temporarily while executing those processes). Also, and this is a bit of a rarity in the animation-oriented 3D apps world, it uses a "z-is-up" coordinate system.
So, when one imports SWTOR objects with the .gr2 importer set to neutral settings, they show up a tenth of the size we might expect them to have. Also, they all happen to have a rotation of 90º in the x-axis despite standing upright. Without it, they would appear tumbled backwards.
This is not much of an issue. Everything appears natural, if tiny (we might have to adjust the View settings' Clip Start to 0.01 to avoid clipping through the models when we get really close to faces). We can also scale them up, temporarily or long term, to get them up to real world sizes (a x10 factor usually suffices).
But the moment we want to do advanced or complicated things (constraining extra armatures to SWTOR ones' bones, mixing assets from outside the game world…), we might want to do some "Apply Transformations" (with special settings available in Blender's Undo Box) to get all those issues permanently sorted out (at the object's mesh level instead of at merely the object level) so that the models work as if they had been created in Blender.
It's something that we might never need, or we might be needing all the time, hence the .gr2 Importer Add-on's new settings. you can find an explanation of them in its Github repository's README and in its page in this Wiki.
-
It stores a record of such mesh level transformations as objects' Custom Properties: so that tools like this Add-on's and others can be aware of them. So far, they are:
- gr2_axis_conversion: The default is False ("no").
- gr2_scale: the default is 1.0 (typical "real world" scale would be 10.0).
(By the way: those properties are used by the animation importer so that, when applied to a scaled character's skeleton, the keyframes' translations are scaled accordingly, too)
There is a global option in the ZG SWTOR Tools' Status Panel: Use SWTOR Obj. Scale data: if off, everything is as it used to be. If on, the Object Tools will interact with the objects' custom properties or, in their absence, with the current .gr2 Importer Add-on's settings as shown in the panel.
-
The Quickscaler gives us the option to annotate objects with transformation data. This means that:
- When scaling an object up or down, the objects' custom properties aren't affected, as this is a "soft" scaling (the mesh data as such isn't affected).
- BUT!!! If Applying transformations (that's an actual mesh-level transformation), the custom properties' values will reflect the change accordingly if the Annotate option is on. The gr2_scale data will be multiplied by the "soft" scaling that is being Applied and, so, turned into a "hard" scaling. If the rotation is Applied, too, gr2_axis_conversion will be set to True.
(Quickscaling and then Applying transformations can be a way to unify older, "unmarked" assets, with others imported with settings different to neutral ones)
-
The Add Modifiers tool will use this data (OR, IN THEIR ABSENCE, the .gr2 Add-on's settings exposed in the Status Panel) to set some Modifiers' settings, such as the Solidify's thickness or the Displace's strength: those are arbitrarily chosen, seemingly sensible values for those settings. Now, those values are multiplied by the gr2_scale factor so that they keep on being reasonable at all scales.
-
The new Set Obj. Properties Manually tool lets us add, modify, or delete those custom properties manually, if needed (not any often, typically).
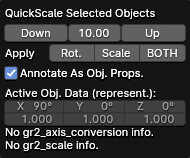
A tool for quickly scaling selections of SWTOR objects and others, taking into account their parent/children hierarchies, which also offers the possibility of applying the scaling (and rotation) permanently, at the mesh level.
- A selection of objects.
-
Scales all selected objects, up or down by a factor, as a whole, preserving their relative distances if their origins don't match. It acts only on non-parented and parent objects, to avoid double-scaling children objects (typically, objects parented to a skeleton).
The idea behind the tool is to be able to quickly upscale all objects of a character or a scene to real life-like sizes (1 Blender scene unit = 1 m. or closest equivalent Imperial Unit), as Blender requires such sizes to successfully calculate things like automatic weights from bones, physics simulations, etc.
Cameras, lights and armatures are correctly scaled, too.
Any number between 1 and 100 can be manually entered. Recommended factors are:
- 10, for simplicity. It results in rather superheroically-sized characters.
- Around 7-8 for more realistic human heights.
WARNING: objects set as selection-disabled in the Outliner aren't affected by this tool, so, careful if doing a 'select all': make sure it really selected everything.
-
Can "Apply"" any current scalings and/or rotations to make them permanent (at the mesh level) (it's just Blender's Apply Transformations tool, but with some parameters set so that it also recalculates any concerned Modifier's settings and other details, which usually requires us to use the Undo box' options).
Before using this particular feature, consider how it fits in your workflow: see this section's Interactions with the new .gr2 Importer Add-on prologue. The
Annotate as Object Propertiesoption makes this feature add or update the transformed objects' Custom properties discussed there.(This tool's operation can be reversed later on, but that requires us doing the transformations in reverse before Applying them again)
-
When using these features, the tool shows the rotation and scale data of the currently Active object, acting as a surrogate or representative of all the objects we are using it with, so that we can see its results taking effect without needing to have the Sidebar's Item panel open or pinned.
When we import .gr2 objects in Blender, their polygons' vertices aren't shared by their neighboring polygons: they just overlap each other, with a certain level of precision. This isn't usually noticeable when toying with characters' models, but is an issue if we merge their body parts into a whole (seam lines show up), or try applying Modifiers such as the Subdivision one (resulting edges are wonky, and holes appear), or export the models to other apps or engines (they might not like them in that state), etc.
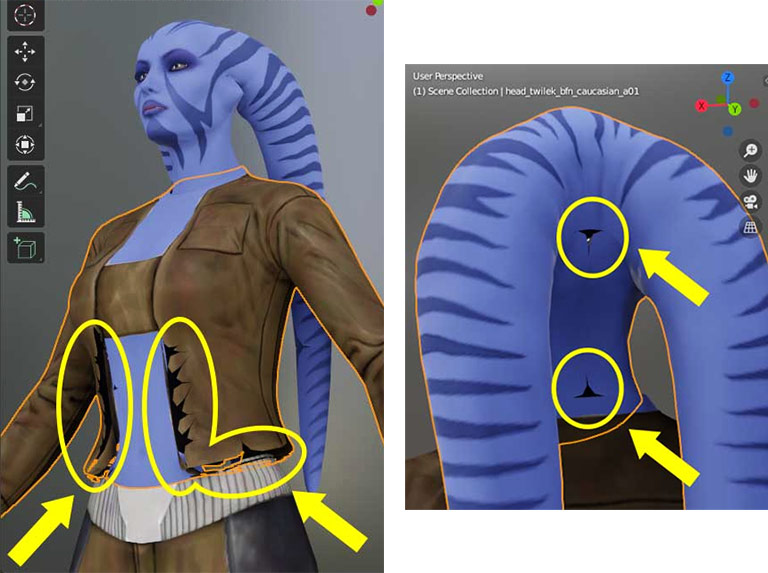
The Merge Doubles tool "fuses" those vertices into single ones and solves those issues. It has two variants:
-
Merge Doubles for selected / all objects while in Object Mode.

Requirements: the existence of objects in the project, or a selection of objects.
Applies a "Merge By Distance" with a tolerance of 0.000001 m. (multiplied by the SWTOR object's gr2_scale factor or the .gr2 Importer Add-on's current scale factor. See this section's Interactions with the new .gr2 Importer Add-on prologue.). When using it on a selection of objects or all objects in the Blender project, the tool acts on each of them separately so as not to merge vertices of different objects by accident.
-
Merge Selected Double Vertices in a single object while in Edit Mode.

Requirements: a selection of vertices, edges or faces.
The problem with merging duplicate vertices is that the tolerance that would absolutely guarantee no seams between joined limbs is lax enough to accidentally fuse lips, teeth, or other finer detail (the head objects' polygon density and detailing is usually far higher than in the rest of the body).
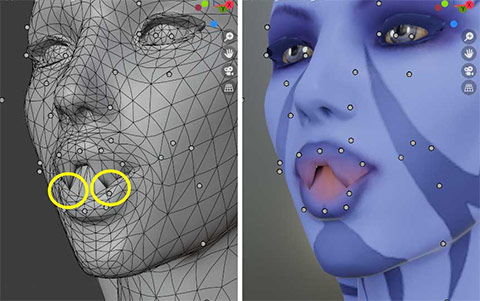
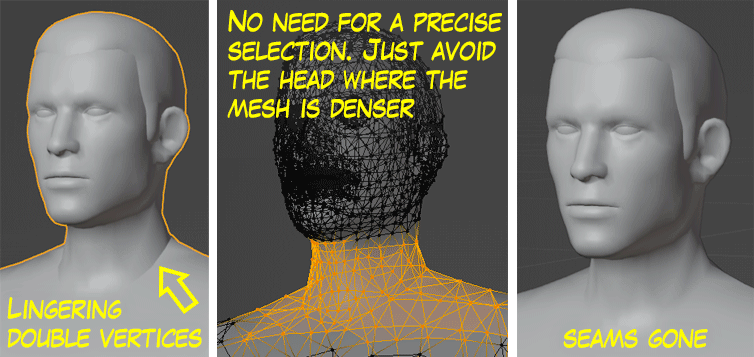
The Object Mode variant's tolerance setting prevents such accidents, but sometimes it fails to solve the appearance of seams, specially in the base of the neck where head objects join the torso ones (some Twi'lek heads seem specially prone to this).
This Edit Mode variant allows us to coarsely select the involved vertices (or edges or faces: it'll convert the selection to vertices anyway), without a need to be overly precise, and apply a "Merge By Distance" with a tolerance higher enough to solve the issue. The only requisite is to avoid the densest areas of the object such as the face, mouth, eyes, etc.
- A selection of one or several objects.
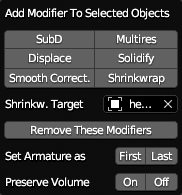
- Adding a Shrinkwrap Modifier requires selecting a Shrinkwrap target.
They add to all selected objects Modifiers like Subdivision or Multires (for hiding SWTOR's models' low poly nature), Displace and Solidify (to facilitate gear-over-full body workflows), Smooth Corrective to reduce distortions by bone deformations, and Shrinkwrap for, say, keeping clothes from intersecting body meshes or sinking into them, all with somewhat sensible settings as an easy starting point. It comes in handy when prettifying whole characters via Blender's unique features.
There is a Remove These Modifiers button that only affects those specific Modifier types, preserving any other Modifier that has been applied manually through Blender's usual means, typically the Armature modifiers that result from parenting to a skeleton. Also, there are buttons for moving such Armature modifiers to the top or the bottom of the Modifier stack, and for ticking their "Preserve Volume" checkboxes, for both usefulness and experimentation.
The Set Armature as First/Last supports the existence of multiple armatures in a given object, and has an Armatures ordering system: no matter if grouped at the beginning or the end of the Modifiers stack, any armatures with an "fk" in their names will be at the bottom of the bunch, followed by any with an "ik", and those followed in turn by armatures without either an "ik" or "fk" (upper or lower case doesn't matter).
- The existence of objects in the project, or a selection of objects.
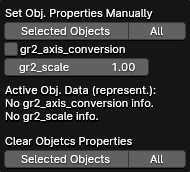
Related to this section's Interactions with the new .gr2 Importer Add-on prologue, this tool lets us manually add, modify, or delete the gr2_scale and gr2_axis_conversion Custom Properties of objects, independently of whether they are appropriate or not. it's meant to be a seldom used "tagging" tool of sorts.
In its central area it shows the results of its actions in the current Active object, that acts as a representative of all objects affected by its use.
We do not condone the usage of our tools for malicious intent, including: exploits, harassment of others, or anything else that may violate EA/Bioware's EULA, TOS, DSA, Privacy Policy Copyrights, Trademarks, or anything else illegal. We will not be held accountable for your actions, and will act against you if nessesary.
- Home.
- State of Play January 2025
- Getting Help:
IMPORTING SWTOR MODELS INTO BLENDER: A BRIEF OVERVIEW.
Check this intro first. Afterwards, you can jump directly to the guides on extracting PCs, NPCs and others.
Downloadable Tools (All Links Page):
-
(NEW) ExtracTOR Windows app.
(Replaces the old Slicers GUI app) -
Blender 3D Windows/Mac/Linux app.
-
SWTOR .gr2 Objects Importer Blender Add-on.
Required by other add-ons. -
ZG SWTOR Tools Blender Add-on:
-
SWTOR Terrain Extractor Windows Command Line Tool.
-
TORCommunity.com:
(runs VERY slowly)- SWTOR Database (with NPC Exporters).
- Character Designer.
- EasyMYP Windows app.
- Noesis Windows app.
READ THE BROAD STROKES FIRST: YOU'LL SEE IT'S EASIER THAN YOU THINK!
-
The steps:
- Extracting SWTOR's game assets with ExtracTOR (WIP).
-
Using TORCommunity's Character Designer to export Player Characters.
- IF ARMOR SELECTION SEARCH IS DOWN: workaround to manually specify Armor Sets.
- Using TORCommunity's NPCs Database to export Non Playable Characters.
- Using our Blender add-ons to auto-assemble the model.
- Rigging the character for posing and animation
- Applying SWTOR animations to the character.
-
Extra steps that require manual work and some knowledge of SWTOR's assets:
-
Making capes and hair work, manually and through Cloth Simulation.
-
Attaching weapons and other objects to a character with a SWTOR rig.
-
Attaching weapons and other objects to a character with a custom rig.
-
Baking the models' textures and exporting to other apps:
- Baking with Legacy SWTOR materials and modern ones.
- Baking the multiple materials of an object into a single one.
- Exporting to VRChat.
- Exporting to Star Wars Battlefront II.
- Exporting to Unreal Engine.
- Exporting to Garry's Mod.
- Exporting to Tabletop Simulator.
-
3D Printing:
-
- Locating armor parts' assets
- Locating weapons' assets.
- Assigning materials and textures to environmental and architectural elements, furniture, props, ships, vehicles and weapons.
- Assembling multi-part assets (Decorations, Rooms, etc).
- Generic guide to importing objects and assigning materials (Legacy Add-on-based. Needs updating).
- Snippets.
- Improving and customizing our SWTOR models and materials.
- Other Extracting Strategies (needs updating).
- SWTOR Materials recipes:
Modding isn't working since SWTOR moved to 64-bit codebase. Unless a new coder takes charge, it'll stay so indefinitely.
- Alternative techniques:
- Modding SWTOR textures with Special K (USE CAUTION).
Basically, use Jedipedia.net's tools and check our Discord. We'll see about adding new material, but this is very involved stuff.
- File Formats:
(32-bit. Needs updating to 64-bit): - A look at SWTOR's Materials and Texture Files.