-
Notifications
You must be signed in to change notification settings - Fork 11
Testing an IBIS AMI Model
If you want to test a new IBIS-AMI model then follow these steps:
-
Install the PyAMI package into a new Python virtual environment:
$ python3 -m venv ~/.venv/ibisami-checker $ . ~/.venv/ibisami-checker/Scripts/activate (`bin/activate` for Linux/MacOS) (ibisami-checker) $ pip install PyIBIS-AMI Collecting PyIBIS-AMI Downloading PyIBIS_AMI-6.2.0-py3-none-any.whl (44 kB) ---------------------------------------- 44.3/44.3 kB 2.1 MB/s eta 0:00:00 Collecting scipy>=1.9 {snip} Successfully installed PyIBIS-AMI-6.2.0 chaco-6.0.0 click-8.1.7 colorama-0.4.6 contourpy-1.3.1 cycler-0.12.1 empy-4.2 enable-6.0.0 fonttools-4.54.1 importlib-resources-6.4.5 kiwisolver-1.4.7 matplotlib-3.9.2 numpy-1.26.4 packaging-24.2 parsec-3.17 pillow-11.0.0 pyface-8.0.0 pyparsing-3.2.0 python-dateutil-2.9.0.post0 scipy-1.14.1 six-1.16.0 traits-6.4.3 traitsui-8.0.0 (ibisami-checker) $ python -c "import pyibisami as dut; print(dut.__version__)" 6.2.0 -
Install
Jupyter,ipympl, andPySide6into your new Python virtual environment:(ibisami-checker) $ pip install jupyter ipympl pyside6 {snip} Successfully installed anyio-4.6.2.post1 argon2-cffi-23.1.0 argon2-cffi-bindings-21.2.0 arrow-1.3.0 asttokens-2.4.1 async-lru-2.0.4 attrs-24.2.0 babel-2.16.0 beautifulsoup4-4.12.3 bleach-6.2.0 certifi-2024.8.30 cffi-1.17.1 charset-normalizer-3.4.0 comm-0.2.2 debugpy-1.8.8 decorator-5.1.1 defusedxml-0.7.1 exceptiongroup-1.2.2 executing-2.1.0 fastjsonschema-2.20.0 fqdn-1.5.1 h11-0.14.0 httpcore-1.0.6 httpx-0.27.2 idna-3.10 ipykernel-6.29.5 ipython-8.29.0 ipywidgets-8.1.5 isoduration-20.11.0 jedi-0.19.2 jinja2-3.1.4 json5-0.9.28 jsonpointer-3.0.0 jsonschema-4.23.0 jsonschema-specifications-2024.10.1 jupyter-1.1.1 jupyter-client-8.6.3 jupyter-console-6.6.3 jupyter-core-5.7.2 jupyter-events-0.10.0 jupyter-lsp-2.2.5 jupyter-server-2.14.2 jupyter-server-terminals-0.5.3 jupyterlab-4.2.5 jupyterlab-pygments-0.3.0 jupyterlab-server-2.27.3 jupyterlab-widgets-3.0.13 markupsafe-3.0.2 matplotlib-inline-0.1.7 mistune-3.0.2 nbclient-0.10.0 nbconvert-7.16.4 nbformat-5.10.4 nest-asyncio-1.6.0 notebook-7.2.2 notebook-shim-0.2.4 overrides-7.7.0 pandocfilters-1.5.1 parso-0.8.4 platformdirs-4.3.6 prometheus-client-0.21.0 prompt-toolkit-3.0.48 psutil-6.1.0 pure-eval-0.2.3 pycparser-2.22 pygments-2.18.0 python-json-logger-2.0.7 pywin32-308 pywinpty-2.0.14 pyyaml-6.0.2 pyzmq-26.2.0 referencing-0.35.1 requests-2.32.3 rfc3339-validator-0.1.4 rfc3986-validator-0.1.1 rpds-py-0.21.0 send2trash-1.8.3 sniffio-1.3.1 soupsieve-2.6 stack-data-0.6.3 terminado-0.18.1 tinycss2-1.4.0 tomli-2.1.0 tornado-6.4.1 traitlets-5.14.3 types-python-dateutil-2.9.0.20241003 typing-extensions-4.12.2 uri-template-1.3.0 urllib3-2.2.3 wcwidth-0.2.13 webcolors-24.11.1 webencodings-0.5.1 websocket-client-1.8.0 widgetsnbextension-4.0.13 -
Copy the
IBIS_AMI_Checker.ipynbfile from this repository into your working directory after downloading it:

-
Launch the Jupyter Notebook server from within your working directory:
(ibisami-checker) $ jupyter lab [I 2024-11-14 08:48:22.700 ServerApp] jupyter_lsp | extension was successfully linked. {snip} -
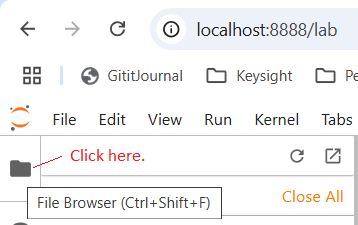
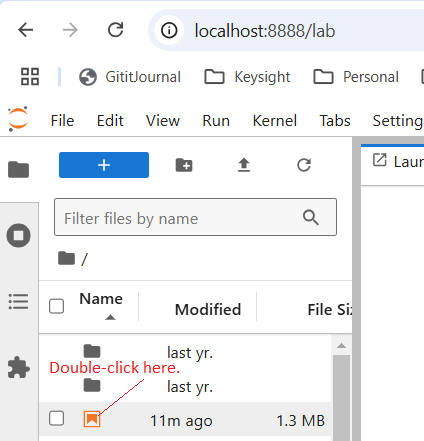
Open the
IBIS_AMI_Checker.ipynbnotebook:

-
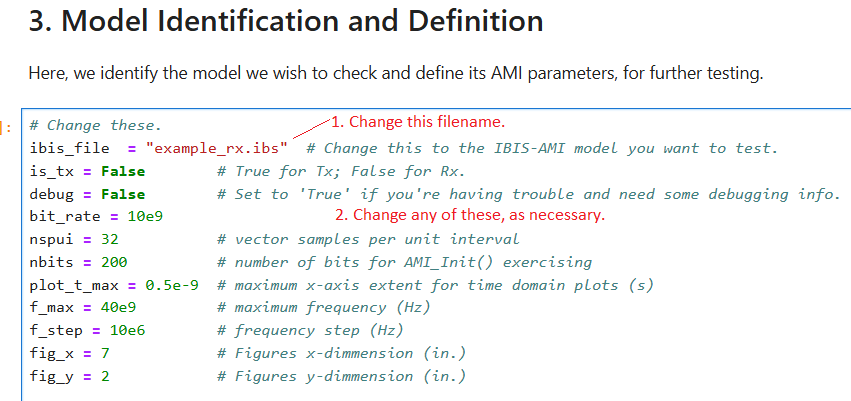
Change the IBIS-AMI model filename, as well as any other required parameters, as appropriate:

-
Run the notebook:

Note: Three times during the notebook run you will need to respond to a GUI applet, which allows you to configure the model. The applet doesn't always assume frontal focus, as it should. So, if the notebook appears to have stalled, check your task bar for a Python-looking icon and select it. Then, configure your model as you like and click
OK, in order to continue the notebook execution.