Navigation and Publishing Process
Step 1: Navigation
Step 2: Commit your branch
Step 3: Publish your branch
Step 4: Create a pull request
Step 5: Complete review
Step 6: Complete final checks
Step 7: Merge your branch
Step 1: Navigation
Our documentation has a responsive theme that adjusts to the width of different devices. The navigation options are the same, but render differently for each device.
-
Go to the published Magento User Guide.
On a desktop device, the main menu appears across the top of the page, and there are three columns of tiles on the landing page.
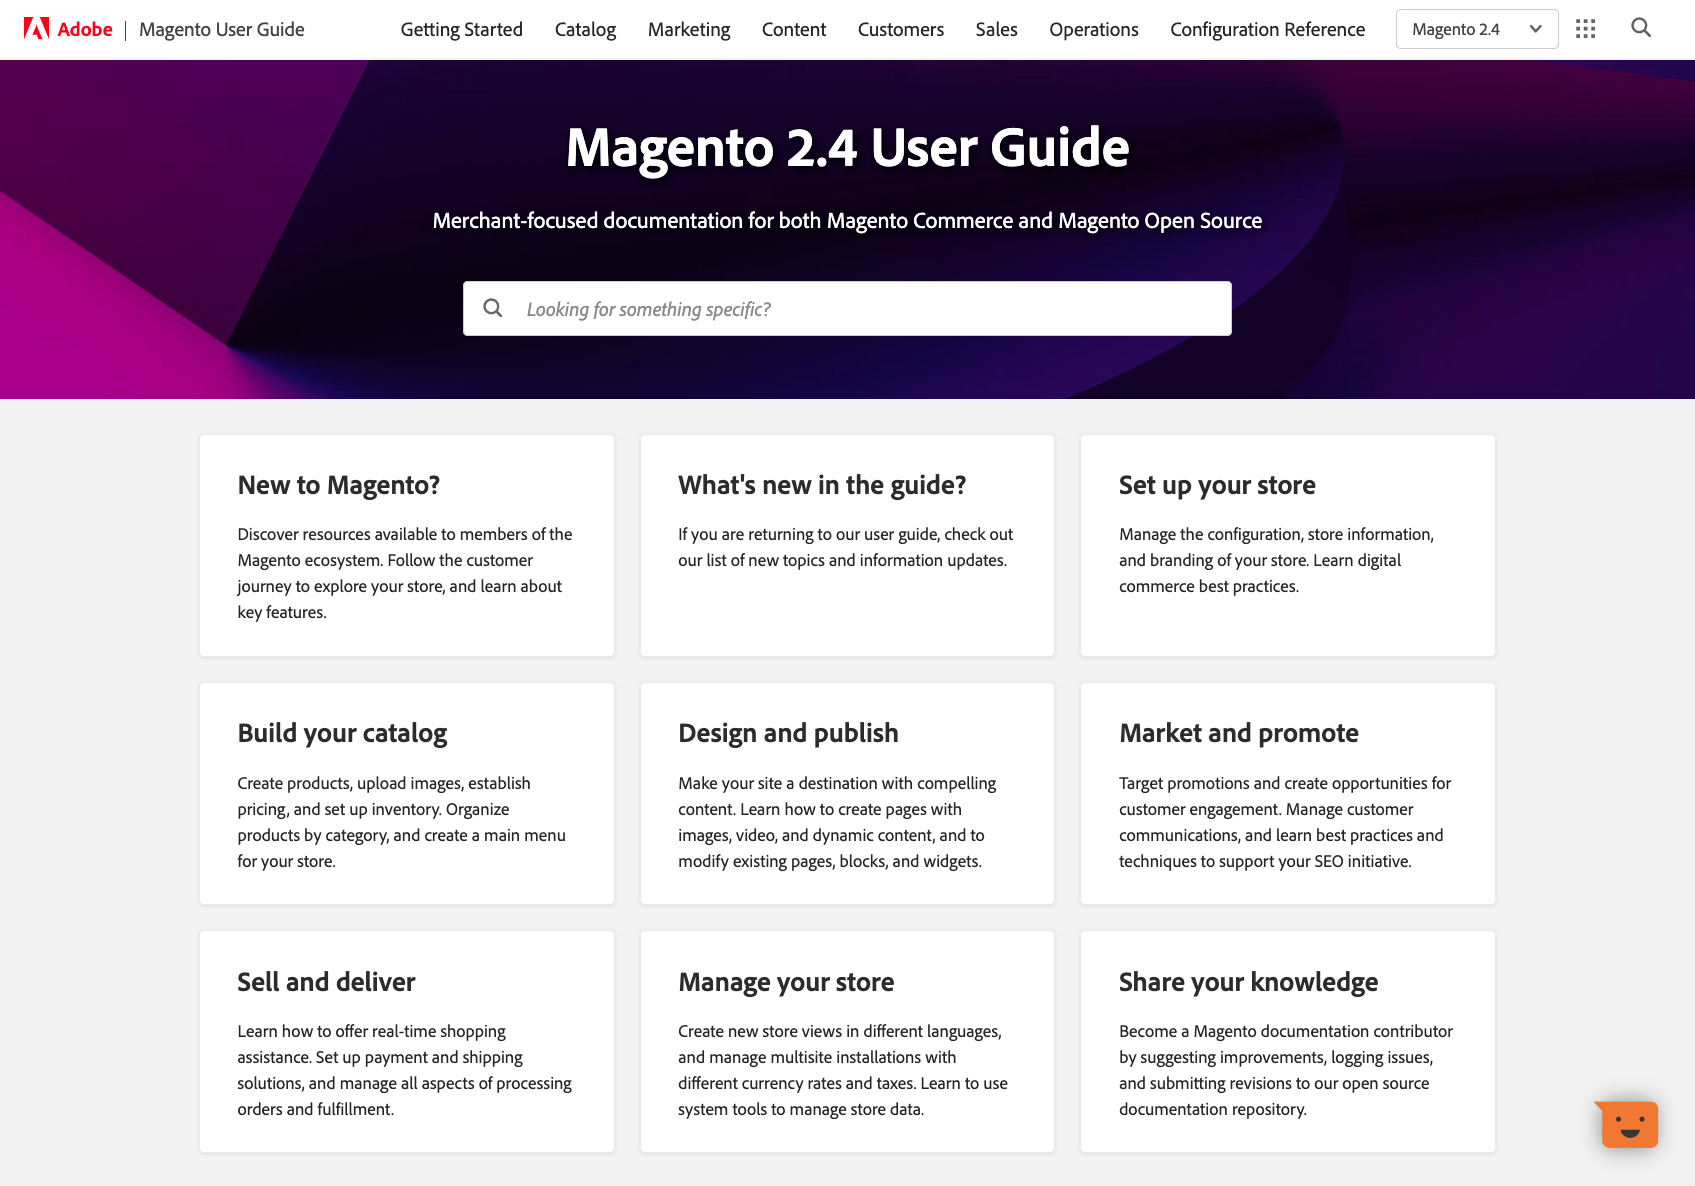 Magento User Guide – desktop view
Although the main menu isn’t available on a tablet or mobile device, the same options are available by clicking the menu icon in the upper-left corner.
-
If you're working on a desktop computer, reduce the width of the browser window until the main menu at the top of the page disappears.
When you're working on a tablet, the main menu is replaced by the menu icon and there are two columns of tiles.
-
Reduce the width of the browser window until there is only one column of tiles. This is how the user guide navigation looks on a mobile device.
 Magento User Guide – mobile view
 -
Using the mobile view navigation, go to Configuration Reference > Sales. Then, click Table of Contents, and under Sales, go to Payment Methods > Recommended Solutions > Braintree.
-
Restore your browser to the normal desktop view.
In addition to the main menu and sidebar navigation, the "On this page" section appears in the right sidebar with a link to each heading on the page. This additional navigation is generated automatically in desktop view when the viewport is wider than 1200 pixels.
 “On this page” navigation
YML Files
The navigation is maintained in YML files that provide the menu options and links for each section of the documentation. Whenever you add a new topic, rename or remove a topic, or reorganize existing topics, you will need to update the related YML files. The navigation for the Magento User Guide is located in multiple YML files that correspond to different sections of the guide. The navigation for the Configuration Reference is located in a single YML file.
-
Launch GitHub Desktop and verify the following:
- The repository is
merchdocs. - The current branch is
tutorial.
- The repository is
-
Open the repository in your external editor, Visual Studio Code.
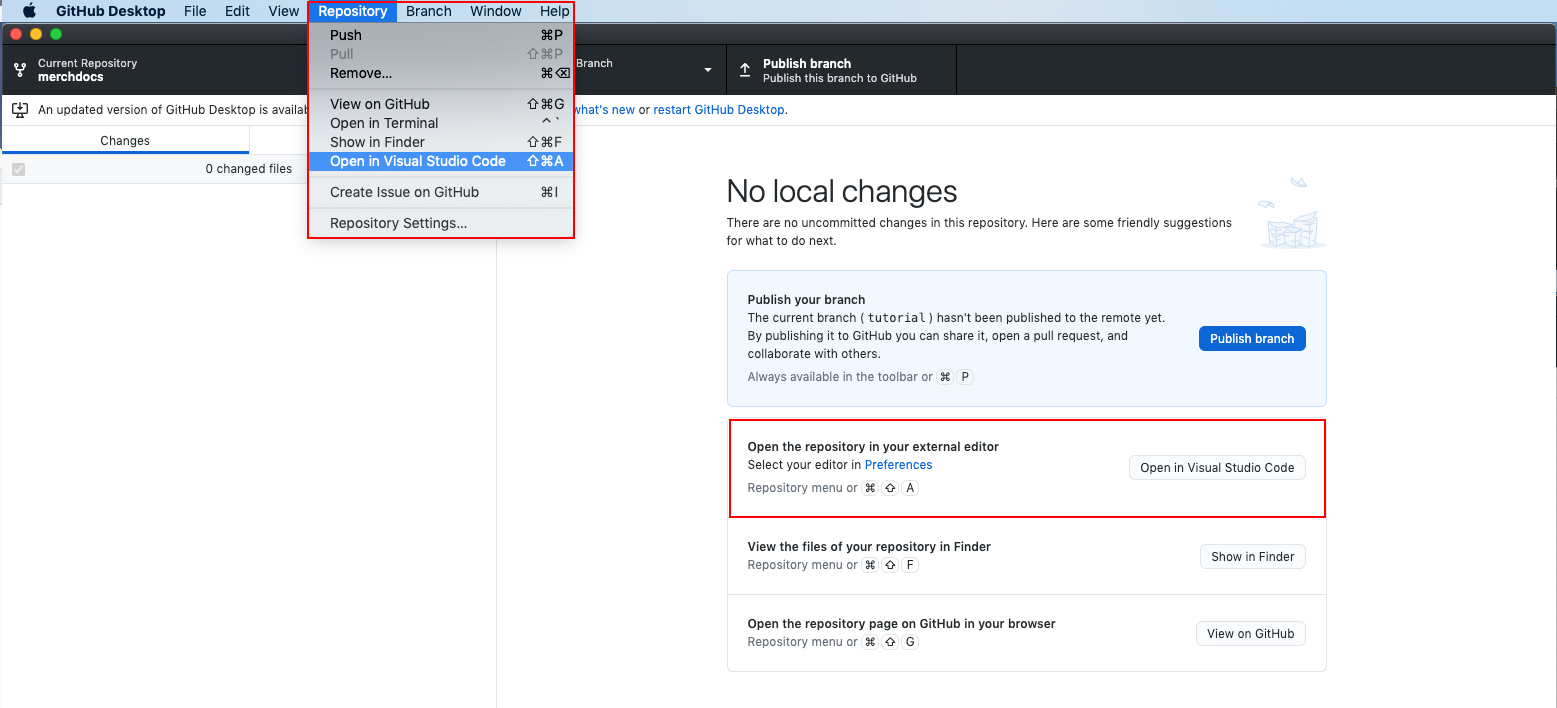 Open in Visual Studio Code
Configuration Reference navigation
The Configuration Reference navigation is located in a single file called config-ref.yml.
-
In the Explorer pane on the left, go to
src/_data/toc/config-ref.ymland open the file in the editor. -
Scroll down and find the following navigation labels:
- “Sales” on line 89
- “Payment Methods” on line 113
- “Recommended Solutions” on line 116
- “Braintree” on line 121
 Configuration Reference navigation
User Guide navigation
The user guide navigation is maintained in multiple YML files that correspond to different sections of the user guide.
-
In the Explorer pane on the left, go to
src/_data/toc/sales.yml. -
In the
sales.ymlfile, scroll down and find the following:- “Payments” on line 202
- “Recommended Solutions” on line 205
- “Braintree” on line 217
-
Take a look at the published Braintree topic to see how the labels are rendered in the navigation.
Although you’re not going to make any changes to the navigation at this time, you should be able to easily find the YML files for the content that you work on.
-
Close both YML files.
YML file structure
The following components define each entry in a YML file. Indentation controls the hierarchy and must be carefully preserved whenever you edit the file.
-  label:	  (The text that appears in the navigation.)
   url:  	  (Relative link to the published HTML file.)
   children:      (If applicable, identifies the next entries as subtopics.)
Step 2: Commit your branch
So far, you have learned how to manage content in Markdown and commit your changes to your local branch. Now you're going to learn how to publish your branch to the remote server, create a pull request in GitHub, and submit your content for review. The process is simplified because your branch of the forked repository has connections to the master branch of the Magento merchdocs repository.
-
Return to GitHub Desktop.
-
If there are any uncommitted changes in your branch, enter a description of each and commit them to the 'tutorial' branch.
Step 3: Publish your branch
In addition to submitting your content for review and publication, in this part of the tutorial you will learn how to resolve common problems that might occur. To learn more, see the Contributor Guidelines.
So far, the commits you have made to your local branch exist only on your local computer. After your branch is published, it will be visible to other users on GitHub.
Important! Our GitHub server is a live working environment and is not intended to be used as a sandbox. Do not actually commit your tutorial files to GitHub. The following instructions are for reference only.
-
In order to allow maintainers to edit and update your work, you might need to adjust the permissions settings of your GitHub account. For more information, see Contributor Guidelines under Get Started.
-
In GitHub Desktop, verify that the Current Repository and Current Branch are correct.
This is especially important if you work on multiple issues in different repositories and branches.
-
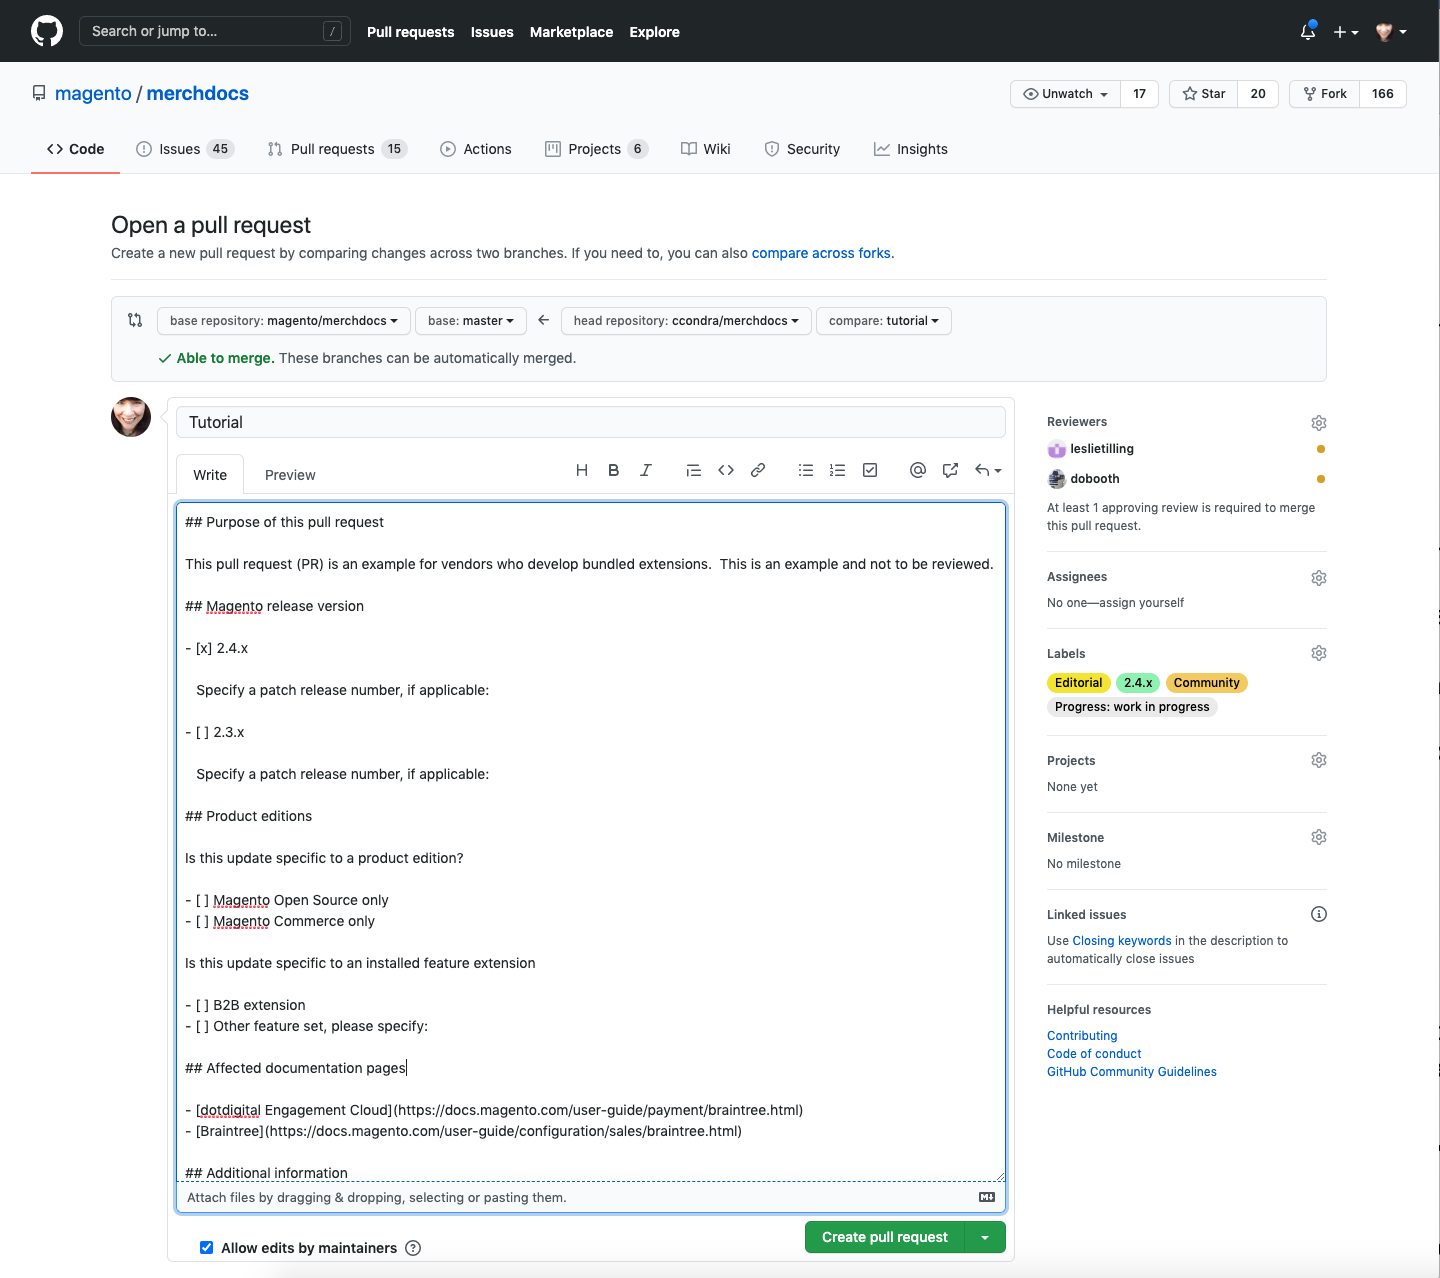
When you are ready to publish your local branch to the server, click Publish your branch.
 Publish your branch
 -
In the main menu, go to Repository > View on GitHub.
A note at the top says that you recently pushed content to your forked repository.
-
Click the big green button, Compare & pull request.
Step 4: Create a pull request
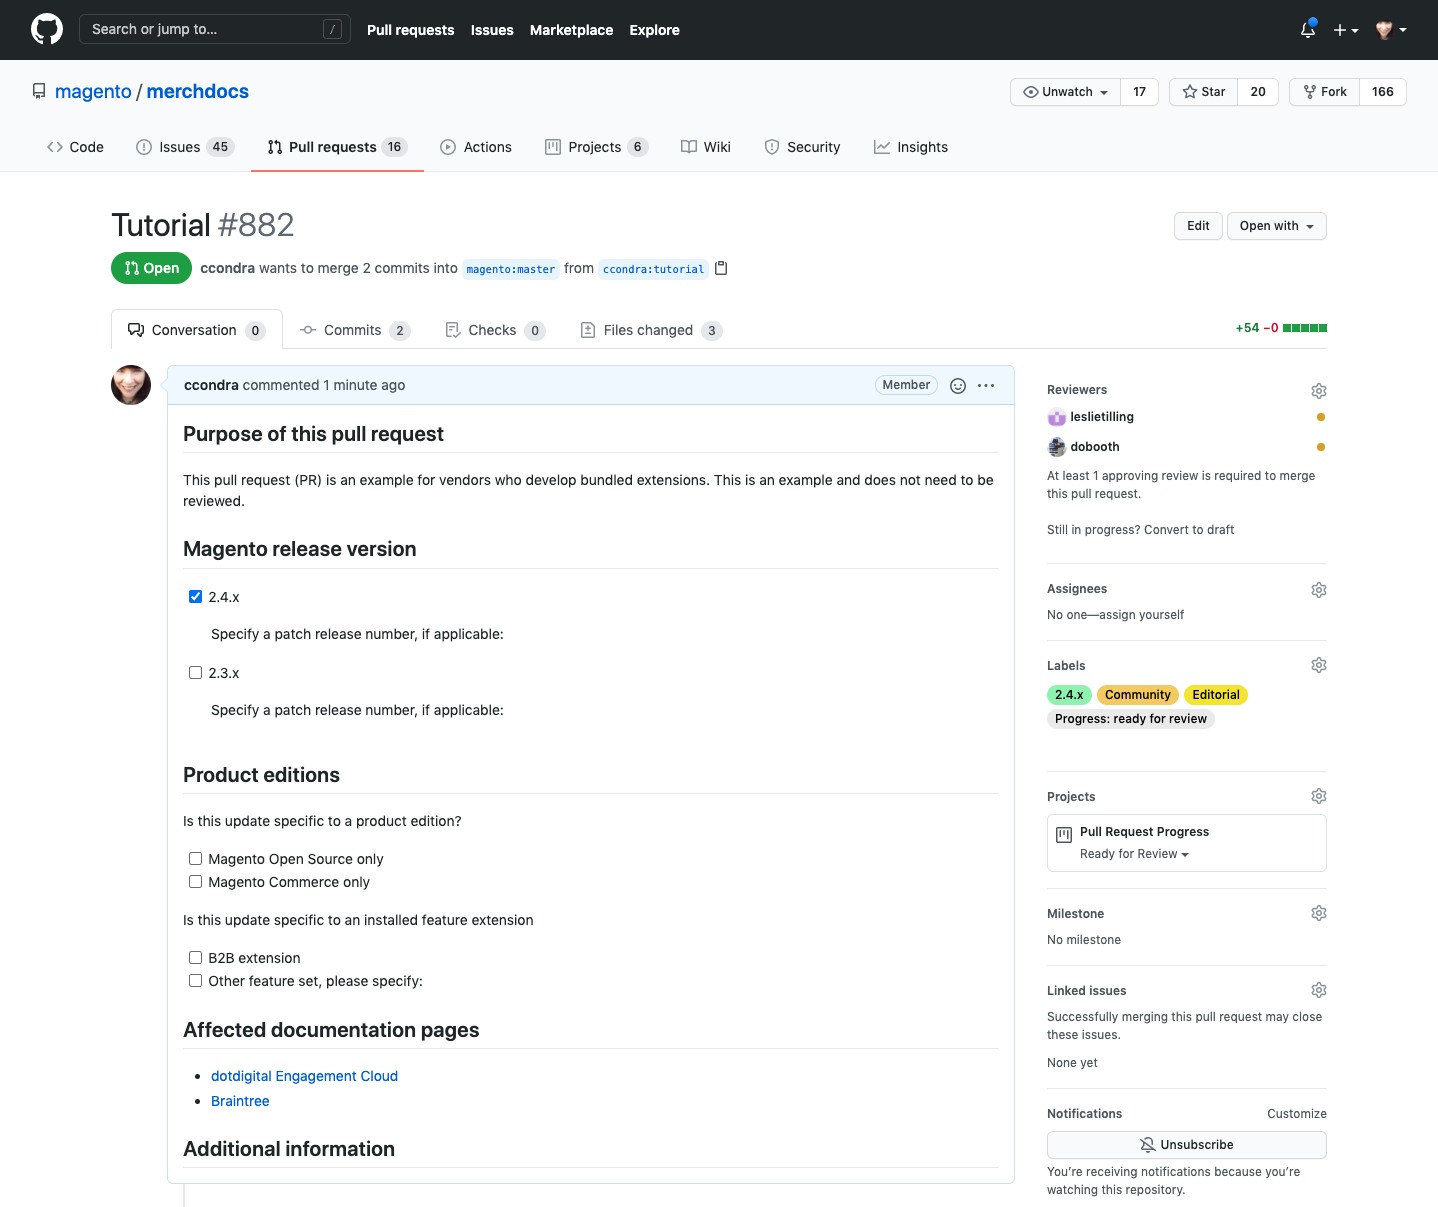
The pull request is the beginning of your conversation with your review team and should provide all the information they need to understand and review your updates. The PR template provides an outline for each section.
-
Because the base branch defaults to
master, always make sure that the correct base branch is selected. If you are working in a development branch, click base:master and choose the correct base branch from the list.- If other writers have merged changes to the original branch since your local branch was created, the message “Can’t automatically merge” appears in red. You can go ahead and submit the PR and resolve the differences later.
- If your local branch is in sync with its base branch, a message in green text indicates that the branch can be merged.

Verify base branch -
The branch name appears as the default title of the pull request. You can update the title to be more descriptive, if needed.
-
Under the first heading, complete the following description to briefly explain the purpose of the pull request.
This pull request (PR) ... -
Under Magento release version, mark the correct version with an x.
-
Under Product editions, select the specific product edition where your changes apply. You can skip this step if your updates apply to all editions.
-
Under Affected documentation pages, list each page that is affected by the pull request. Enter the title of each page with a link that goes to the currently published (HTML) topic.
- For a new topic, enter the link as it will be when the page is published.
- List any navigation (YML) files that were updated for reference.
-
Delete any unused headings and comments from the template.
Add labels
It's important to apply correct labels to your PR because they are used to automate many publication processes.
-
In the right sidebar under Labels, click the Settings icon.
-
Do one of the following:
-
If you are a member of the community, choose the Community label.
-
If you are a vendor of a bundled extension, choose the VBE label.
The bot identifies you as a member ofvendor.organd adds the correctTechnology Partner:xxxlabel to your PR.
-
-
Choose the label for the version of Magento where the PR applies. For example; 2.4.x
If the PR is for a future release in development, choose the label that applies to the specific release. For example: 2.4.x-develop.
-
Identify your PR as one of the following:
- Editorial
- Major Update
- Maintenance
- New Topic
- Small Changes
-
Under Additional information, enter anything else that you want to share with reviewers.
Pull request settings
Assign Reviewers
-
At the top of the right sidebar under Reviewers, choose two members of our Documentation team to review your work.
Approval from only one reviewer is required to merge your content.
-
If your work is still in progress and not ready for review, click Convert to draft.
You can change the draft back to a pull request when you are ready to start the review process.

Convert to draft -
Proofread the PR and make any final changes necessary.
-
When ready to submit your PR for review, click Create Pull Request.
-
Take note of the PR# that appears at the top of the page.
To make it easy, copy the URL and paste it in your notes about your project. As a best practice, keep complete notes about each documentation assignment you work on, because you might need to refer to it later.
Pull Request #882 -
Reviewers will read your description on the Conversation tab of the pull request, and examine the files that have changed. To view the detail of each change, click the Files changed link.

Files changed -
Verify that the list of changed files matches the list in your pull request description. If necessary, go back and edit the description so it is accurate. The pull request in this example has two Markdown files and one image.
If the list doesn't match the work that you have done, ask someone on the Docs team for help. It's easy to get mixed up while working on multiple local branches, and it's possible that you made some changes to the wrong branch. Always make sure that GitHub Desktop points to the correct local branch before you edit any files.
Step 5: Complete review
The review process is a conversation between you and the review team. A reviewer will add a comment and either approve the pull request or request changes. Depending on the circumstance, a reviewer might also make the needed changes and commit them if necessary.
-
To return to your pull request, click the Conversation tab. Scroll down the page to see all reviewer comments, and respond as needed.
For each change, the original version of the code is shaded pink, and the changed version is shaded green.
-
Read all comments from reviewers and apply their suggested changes. If there’s a reason why a suggested change doesn’t apply, leave a comment to explain why.
-
If a reviewer wants to proofread your edits, click the Refresh icon that appears after the reviewer’s name to request another round of reviews.
A green checkmark appears after the reviewer’s name when your pull request is approved.
 PR Approved
- When your content passes review, scroll down to the bottom of the Conversation tab to the Changes approved section. Update branch and resolve conflicts
During the review process, your branch might become out of date with the base branch. Your branch must be in sync with the base branch before it can be merged.
-
If your branch is out of date with the base branch, click Update branch before proceeding.
If someone else has made changes to any file in your pull request, you will have to resolve all conflicts before the branch can be updated.
-
Click Resolve conflict.
The file opens in the web editor with the conflicting lines highlighted yellow. Each version of the line is followed by a comment line that shows the source of the content.
In this example, the first version of the line originates in the
tutorialbranch, and the second version originates inmaster. The two versions of the conflicted content are separated by a line of seven equal signs. -
In each highlighted section, keep the line that is correct and delete the one that is out of date.
-
Delete the comment and separator lines, so that only the correct version remains. Make sure there are no extra blank lines in the code. Then in the header, click Next.
<<<<<<< tutorial

=======

>>>>>>> master
Comment and separator lines to delete
-
Scroll down to the next conflict that is highlighted yellow and repeat the process.
-
When all conflicts are resolved, scroll up to the top of the page and click Mark as resolved.
-
To confirm the changes and merge the update into your branch, click the green Commit merge button.
The green "Cannot merge" message means that there are final checks to complete before your approved changes can be merged with the base branch. A green checkmark marks each completed test. The Markdown linting and the Adobe CLS Signed tests complete quickly. However, the Jenkins check takes longer.
- Lint Code Base
- Markdown linting
- Adobe CLA Signed
- Jenkins
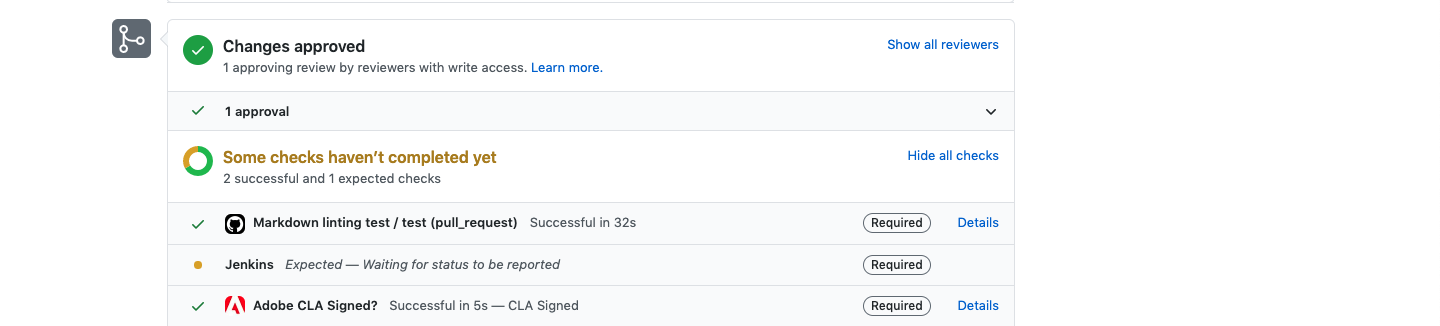 Checks to complete
To put your job in the Jenkins queue for the final check, do the following:
-
In the Comment box, enter the following text on a single line and DO NOT press Enter.
running tests -
Press Comment.
 Running tests
 -
Wait until all checks have pass before continuing.
 All checks passed
Step 7: Merge your branch
When all checks have passed, you can merge your branch with its base branch and publish your updates. Of the options available, the following are most commonly used:
- Create a merge commit - For merges with few commits and associated activity.
- Squash & merge - For complex merges with many commits and associated activity.
-
Click Squash and merge.
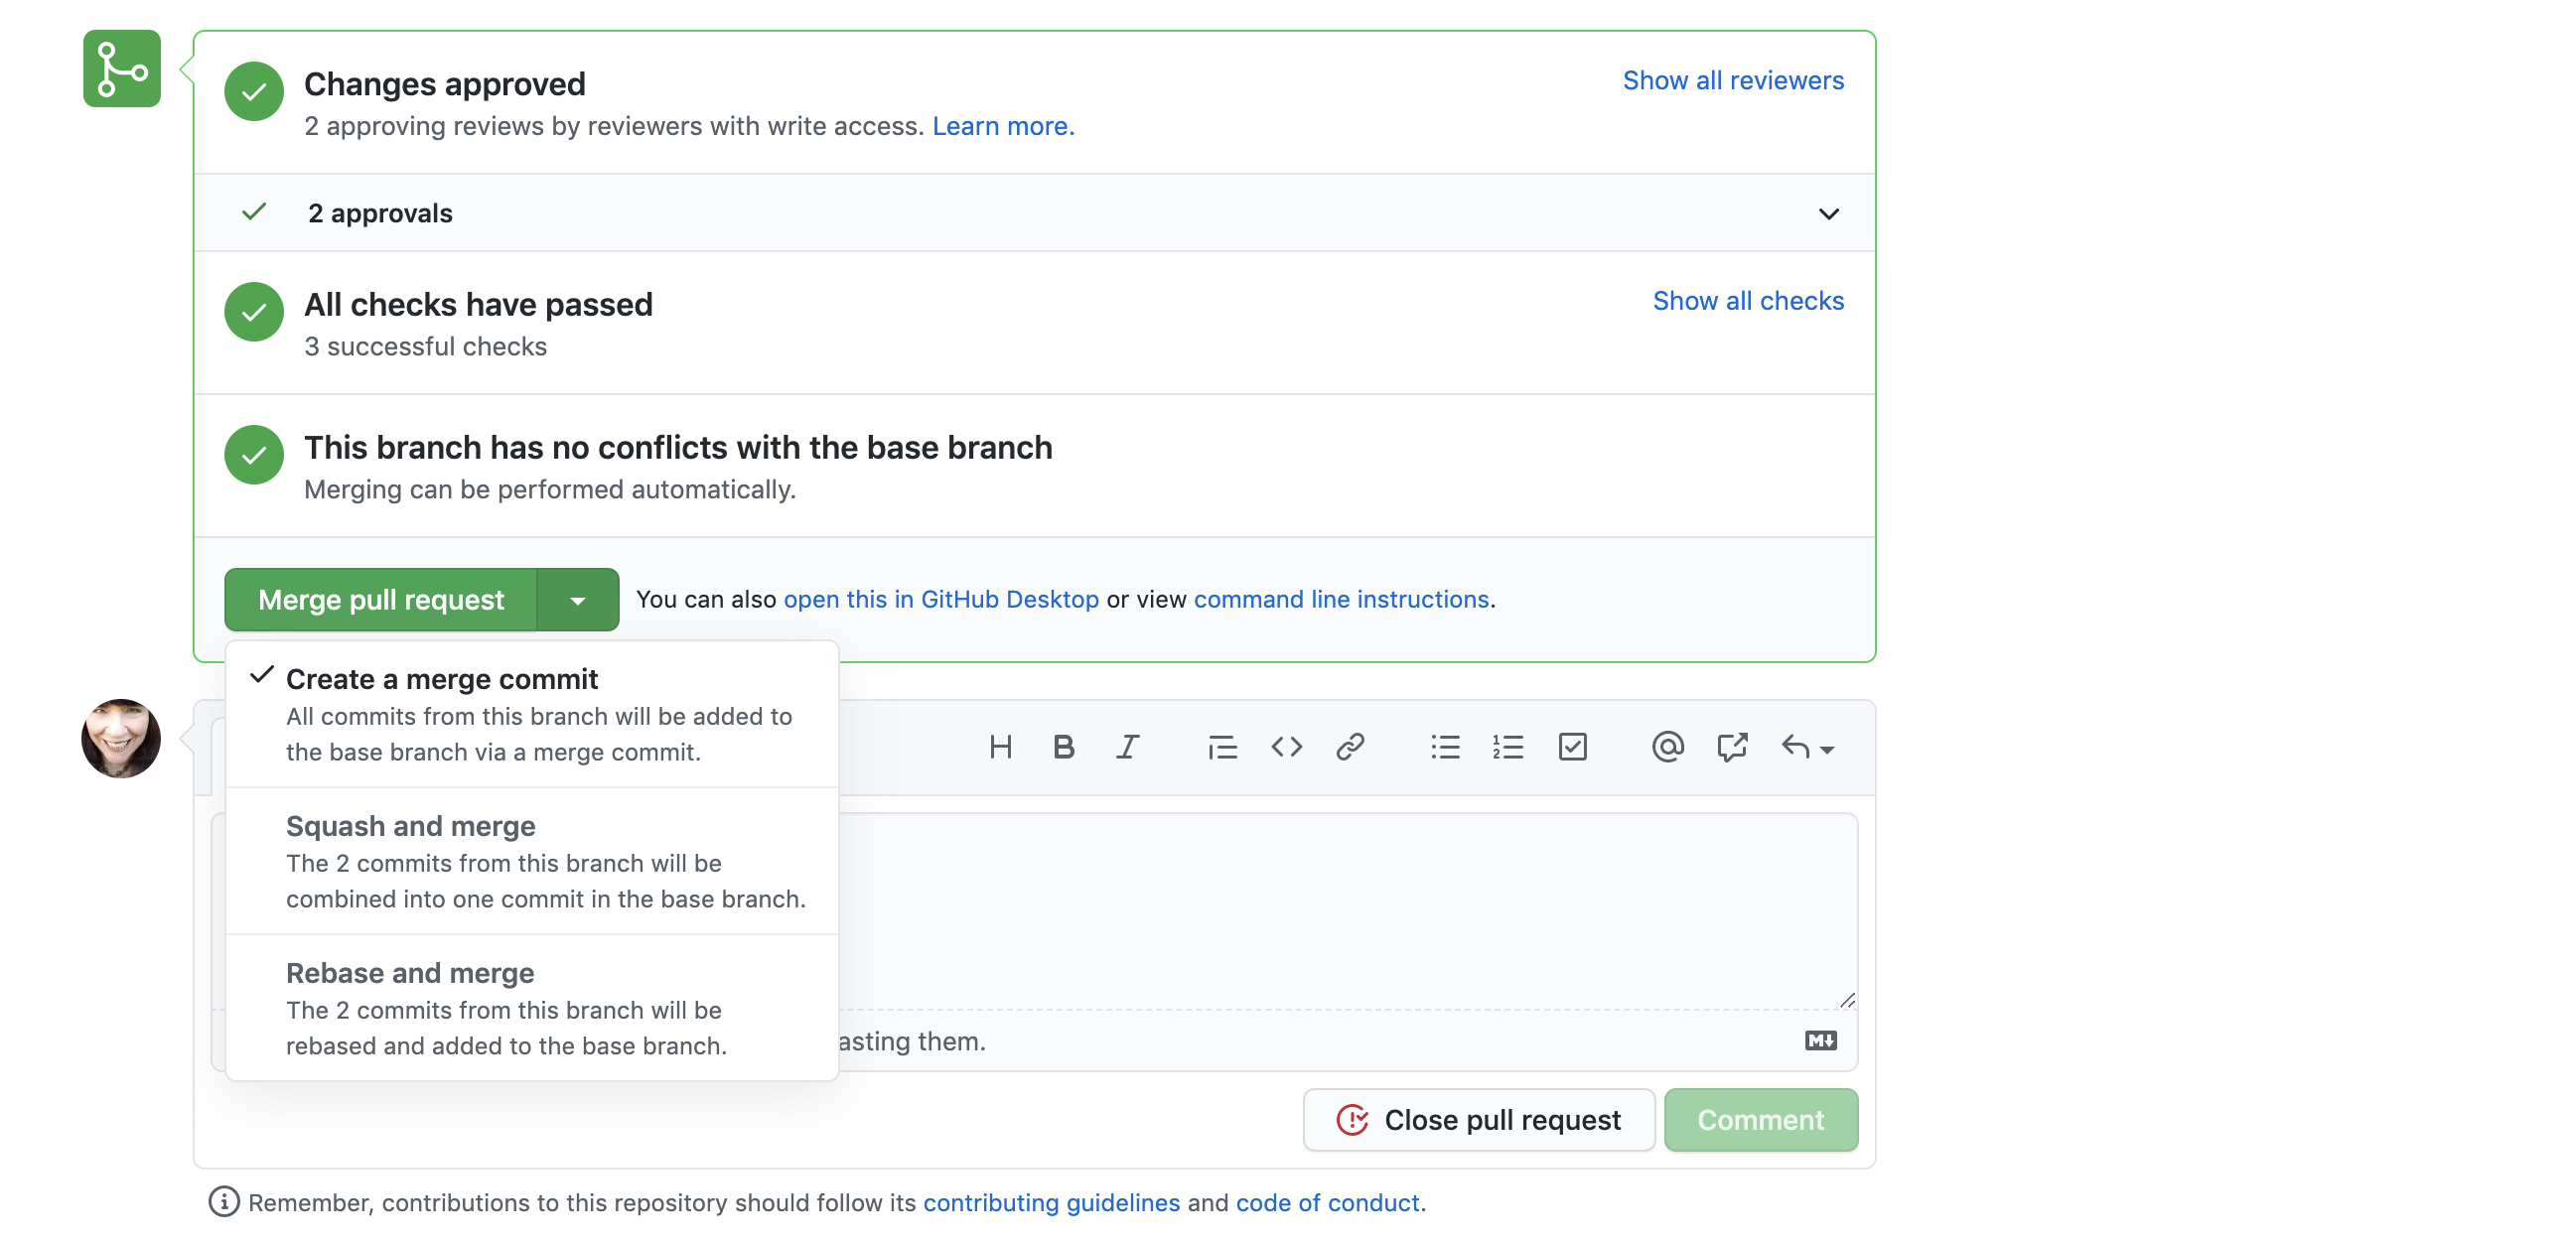 Merge pull request
 -
When prompted, click Confirm merge.
-
After the pull request is successfully merged and closed, click Delete branch to remove it from the remote server.
The branch can later be restored, if necessary.
 Delete branch
Delete your local branch
-
To complete the process, return to GitHub Desktop.
-
Under Current Branch, choose the branch that you want to delete.
-
On the Branch menu, click Delete.
-
When prompted to confirm, click Delete.
Bravo! You're good to go!
