Adding Interactable Objects to the map
This tutorial will show how to add Interactable Objects to a map in GSHTML5. Please notice that most of the necessary Interactable Objects are already defined in the main demo of this engine. So just copying and pasting them (or using the same database file) should be enough.
In order to add an Interactable Object (IO) to the map, first, this IO needs to be registered in the engine. This can be done by adding its basic info in the assets/dbs/interactable_objects_db.json file. This file contains an array of objects, each object represents an IO. So in order to register an IO, just adding one more object to this array with its info is enough.
The info passed to this object will be common for each instance of this IO you'll create in the maps you want to add it. So keep in mind that registering an IO in this file doesn't mean you'll add an IO somewhere, here you're just registering the IO and setting its common settings that all instances will have by default. In this file, you'll set settings like spritesheet data, psynergy interaction data, collision body radius, sprite anchor point, key name, etc. The full list of these options can be found here.
Example of a standard pushable pillar:
{
  "key_name": "push_pillar",
  "anchor_x": 0.5,
  "anchor_y": 0.8,
  "body_radius": 7.0,
  "psynergies_info": {
    "move": {
      "interaction_type": "infinite"
    },
    "whirlwind": {
      "interaction_type": "once"
    }
  },
  "pushable": true,
  "collision_body_bevel": 3,
  "events": [
    {
      "type": "jump",
      "active": true,
      "x_shift": 0,
      "y_shift": -2
    }
  ],
  "initial_action": "push_pillar",
  "actions": {
    "push_pillar": {
      "frame_rate": [1, 1, 1, 12, 10],
      "animations": [
        "column",
        "pillar",
        "wooden_box",
        "pillar_fall_into_water",
        "pillar_in_the_water"
      ],
      "frames_count": [1, 1, 1, 4, 4],
      "loop": [false, false, false, false, true],
      "initial_animation": "pillar",
      "spritesheet": {
        "image": "assets/images/interactable_objects/push_pillars.png",
        "json": "assets/images/interactable_objects/push_pillars.json"
      }
    }
  }
}
So any time we add a pushable pillar IO in a map, by default, this IO will have the above settings.
Please notice that here is where you define the spritesheets of this IO and how these sprites will be animated. The "actions" property will hold each action/state available for this IO, in the case of push pillar in this example, we set only "push_pillar". Each action will have its own spritesheet files containing all the available animations, that are defined by "animations" property. The engine allows you to control whether those animations will loop or not, how long each frame will last, etc. Please also notice that IOs can be accompanied by Tile Events in "events" property, in the case of a push pillar, it will have a "jump" event on top of it. You can find full details on these properties here.
For this tutorial, I'll be using the same map from Creating a simple map tutorial, but with some modifications. I'll increase the gap between the houses, hence adapting the collision structure:

Second collision layer:

Third collision layer:

In the third collision layer, I added a rectangular collision structure between the houses. I plan to add push pillars in this area between the houses, so the hero could jump from one house to the other through them. But in order for the jump system to work with flexibility (or work at all), this collision structure must be a polygon (not a rectangle) and needs to have the split_polygon property set to true. If this property is true, it will split this polygon into chunks of the size of a tile. By doing this, the engine knows how to disable or enable collision in a particular tile. In order to add this custom property in Tiled, select the collision layer where the structure is, select the polygon, then add a custom property for it of boolean type and with split_polygon name on Custom Properties pane. In order to set it to true, you need to check its checkbox:

Here is the resulting structure:
Now our map is ready to receive the pillars.
Now that you registered the IO and adapted the map, it's time to add it to a map. In order to do so, you need to open the map file you want to add the IO on Tiled. Once you opened it, click on Map > Map Properties... (steps 1 and 2), then add a new map property (step 3) of type string (step 4) with the following key name: interactable_object/pillar_01 (Step 5). The engine will know that this property is to create an IO because its key name starts with interactable_object/, and the pillar_01 after it could be any unique name that reminds the IO you're creating. Press OK to confirm (step 6).

We'll now set the value of the interactable_object/pillar_01 property. It expects a json object containing the unique properties of this IO you're adding to this map, like position in map, allowed tiles to be in, collision layer, etc. The full list of these options can be found here. For this IO, we'll add the following:
{
  "key_name": "push_pillar",
  "animation": "pillar",
  "x": 10,
  "y": 7,
  "allowed_tiles": [
    { "x": 9, "y": 7, "collision_layer": 0 },
    { "x": 10, "y": 7, "collision_layer": 0 },
    { "x": 11, "y": 7, "collision_layer": 0 },
    { "x": 12, "y": 7, "collision_layer": 0 },
    { "x": 9, "y": 8, "collision_layer": 0 },
    { "x": 10, "y": 8, "collision_layer": 0 },
    { "x": 11, "y": 8, "collision_layer": 0 },
    { "x": 12, "y": 8, "collision_layer": 0 },
    { "x": 9, "y": 9, "collision_layer": 0 },
    { "x": 10, "y": 9, "collision_layer": 0 },
    { "x": 11, "y": 9, "collision_layer": 0 },
    { "x": 12, "y": 9, "collision_layer": 0 }
  ],
  "base_collision_layer": 0,
  "events_info": {
    "0": {
      "collision_layer_shift": 2
    }
  }
}
It's good practice to always set "base_collision_layer" value. But if not passed, the default value is 0.
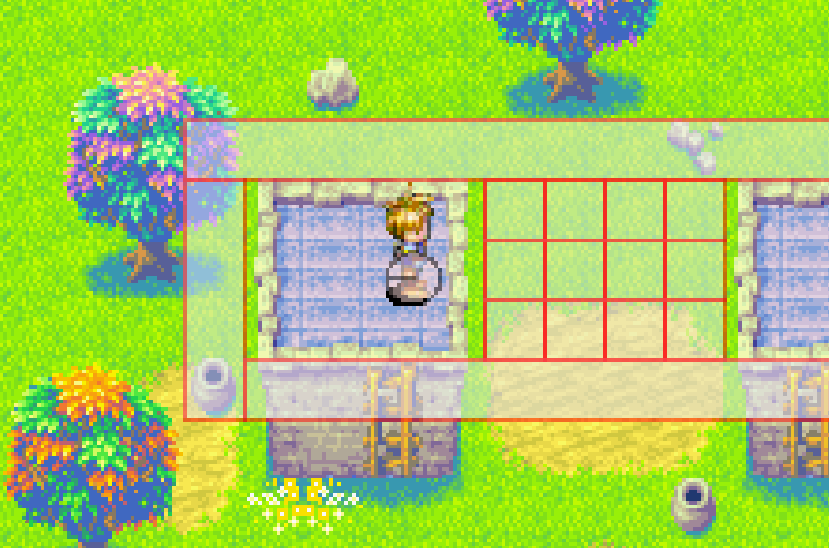
Please notice that in the "allowed_tiles" property, we set all allowed tiles that this IO can be in, it corresponds to the following area:

In "events_info" property, we can set custom properties for the Tile Events that will be created along with this IO. If you remember, these events are defined when registering an IO by the "events" property. In this case, the "0" represents the index of the event we want to set in the "events" array. The jump event we set is the first element (and the only one) of this array, that's why we're referring to it with "0". So, for this jump event, we set this "collision_layer_shift" property that basically will shift the collision number of this event by the number passed there from the base collision layer of the IO. In our case, the IO is at collision layer index 0, so now that we set the "collision_layer_shift", the jump event will be in the collision layer index 2, which is expected, because we want that these jumps events to happen in the collision layer where we can access the roof of the houses.
Now that you added interactable_object/pillar_01, add another push pillar interactable_object/pillar_02, but setting its position to "x": 11 and "y": 7.
The result:

Moving the pillars and jumping:

Just giving another example, now adding a frost pool in the system. First register it:
{
  "key_name": "frost_pool",
  "anchor_x": 0.5,
  "anchor_y": 0.85,
  "body_radius": 7.0,
  "send_to_back": true,
  "psynergies_info": {
    "frost": {
      "interaction_type": "once"
    }
  },
  "pushable": false,
  "allow_jumping_through_it": true,
  "events": [
    {
      "type": "jump_around",
      "active": true
    },
    {
      "type": "jump",
      "active": false,
      "x_shift": 0,
      "y_shift": -2
    }
  ],
  "initial_action": "frost_pool",
  "actions": {
    "frost_pool": {
      "frame_rate": [5, 8],
      "animations": ["pool", "pillar"],
      "frames_count": [2, 6],
      "loop": [true, false],
      "initial_animation": "pool",
      "spritesheet": {
        "image": "assets/images/interactable_objects/psynergy_frost.png",
        "json": "assets/images/interactable_objects/psynergy_frost.json"
      }
    }
  }
}
Then add it in Tiled:
{
  "key_name": "frost_pool",
  "x": 11,
  "y": 9,
  "base_collision_layer": 0,
  "events_info": {
    "1": {
      "collision_layer_shift": 2
    }
  }
}
The result:

These are the basics for IOs. In order to have more examples, please check GSHTML5 default demo.