The first simulation
After you have successfully compiled Shawn, there is an executable in the buildfiles-directory (usually shawn.exe for Windows users, or just shawn for Unix). When you execute the binary in your preferred shell, the following screen (or a similar one, depending on the applications you have enabled) can be seen in Figure XXX.
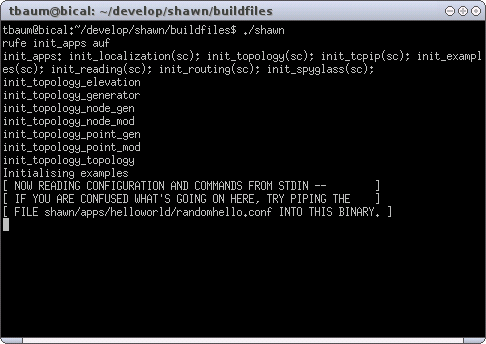
For this section, it is essential that you enabled the Examples application when configured shawn using ccmake earlier. The line 'init_examples(sc)' occurs after 'init_apps' (in the picture the output is wrapped) and indicates that this application is enabled.
We will use the HelloWorld-processor as a first example. As the name implies, it is just a very simple one. After booting, every node sends a message of a special type. Each node that receives such a message, prints out its own label as well as the label of the sender. If a node does not receive a message for five rounds, it prints out the number of known neighbors (the nodes from whom it has received a message) and the labels (or names) of these neighbors. Then it deactivates itself.
But let us start with the first example. At first, the basic conditions of the simulation environment must be set. Therefore enter the following line in your console to pass it to Shawn:
prepare_world edge_model=simple comm_model=disk_graph range=1
This command creates a new simulated world and sets its properties such as edge model, communication model, and the communication radius as previously described in Section XXX. Then, the screen looks like Figure XXX.
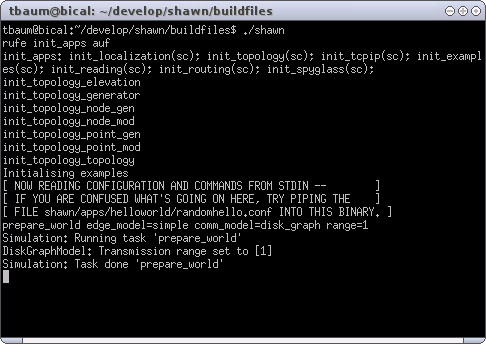
Note that executing a task follows a recurrent process. First, Simulation: Running task 'name_of_task' is printed. Then, there follows the output of the task. Finally, the line Simulation: Task done 'name_of_task' is printed.
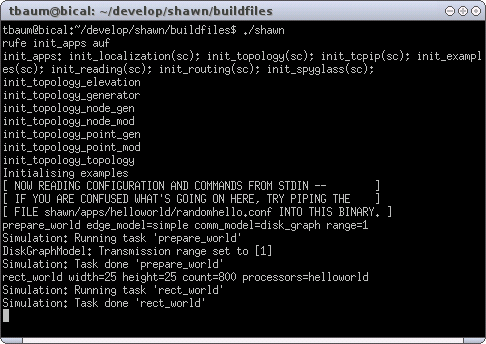
After the simulated world has successfully been created, the world must be filled with life. Therefore we add processors (Section XXX) of type HelloWorld with the following command. Note that this does not create a new world but only adds nodes to the newly created world within the supplied area.
rect_world width=25 height=25 count=800 processors=helloworld
The command adds 800 processors of type HelloWorld in a rectangular part of the world (here of size 25x25), as shown in Figure XXX.
At last, the simulation must be started with the following command:
simulation max_iterations=10
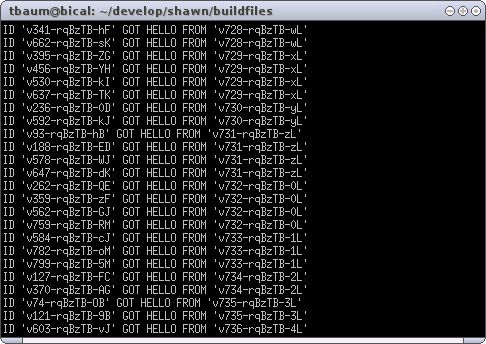
In this example, the parameter 'max_iterations' is not required to be given, because the processors set themselves to "inactive" after some rounds (here: after round 6). But generally, we would advise to set this parameter in each simulation to avoid perpetual runs. However, starting the simulation should look similar to the screens in Figure XXX.
 'Running the First Application.'
First, all nodes print out from whom they received a message. For example, in the first shown line in Figure XXX(a), node 341 received a message from node 728. Then, all nodes print the size of their neighborhood, followed by the labels of the neighbors. Node 799, for example, got 6 neighbors with node 141 as the first one, as can be seen in Figure XXX(b). The simulation ends with simulation round 6, in contrast to the maximal iteration count of 10. This is caused by the behavior of the nodes which deactivate themselves. Directly after the line that shows the finished simulation round 6, the current number of active, sleeping, and inactive nodes is printed. If the sum of active and sleeping is zero, the simulation finishes.
As you may notice, typing those lines every time you start a simulation is frustrating and exhausting work. Thus, it is also possible to generate a configuration file that contains all the lines you want to pass to Shawn, and then just pass the generated file.
Therefore, create a file named 'my_conf' that contains the following lines:
  # This is a comment that is not processed. Comments *must* be
  # written in a separate line, and are *not* allowed to be
  # attached to a line that contains a command for Shawn.
  prepare_world edge_model=simple comm_model=disk_graph range=1
  rect_world width=25 height=25 count=800 processors=helloworld
  simulation max_iterations=10
Generally, there are only a few rules when using configuration
files. At first, every line that begins with \# is comment
that is not processed by the parser. Instead, it is continued with the
next line. Also, a comment is not allowed to be attached to a valid
command for Shawn. Second, a parameter can be made globally available
by writing key=value. The key can then be accessed
by all following tasks. Finally, a simulation task can be invoked by
writing its name. For example, simulation invokes the
corresponding simulation task simulation. Such a task can
also be followed by parameter assignment such as the assignment of
max_iterations after invoking simulation. If so,
this assignment happens strictly local, and can only be seen by the
corresponding task. Subsequent tasks can not access this parameter (if
wanted to be global, the assignment must be written in a single line
as described before).
A configuration can be passed to Shawn with the parameter
-f. Hence, start Shawn as follows:
./shawn -f my_conf
For now, it is not necessary, but if your configuration files get more and more complex, you can also split them into multiple files. Then, you have one master configuration file that you pass to Shawn, and multiple slave files that are included by the master. The master file must contain the following line to include a slave file,
  # some commands for Shawn ...
  include_file slave_file_to_include
  # more commands for Shawn ...
with include_file located exactly at the beginning of the appropriate line in the configuration file. Please note that multiple inclusions are 'not' supported (that is, an included file can 'not' include other files).