Installation Guide
This installation guide describes the required steps for getting Shawn run on Windows and Unix-based systems. There are a few additional tools required, but for each a download line and installation instructions is given.
- Install cygwin from: http://cygwin.com/. The direct link to download setup.exe is: http://cygwin.com/setup.exe
- Execute
setup.exe. You should use the standard installation path ofc:\Program Files\cygwin. - Change view to full to have packages sorted in alphabetical order as shown in Figure XXX.
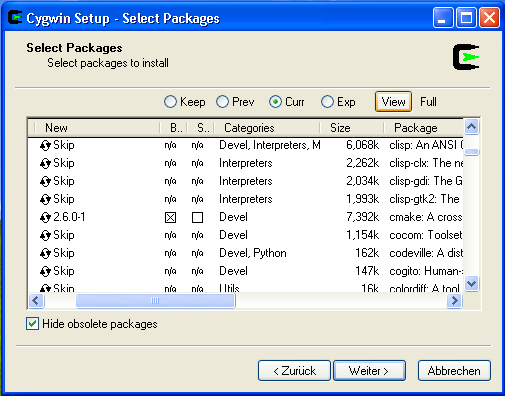 Select:
 - cmake: A cross platform build manager
- gcc-g++: C++ Compiler
- gdb
- make
- unzip
- If not already included, add
C:\Program Files\cygwin\binto the PATH environment variable as follows: - On desktop: right-click on My Computer and click on properties.
- Click on the Advanced tab.
- Click on the Environment Variables button.
- Highlight the path variable in the Systems Variable section and click edit. Add
;C:\Program Files\cygwin\binat the end of the path-entries.
To use JShawn, you need an installed Java Runtime Environment on your system (minimum required is Java 1.6). You can download it at http://www.java.com/en/.
You can download TortoiseSVN here: :http://tortoisesvn.net/downloads
- Open your Windows explorer and create a new folder named Shawn somewhere on your disk. Note that the path name must not contain any spaces.
- If you have installed TortoiseSVN, right-click on your Shawn-folder, select
SVN Checkout, and use https://svn.code.sf.net/p/shawn/code as the URL for URL of repository as shown in Figure XXX.
Now we will generate a makefile with the aid of CMake. This makefile is then used to compile Shawn with the GCC.
- Go to Shawn/buildfiles in cygwin shell (e.g.: cd /cygdrive/C/Programme/Shawn/buildfiles)
- Call
ccmake ../src - Press
cto create the initial configuration, and wait until it looks as shown in Figure XXX.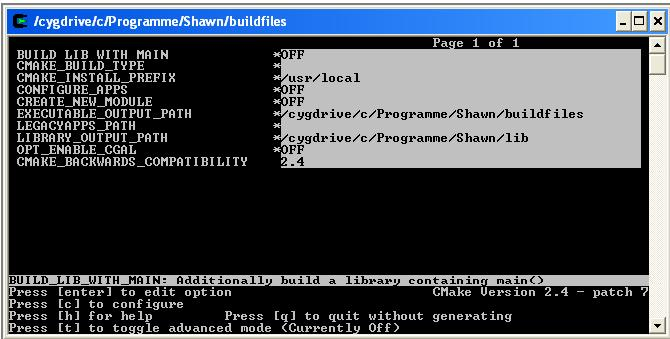
- Go down to line
CONFIGURE_APPSand pressenterto turn it toON. - Again, press
cto configure. The resulting screen is shown in Figure XXX.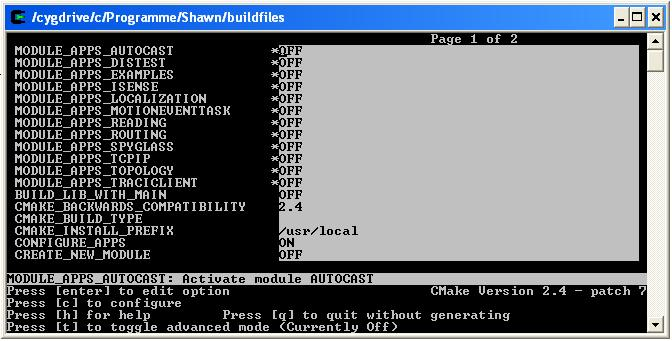
- Now turn all needed modules (starting with
MODULE_APPS_) toON. Therefore move the cursor to the appropriate line and pressEnter. With respect to Getting Started, choosing module apps*_EXAMPLES,*_LOCALIZATION,*_READING, and*_TOPOLOGYis a good choice. If you do not develop against the iSense-API, 'do not' select*_ISENSE, because it would result in a linker error. - Press
cagain afterwards to update the configuration. - Finally, press
gto generate the makefile that is used for compiling Shawn.
Still in Shawn/buildfiles in
cygwin shell, call make to start the compilation
process. Depending on your CPU, it may take a few minutes. When
finished, there is the executable shawn.exe located in the
current directory (Shawn/buildfiles).
- Download Eclipse from http://www.eclipse.org/downloads/. Either you can choose Eclipse IDE for C/C++ Developers directly, or you should additionally download CDT.
- Create a new C++-project in Eclipse with the location of your Shawn. Therefore rightclick on the project explorer and select New
->C++ Project. The dialog is shown in Figure XXX.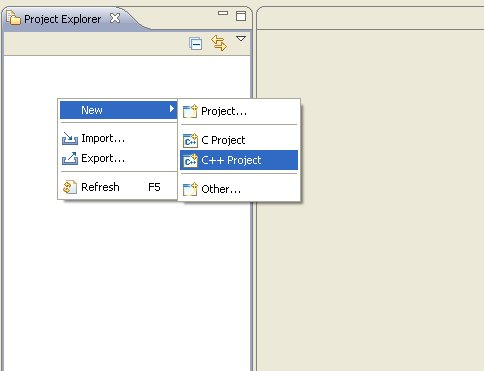
Then, deselect "Use default location", choose the directory that contains Shawn, and enter a project name. In addition, select "Makefile project" and "Cygwin GCC" as toolchain as in Figure XXX.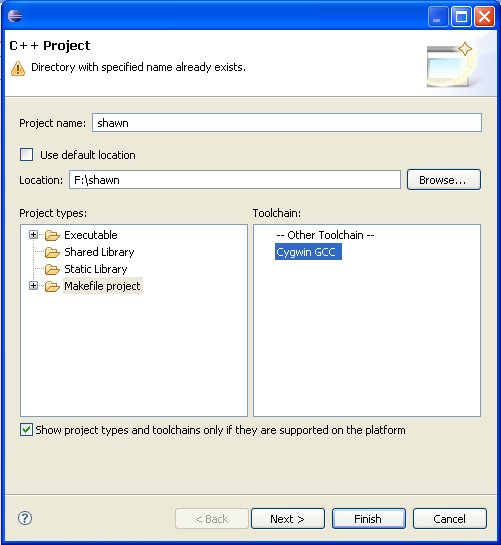
The next screen should look like Figure XXX.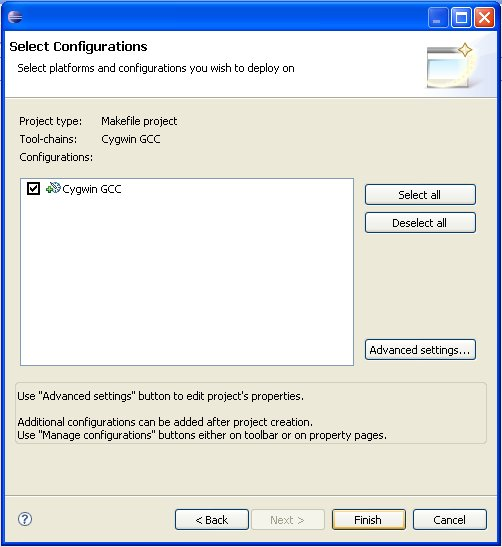
- Create a new make target for this project in Shawn/buildfiles. For this purpose open the
Make Target-View, go to Shawn ->buildfiles, right-click there and chooseAdd Make Target. A new window appears that must be completed like shown in Figure XXX.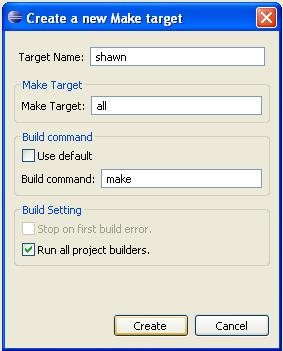
To finish click theCreate-Button. With this standard make target, a complex process is started. Dependencies are recalculated, and the CMake build system is checked for any changes. Especially the latter behavior leads to complete recompilation of the whole code, even when a comment has been added to any CMake configuration file. Therefore it is also possible to use a fast target that only recompiles any changed source file, and rebuilds the binary. The configuration is shown in Figure XXX.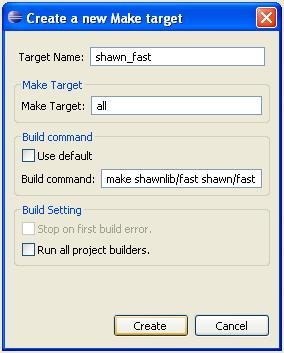
Afterwards yourMake Targets-View should look like Figure XXX.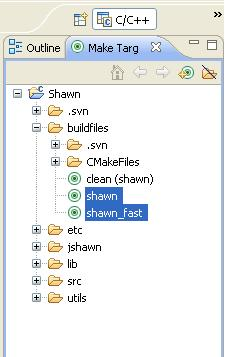
- Set in project properties -
>C/C++ Build: Build directory: workspace_loc:/Shawn/buildfile Afterwards it should look like Figure XXX.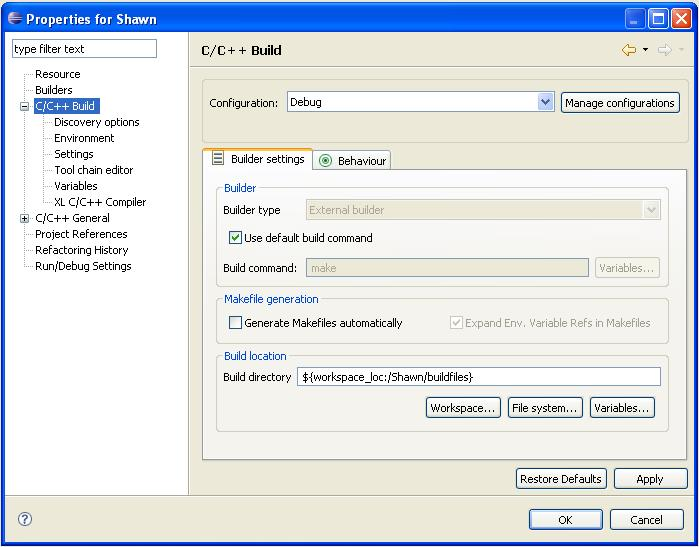
- Double click on one of your new created make targets to compile Shawn.
This guide shows how to configure and compile Shawn using cmake with Microsoft's Visual Studio 2008 IDE. If there is no full version of Visual Studio 2008 available, you may also use Visual C++ 2008 Express, which can be downloaded for free from the [http://www.microsoft.com/express/download/ Microsoft Visual Studio Express Webseite]. Using either the web installer or the offline installation ISO, everything which is needed to basically compile Shawn get's installed automatically.
To use JShawn, you need an installed Java Runtime Environment on your system (minimum required is Java 1.6). You can download it at :http://www.java.com/en/.
Shawn uses cmake buildfiles, so you need a copy of cmake installed. A Windows installer is provided at the official cmake project page at http://www.cmake.org/cmake/resources/software.html
You can download TortoiseSVN here: http://tortoisesvn.net/downloads
- Open your Windows explorer and create a new folder named Shawn somewhere on your disk. Note that the path name must not contain any spaces.
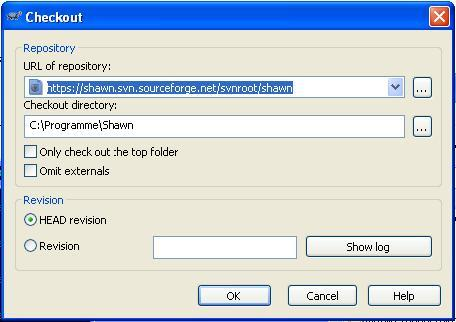
- If you have installed TortoiseSVN, right-click on your Shawn-folder, select
SVN Checkout, and use https://shawn.svn.sourceforge.net/svnroot/shawn as the URL for URL of repository as shown in Figure XXX.
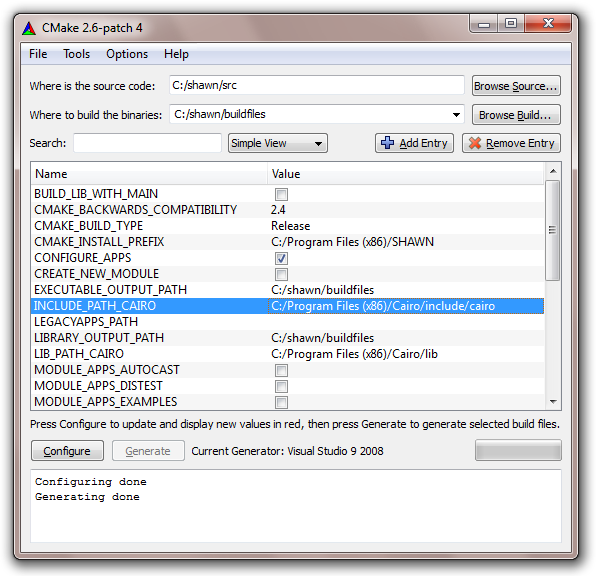
Now we create a Visual Studio 2008 solution (aka project files) using cmake. You may use the command line version of cmake as described in the Linux and/or Cygwin instructions, or use the cmake gui, which get's installed automatically by the cmake installer:
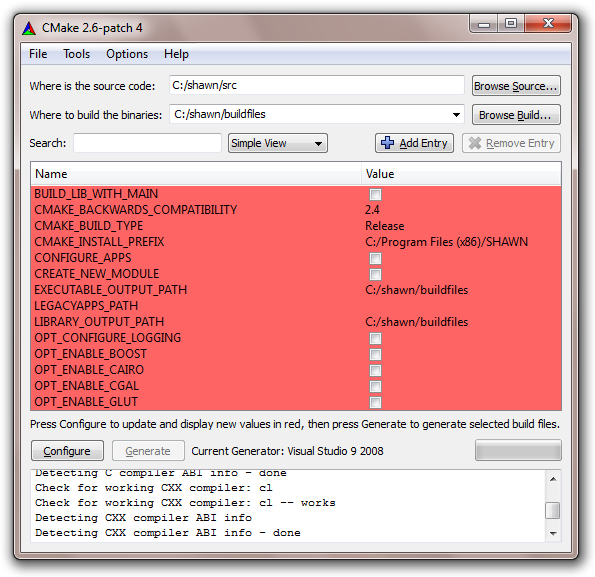
- Enter the path to your downloaded shawn source files into the source code textbox (e.g. c:\shawn\src).
- Enter the path to your buildfiles directory into the binaries textbox (e.g. c:\shawn\buildfiles).
- Hit the configure button.
- cmake asks which buildfile generator to use, which should be "Visual Studio 9 2008" with "Use default native compilers". Hit the Finish button.
- Shawns configuration options appear. You may now configure your apps and additional library dependencies and other options provided by cmake. Hit "Configure" to finish a configuration step until configuration is finished entirely.
- Hit "Generate" to finally create the solution files. They are located in \buildfiles and you may open the project by opening the "SHAWN.sln" solution file.
While Shawn itself doesn't need any additional libraries, some of it's configurable applications do. Most of these libraries are optional, but recommended if using the appropriate Shawn applications. This section handles where to get and how to install these libraries, as well as showing how Shawn has to be configured to finally use them.
To use the Vis application, a development package of the Cairo graphics library is mandatory, as Vis uses Cairo for it's visualization tasks. The easiest way to obtain Cairo is to use the precompiled build which is part of the GTK+ bundle. You can download it from the official GTK+ website: :http://www.gtk.org/download-windows.html Cairo depends on libpng and z-lib, so you need to download at least the binary distributions of these libraries as well. The DLLs libcairo-2.dll, libpng13.dll and zlib1.dll should be put somewhere the system finds it (like Windows\System32 or Windows\SysWOW64 on 64 Bit systems). You may also download and install the GTK+ bundle distribution provided at the above webseite as well, as it contains Cairo and all of it's dependencies.
To enable Cairo in Shawn, it must be configured using cmake again. Just switch on the "OPT_ENABLE_CAIRO" option, hit 'Configure' (or press c in cli version) and fill out INCLUDE_PATH_CAIRO, pointing to the directory where the Cairo header files where installed, and LIB_PATH_CAIRO, pointing to Cairo's lib directory. Hit 'Configure' again and Cairo should be ready to use.
Note that INCLUDE_PATH_CAIRO should point to "<cairo_dir>\include\cairo", NOT to "<cairo_dir>\include"!
Like Cairo, GLUT (OpenGL Utility Library) is used by the Vis application for visualization purposes, but it is only needed for the LiveView feature. If GLUT is not enabled inside of cmake, LiveView is not available, but it is not mandatory for using the Vis application. You can get a precompiled version of GLUT from :http://www.xmission.com/~nate/glut.html It is assumed to be installed into the Microsoft Platform SDK path, putting glut.h into "<platform_sdk>\Include\gl", the glut.lib into "<platform_sdk>\Lib" and glut.dll for example into "Windows\System32".
After installing GLUT, just enable it by switching on "OPT_ENABLE_GLUT" in cmake. If installed this way, you can leave INCLUDE_PATH_GLUT and LIB_PATH_GLUT empty.
Note: A basic version of the Platform SDK get's installed automatically by the Visual Studio 2008 and Visual C++ 2008 Express installers. It normally resides in "\Microsoft SDKs\Windows<version>". You may also use your own GLUT paths, just use cmake to specify INCLUDE_PATH_GLUT and LIB_PATH_GLUT. 'glut.h' still needs to be in a 'gl' subdirectory of the INCLUDE_PATH_GLUT though.
The Boost library is used by the Vis application as well. It allows to use regular expressions in several different Vis tasks and features. It is not mandatory for using Vis, but it is recommended. It IS mandatory to use the LiveView feature though, as LiveView uses it for threading and timing purposes. You can get a precompiled version of Boost for free using the Boost binary installer which is downloadable after a free registration at http://www.boostpro.com/download If you don't want to register, you have to obtain the source and build the libraries by yourself, which is not handled here. Assuming you have the Boost include path installed into "\boost\include" and the libs into "\boost\lib", just use cmake once more to enable it using "OPT_ENABLE_BOOST". Hit 'Configure' and enter the include path and library path into INCLUDE_PATH_BOOST and LIB_PATH_BOOST fields.
CGAL stands for Computational Geometry Algorithms Library and is a nice and efficient library for handling with geometry algorithms. It is used by the Topology application of Shawn to work with polygon representations, and though it is optional and doesn't have to be enabled to use topologies, it's strongly recommended.
CGAL has to be compiled and for that you need a compiled version of Boost, as cgal depends on Boost. You can use cmake to configure CGAL and generate buildfiles for Visual Studio, so it's not that hard and maybe worth it. A CGAL Source-Installer can be downloaded at :http://gforge.inria.fr/frs/?group_id=52
Once installed and built, use cmake to switch on "OPT_ENABLE_CGAL", hit 'Configure' and enter INCLUDE_PATCH_CGAL and LIB_PATH_CGAL as usual.
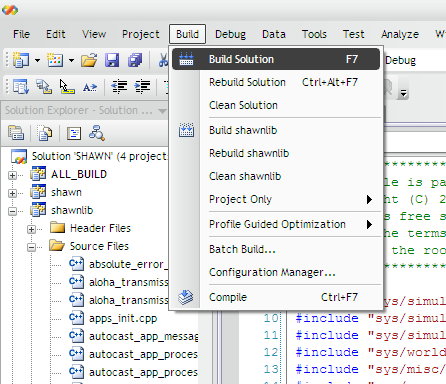
Open the generated solution with Visual C++ 2008 (Express) and use build->build solution to start compiling shawn.
- If not installed on your system yet, download cmake from http://www.cmake.org/HTML/Download.html (minimum required is CMake 2.4). Alternatively, depending on the used distribution, select the packet from the corresponding packet manager (for example, call
apt-get install cmakefrom a shell when using Debian). Either way, make sure thatccmake, a curses interface for CMake, is installed (there may be Linux distributions where it is not part of the CMake package). E.g., when running Ubuntu, callapt-get install cmake-curses-guito installccmake. - If you build it by hand, unpack the source distributions and follow the instructions in Readme.txt. The steps of installation are:
- ./bootstrap
- make
- make install
from within the unzipped cmake directory.
To use JShawn, you need an installed Java Runtime Environment on your system (minimum required is Java 1.6). You can download it at http://www.java.com/en/.
At first, make sure that
Subversion is installed. You can obtain it at
http://subversion.tigris.org/project_packages.html, or you use
the packet manager of the distribution (e.g., type apt-get install subversion under Debian systems).
- Open a terminal and go to the location where your new Shawn directory should be created.
- Use the svn commandline client to check-out Shawn:
svn co https://shawn.svn.sourceforge.net/svnroot/shawn
While Shawn itself doesn't need any additional libraries, some of it's configurable applications do. Most of these libraries are optional, but recommended if using the appropriate Shawn applications. The required libraries are stated in section Installation_Guide#Additional_Libraries. The installation process depends on your systems packet manager and whether you intend to install them via packet manager or compile them on your own. The websites to obtain the sources are stated in the mentioned section, too.
Call sudo apt-get install libcairo-ocaml-dev
Call sudo apt-get install libboost-regex1.54-dev libboost-thread1.54-dev libboost-system1.54-dev
Call sudo apt-get install liblablgl-ocaml-dev
Call sudo apt-get install libcgal-dev
- Go to the folder shawn/buildfiles in your terminal.
- Call
ccmake ../src. - Press
cto create the initial configuration, and wait until it looks as shown in Figure XXX.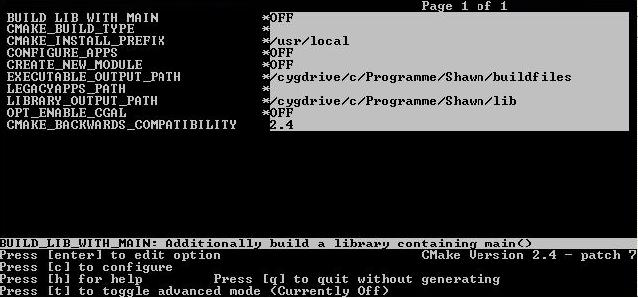
- Go down to line
CONFIGURE_APPSand pressenterto turn it toON. - Again, press
cto configure. The resulting screen is shown in Figure XXX.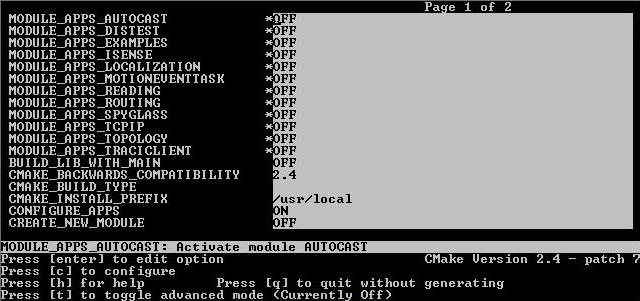
- Now turn all needed modules (starting with
MODULE_APPS_) toON. Therefore move the cursor to the appropriate line and pressEnter. With respect to Getting Started, choosing module apps*_EXAMPLES,\*_LOCALIZATION,*_READING, and*_TOPOLOGYis a good choice. If you do not develop against the iSense-API, 'do not' select*_ISENSE, because it would result in a linker error. - Press
cagain afterwards to update the configuration. - Finally, press
gto generate the makefile that is used for compiling Shawn.
Still in Shawn/buildfiles in your
shell, call make to start the compilation process. Depending
on your CPU, it may take a few minutes. When finished, there is the
executable shawn located in the current directory
(Shawn/buildfiles).
The latest successfully tested GCC version was 4.4 (Ubuntu 4.4.3-4ubuntu5)
- Download Eclipse from http://www.eclipse.org/downloads/. Either you can choose Eclipse IDE for C/C++ Developers directly, or you should additionally download CDT.
- Create a new C++-project in Eclipse with the location of your Shawn. Therefore rightclick on the project explorer and select New -
>C++ Project. The dialog is shown in Figure XXX.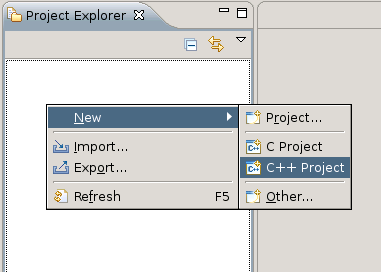
Then, deselectUse default location, choose the directory that contains Shawn, and enter a project name. In addition, selectMakefile projectandLinux GCCas toolchain as in Figure XXX.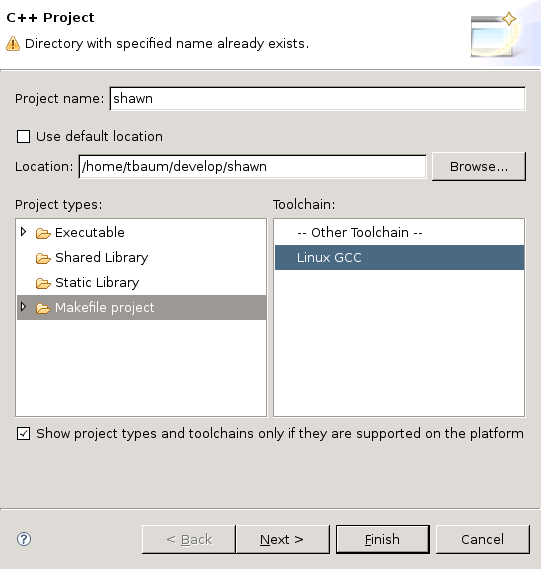
The next screen should look like Figure XXX.
- Create a new make target for this project in Shawn/buildfiles. For this purpose open the
Make Target-View, go to Shawn ->buildfiles, right-click there and chooseAdd Make Target. A new window appears. Complete it like this:
Target Name: shawn
Make Target: all
Build command: make
Then, it looks like shown in Figure XXX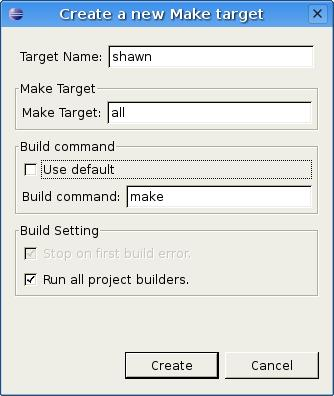
To finish click theCreate-Button. With this standard make target, a complex process is started. Dependencies are recalculated, and the CMake build system is checked for any changes. Especially the latter behavior leads to complete recompilation of the whole code, even when a comment has been added to any CMake configuration file. Therefore it is also possible to use a fast target that only recompiles any changed source file, and rebuilds the binary. The configuration looks as follows:
Target Name: shawn_fast
Make Target: all
Build command: make shawnlib/fast shawn/fast
The result is shown in Figure XXX.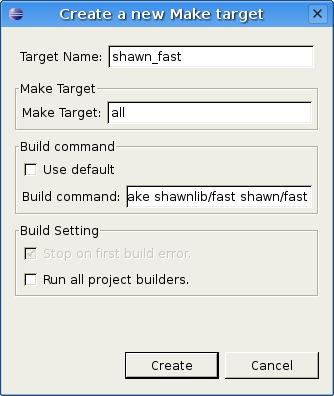
Afterwards yourMake Targets-View should look like Figure XXX.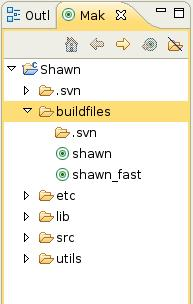
- Set in project properties -
>C/C++ Build: Build directory: workspace_loc:/Shawn/buildfile Afterwards it should look like Figure XXX.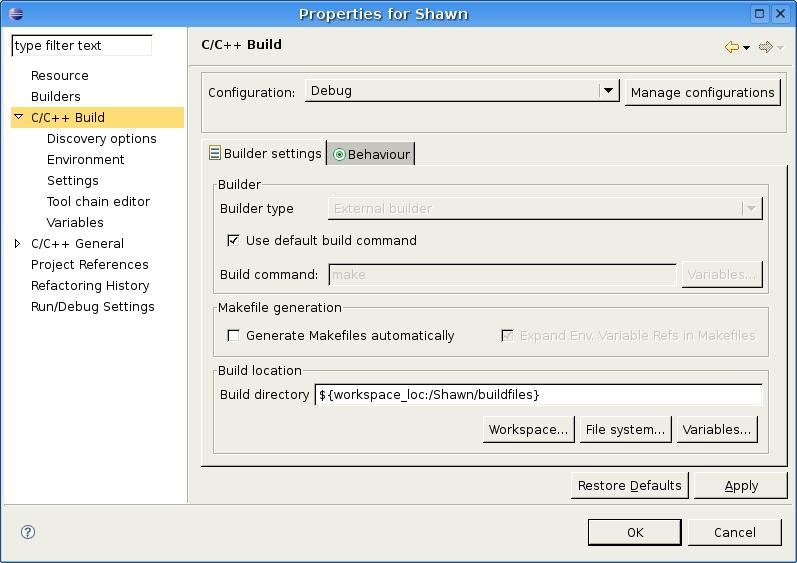
- Double click on one of your new created make targets to compile Shawn.