-
Notifications
You must be signed in to change notification settings - Fork 1
MMU Development
If you want to develop MMUs, you need to prepare your system with a few tools and components. In general, you require the following three components
- Existing MMI Environment: The MMI Environment is required to execute the MMU and integrate it into the framework. For an easy setup, please consider using the precompiled environment
- Target Engine (Unity): A target engine is required to trigger the execution and visualize the result. You can find an example Unity target engine project in the Github Demo Repository and more information the documentation
- MMU Development Tools: Depending on the programming language you are using, different tools are provided, which help for MMU Development.
If you get started with the MOSIM Framework, we do recommend starting with the Unity Demo repository. Here, we provide several example scenes, e.g. the SingleMMUs Scene located in Assets/MMI/Scenes/SingleMMUs, which is perfectly suited for MMU development and testing.
In order to invoke an MMU, a MInstruction must be created inside the target engine and sent to the co-simulator. The co-simulator will activate and interact with the MMU depending on the instructions. For example, we can create an instruction to wave at a goal object with the following code inside of a Avatar Behavior Component.
MInstruction idleInstruction = new MInstruction(MInstructionFactory.GenerateID(), "Idle", "Pose/Idle");

MInstruction waveObject = new MInstruction(MInstructionFactory.GenerateID(), "wave to", "Pose/Wave")
{
   Properties = PropertiesCreator.Create("TargetID", UnitySceneAccess.Instance["WaveObject"].ID),
};

this.CoSimulator.Abort();
this.CoSimulator.AssignInstruction(idleInstruction, new MSimulationState() { Initial = this.avatar.GetPosture(), Current = this.avatar.GetPosture() });
this.CoSimulator.AssignInstruction(waveObject, new MSimulationState() { Initial = this.avatar.GetPosture(), Current = this.avatar.GetPosture() });
For more information on how to use the MMI framework inside a Unity target engine, please consider reading the documentation on Integrating the MOSIM Framework to Unity.
For MMU development in Unity, we do recommend using the MMU Generator, which currently is provided in a stable release for Unity 2018.4.1.f1. To develop MMUs in Unity, you require an installation of Unity 2018.4.1.f1 and Visual Studio. If you want to utilize the MMU Generator in its released form, first create an empty 3D Project and integrate the MMU Generator. For more information on the MMU Generator, please consider its documentation.
In order to create more complex MMUs, you can use the Unity Animation Controller. For more information on how to use the animation controller, please consider reading our Introduction to Unity Animators.
Unity MMUs with a working animator have to be integrated to the MOSIM Framework. For more information about the integration, please check our documentation on MMUs in Unity.
- MMICSharp.dll, MMIStandard.dll, MMIAdapter.dll
- Visual Studio
- Python environment with MMIStandard and MMIPython installed
The MMU Generator is a Unity package, which helps to easily develop and deploy MMUs without needing to take care of the complexity of handling Unity and C# development files. The current version of the MMU Generator is tested in Unity 2019.4.25f1. We cannot guarantee it will work with other Unity Versions.
To install the MMU Generator it is needed to clone the repositories. Additionally, Unity Version 2019.4.25f1 is required to be installed on the system. We recommend using Unity Hub for easier installation.
Use a git client to clone the repositories MMIUnity-Core and MMU-Generator into a folder of your choice. However, we recommend to use Meta git to download the complete MOSIM repository, where the required repositories should already be included.
Alternatively, one can use the Unity package manager to download a package via git URL. This procedure is further described in the section below.
Create or open a new Unity project with version 2019.4.25f1.
Ensure, that the "API Compatibility Level" is set to ".Net 4.x" in the player settings. To open the player settings, select "File" - "Build Settings" from the Unity menu and click on "Player Settings" in the build settings dialog.

To successfully import the MMIUnity-Core package it may be needed to include a csc.rsp file. To create it, open the text editor of your choice (Notepad++ recommended) and create a file called csc.rsp in the Assets folder of your Unity Project with the following content:
-r:System.IO.Compression.FileSystem.dll
-r:System.IO.Compression.dll
If this step is skipped, the following error might occure:
error CS1069: The type name 'ZipArchiveEntry' could not be found in the namespace 'System.IO.Compression'. This type has been forwarded to assembly 'System.IO.Compression, Version=4.0.0.0, Culture=neutral, PublicKeyToken=b77a5c561934e089' Consider adding a reference to that assembly.
To open the Unity Package Manager navigate to the tab "Window" - "Package Manager". With the Package Manager it is possible to import the MMU Generator either from disk or git URL. Importing the Unity packages from disk provides the ability to implement and push additional functionality to the packages. Importing the Unity packages from git URL does not give access to modify the packages.
With the Packet Manager open, click on the plus icon on the top left corner of the Packet Manager window. Choose to "import Unity package from disk".

This should open the explorer, navigate to the folders where you cloned the MMIUnity-Core and MMU-Generator to and select the package.json files for each of the packages.
With the Packet Manager open, click on the plus icon on the top left corner of the Packet Manager window. Choose to "import Unity package from git URL".
This should open a Textfield and an Add button. To download the MMIUnity-Core package use the following link and press the Add button:
[email protected]:dfki-asr/MMIUnity-Core.git
To download the MMU-Generator package use the following link and press the Add button:
[email protected]:dfki-asr/MMU-Generator.git
Once the installation is complete, there should be a menu item "MMI" in the Unity menu and no new error messages should appear. INSERT SCREENSHOT
There are two pipelines to create MMUs with the MMU Generator. The first pipeline is considered for the pure replay of motion capture data and requires no knowledge of C#, Animators, or the MOSIM Framework. It is a good starting point but will only result in rudimentary animation replay that will not generalize.
The second pipeline assists Unity developers in integrating existing animations and animators to the MOSIM Framework. It sets up the rudimentary MMU class, which has to be extended further. This approach requires prior knowledge in C#, Unity Animators, and ideally the MOSIM Framework.
In order for a simple MMU replaying a motion capture take, we assume that the motion capture data was preprocessed (e.g. denoised, cut, and cleaned) and is available in a *.fbx file format.
Inside the Unity project which includes the MMU Generator, the MMU creation process can be started from the MMI - Menu ("MMI" -> "MMU Creator", see above). If the default scene was not yet opened, the dialogue will first ask to open it. Click on "Open default scene", if required.
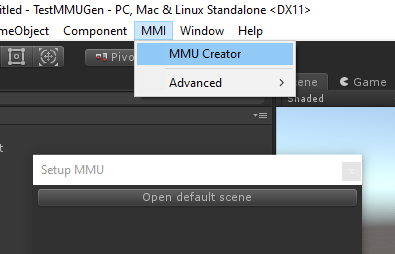
Please enter the MMU information in the Setup MMU dialog. The name is used to generate class files, hence only use valid class names (e.g. no white-spaces, no special characters, no leading number) to ensure an error-free experience. To create an MMU replaying motion capture recordings select the "Should the MMU play MoCap recordings?" toggle and choose a FBX file. Afterwards, press the "Setup" button.
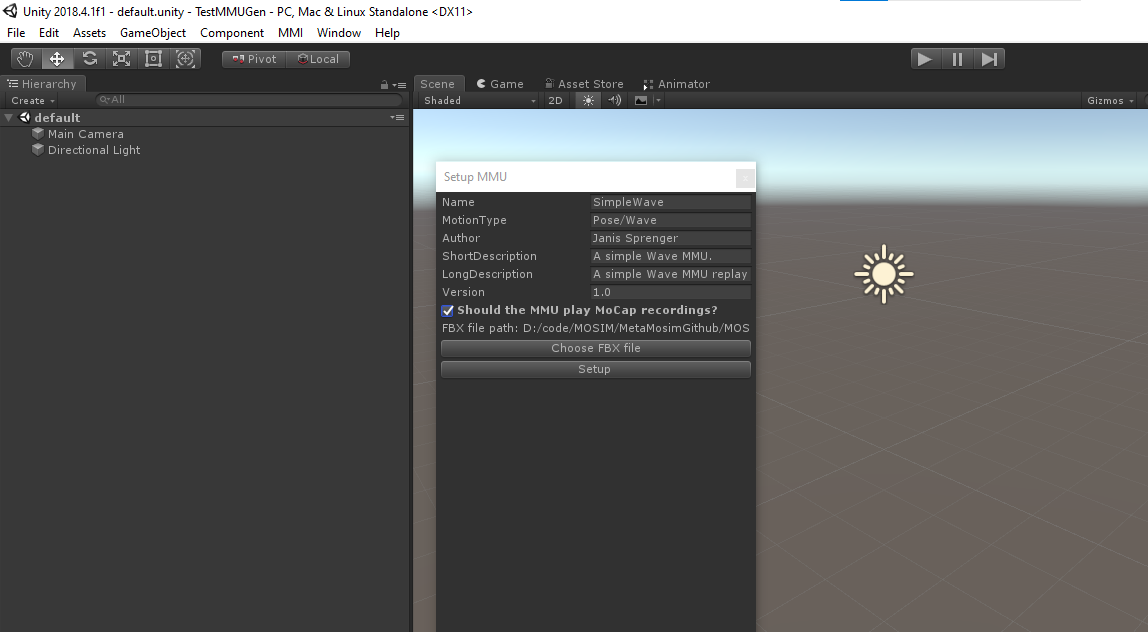
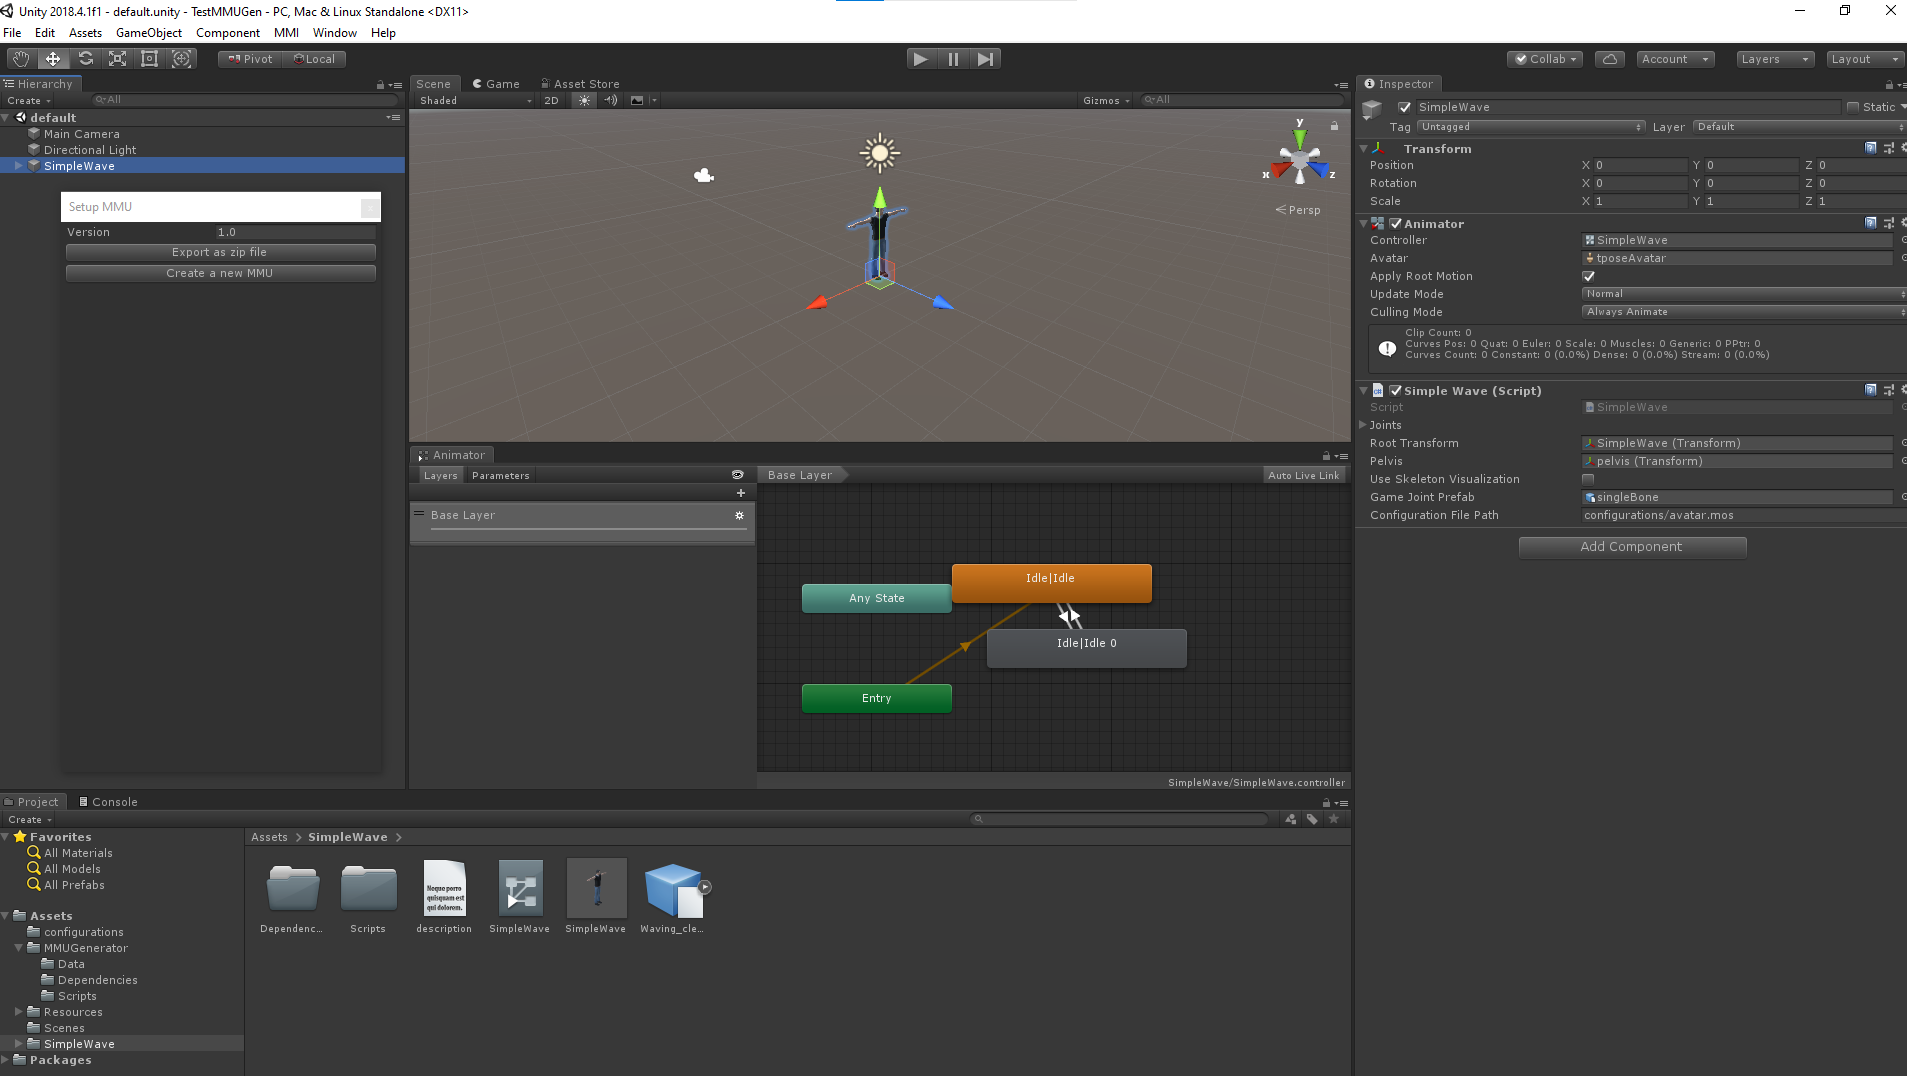
After the animation was imported, it will be displayed on the reference character. A new folder with the MMU content will be created. In addition, a simple Animator graph will be created to replay the motion-capture animations. If the FBX file contained more than a single animation, the specific animation can be replaced in the Animator. The source code required to run the MMU will be included in the Scrips folder and can be adapted before exporting, as well. For more information about MMU development in Unity, please consider the respective Wiki article on MMU Development in Unity.
It is possible to use the MMU Generator in order to integrate a more complex animator into the MOSIM Framework. In this example, we assume that the Unity animator was already set up and the blend trees can be controlled in a meaningful manner, for example blending different wave animations together to wave in a particular direction.
For more information on Unity Animation Controllers, please consult our Introduction to Unity Animators.
Inside the Unity project which includes the MMU Generator, the MMU creation process can be started from the MMI - Menu ("MMI" -> "MMU Creator", see above). If the default scene was not yet opened, the dialogue will first ask to open it. Click on "Open default scene", if required.

Please enter the MMU information in the Setup MMU dialog. The name is used to generate class files, hence only use valid class names (e.g. no white-spaces, no special characters, no leading number) to ensure an error-free experience. To create an MMU replaying motion capture recordings do not select the "Should the MMU play MoCap recordings?" toggle. Afterwards, press the "Setup" button.
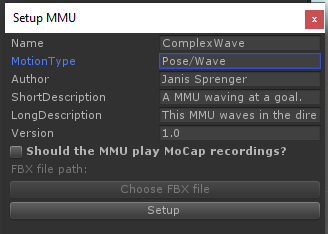
After pressing the Setup button, a new folder for the MMU (in this example named ComplexWave) will be created. The folder contains the reference character, a description file and a script in the name of the MMU (in this example named ComplexWave.cs). The reference avatar will be added to the scene and should contain the MMU script as a component.
The MMU Script will not be complete and must be finished, before testing and/or exporting the MMU, as it is not functional as is. For more information about MMU development in Unity, please consider the respective Wiki article on MMU Development in Unity.
In order to test a MMU, three components are required:
- there has to be a running version of the MMI Environment installed and started (see Core Documentation).
- there has to be a target engine running that is using the MMU / motion type (see Core Documentation).
- there has to be an executable implementation of the MMU linked to an Adapter
To link your implementation to an adapter inside the MMU Generator, simply add the MMU Adapter component to the avatar. Inside the component, the system specifics for the MMI Framework can be adapted (e.g. port and IP address, if required).
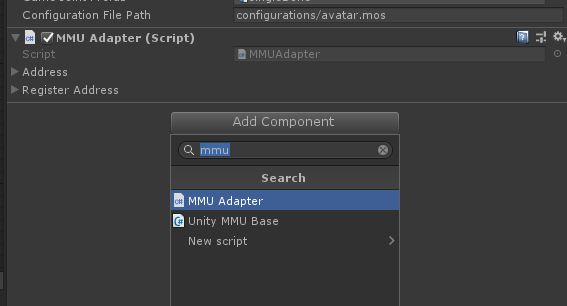
In order to export the MMU, click on the "Export as zip file" button in the Setup MMU Dialog in the MMU Generator project. Do not forget to remove the MMU Adapter component before starting to export. The exported MMU can be integrated into the MMI Framework to be automatically loaded and utilized after exporting. Please be aware, that the source code is not exported and hence should be backed up separately.
Next to the export option in the Setup MMU dialogue of the MMU Creator, there is a button for creating a new MMU (see above).
Once clicked on the "Create a new MMU" Button, it will permanently delete your current status of the MMU development. Please consider to backup your state to a separate folder, before (e.g. copying it to a "Sandbox" folder).
The following issues are known:
Please check the Unity Version of your current project (it should be 2019.4.25f1) and check the API compatibility level and the csc.rsp file.
Please check, whether the MMU name qualifies for a class name, or whether it contains wrong characters (e.g. white space).
After restarting the target engine, the MMUs are not loading anymore and the MMU Adapter throws the error
ArgumentException: An item with the same key has already been added. Key: 1
This is a known bug, which can be solved by restarting the MMU Generator.
Please check if you assign the proper animator controller to the animator in the MMU prefab, before you export the MMU.
In order to integrate an existing Unity animation controller to MOSIM, we have to create a custom MMU script. Ideally, this can be done by using the MMU Generator. After a new MMU was created, there should be a folder containing the MMU script as well as a reference character. At the current point, we do recommend utilizing the reference avatar, but replacing it with a custom character is possible. The generated MMU script contains a custom, but empty MMU script. In the following, we will describe the functions individually. Afterwards, an example implementation using the Waving MMU is described.
The following MMU functions must be implemented. The MMU Interface is defined in the MMU thrift file.
Parameters: MAvatarDescription avatarDescription; Map<string, string> properties
Returns: MBoolResponse
This function gets called when the target engine is started and initializes a new target avatar. The target avatar is described with the avatarDescription. In this function, the MMU can initialize the avatar, adjust the environment based on the target scene and prepare everything for the MMU execution. If there is an error during initialization, the MMU can return a negative response, which will prevent the co-simulator to load.
Parameters: MInstruction motionInstruction; MSimulationState simulationState
Returns: MBoolResponse
In this function, an instruction is assigned. The instruction should contain all required information for the MMU to be executed. In case of IDs, please consider using IDs that are referring to Constraints rather than to scene objects.
The simulationState describes the current state of the simulation, containing the current avatar pose and its constraints.
If the requirements for execution are not met, the MMU can return a negative result.
Parameters: double time; MSimulationState simulationState
Returns: MSimulationResult
DoStep is the central method to simulate poses. It is compatible to the Update function of the Unity game engine and performs a single simulation step for the amount of time in seconds as provided. The simulationState contains the current and initial posture, as well as all active constraints. In this method, the MMU is supposed to calculate the next pose after time elapsed seconds to the previous pose. The previous frames merged posture is contained in simulationState.Initial. The resulting posture should be returned with the simulation result. In this result, you can as well return events, depending on the current state of the simulation. The most important constraint is the "end" constraint, denoting the end of simulation for this MMU, e.g. when the goal is reached. For all constraints, please consider the MMI.thrift file.
The MSimulationState contains two avatar definitions.
- Initial describes the initial MAvatarPosture before any MMU was executed. Usually, it is the last frames posture after merging and applying all constraints.
- Current describes the current MAvatarPosture with all animations from other MMUs applied, which are running in parallel and are executed prior to the current MMU. If no MMU was executed before, it will be equal to the initial posture.
- Constraints describes the list of constraints, which should be enforced currently, this field should be (at least) forwarded to the simulation result.
- SceneManipulations contains all scene manipulations, which are requested by MMUs that are executed prior to this MMU for the current frame. This field should be (at least) forwarded to the simulation result.
- Events contains a list of events, which are sent by MMUs that are executed prior to this MMU for the current frame. This field should be (at least) forwarded to the simulation result.
- Posture contains the avatar posture after applying this MMU in the internal skeleton format.
- Constraints this field contains all constraints combined: constraints from MMUs executed prior to this MMU and constraints enforced by this MMU.
- Events this field contains all events combined: events from MMUs executed prior to this MMU and events evoked by this MMU.
- SceneManipulations this field contains all scene manipulations combined: manipulations requested from MMUs executed prior to this MMU and manipulations requested by this MMU.
- DrawingCalls this field can contain drawing calls from this MMU
Please remember, that creating a new MMU can remove the old status, hence back up your progress regularly. In addition, the MMU Generator currently does not support a persistent state. Hence, after every restart, the whole MMU generation process has to be repeated from the start. We provide the source code of the WaveMMU as well as all of the assets as a Unity Package. If you want to utilize the MMU Generator to export this MMU, please be aware, that you have to start a new MMU Generation process and copy the source code manually to be able to export the MMU later on.
In addition, you can download the Simple Wave MMU script, containing the complete source code described below.
For the Waving MMU, we created a new MMU called "WaveMMU", without providing a motion capture recording. As a result, a new folder named WaveMMU was created in the asset library, containing a WaveMMU-prefab and a WaveMMU-script. The script is not usable at the start, e.g. because the AssignInstruction method throws an error by default. In addition, the default avatar in the scene should contain a component for this WaveMMU-script and an animator component. For the description on how the animations and the animator are created, please check the section "Introduction to Unity Animators" of our documentation.
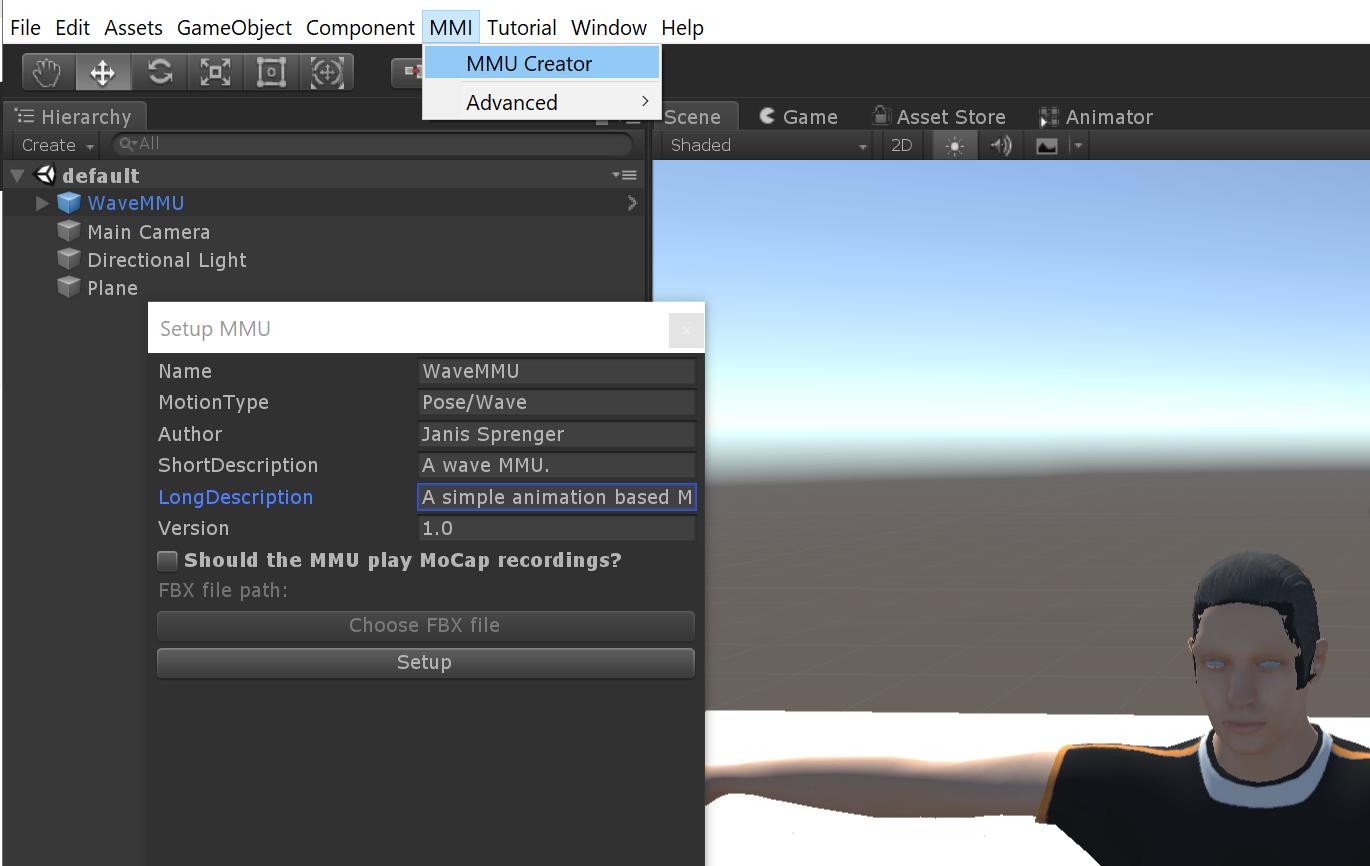
At the start, we opened the WaveMMU script in visual studio, added a class member for the animator and assigned the component in the Awake method. In addition, we disabled the animator to allow manual animation and set the culling mode to "AlwaysAnimate".
protected override void Awake()
{
   // Assign the name of the MMU. This name should correspond to the GameObject name, the prefab asset, and the MMU folder.
   this.Name = "WaveMMU";

   // Assign the motion type of the MMU. This motion type will be utilized to assign Instr
   this.MotionType = "Pose/Wave";

   // Auto generated source code for assignemnt of root transform and root bone:
   this.Pelvis = this.gameObject.GetComponentsInChildren<Transform>().First(s => s.name == "pelvis");
   this.RootTransform = this.transform;

   // Get the animator (needs to be added in before)
   this.animator = this.GetComponent<Animator>();

   // Disable the animator at the beginning (otherwise retargeting won't work)
   this.animator.enabled = false;
   this.animator.cullingMode = AnimatorCullingMode.AlwaysAnimate;

   // It is important that the bone assignment is done before the base class awake is called
   base.Awake();
}
Inside the AssignInstruction method, the goal should be assigned. We assume, that the MMU will receive a "TargetID" property that is either pointing to a constraint or a scene object. If there is a constraint with this id provided, it will be utilized.
public override MBoolResponse AssignInstruction(MInstruction instruction, MSimulationState state)
{
   //Assign the instruction to the class variable
   this.instruction = instruction;

   Vector3 target_position = new Vector3(0, 0, 0);
   bool wasConstraint = false;

   // Check if the target id is a constraint
   foreach (MConstraint c in instruction.Constraints)
   {
      if (c.ID == instruction.Properties["TargetID"] && c.GeometryConstraint != null)
      {
         // Constraint found
         Quaternion parentRot = Quaternion.identity;
         Vector3 parentPos = Vector3.zero;
         if (!string.IsNullOrEmpty(c.GeometryConstraint.ParentObjectID))
         {
         // has a parent
         var parent = this.SceneAccess.GetSceneObjectByID(c.GeometryConstraint.ParentObjectID);
            if (parent != null)
            {
               parentRot = parent.Transform.Rotation.ToQuaternion();
               parentPos = parent.Transform.Position.ToVector3();
            }
         }
         // Transform to global space
         target_position = parentRot * c.GeometryConstraint.ParentToConstraint.Position.ToVector3() + parentPos;
         wasConstraint = true;
         break;
      }
   }

...
If there is no constraint provided, we search for a scene object via the scene access. If there is no object exists with the defined constraint, we return a bad return value and a debug message.
...
   // If no constraint, check if there is a suitable scene object
   if (!wasConstraint)
   {
      var mobj = this.SceneAccess.GetSceneObjectByID(this.instruction.Properties["TargetID"]);
      if (mobj == null)
      {
         MBoolResponse result = new MBoolResponse(false);
         result.LogData = new List<string>() { "Target Constraint or Object not found with ID: " + this.instruction.Properties["TargetID"] };
         return result;
      }
      target_position = mobj.Transform.Position.ToVector3();
   }

...
Still inside the AssignInstruction method, we want to prepare the animator to start playing the animation in the next DoStep call. As the MMU itself is running in a separate thread, all Unity related code has to be executed on the main thread. In order to facilitate this parallelism, the base mmu class provides an ExecuteOnMainThread method, which can be provided some additional code. For this example, we first assign the current animation state and compute the blending weight as described in the section "Introduction to Unity Animators". In addition, we update the animator by a very small section, to initialize the animation and force the current animation state to not be in "Idle".
...
   this.ExecuteOnMainThread(() =>
   {
      this.AssignPostureValues(state.Current);

      var dir = this.transform.TransformDirection(target_position - this.transform.position).normalized;

      dir = Vector3.ProjectOnPlane(dir, Vector3.up);
      float angle = Mathf.Clamp(Vector2.SignedAngle(new Vector2(0, 1), new Vector2(dir.x, dir.z)) / 90, -1, 1);

      animator.SetFloat("WaveBlend", angle);
      animator.SetLayerWeight(1, 1);
      animator.SetTrigger("Wave");

      // Initial animator update to start the trigger
      this.animator.Update(0.01f);

   });

   return new MBoolResponse(true);
}
Now we have prepared the MMU for execution and return a positive value in the AssignInstruction. To execute the animation, we have to extend the DoStep method. By default, the method already prepares a return value, which forwards all events, poses, and scene changes provided in the input. We extend the return value, by calling our animator to animate for the provided time. In case, the animator is back in the state "Idle", we want to return an end event. In case, we either did set up a transition window from the idle to the waving state, or we did not invoke the animator update in the AssignInstruction (see above), the animation would still be in the idle state and directly return an end event without actually executing the animation.
public override MSimulationResult DoStep(double time, MSimulationState state)
{
   //Create a new simulation result
   MSimulationResult result = new MSimulationResult()
   {
      Posture = state.Current,
      Constraints = state.Constraints != null ? state.Constraints : new List<MConstraint>(),
      Events = state.Events != null ? state.Events : new List<MSimulationEvent>(),
      SceneManipulations = state.SceneManipulations != null ? state.SceneManipulations : new List<MSceneManipulation>(),
   };

   //Execute the instruction on the main thread (required in order to access unity functionality)
   this.ExecuteOnMainThread(() =>
   {
      this.AssignPostureValues(state.Current);
      this.animator.Update((float)time);

      if (this.animator.GetCurrentAnimatorStateInfo(0).IsName("Idle"))
      {
         result.Events.Add(new MSimulationEvent(this.instruction.Name, mmiConstants.MSimulationEvent_End, this.instruction.ID));
      }

      MAvatarPostureValues simVals = this.GetRetargetedPosture();
      result.Posture = simVals;
   });

   //To do -> insert your do step code in here

   return result;
}
The end-condition (this.animator.GetCurrentAnimatorStateInfo(0).IsName("Idle")) can only be used, if the transition time inside the animator from the Idle state is set to 0 and the "Has Exit Time" toggle is not set. For more information, please consult the documentation on Animator Development.
With this change, we have prepared the animation code. Inside the Unity editor, we want to ensure, that the "waving" animation controller is assigned to the animation component of the scene avatar and that the WaveMMU component is already set up. In addition, we can use the "MMUAdapter" component to debug our MMU directly within the MMU Generator (For more information check the MMU Generator documentation. After the MMUAdapter is added and set up, we can run the "MMU Generator" project and it should connect to the launcher (provided, it is started). In addition, we now should set up a target-engine project to call the wave mmu. For this purpose, we do recommend using the Demo Project and more specifically, the Single MMUs Scene. Inside the scene script behavior, we can change one of the buttons to call our wave with the following code. It assumes, that there is a scene object setup with a MMISceneObject component attached, which is called "WaveObject". You can, however, utilize any MMISceneObject within the scene for this purpose. Alternatively, a MGeometryConstraint could have been generated with a hard-coded world position.
MInstruction idleInstruction = new MInstruction(MInstructionFactory.GenerateID(), "Idle", "Pose/Idle");

MInstruction waveObject = new MInstruction(MInstructionFactory.GenerateID(), "wave to", "Pose/Wave")
{
   Properties = PropertiesCreator.Create("TargetID", UnitySceneAccess.Instance["WaveObject"].ID),
};

this.CoSimulator.Abort();
this.CoSimulator.AssignInstruction(idleInstruction, new MSimulationState() { Initial = this.avatar.GetPosture(), Current = this.avatar.GetPosture() });
this.CoSimulator.AssignInstruction(waveObject, new MSimulationState() { Initial = this.avatar.GetPosture(), Current = this.avatar.GetPosture() });
Now we can start the target engine scene and upon clicking the respective button, the target avatar will perform the wave action and wave towards the "WaveObject".
It is possible to rename MMUs in the MMU Generator. As different components of the debugging adapter and MMU generator depend on the name, it must be changed in the following places:
- inside the mmu script: renaming the this.Name field to the new name
- inside the Unity inspector: renaming the game object
- inside the description.json: renaming the MMU name
- inside the project assets: renaming the folder containing the MMU prefab and description file
- inside the project assets: renaming the prefab asset
After renaming, the MMU Generator will not be able to export the MMU anymore. To export the MMU, a new process using the MMU Generator must be started. Please be aware, that the MMU Generator will overwrite your current status if you start a new MMU with the name of an existing one inside your project, and do not forget to generate frequent backups of your code.
In order to export the MMU, we have to ensure, that the prefab-asset (WaveMMU.prefab) has the animator component assigned. To do that, open the prefab by double-clicking it, and assign the waving animator controller. Afterwards, press the left arrow on the top left of the hierarchy to return to the main scene.
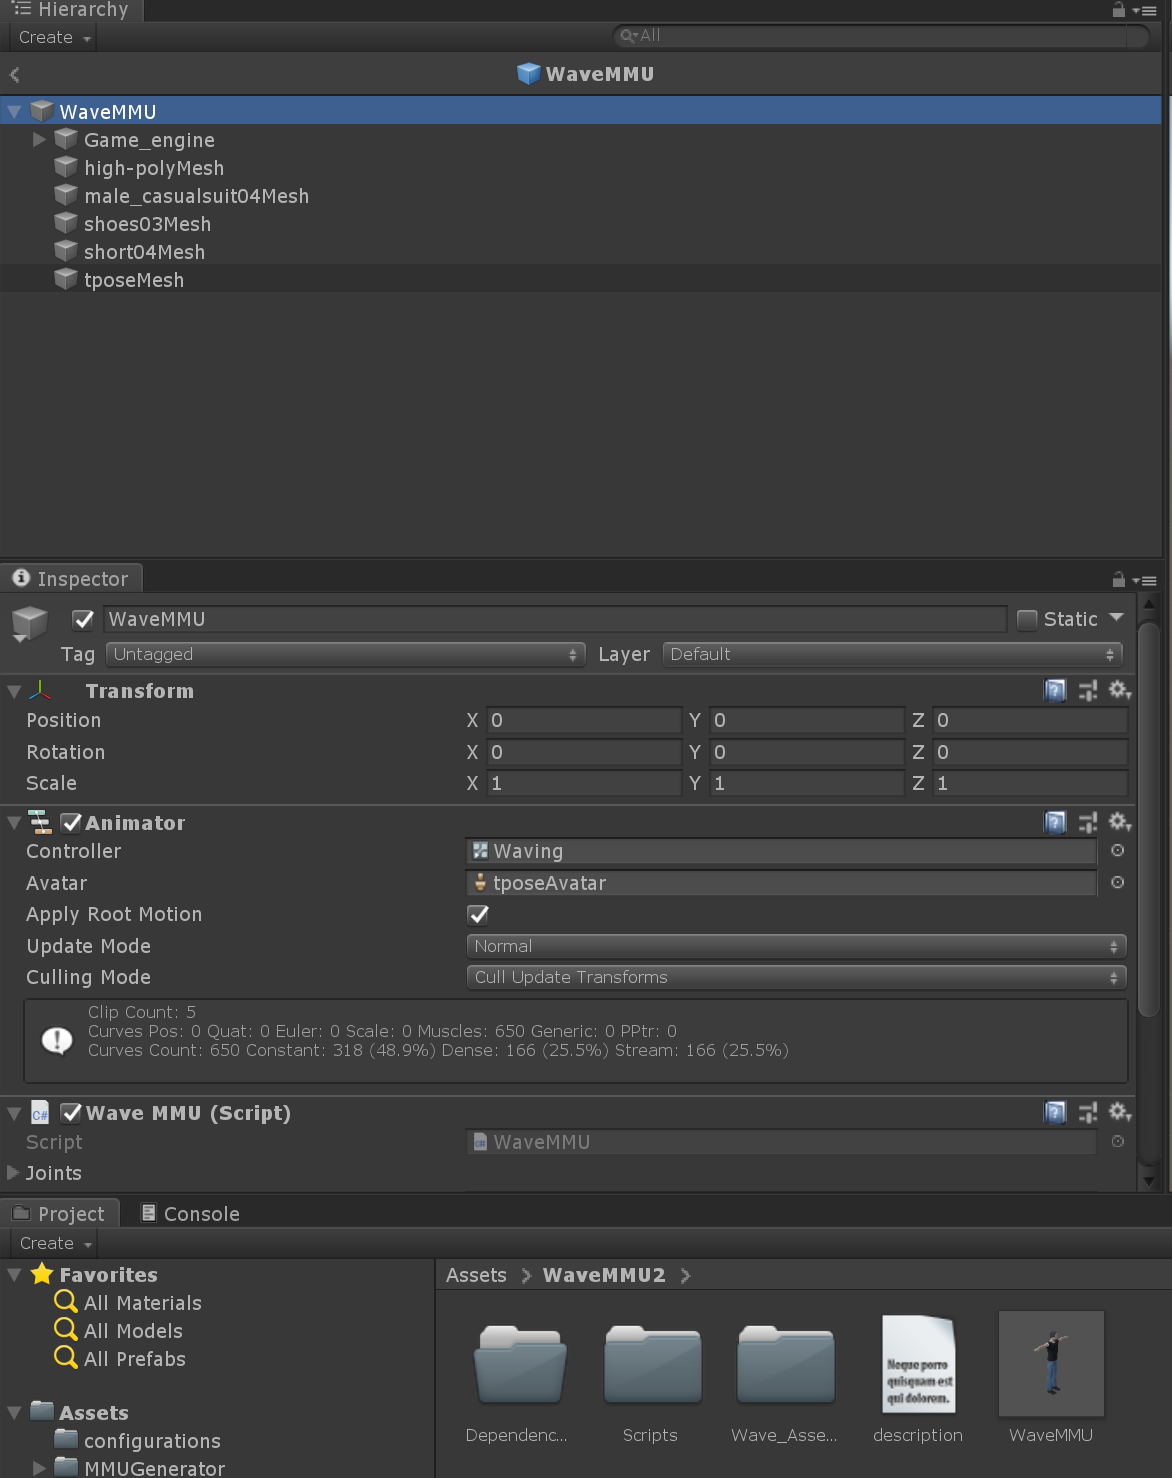
Inside the MMUGenerator dialogue, we can now export the MMU. Please remember, to copy the UnityEngine.dll to Assets/MMUGenerator/Dependencies/UnityEngine.dllx. Your UnityEngine.dll is most likely located within your Unity installation folder (e.g. C:\Program Files\Unity\Hub\Editor\2018.4.1f1\Editor\Data\Managed\UnityEngine.dll). We are not allowed to push Unity libraries to Github.
The generated MMU can now be unzipped and the containing folder can be copied to the Framework. Please make sure, that only the containing folder is copied to the frameworks MMU folder, such that the descriptions.json is on the first level (Environment/MMUs/WaveMMU/description.json).
In many cases, only part of the body will be simulated. In our case, only the left arm is relevant. The rest of the body, can be controlled by other MMUs. Due to the hierarchical execution of the MMUs, we do not want to override the rest of the animation. Hence, we can let the Locomotion MMU generate walking, and purely simulate the arm movement, by only transferring part of the animation to the MOSIM framework. I propose the following extensions to MAvatarPostureValues, to copy and transfer partial joint information. This is currently not yet integrated to the core framework, hence it has to be defined in the MMU directly. You can simply copy the following code after your MMU class.
The complete source code using transition blending and partial motion information can be downloaded as WaveMMU_complete.cs.
public static class TransformExtensionsWaveMMU
{

    public static MAvatarPostureValues MakePartial(this MAvatarPostureValues vals, List<MJointType> PartialJointList)
    {
        List<MJoint> defaultList = ISDescription.GetDefaultJointList();
        MAvatarPostureValues ret = new MAvatarPostureValues(vals.AvatarID, new List<double>());
        ret.PartialJointList = PartialJointList;
        int id = 0;
        foreach (MJoint joint in defaultList)
        {
            if (PartialJointList.Contains(joint.Type))
            {
                foreach (var x in joint.Channels)
                {
                    ret.PostureData.Add(vals.PostureData[id]);
                    id++;
                }
            }
            else
            {
                id += joint.Channels.Count;
            }
        }

        return ret;
    }

    public static MAvatarPostureValues OverwriteWithPartial(this MAvatarPostureValues vals, MAvatarPostureValues other)
    {
        List<MJoint> defaultList = ISDescription.GetDefaultJointList();
        MAvatarPostureValues ret = new MAvatarPostureValues(vals.AvatarID, new List<double>());

        int id = 0;
        int idPartial = 0;
        foreach (MJoint joint in defaultList)
        {
            if (other.PartialJointList.Contains(joint.Type))
            {
                foreach (var x in joint.Channels)
                {
                    ret.PostureData.Add(other.PostureData[idPartial]);
                    id++;
                    idPartial++;
                }
            }
            else
            {
                foreach (var x in joint.Channels)
                {
                    ret.PostureData.Add(vals.PostureData[id]);
                    id++;
                }
            }
        }

        return ret;

    }

    public static string[] GetChildNameList(this Transform t)
    {
        string[] acc = new string[] { t.name };
        for (int c = 0; c < t.childCount; c++)
        {
            string[] addAcc = t.GetChild(c).GetChildNameList();
            acc = acc.Concat(addAcc).ToArray();
        }
        return acc;
    }

}
Using this code, the transfer of partial data becomes comparably easy. We have to provide a list of joint types, e.g.
private List<MJointType> partialList = new List<MJointType>() { MJointType.S1L5Joint, MJointType.T12L1Joint, MJointType.T1T2Joint, MJointType.C4C5Joint, MJointType.HeadJoint, MJointType.HeadTip, MJointType.RightShoulder, MJointType.RightElbow, MJointType.RightWrist };and can utilize this joint list to partialize a pose with the following script before setting the resulting posture:
// Make Partial
simVals = result.Posture.OverwriteWithPartial(simVals.MakePartial(this.partialList));In many cases, we want to ensure a smooth transition from and to our animation. A simple tool for smooth transitions is linear blending. Assuming, there is an underlying animation still running (e.g. idle), we can utilize the blending service to perform the blending operation. For this purpose, the blending service should be set up in the Initialize method:
// Setup Blending Service
blending_service = this.ServiceAccess.PostureBlendingService;
blending_service.Setup(avatarDescription, new Dictionary<string, string>());
Using suitable blending times, e.g.
private float start_percentage = 0.15f;
private float end_percentage = 0.15f;
we can perform the blending operation at the start and the end of our animation cycle inside the Do-Step method.
var simTime = this.animator.GetCurrentAnimatorStateInfo(0).normalizedTime % 1.0f;
if (simTime < this.start_percentage)
{
   var blend_weight = simTime / this.start_percentage;
   result.Posture = this.blending_service.Blend(result.Posture, simVals, blend_weight, new Dictionary<MJointType, double>(), new Dictionary<string, string>());
}
else if (simTime > 1 - this.end_percentage)
{
   var blend_weight = 1 - (1 - simTime) / this.end_percentage;
   result.Posture = this.blending_service.Blend(simVals, result.Posture, blend_weight, new Dictionary<MJointType, double>(), new Dictionary<string, string>());
}
else
{
   result.Posture = simVals;
}
Scaling the blending factor with a better ease function, e.g. using a sine function, an even smoother transition can be achieved.
The complete source code using transition blending and partial motion information can be downloaded as WaveMMU_complete.cs.
Unity uses a state-machine allowing to combine different animation clips and blend trees with simple transitions. Using the animator and additional scripting, simple animation clips can be combined to simulate more complex behavior. For example, we can combine three individual clips waving to the front, left, and right in a blend tree and combine them, depending on the goal direction relative to the current forward-facing direction.
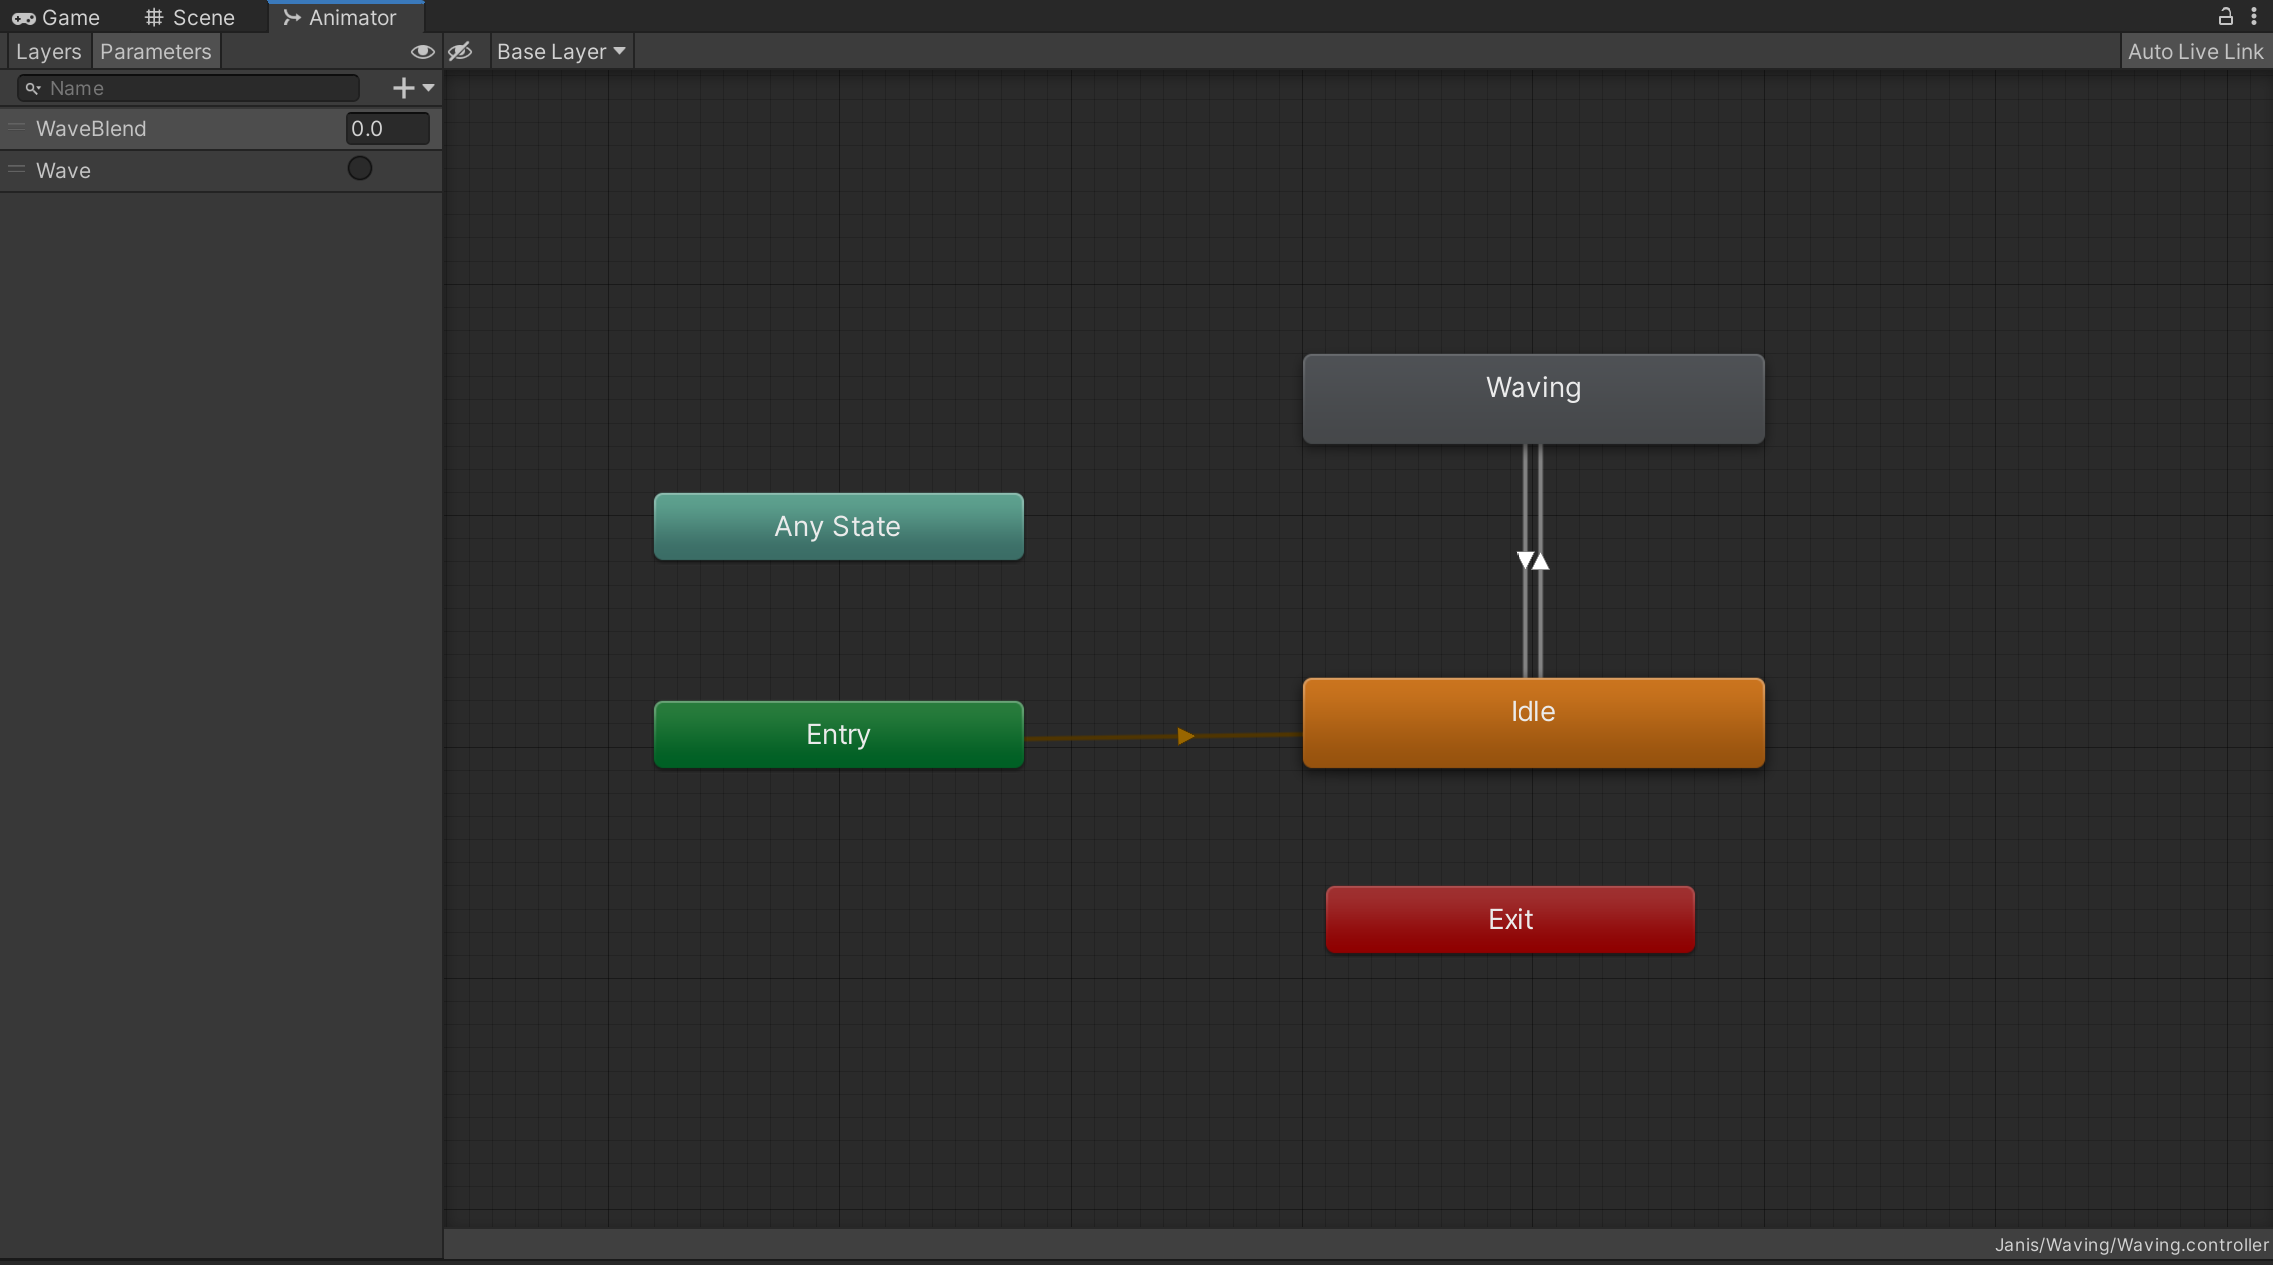
Although you can utilize MMUs to execute simple animation clips, using such standard tools as the Unity Animator Controllers are beneficial in multiple relations:
- it is computationally more efficient
- there is a higher-level of control for the mmu developer
- the combination of animation clips can be visually investigated
- a better MMU can be created, being able to simulate behavior with different goals and in different environments
The resulting MMU would be not only able to replay a single motion capture clip (e.g. wave to the front), but to simulate human behavior based on the environment and the goal (e.g. wave in the direction of any goal position).
Unity Animator Controllers are further described in the Unity Manual
As an example, we created a Waving MMU, which should wave in the direction of a goal in front of the character. For this purpose, three motion capture clips have been capture, post-processed and exported as FBX files. See the section "From MoCap to MMU" in tutorial page for more information. The example assets for the Unity Animator example can be downloaded as a Unity package.
In order to import an FBX to Unity, simply drag and drop it from the windows file explorer to the project tab or use the "Assets" - "Import a new Asset" dialogue from the Unity menu.
After importing, the FBX file will appear as an asset in your Unity project tab. In order for animations to work properly inside the Unity (Mechanim) animation system, please ensure that both, the asset containing the animation and, if used, the asset containing the avatar are set to the humanoid skeleton. For this, select the asset, and select "Humanoid" as the Animation Type. Afterwards, press "Apply".
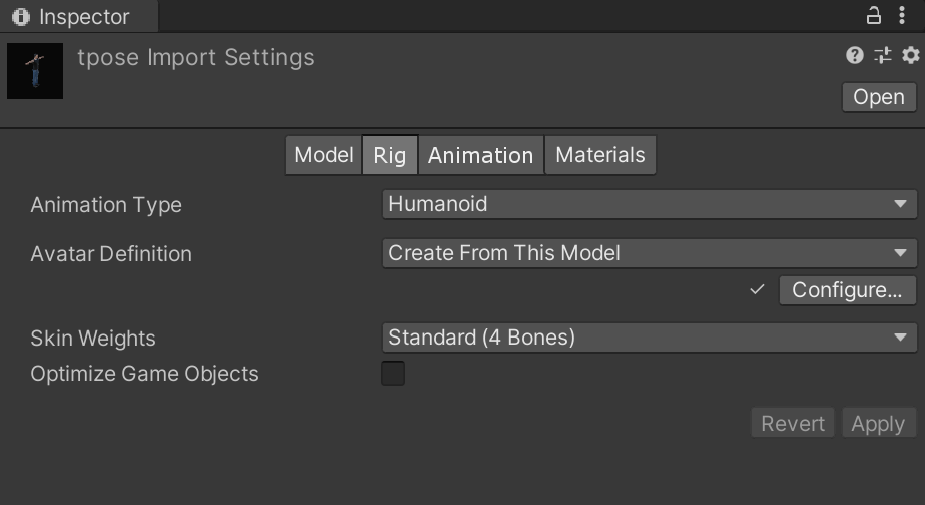
In some cases, e.g. when importing animations from Blender, a single FBX file can contain multiple animations. In order to be able to edit the animations, you can extract them from the asset by selecting an animation, and duplicating it by pressing + or selecting "Edit"-"Duplicate" from the menu. It will create a duplication of the animation outside of the asset, which is editable, can be renamed, cutted, or looped. For more information, please consider the Unity documentation on animation clips.

Root motion will be usually transferred to the main transform of the avatar. If you want to keep the root movement in the animation, please select the "Bake into Pose" option from the inspector window with the animation details. For more information, please consider the Unity Documentation Inside the animation details, looping can be controlled as well.
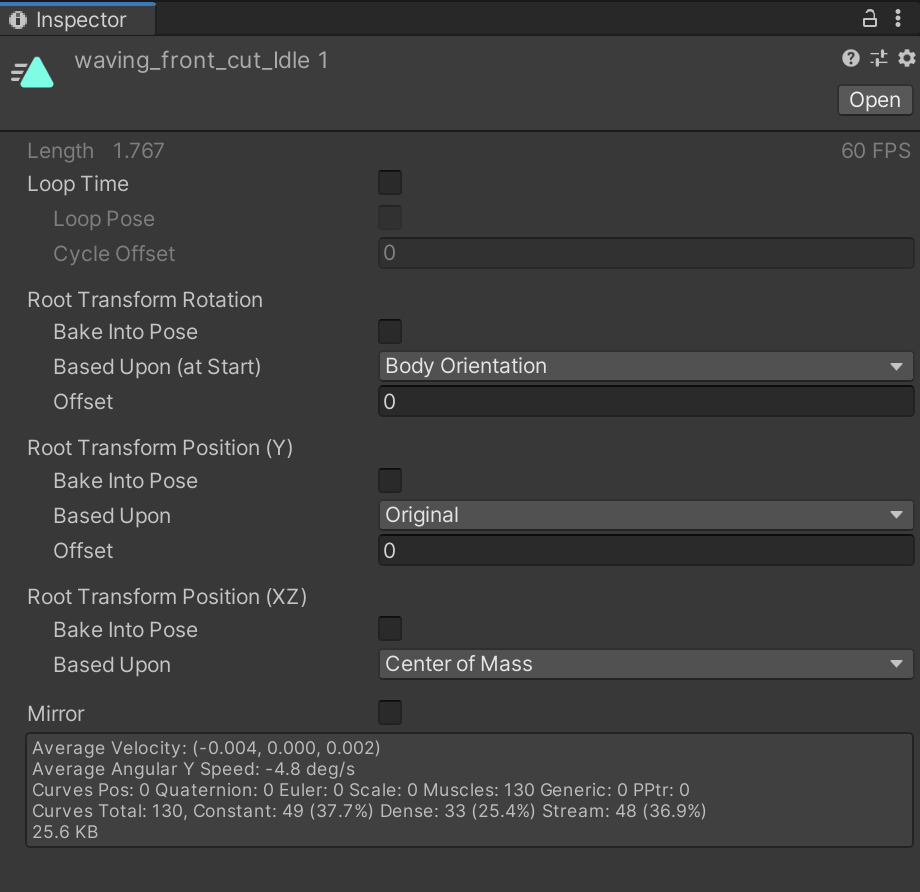
As described above, the animation controller is a state-machine allowing to blend and combine different animation clips. In order to create a new animation controller select the "Assets" - "Create" - "Animation Controller" dialogue either from the Unity menu or by right-clicking into the project folder.
Inside the animation controller, states representing individual animation clips, blend trees, or sub-controllers can be created by right-clicking into the controller graph window. It is possible to add transitions between states by right-clicking on the state and selecting "Make Transition". The inspector displays information about animation states or transitions, depending on the selection in the main window.
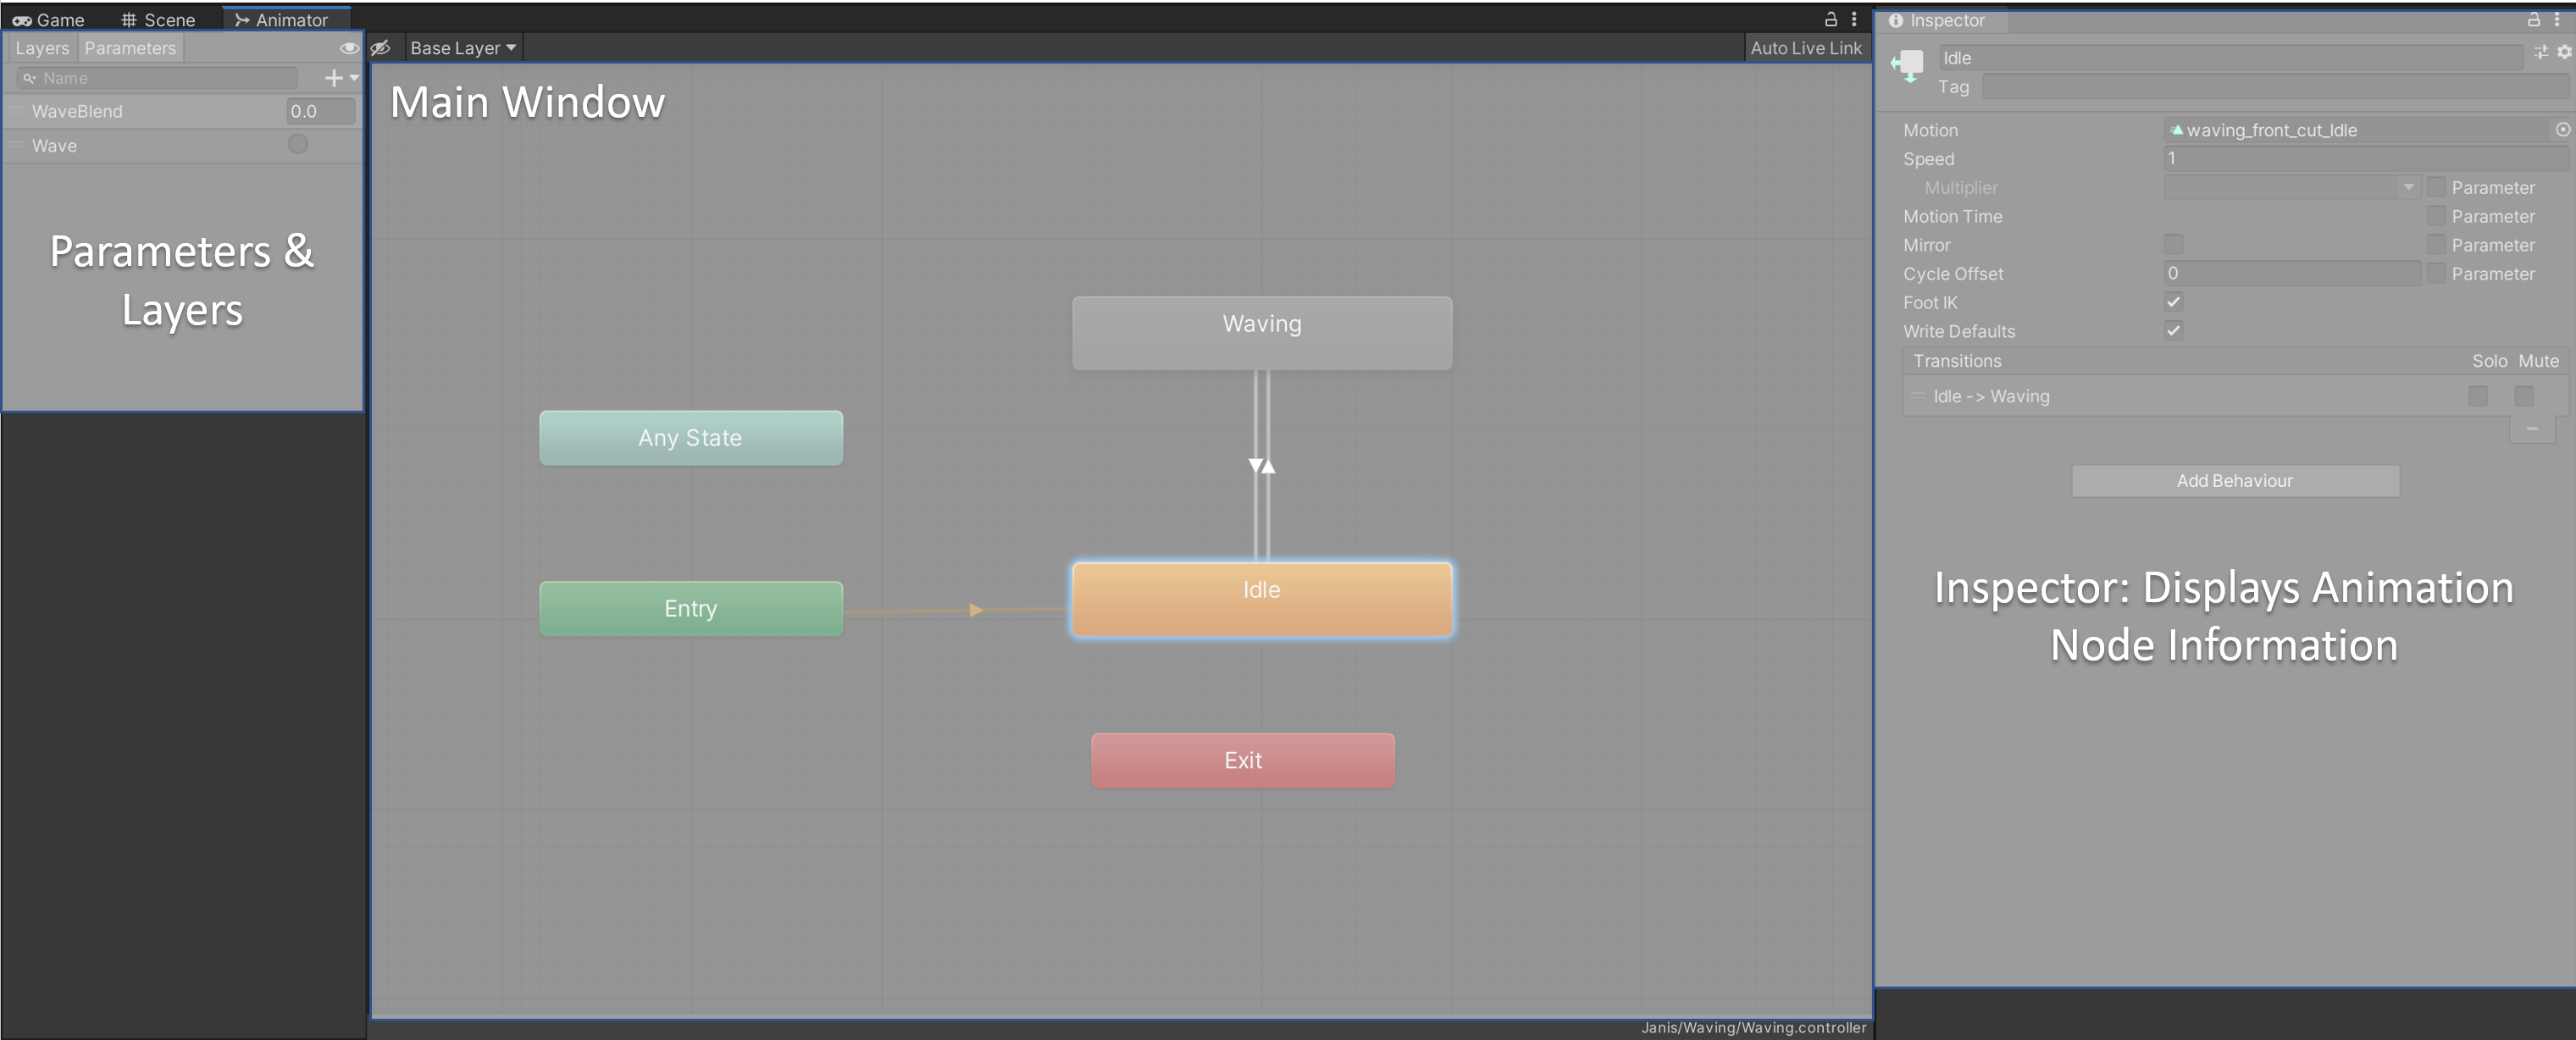
If an animation clip is configured to be looping, the animation state will be constantly active, until a transition condition is true. If the animations are not looping (e.g. in the examples blend-tree), there will be an outgoing transition as soon as the animation is finished. There always has to be a default state defined. This usually is something similar to "idle" animation. Blend trees can be default states as well. The default state is highlighted in orange. If a transition is set to "Has Exit Time", it will perform a linear blending over time to the next animation state. The blending window can be configured. If the flag is not set, there will be no blending and the new animation state will start to play at the next engine update. It is possible to tie transitions to conditions via parameters. It is possible to define float, int, bool and trigger parameters. Trigger parameters can be used to trigger the "start" of an animation type. For the other parameters, conditions can be defined with "greater", "less", "equal" and "nonequal" operations. Parameters can be created left to the main controller window.
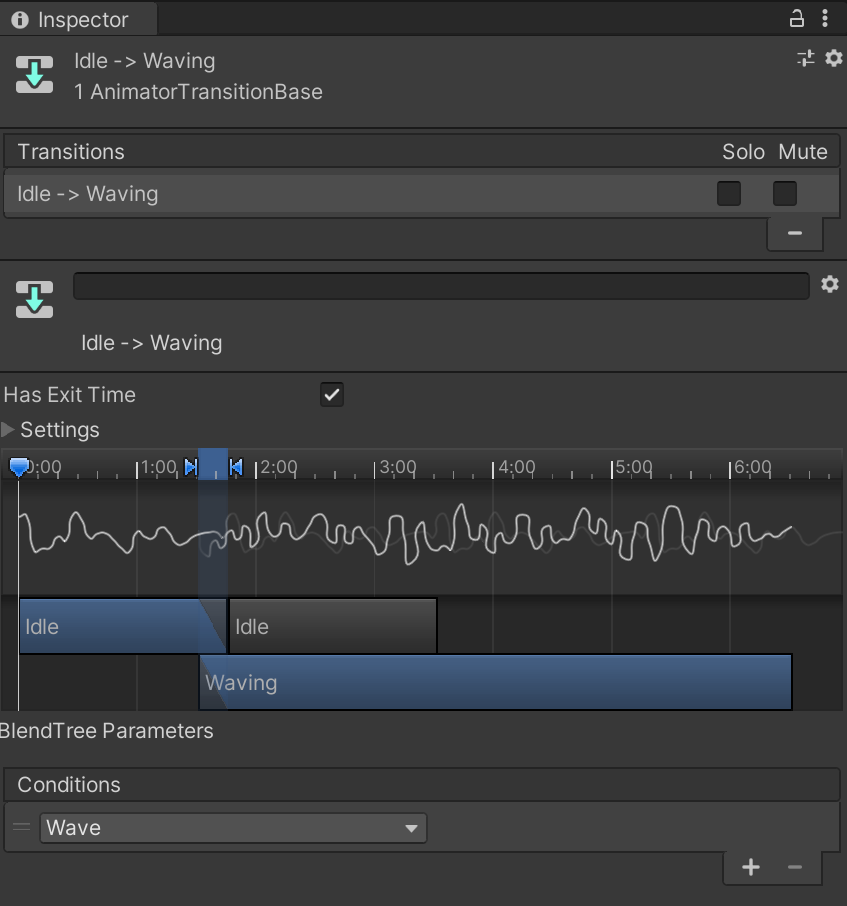
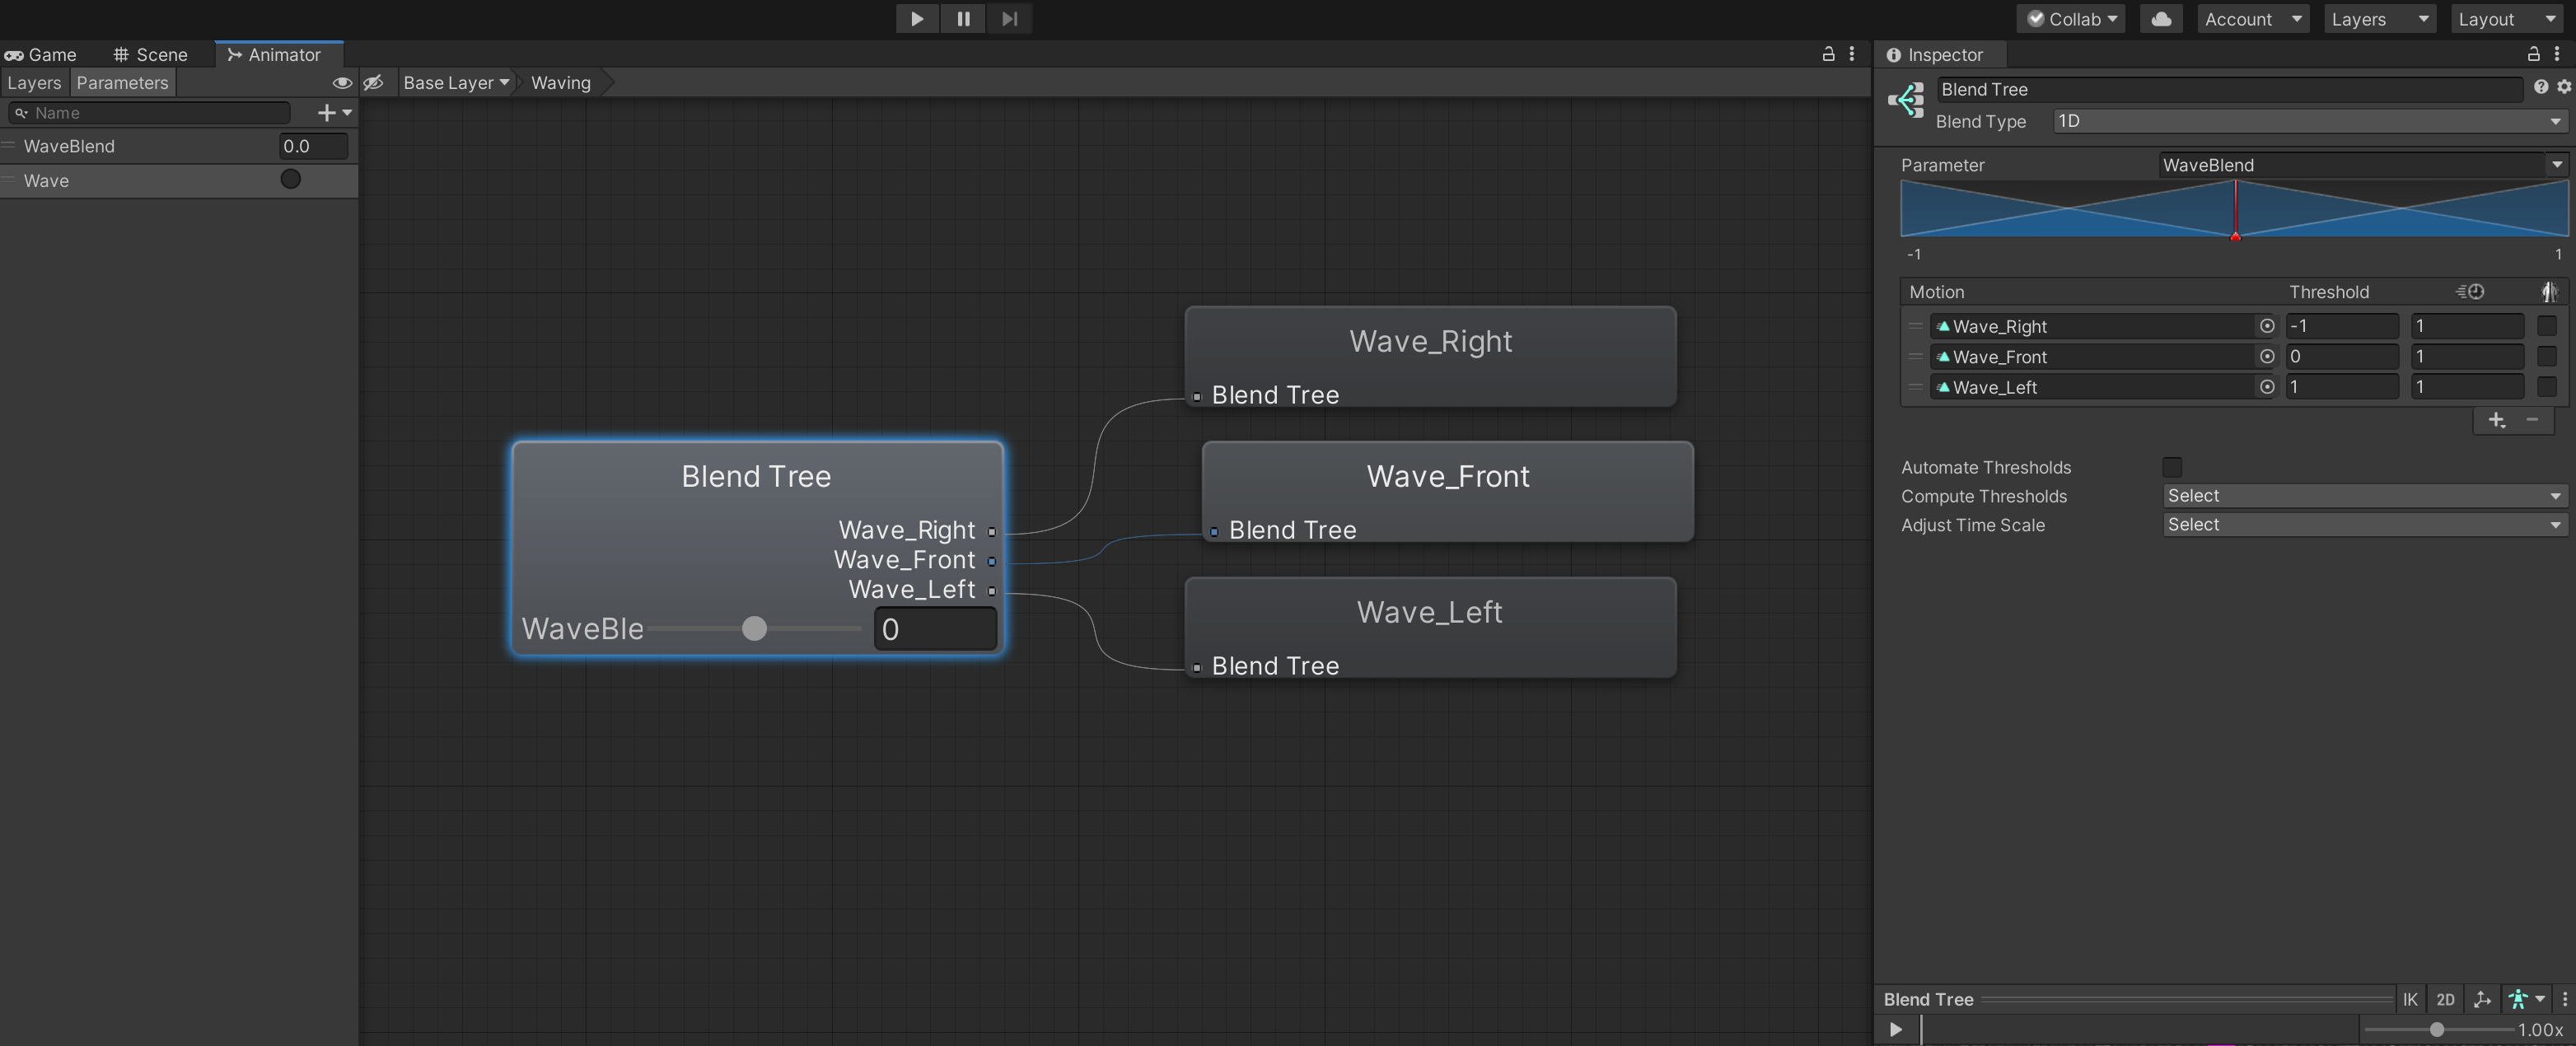
To enter a blend tree, double-click on the blend tree. To exit a blend tree, select the "Base Layer" on the top of the main animator window. There are multiple blending functions, which are described in the Unity documentation on Blend Trees. Here, we will only discuss linear one-dimensional blending. The blend tree was set up to play the front-waving animation at a blending factor of 0, the right-waving at a blending factor of -1 and the left-waving at a blending factor of 1. The blending factor (blend wave) should not be set to values larger than 1 or smaller than -1. Values between 0 and 1 will result in a simple linear blending of the poses of the front-waving and left-waving animations for every frame. In order to set the blending thresholds to specific values, the "Automate thresholds" option must be disabled. Inside the blend tree, there are options to reverse and speed up the animation, as well as mirroring the animation from left-to-right and vice versa. The blending factor will not accommodate for time on its own. If the goal is to simulate acceleration (e.g. transitioning from walking to running), please ensure, that the blending factor is changed smoothly.
To be able to use the animation controller, please ensure that the avatar has an animator component and that the correct animation controller is assigned to the component. Ensure, that the animations are played by selecting "Always Animate" as the culling mode. If "Cull Completely" or "Cull Update Transforms" is selected, the animation might not play if the character is not within the view-frustrum of the game camera. After pressing play, the default animation (in this case "idle") should be displayed on the avatar. In order to transition to other states, a script is required.
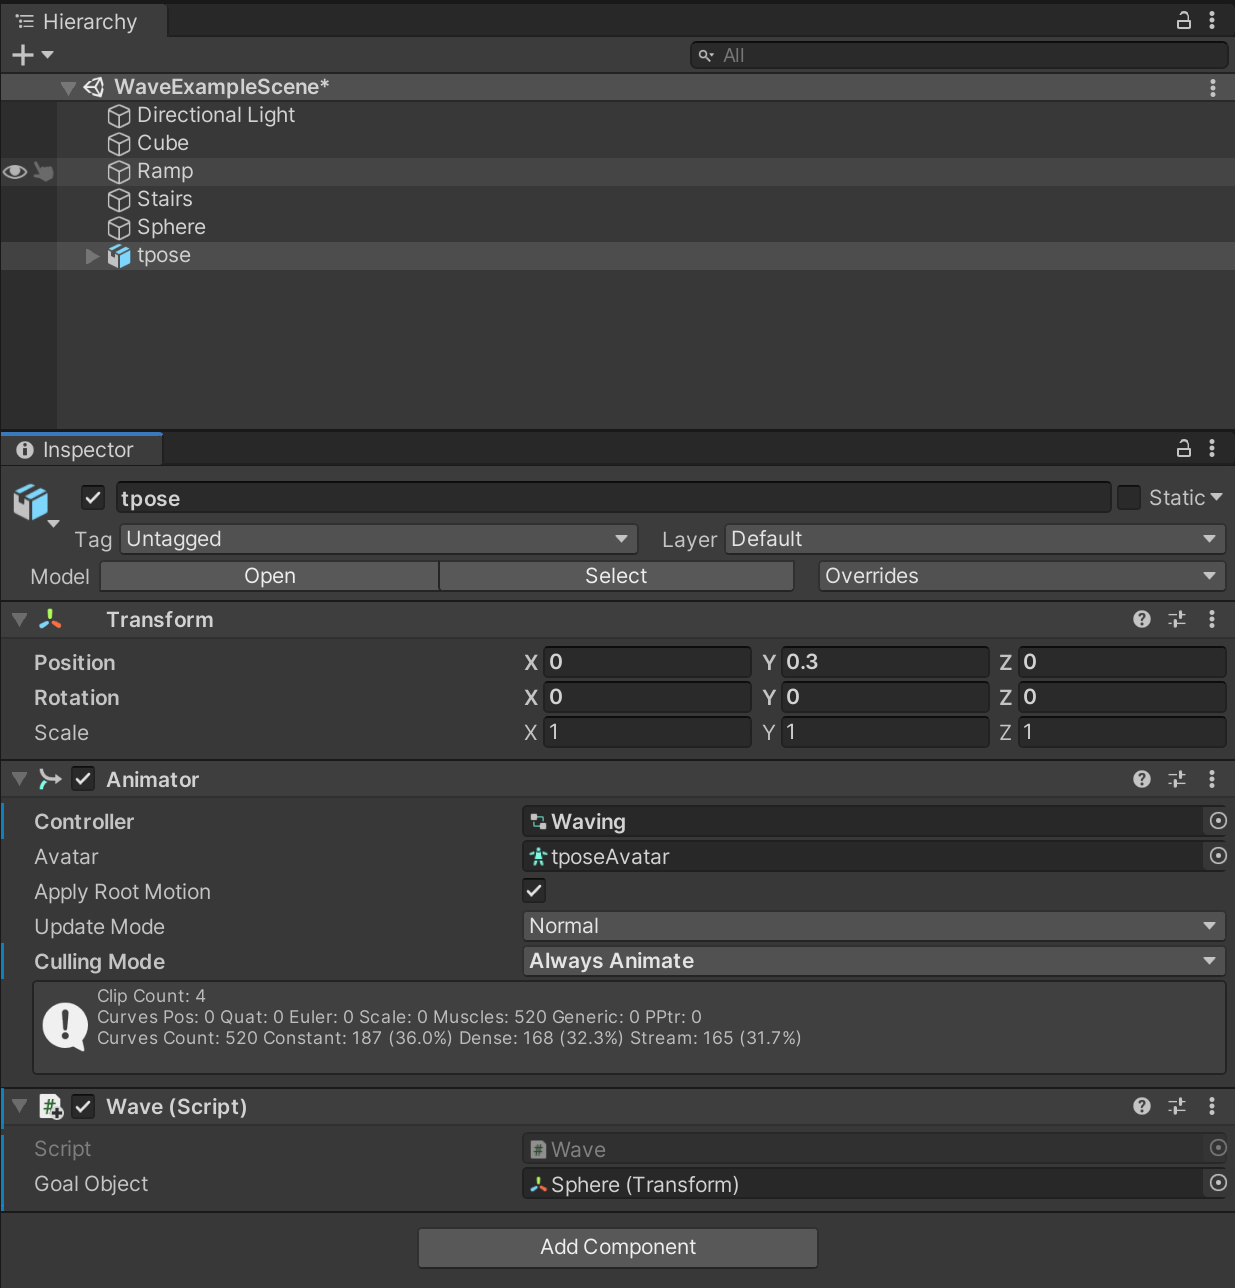
It is recommended, to test animators and their functionality within a single unity instance, before attempting the first integration into the MOSIM Framework, if possible. For this purpose, we created a new MonoBehavior-Script ("Wave"). The Wave class requires two attributes, a reference to the animator component and a placeholder-transform to symbolize the wave-target. This dummy wave-target will be replaced in the final MMU by the target provided by the AssignInstruction method.
    private Animator anim;

    [SerializeField]
    private Transform goalObject;

    // Start is called before the first frame update
    void Start()
    {
        anim = this.GetComponent<Animator>();
    }
In the update method, we want to trigger the wave animation, whenever the user clicks the mouse button. In the final MMU, this code will be placed in the AssignInstruction method to start the animation. In this example, we assume that the MMU will be provided with a goal constraint to wave at. First, we compute the direction to the goal depending on our current transform orientation. After projecting the resulting vector on the ground, we can compute the signed angle relative to our forward-facing direction. By rescaling and clamping to the range of [1-,1], a suitable blending factor is created and assigned.
Parameters defined in the animation controller can be set of the animator instance with "SetFloat", "SetBool", "SetInt", and "SetTrigger. The parameter name is provided as a string. Additionally, the Set-functions provide overloads to dampen and smooth the transition over time, e.g. to enable smooth transitions in cases of acceleration (e.g. transitioning from walking to running).
    void Update()
    {
        if (Input.GetButtonDown("Fire1"))
        {
            var dir = this.transform.TransformDirection(goalObject.position - this.transform.position).normalized;

            dir = Vector3.ProjectOnPlane(dir, Vector3.up).normalized;
            float blendingFactor = Mathf.Clamp(Vector2.SignedAngle(new Vector2(0, 1), new Vector2(dir.x, dir.z)) / 90, -1, 1);

            anim.SetFloat("WaveBlend", blendingFactor);
            anim.SetTrigger("Wave");
        }
For the MMU, it will be important to know when the MMU is finished playing, to be able to determine the right moment to return an end-event. One example of detecting this moment is by querying the current animator state. In case, the "Has Exit Time" toggle was set, the animator state will only change, once the transition blending is completed.
        if (anim.GetCurrentAnimatorStateInfo(0).IsName("Idle"))
        {
            Debug.Log("Idle");
        }
        else if (anim.GetCurrentAnimatorStateInfo(0).IsName("Waving"))
        {
            Debug.Log("Waving");
        }
In order to run the script, add it as a component to the avatar. In addition, the script requires a dummy object. For this purpose, we create, scaled and positioned a sphere in the scene to function as a dummy target object. Once the game is started, the avatar should wave in the direction of the dummy goal when the left mouse button is pressed.
Animation layers can be utilized to blend different animations, e.g. for different body parts. In this case, this functionality is not utilized. For more information on the animation layers, please consider the Unity documentation on animation layers.
When used as a MMU, several options have to be considered. In some cases, it might make sense to combine multiple actions within a single animation controller and expose it to MOSIM framework as a complex MMU. For example, the individual waving animations could have been exposed to the MOSIM framework and a separate custom co-simulator could have combined the animations with linear blending. However, this would have not added any value, hence the animations have been combined within Unity to create a more useful MMU.
In other cases, more fine-grained MMUs to be re-used in different contexts and combined in the co-simulator is more useful. For example, instead of using a locomotion controller to get to the target, a constraint can be imposed to ensure, that the avatar is within a certain distance to the goal. Instead of simulating the arm movement to reach to an object, only the finger animation to grasp the object can be animated.
The "idle" or "default state" in particular can be used in a different way for MOSIM MMUs. In the example above, the Idle animation is redundant, as the MOSIM Idle would have been used to simulate idle behavior within the framework. Hence, the actual animation that is presented is irrelevant and for a MMU, there should be no linear transition between the idle and the waving state. However, the combination of Idle and Waving states allows for an easier control to start and end the animation, as well as the MMU.
Another specific case denotes partial simulation and blending to and from animations within the MOSIM framework. As the pose and underlying animation, the target avatar displays whenever the Wave-MMU is invoked is unknown during development time, it is not possible to use the Unity animation system to enable smooth transitions. At the moment, the co-simulation and transition model considers a hierarchical execution and blending scheme. Hence, the MMU should consider incoming poses and enable a smooth integration.
How to properly integrate the animation to the MOSIM framework, how to enable a smooth transition and how to send partial information is discussed in the section "MMUs in Unity"
Unity animators are well documented. We do recommend the Unity documentation on animation. In addition, there are multiple youtube channels providing excellent tutorials and examples on animation, for example Brackeys and iHeartGameDev.
In order to integrate an existing motion synthesis approach in Python to the MOSIM framework, you require an MMU wrapper implementing the MotionModelInterface. In order to send and receive information, the MOSIM datatypes as defined in thrift have to be utilized. To use the MMU, an example behavior must be defined in the target engine. To utilize the retargeting service, you require a retargeting configuration, to initialize the service.
Unlike the CSharp-based MMUs, there are no dlls to integrate. However, we recommend utilizing the MMIPython pip libraries from the core repository. Unlike the csharp- and unity-based MMUs, the adapter will not search in the file system to load mmus. As different MMUs from different providers will have separate python environments, the MMUs should instantiate their own Adapter. Using the PythonAdapter.start_adapter function, allows to easily start an adapter for a number of MMUs.
For distributing MMUs written in python, please do not forget to provide your own Python environment with all required packages.
We provide an example MMU for streaming BVH file content to the MOSIM Framework in the MOSIM-Python repository under MMUs/ExampleBVH/
The following MMU functions must be implemented. The MMU Interface is defined in the MMU thrift file.
Parameters: MAvatarDescription avatarDescription; Map<string, string> properties
Returns: MBoolResponse
This function gets called when the target engine is started and initializes a new target avatar. The target avatar is described with the avatarDescription. In this function, the MMU can initialize the avatar, adjust the environment based on the target scene and prepare everything for the MMU execution. If there is an error during initialization, the MMU can return a negative response, which will prevent the co-simulator to load.
Parameters: MInstruction motionInstruction; MSimulationState simulationState
Returns: MBoolResponse
In this function, an instruction is assigned. The instruction should contain all required information for the MMU to be executed. In case of IDs, please consider using IDs that are referring to Constraints rather than to scene objects.
The simulationState describes the current state of the simulation, containing the current avatar pose and its constraints.
If the requirements for execution are not met, the MMU can return a negative result.
Parameters: double time; MSimulationState simulationState
Returns: MSimulationResult
DoStep is the central method to simulate poses. It is compatible to the Update function of the Unity game engine and performs a single simulation step for the amount of time in seconds as provided. The simulationState contains the current and initial posture, as well as all active constraints. In this method, the MMU is supposed to calculate the next pose after time elapsed seconds to the previous pose. The previous frames merged posture is contained in simulationState.Initial. The resulting posture should be returned with the simulation result. In this result, you can as well return events, depending on the current state of the simulation. The most important constraint is the "end" constraint, denoting the end of simulation for this MMU, e.g. when the goal is reached. For all constraints, please consider the MMI.thrift file.
The MSimulationState contains two avatar definitions.
- Initial describes the initial MAvatarPosture before any MMU was executed. Usually, it is the last frames posture after merging and applying all constraints.
- Current describes the current MAvatarPosture with all animations from other MMUs applied, which are running in parallel and are executed prior to the current MMU. If no MMU was executed before, it will be equal to the initial posture.
- Constraints describes the list of constraints, which should be enforced currently, this field should be (at least) forwarded to the simulation result.
- SceneManipulations contains all scene manipulations, which are requested by MMUs that are executed prior to this MMU for the current frame. This field should be (at least) forwarded to the simulation result.
- Events contains a list of events, which are sent by MMUs that are executed prior to this MMU for the current frame. This field should be (at least) forwarded to the simulation result.
- Posture contains the avatar posture after applying this MMU in the internal skeleton format.
- Constraints this field contains all constraints combined: constraints from MMUs executed prior to this MMU and constraints enforced by this MMU.
- Events this field contains all events combined: events from MMUs executed prior to this MMU and events evoked by this MMU.
- SceneManipulations this field contains all scene manipulations combined: manipulations requested from MMUs executed prior to this MMU and manipulations requested by this MMU.
- DrawingCalls this field can contain drawing calls from this MMU
When developing MMUs in Python, there are a couple of things to consider.
- Interfaces are defined in the main packages (e.g.
import MMIPython.PythonAdapter as PythonAdapter) - Datatypes are defined in a sub-package .ttpyes (e.g.
from MMIStandard.core.ttypes import MBoolResponse) - Some functions require an "MBoolResponse" return. Returning a boolean here is not sufficient.
- The init method provides scene and service access, which can be used to access further services (e.g.
service_access.GetRetargetingService()) - The init method can be utilized to load data (e.g. load the neural network, the motion database, etc.)
- In the initialize, the avatar description of the target avatar is provided
- Initialize your own skeleton and a scaling function here. The retargeting service does not solve scaling issues
- In the AssignInstruction method, an instruction object is provided
- Use the instruction to prepare motion synthesis, e.g. setting the current position, planning paths, etc.
- This is the core simulation loop
- create new frames and send them to the framework
- At least copy the simulation state to the result:
simres = MSimulationResult()
simres.Posture = simulationState.Current
simres.Events = simulationState.Events
simres.SceneManipulations = simulationState.SceneManipulations
simres.Constraints = simulationState.ConstraintsMOSIM Documentation
About MOSIM:
Tutorials
Development