-
Notifications
You must be signed in to change notification settings - Fork 15
EditLabels Tutorial
EditLabels is useful for hand editing labels from applying an extraction annotator. A data directory and a labels file created by running ApplyAnnotator with an ExtractionAnnotator are needed. To see how to create an ExtractionAnnotator, look at the TrainExtractor Tutorial. To see how to apply the annotator to a dataset, look at the ApplyAnnotator Tutorial. The extracted type (such as extracted_name) and the true type (such as true_name) also must be known.
For this example, we will use a name annotator and apply it to a directory of data. For a quick reference, here are the commands to do that:
$ java –Xmx500M edu.cmu.minorthird.ui.TrainExtractor –labels sample1.train –spanType trueName –saveAs sample1.annand
$ java –Xmx500M edu.cmu.minorthird.ui.ApplyAnnotator –labels DATA_DIR –loadFRom sample1.ann –saveAs sample1.labelsNote: For this example the user must create their own data directory with whatever files they would like. I created a simple data directory with one document that contains this simple text:
Did <trueName>Andrew Carnegie</trueName> found Carnegie Tech?
Feel free to create the same sample or use the annotator on another directory to run through this example.
To run EditLabels, start with:
$ java –Xmx500M edu.cmu.minorthird.ui.EditLabelsLike all UI tasks, all the parameters for EditLabels may be specified in either the GUI or by the command line. To use the GUI, simple type –gui on the command line. It is also possible to mix and match where the parameters are specified; for example, one can specify two parameters on the command line and use the GUI to select the rest. For this reason, the step-by-step process for this experiment will first explain how to select a parameter value in the GUI and then how to set the same parameter on the command line.
Note: in this experiment every parameter must be specified.
If you are using the GUI, click the Edit button next to EditLabels to edit the parameters. A Property Editor window will appear:

-
baseParameters: - GUI: enter the name of the data directory in the
labelsFilenametext field. - Command Line: Use the
–labelsoption followed by the repository key or the directory of files to load. For this tutorial specify–labels DATA_DIR. -
editParameters: - GUI:
-
editFilename: enter the name of the labels file (the result of the ApplyAnnotator experiment), in this casesample1.labels. -
extractedType: enter the type thatApplyAnnotatorpredicted. Note: this type is set inTrainExtractorusing the–outputoption and the default is_prediction. -
trueType: enter the name of the type that has been hand labeled, in this casetrueName. - Command Line:
- Use the
–editoption to specify the name of the labels file (the result of theApplyAnnotatorexperiment), in this case–edit sample1.labels. - Use the
–extractedTypeoption to specify what typeApplyAnnotatorpredicted. Note: this type is set inTrainExtractorusing the–outputoption and the default is_prediction. In this case do-extractedType _prediction. - Use the
–trueTypeoption to specify the correct hand label, in this case do-trueType trueName.
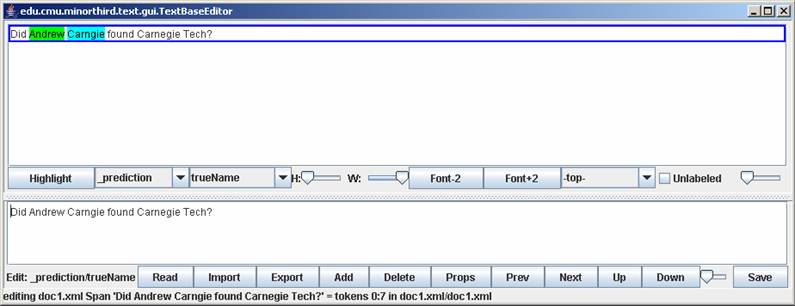
At this point, press enter on the command line or click OK in the Property Editor in the GUI and press Start Task. A window like this will appear:
