-
Notifications
You must be signed in to change notification settings - Fork 15
Classify Package Tutorial
The classification package is for using MinorThird for general classification and categorization tasks - the input does not have to be text data. All you need is a class label and a list of features for each data point. For example, consider this data for whether to play tennis or not:

The example above is a sample of simple (non-sequential) data. b indicates that class labels are binary (i.e., it can only be POS or NEG). For multi-class (k-ary) data, use k instead of b.
The classify package can also evaluate sequential data. For example, to make the dataset above sequential, you may want to consider whether or not you played tennis the day before. In this case, you can list the dataset in sequences with a * between each sequence. For example:
b week1 NEG sunny humid temp=85
b week1 POS sunny humid temp=90
*
b week2 POS sunny dry temp=76
b week2 NEG sunny humid temp=80
...
IMPORTANT: to load a sequential dataset, you must specify the –type seq option before the –data option on the command line.
You can train a classifier on given data:
$ java edu.cmu.minorthird.classify.Train –data simpleClassifyData.train –saveAs simpleClassify.annNote: to see what other options you have, to using the –help option.
The output should look like this:

Notice that there are no results since this is just training.
To test the trained classifier on given data:
$ java edu.cmu.minorthird.classify.UI –type seq –op test –data sub_sig.test –classifierFile sub_sig_class.evalTo run an experiment in the GUI, first type the command:
$ java –Xmx500M edu.cmu.minorthird.classify.UI –guiWhen the window appears, click the Edit button under Parameter Modification. This will make the Property Editor window appear. The _operation: field for the property editor should be set to trainTest, so you will want to change it to train:

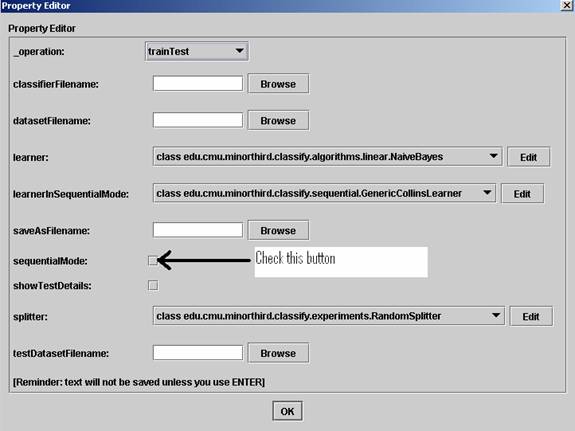
Once again, make sure that you check the sequentialMode checkbox before specifying your dataset if your data is sequential. Remember, the data will not load if you do not check this button before specifying your data. Next specify the datasetFilename by clicking the Browse button next to the datasetFilename field and selecting your data file.
These next fields have defaults, but can be changed:
-
learner- You can specify the learner for this experiment by clicking on the pull down menu next tolearnerInSequentialMode, NOT next tolearner. Since this is a sequential experiment, only the learner from thelearnerInSequentialModemenu will be used. -
splitter- Specify the splitter by choosing one from the pull down menu next tosplitter. You can change any of the splitter options by clicking theEditbutton to the right of the pull down menu.
Now since this is a training experiment, you want to save the learned classifier so you can use it on future test data. To save your classifier, type what you would like to name the file with a .eval extension in saveAsFilename text field. For example, you can save your classifier in a file named myClassifier.eval. You do NOT need to specify the testDatasetFilename since this is only a training experiment.
Click OK to save these parameters, and click the Start Task button to start the experiment. When the experiment finishes you will notice that there are no results since this is only a training experiment. Your learned classifier will be saved in your current directory.
If a GUI window is not currently open, first type the command:
$ java –Xmx500M edu.cmu.minorthird.classify.UI –guiWhen the window appears, click the Edit button under Parameter Modification. This will make the Property Editor window appear. The _operation: field for the property editor should be set to trainTest or train, so you will want to change it to test.
Next you need to specify your classifier file name. To do this click the Browse button next to the classifierFilename text field and find the .eval file which you saved your classifier as.
Once again, make sure that you check the sequentialMode checkbox before specifying your dataset if your data is sequential. Remember, the data will not load if you do not check this box before specifying your data. Next specify the datasetFilename by clicking the Browse button next to the datasetFilename field and selecting your data file.
Click the OK button to save these parameter and click the Start Task button to run the experiment.
To learn what options are available from the command line type:
$ java –Xmx500M edu.cmu.minorthird.classify.UI –helpLets first try running a classification experiment on a sequential dataset. When using a sequential dataset, it is important to use the –seq option so that the program can properly process the data. Make sure the –seq option is declared before the dataset.
To run an experiment, type:
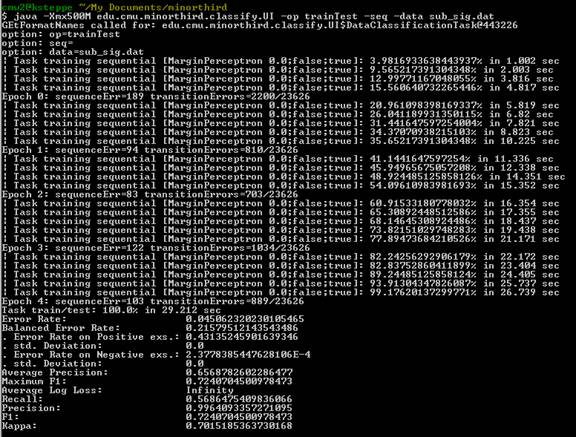
$ java –Xmx500M edu.cmu.minorthird.classify.UI –op trainTest –seq –data sub_sig.dataNote: If you get a java.lang.reflect.InvocationTargetException it probably means that you did not specify the –seq option before the dataset.
The output of the program should look like this:

To run an experiment in the GUI, first type the command:
$ java –Xmx500M edu.cmu.minorthird.classify.UI –guiWhen the window appears, click the Edit button under Parameter Modification. This will make the Property Editor window appear. The _operation: field for the property editor should already be set to trainTest, which is what you want for this experiment. The next very important step is the check the sequentialMode checkbox towards the bottom of the window. If this button is not checked, you will not be able to properly load your data.

Note: if the data is taking a long time to load, the sequentialMode box is most likely inappropriately checked. Try closing the window and trying again.
Next specify the datasetFilename by clicking the Browse button next to the text field. Find the directory where you saved the file, select the file, and click Open.
These next fields have defaults, but can be changed:
-
learner- You can specify the learner for this experiment by clicking on the pull down menu next tolearnerInSequentialMode, NOT next tolearner. Since this is a sequential experiment, only the learner from thelearnerInSequentialModemenu will be used. -
splitter- Specify the splitter by choosing one from the pull down menu next tosplitter. You can change any of the splitter options by clicking theEditbutton to the right of the pull down menu.
Click the OK button to close the Property Editor and press the Start Task button to begin the experiment.