Tutorial #1: Setup
Credit goes to Christopher Buecheler for his April 2018 version of The Dead-Simple Step-By-Step Guide for Front-End Developers to Getting Up and Running With Node.JS, Express, and MongoDB - the content below is his text and content tweaked in places for Scoutradioz specifics.
The (Updated) Dead-Simple Step-By-Step Guide for Front-End Developers to Getting Up and Running With Node.JS, Express, and MongoDB
Set up the full stack and have a webpage running in 30 minutes. Make it talk to your DB in another 30.
If you check out the original page above, Chris got us to having a web project up and running which uses Node.JS, the Express framework, the Pug HTML pre-processor (which used to be called Jade), and MongoDB for data - it can read to and write from the DB. From there, the sky's the limit.
We're going to show you how to get all of this stuff set up. We're lightly assuming that you're a front-end developer who knows HTML5/CSS3/JavaScript well enough that we don't have to explain those. If that's you, then this should be a solid primer.
Your app will look pretty, it will connect to a DB, it'll get some results, and it'll do stuff with those results. Then for kicks we'll also make it save data to the DB. Through it all, Chris will explain what the code does, and how to write it, instead of just giving you massive functions to stare at. We'll go from nothing even installed, to a DB-driven web app written in a language you fully understand, and the foundation necessary to build additional functionality into your app. And we'll do it in about 60 minutes of installation and coding time.
Note: While the setup steps described here are oriented for Windows, this entire workflow can be installed on Linux. The setup process is similar on Linux. (If you'd like us to include steps for Linux in the tutorial, let us know by creating an Issue.)
Software to download & install (if you don't already have them):
- Visual Studio Code (IDE): https://code.visualstudio.com
- Git: https://git-scm.com/downloads
- MongoDB Community Server: https://www.mongodb.com/try/download/community
- MongoDB Database Tools: https://www.mongodb.com/try/download/database-tools (Select the "zip" option.)
- NodeJS: https://nodejs.org/en/ (Download LTS version)
Recently, on Windows 10 machines, the default security policy is such that scripts are not allowed to execute. If this is the case on your computer, you will need to change that policy. Not to worry, it is simple.
First, to check what your current security policy is, open PowerShell and enter the following command:
Get-ExecutionPolicy -listIf it returns something like the following, where the only defined policy is Restricted, you will need to change the policy to allow remote signed scripts.
        Scope ExecutionPolicy
        ----- ---------------
MachinePolicy       Undefined
   UserPolicy       Undefined
      Process       Undefined
  CurrentUser       Undefined
 LocalMachine      Restricted
To do so, in PowerShell, enter the following, then press Y when prompted:
Set-ExecutionPolicy RemoteSigned -Scope CurrentUserYou may need to do this as administrator if it gives you an error. After it is successfully changed, scripts will be able to run on your system.
If you're really starting from scratch, then getting everything up and running takes a little bit of time. None of it is difficult. Chris ran Windows 10 on his main machine, so it'll be slightly different for those on a Mac or Ubuntu or other *nix system, but it's principally the same thing in all cases.
This is really easy. Hit the Node.js website (see above) and click the big green Install button for the LTS (long-term-stable) version. It'll detect your OS and give you the appropriate installer. Run the installer. That's it, you have installed Node.js and, equally important, NPM—Node Package Manager — which lets you add all kinds of great stuff to Node quickly and easily.
Find (or make) a folder someplace on your device in which to store your many Node projects. Chris used C:\Node in his original tutorial, but it can in any filesystem which you can write to (although, it's better if it's local and not a remote filesystem).
- Open a command prompt
- Locate (or create) the directory in which you wish to keep your Node apps (for the purposes of this tutorial, C:\node)
- cd to that directory
Once we have Node running, we need the rest of the stuff we're going to actually use to create a working website. To do that we're going to install Express, which is a framework that takes Node from a barebones application and turns it into something that behaves more like the web servers we're all used to working with (and actually quite a bit more than that). We need to start with Express-Generator, which is actually different than Express itself ... it's a scaffolding app that creates a skeleton for express-driven sites.
In your command prompt (e.g., at C:\node>), type the following:
npm install -g express-generatorThe generator should auto-install, and since it (like all packages installed with -g) lives in your master NPM installation directory, it should already be available in your system path.
While we're here, also install nodemon:
npm install -g nodemonNow, let's use our generator to create the scaffolding for a website.
We're going to use Express and Pug, but not the Stylus CSS preprocessor (which people often use in this stack). We're just going to use straight CSS for right now. We have to use Pug or another templating engine to gain access to our Node/Express-based data. Pug's not hard to learn if you already know HTML, just remember that you really have to pay attention to indentation or things will go badly wrong.
A quick note on indentation: everything is this tutorial has been normalized to 2-space indents. If you want to use four spaces, or actual tabs, that's just fine by me. But, again, YOUR INDENTATION MUST BE CONSISTENT or Pug will throw errors. Not just "all tabs" or "all spaces" but you must be very, very careful to make sure that everything is indented the exact right amount. For example, in Pug, the following:
body
  h1
  ul
    li
... is VERY different from:
body
  h1
    ul
      li
(that second piece of code would nest the UL inside of the H1 ... which you obviously don't want).
Anyway, still in c:\node or wherever you're storing your node apps, type this (change "tutorial" to a different project name if you want):
express tutorialNote: If you get an error saying that running scripts is disabled on your system, check part 0a above.
Hit enter and watch it go. You'll see something like this:
C:\node>express tutorial
   create : tutorial\
   create : tutorial\public\
   create : tutorial\public\javascripts\
   create : tutorial\public\images\
   create : tutorial\public\stylesheets\
   create : tutorial\public\stylesheets\style.css
   create : tutorial\routes\
   create : tutorial\routes\index.js
   create : tutorial\routes\users.js
   create : tutorial\views\
   create : tutorial\views\error.jade
   create : tutorial\views\index.jade
   create : tutorial\views\layout.jade
   create : tutorial\app.js
   create : tutorial\package.json
   create : tutorial\bin\
   create : tutorial\bin\www

   change directory:
     > cd tutorial

   install dependencies:
     > npm install

   run the app:
> SET DEBUG=tutorial:* & npm startOK, now we have some basic structure in there, but we're not quite done. You'll note that the express-generator routine created a file called package.json in your tutorial (or whatever you named it) directory. Open this up in a text editor and it'll look like this:
{
  "name": "tutorial",
  "version": "0.0.0",
  "private": true,
  "scripts": {
    "start": "node ./bin/www"
  },
  "dependencies": {
    "cookie-parser": "~1.4.3",
    "debug": "~2.6.9",
    "express": "~4.16.0",
    "http-errors": "~1.6.2",
    "jade": "~1.11.0",
    "morgan": "~1.9.0"
  }
}
This is a basic JSON file describing our app and its dependencies. We need to add a few things to it. Specifically, calls for MongoDB and Monk. Let's make our dependencies object look like this:
This is a basic JSON file describing our app and its dependencies. We need to add several things to it to match the Scoutradioz workflow. Some will be used now, and some will be introduced later.
"dependencies": {
    "@firstteam102/http-errors": "^1.0.2",
    "@firstteam102/monk-fork": "^0.0.2",
    "@firstteam102/scoutradioz-utilities": "^1.0.49",
    "bcryptjs": "^2.4.3",
    "body-parser": "^1.19.0",
    "colors": "^1.4.0",
    "cookie-parser": "^1.4.5",
    "dotenv": "^8.2.0",
    "express": "^4.17.1",
    "express-async-handler": "^1.1.4",
    "express-session": "^1.17.1",
    "express-useragent": "^1.0.15",
    "log4js": "^6.3.0",
    "mongodb": "^3.6.6",
    "passport": "^0.4.1",
    "passport-local": "^1.0.0",
    "pug": "^3.0.2",
    "serve-favicon": "^2.5.0"
}
Note that this file needs to be valid JSON, or your app won't install, so make sure you have commas after every entry except the final one.
For the curious, here is a short explanation of each dependency.
- @firstteam102/http-errors: This is a small module that allows for specific HTTP errors to be thrown from within routes.
- @firstteam102/monk-fork: This is a fork of the Monk database API which utilizes a more up-to-date version of MongoDB.
- @firstteam102/scoutradioz-utilities: This is our own database utilities package which provides a cleaner and easier way of creating database requests (with additional logging and caching).
- bcryptjs: This is used for hashing passwords.
- body-parser: This package makes it easy to get the contents of HTTP requests.
- colors: Allows colorful logging (not necessary, but a nice-to-have feature)
- cookie-parser: Allows us to view and edit cookies.
- dotenv: Allows for configuration files
- express: This is the framework that our entire app uses!
- express-async-handler: Utility that lets us catch errors inside async functions. You'll learn what that means later.
- express-useragent: Helps us see the useragent of who connects to our website.
- express-session, passport, and passport-local: We use the three of these for user sign-in and sessions.
- log4js: A debug logger utility. We use log4js instead of Morgan.
- pug: This is our view engine, which renders HTML.
- serve-favicon: This package improves performance when the user requests a favicon.
Now, because we changed our dependencies, there are a few things we need to change from the template to get our app to work.
Don't worry about exactly what you're writing just yet. We'll go into detail in Part 2.
First, replace the line var createError = require('http-errors'); with var e = require('@firstteam102/http-errors');. This variable "e" contains a few constructors that generate Error objects with status codes.
Next, as we use log4js instead of Morgan, you can remove the line var logger = require('morgan');. Then, replace it with this bit of code: (Don't worry about the specifics. What it does is create a formatting configuration that makes it easier to differentiate what script/route the log message came from.)
C:\node\tutorial\app.js
var log4js = require('log4js');

//log4js config
var log4jsConfig = {
    appenders: { out: { type: 'stdout', layout: {
        type: 'pattern',
        //Non-colored pattern layout (default)
        pattern: '[%x{tier}] [%p] %c.%x{funcName} - %m',
        tokens: {
            'tier': logEvent => {
                if (process.env.ALIAS) return process.env.ALIAS;
                else return 'LOCAL|' + process.env.TIER;
            },
            'funcName': logEvent => {
                if (logEvent.context && logEvent.context.funcName) {
                    return logEvent.context.funcName;
                }
                else return '';
            },
        },
    } } },
    categories: { default: { appenders: ['out'], level: 'info' } }
};
if( process.env.COLORIZE_LOGS == 'true'){
    //Colored pattern layout
    log4jsConfig.appenders.out.layout.pattern = '%[[%d{hh:mm:ss}] [%x{tier}] [%p] %c.%x{funcName} - %]%m';
}
log4js.configure(log4jsConfig);
Next, where it says app.set('view engine', 'jade');, we need to rename 'jade' with 'pug'. Long story short, Jade had to rename themselves to Pug due to a trademark issue. That is why we had to rename jade to pug in our package.json.
Next, you can remove the line app.use(logger('dev'));. This line was for Morgan; log4js is used differently.
Lastly, within the app.use statement below the comment about catching 404 errors, replace next(createError(404)); with next(new e.NotFoundError());.
Now, because of the aforementioned rename from jade to pug, we'll need to open the "views" subfolder and rename all of the .jade files to .pug. Inside your views subfolder, you should then have error.pug, index.pug, and layout.pug.
Now we've defined our dependencies and we're ready to go. Note that the version numbers for those two modules are current as of the latest update, but new versions of NPM modules are frequently rolled out. These versions are proven to work with this tutorial; if you go with the latest versions, I'm afraid you're on your own.
Return to your command prompt, cd to your tutorial directory, and type this:
npm install
That will read the JSON file we just edited and install all the stuff listed in the dependencies object (yes, including Express – we installed the generator globally, but we still have to install the actual module inside this one particular project).
Once NPM has run its course, you should have a node_modules directory which contains all of our dependencies for this tutorial. You can ignore the two warnings the install process generates. They're not an issue for this tutorial.
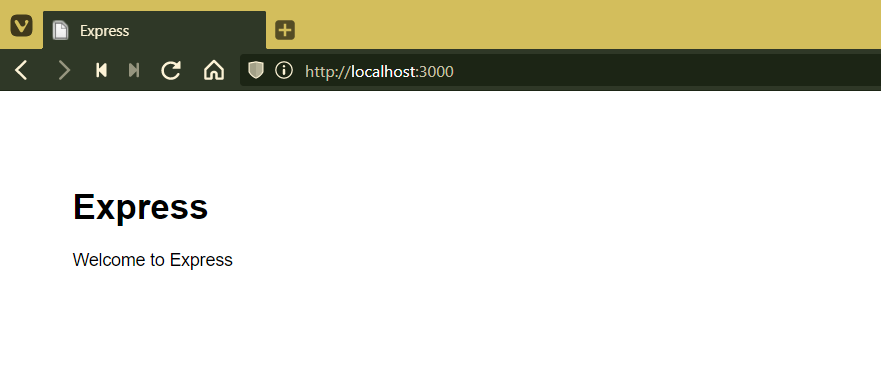
You now have a fully-functioning app ready and waiting to run, so let's test out our web server! Type the following:
npm start
Hit enter, and you'll get this:
> [email protected] start D:\sites\node\tutorial
> node ./bin/www
Everything working? Awesome! Open a browser and head for http://localhost:3000 where you will see a welcome to Express page.
You are now running your own Node JS webserver, with the Express engine and Pug HTML preprocessor installed. Not so tough, huh?
On the next page we will be creating our Hello World - but first, let's get the database installed.
When you run the MongoDB Community installer, there will be a few settings you might not be sure of. Let's go through it step by step:
- On the welcome page, hit Next.
- After reading the EULA, click Accept and Next.
- Where it gives you the option to either install Complete or Custom, select Complete.
- Now, it'll ask you to install MongoD as a service. As we're just setting up a development environment, we won't want to do that. Uncheck "Install MongoD as a Service" and hit Next.
- Now, it'll ask you to install Compass, which is a handy GUI-based browser for Mongo. We'd recommend installing it.
- Finally, proceed with the installation.
In order to run the MongoDB server and client from the command line, you will need to add it to your system PATH. In the Windows search bar, type "environment variables". Click the option titled "Edit the system environment variables". In the dialog that opens, click "Environment Variables".
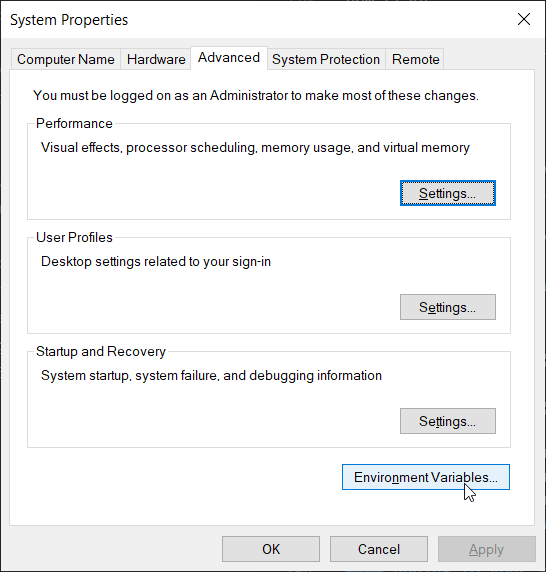
Next, find where it says "Path" and double click on it.

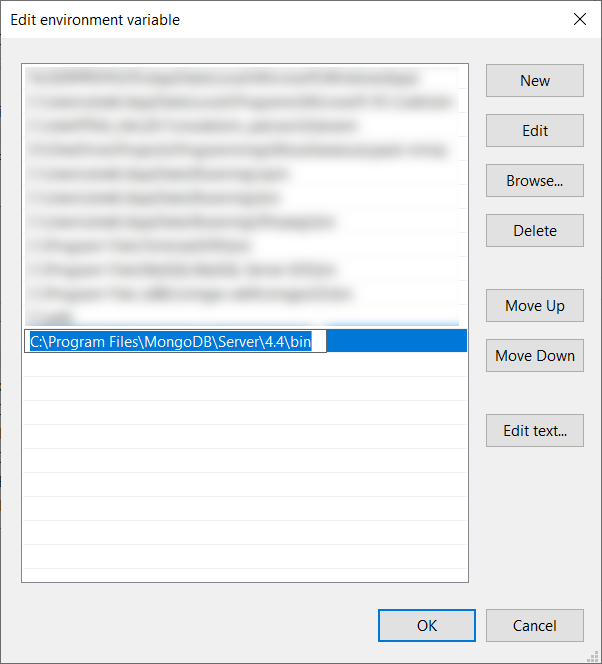
Here is a list of all the folders in your system PATH. By adding your MongoDB install filepath here, you'll be able to run its commands from any terminal. Click "New", and paste in the filepath to mongod.exe - Most likely, it will be C:\Program Files\MongoDB\Server\4.4\bin.
Recently, they stopped including database tools with the MongoDB Community Server installer, so you'll need to install them separately. Open the MongoDB Database Tools zip file that you downloaded. Navigate to mongodb-database-tools-windows-(version)/bin. You should see mongodump.exe and mongoexport.exe, among others. Select all the files in there and click Copy. In a new File Explorer window, navigate to your MongoDB Server install directory (it's the filepath you just added to your system PATH). Now, paste into the same place that contains mongod.exe and others. Now, you will be able to use the MongoDB database tools such as mongodump from any terminal as well!
Now that we've gotten everything set up, it's time to make a "Hello World"! Go to Tutorial #2: Hello World to proceed.