-
Notifications
You must be signed in to change notification settings - Fork 28
Getting started

If you have any problems or questions please see the Troubleshooting page or chat at Gitter.
In Visual Studio create a WPF-Application project named XamlCSSTestApp.
Search for XamlCSS.WPF in NuGet Package Manager and install the newest version.
Caution
On XamlCSS 2.1.0 and lower, ensure that the version of AngleSharp is the exact version stated on nuget!
Call XamlCSS.WPF.Css.Initialize() in your startup code, before the first usage of stylesheets.
If you use the ResourceDictionary in App.xaml, you must place the Initialize(...) call before the InitializeComponent() call.
App.xaml.cs
using System.Windows;
using XamlCSS.WPF;

namespace XamlCSSTestApp
{
    public partial class App : Application
    {
        public App()
        {
            Css.Initialize();

            InitializeComponent();
        }
    }
}Add an xml-namespace css to your xaml-file refering to XamlCSS namespace.
In the resource-dictionary create a stylesheet with the key inlineStyle. Inside it initialize the property Content, which takes a css-string.
Use
xml:space="preserve"to prevent the xaml-parser from removing your line-breaks. Use<!CDATA[ ]>to avoid having to convert characters like&to xml-encoded entities like&. The parser will read your css a-is without looking for special characters.
Now add your css-style.
In the following sample all selectors are commented so you can read what they're meaning. We also use a control-template for button to support setting the hover and pressed background-colors with property-triggers.
<Application x:Class="XamlCSSTestApp.App"
             xmlns="http://schemas.microsoft.com/winfx/2006/xaml/presentation"
             xmlns:x="http://schemas.microsoft.com/winfx/2006/xaml"
             xmlns:local="clr-namespace:XamlCSSTestApp"
             xmlns:css="clr-namespace:XamlCSS;assembly=XamlCSS"
             StartupUri="MainWindow.xaml">
    <Application.Resources>
    <ResourceDictionary>
    <!-- for styling button's mouse over color -->
    <ControlTemplate x:Key="buttonTemplate" TargetType="{x:Type Button}">
        <Border Background="{TemplateBinding Background}" BorderBrush="{TemplateBinding BorderBrush}" BorderThickness="1">
            <ContentPresenter HorizontalAlignment="Center" VerticalAlignment="Center" />
        </Border>
    </ControlTemplate>
    <css:StyleSheet x:Key="inlineStyle" xml:space="preserve">
        <css:StyleSheet.Content>
          <![CDATA[
/* declare some variables */
$background-color: #333;
$foreground-color: #fff;

$important-bg-color: #9c1ab2;
$important-color: #e7abf1;

$control-color: #666;
$control-hover-color: #999;

$font-color: #ddd;
$control-height: 32;

/* for all elements that are "important" */
.important
{
    Background: $important-bg-color;
}

/* for all elements that
    - are jumbo elements OR
    - are Runs directly under a jumbo-element (workaround a bug in WPF designer if TextBlock is initialized not as attribute but as xml-node-content)
*/
.jumbo,
.jumbo>Run {
    FontSize: $control-height;
}

/* for all elements that are navigation-buttons (means a container of navigation buttons) */
.navigation-buttons {
    Background: #222;
    Orientation: Horizontal;
    FlowDirection: RightToLeft;
    Grid.Row: 1;

    /* for all Buttons somewhere down in a navigation-buttons container */
    Button {
        Margin: 5, 5, 5, 5;

        /* for all Buttons following a Button in side a navigation-buttons container */
        &~Button {
            Margin: 0, 5, 5, 5;
        }
    }
}

/* for all Grids */
Grid {
    Background: $background-color;
}

/* for all StackPanels */
StackPanel {
    Spacing: 10;
    Background: $background-color;
    SnapsToDevicePixels: true;

    /* for all TextBlocks somewhere down in an StackPanel */
    TextBlock {
        Foreground: $font-color;
    }
}

/* for all TextBlocks */
TextBlock
{
    Padding: 5;
    UseLayoutRounding: true;

    /* for all TextBlocks that are important */
    &.important {
        Background: $important-bg-color;
        Foreground: $important-color;
        TextAlignment: Center;
    }
}

/* for all Buttons */
Button
{
    Height: $control-height;
    MinWidth: 150;
    Foreground: $foreground-color;
    Background: $control-color;
    Template: #StaticResource buttonTemplate; /* using a control template in a resource dictioanry */
    Cursor: Hand;

    /* when IsMouseOver property is true, then...*/
    @Property IsMouseOver true {
        Background: $control-hover-color;
    }

    /* when IsPressed property is true, then...*/
    @Property IsPressed true {
        Background: #333;
        Foreground: #fff;
    }


    &.important {
        Foreground: #fff;
        FontWeight: Bold;

        /* when IsMouseOver property is true, then...*/
        @Property IsMouseOver true {
            Background: #bc2ac2;
        }

        /* when IsPressed property is true, then...*/
        @Property IsPressed true {
            Background: $important-bg-color;
        }
    }
}

]]>
        </css:StyleSheet.Content>
      </css:StyleSheet>
    </ResourceDictionary>
  </Application.Resources>
</Application>Add an xml-namespace cssWPF to your xaml-file refering to XamlCSS.WPF namespace.
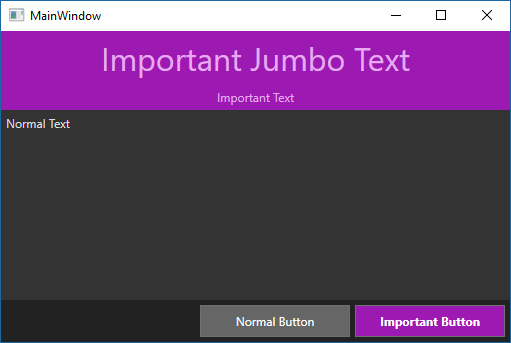
Use the stylesheet by setting the property cssWPF:Css.StyleSheet to the stylesheet defined in App.xaml called inlineStyle. Now the stylesheet applies the matching styles to all elements.
Current Limitation
Currently only one element can have a stylesheet attached throughcssWPF:Css.StyleSheet. If you want to use an application style on many windows, you have to create a new stylesheet on each window which imports the application stylesheet (@import "inlineStyle";). As it breaks live preview, the following sample ommits that.
<Window x:Class="XamlCSSTestApp.MainWindow"
        xmlns="http://schemas.microsoft.com/winfx/2006/xaml/presentation"
        xmlns:x="http://schemas.microsoft.com/winfx/2006/xaml"
        xmlns:d="http://schemas.microsoft.com/expression/blend/2008"
        xmlns:mc="http://schemas.openxmlformats.org/markup-compatibility/2006"
        xmlns:local="clr-namespace:XamlCSSTestApp"
        xmlns:css="clr-namespace:XamlCSS;assembly=XamlCSS"
        xmlns:cssWPF="clr-namespace:XamlCSS.WPF;assembly=XamlCSS.WPF"
        mc:Ignorable="d"
        Title="MainWindow" Height="350" Width="525"
        cssWPF:Css.StyleSheet="{StaticResource inlineStyle}"
        >
    <Grid>
        <Grid.RowDefinitions>
            <RowDefinition Height="*"/>
            <RowDefinition Height="Auto"/>
        </Grid.RowDefinitions>
        <StackPanel>
            <TextBlock cssWPF:Css.Class="important jumbo" Text="Important Jumbo Text" />
            <TextBlock cssWPF:Css.Class="important" Text="Important Text" />
            <TextBlock Text="Normal Text" />
        </StackPanel>
        <StackPanel cssWPF:Css.Class="navigation-buttons">
            <Button cssWPF:Css.Class="important">Important Button</Button>
            <Button>Normal Button</Button>
        </StackPanel>
    </Grid>
</Window>Defining styles in xaml as a resource allows you to use Visual Studio's WPF-Designer which updates live to show how your style looks. Visual Studio also allows you to run your app in debugger, edit your style and see the results in your live running application.