申明:本文章内容仅用作学习。
作为一名技术开发人员,我们有时候需要去国外网站去查询一些资料,所以需要我的设备能够使用virtual private network。 为了寻求一个稳定,性价比高的方案,我会选择去搬瓦工买一个vps服务器。由于只是查查学习资料,所以我一般会买一个低配置的vps服务器,一年大约50美元,折合人民币300多元,完全满足我个人的需求。
可以用支付宝支付,购买成功后,系统安装为CentOS
好多人选择v2ray来搭建自己的virtual private network,我们可以使用大神编写的脚本在已购买的服务器上一键安装v2ray。
https://www.itblogcn.com/article/406.html
基本一路回车,使用默认配置就行,新手的话建议关闭防火墙,打开防火墙可能导致服务器无法访问。
v2ray安装成功后配置信息(建议备份,以后备用):
..由于你的 VPS 内核支持开启 BBR ...已经为你启用 BBR 优化....
---------- V2Ray 配置信息 -------------
地址 (Address) = 45.62.XXX.XXX
端口 (Port) = 8888
用户ID (User ID / UUID) = faa0616b-45cf-4786-9162-ae8bdXXXXX
额外ID (Alter Id) = 0
传输协议 (Network) = tcp
伪装类型 (header type) = none
---------- END -------------
V2Ray 客户端使用教程: https://git.io/v2ray-client
提示: 输入 v2ray url 可生成 vmess URL 链接 / 输入 v2ray qr 可生成二维码链接
免被墙..推荐使用JMS: https://www.itblogcn.com/article/1012.html
该脚本已自动关闭防火墙...
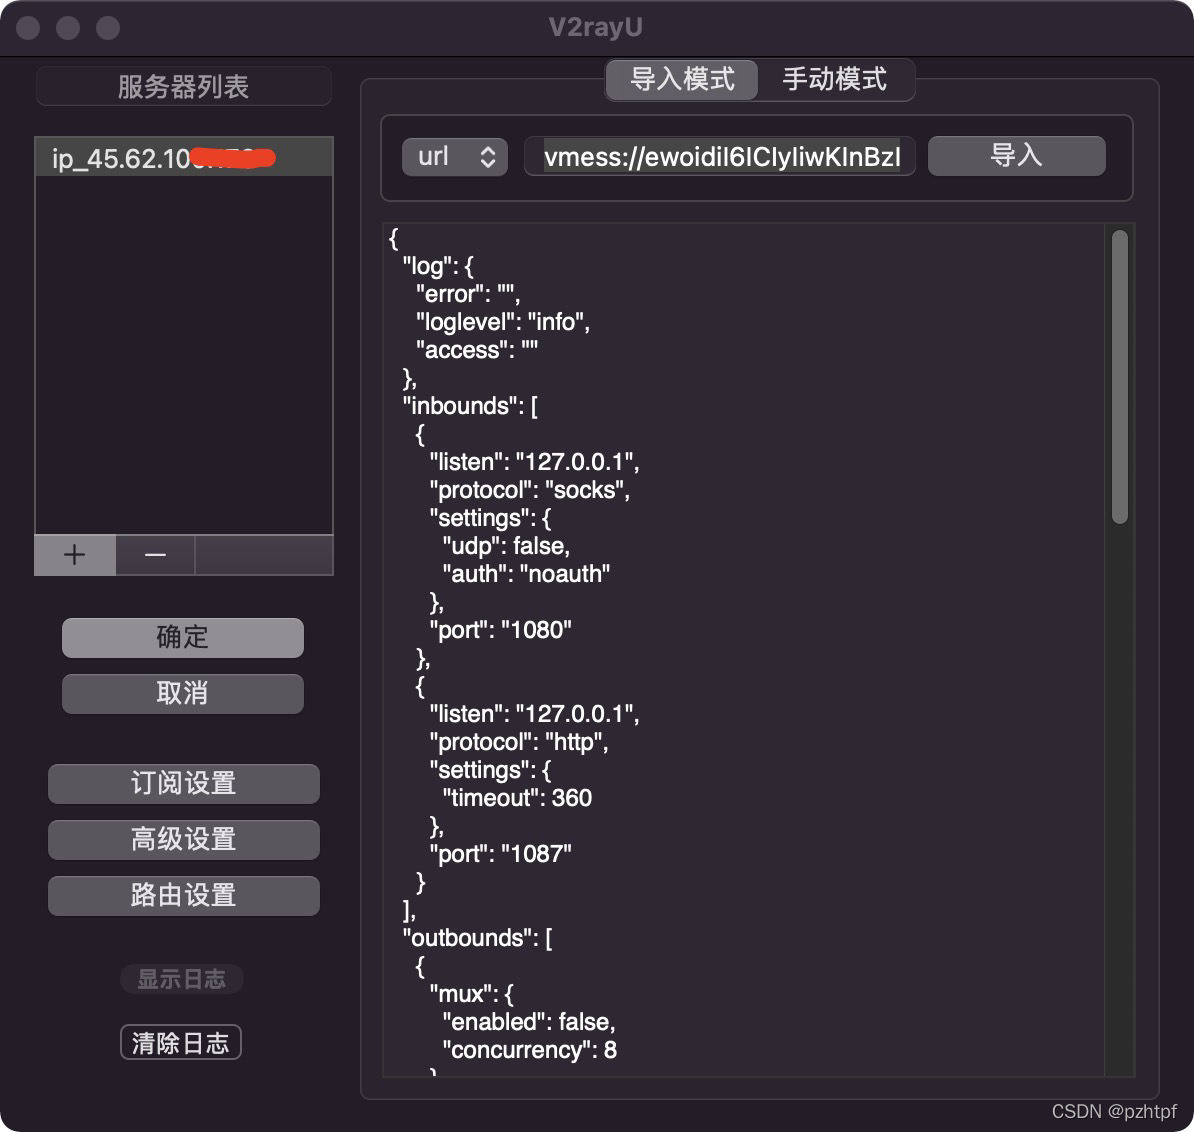
---------- V2Ray vmess URL / V2RayNG v0.4.1+ / V2RayN v2.1+ / 仅适合部分客户端 -------------
vmess://ewoidiI6ICIyIiwKInBzIjogImlwXzQ1LjYyLjEwMC4xNzYiLAoiYWRkIjogIjQ1LjYyLjEwMC4xNzYiLAoicG9ydCI6ICI4ODg4IiwKImlkIjogImZhYTA2MTZiLTQ1Y2YtNDc4Ni05MTYyLWFlOGJkM2QxNjNiNCIsCiJhaWQiOiAiMCIsCiJuZXQiOiAidGNwIiwKInR5cGUiOiAibm9uZSIsCiJob3N0IjogIiIsCiJwYXRoIjogIiIsCiXXXXXXXX==
- 地址,端口,用户ID,额外ID 可用于v2ray 客户端手动配置。
- vmess URL 可用于v2ray 客户端一键导入配置。
在macOS上,我用的v2ray客户端是V2rayU,大家可自行搜索下载。
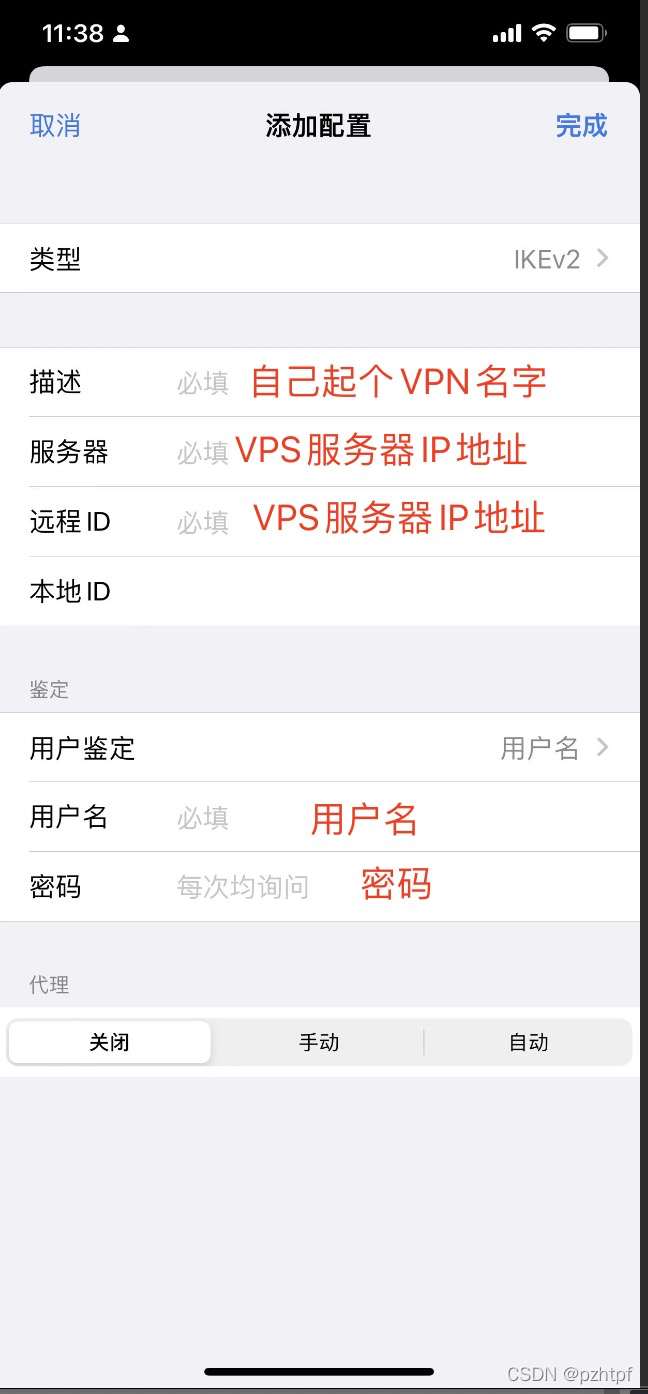
我们打开iOS手机的设置-VPN-添加VPN配置,在添加配置中可以看到有三种类型,也就是说我们的服务端支持三种类型中的某一种配置才可以成功。那我们选择第一种IKEv2
一键安装,有需要输入的,使用默认值即可。 建议关闭防火墙,不然可能导致无法访问。 如果购买的搬瓦工的VPS服务器,VPS类型选择KVM。 建议使用本地终端,用SSH命令链接VPS服务器, 去执行安装脚本,
经本人测试搬瓦工VPS自带的命令终端,要不执行脚本超时,要不无法处理用户输入。
证书的话使用脚本默认配置的就行,有必要的话可以用scp命令将生成的证书复制到本地。如果只是配置iOS端的VPN ,可以不需要证书,我们可以使用用户名/密码验证的方式。
# [Install Complete]
# Version:1.2.0
# There is the default login info of your IPSec/IkeV2 VPN Service
# UserName: myXXXXXX
# PassWord: myXXXXXX
# PSK: myPSKkey
# you should change default username and password in /usr/local/etc/ipsec.secrets
# you cert: //my_key/ca.cert.pem
# you must copy the cert to the client and install it.
安装成功后保存UserName和PassWord, 默认生成的证书看自己的需求需不需要复制到本地。
建议改掉默认的用户名和密码。
然后打开连接,可以测试服务有没有搭建成功。这里一定要保证VPN搭建成功,并可用。确保服务端没问题,后续我们就可以集中精力去开发iOS客户端。
如果你只是想搭建Mac端或者iOS端的 virtual private network,后续内容可以不必看。但是你是一个iOS开发者,想开发一款VPN软件,那么则继续往下阅读。
接下来我们使用NetworkExtension框架简单开发一个VPN软件。文末附有源码链接。
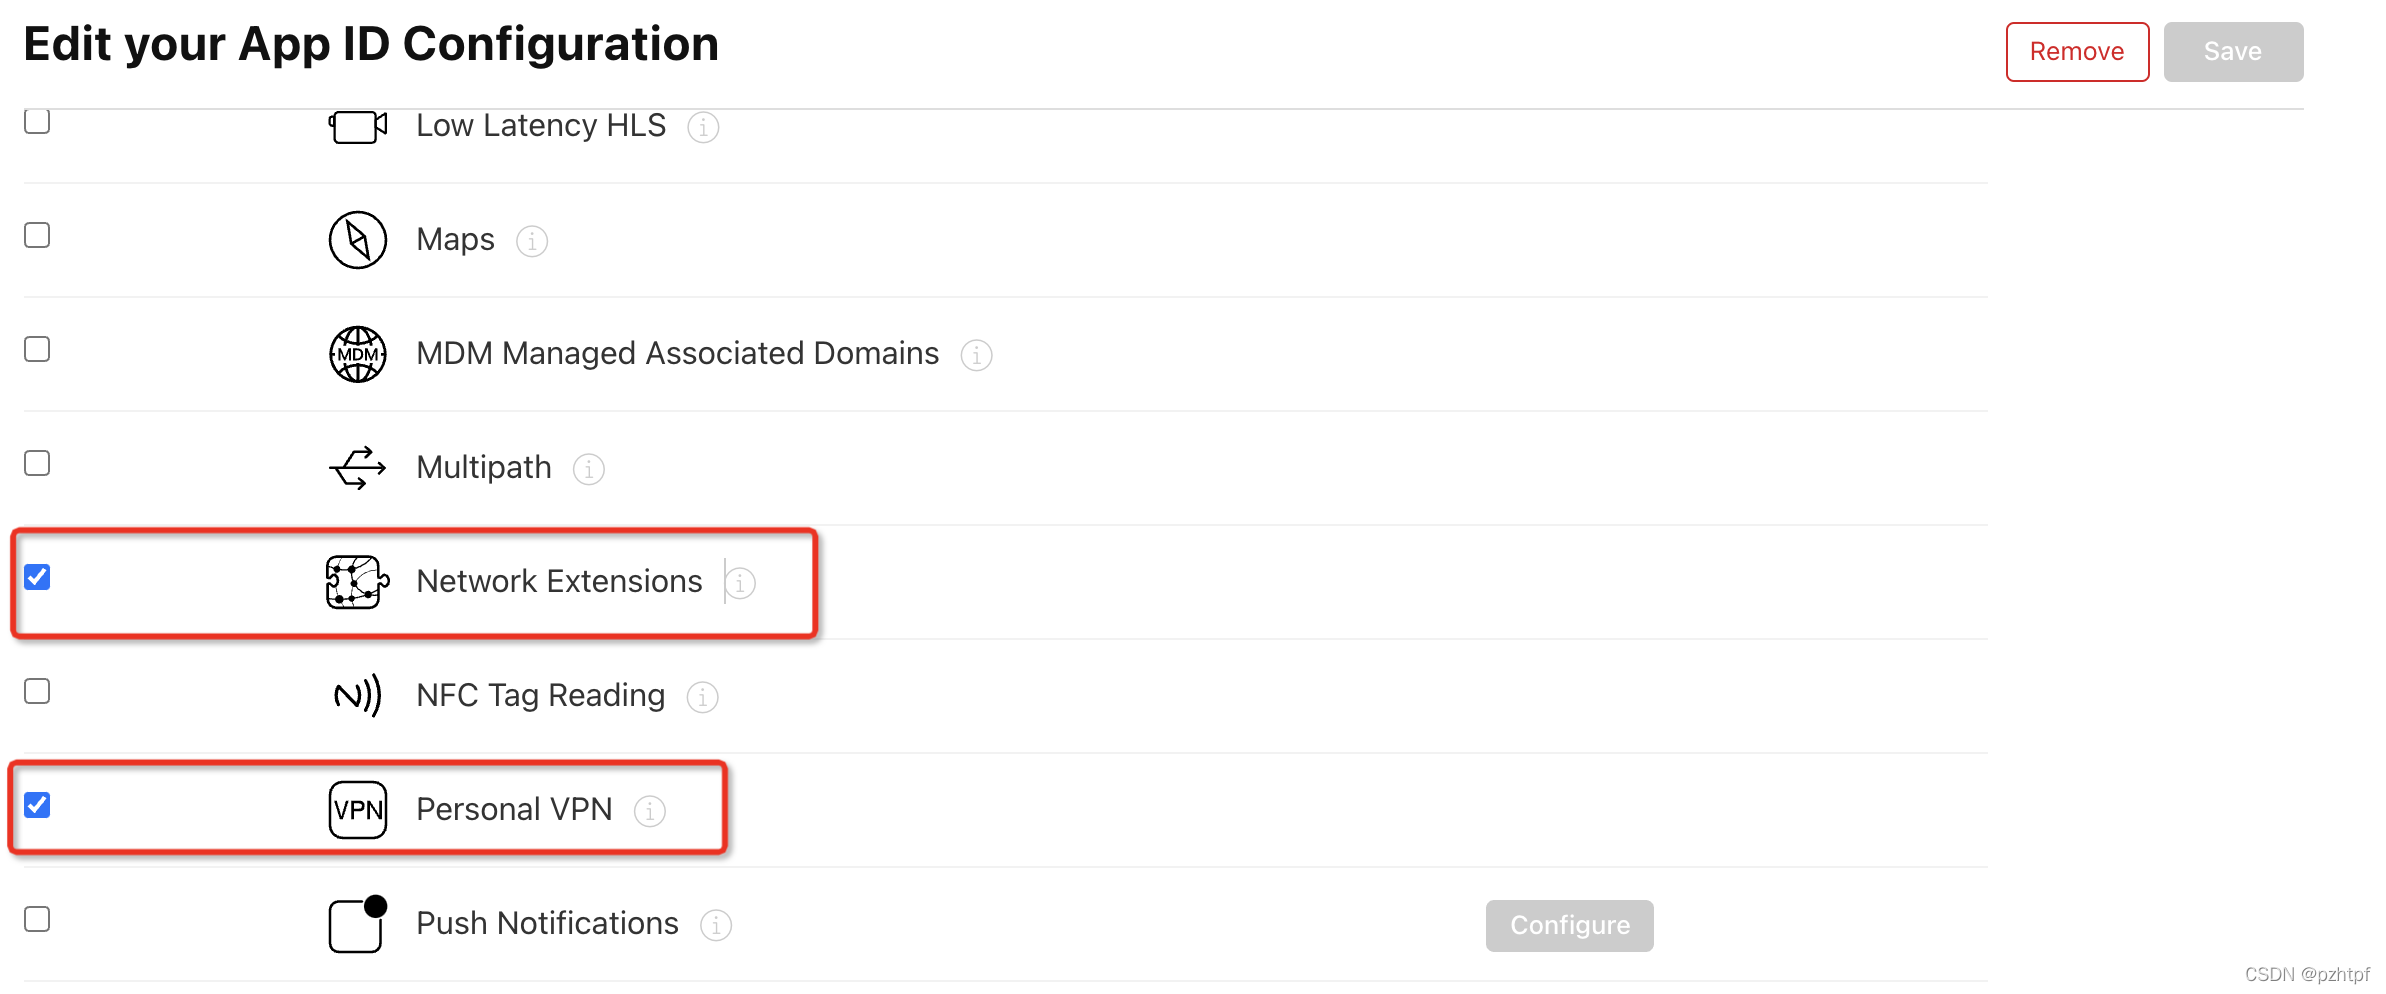
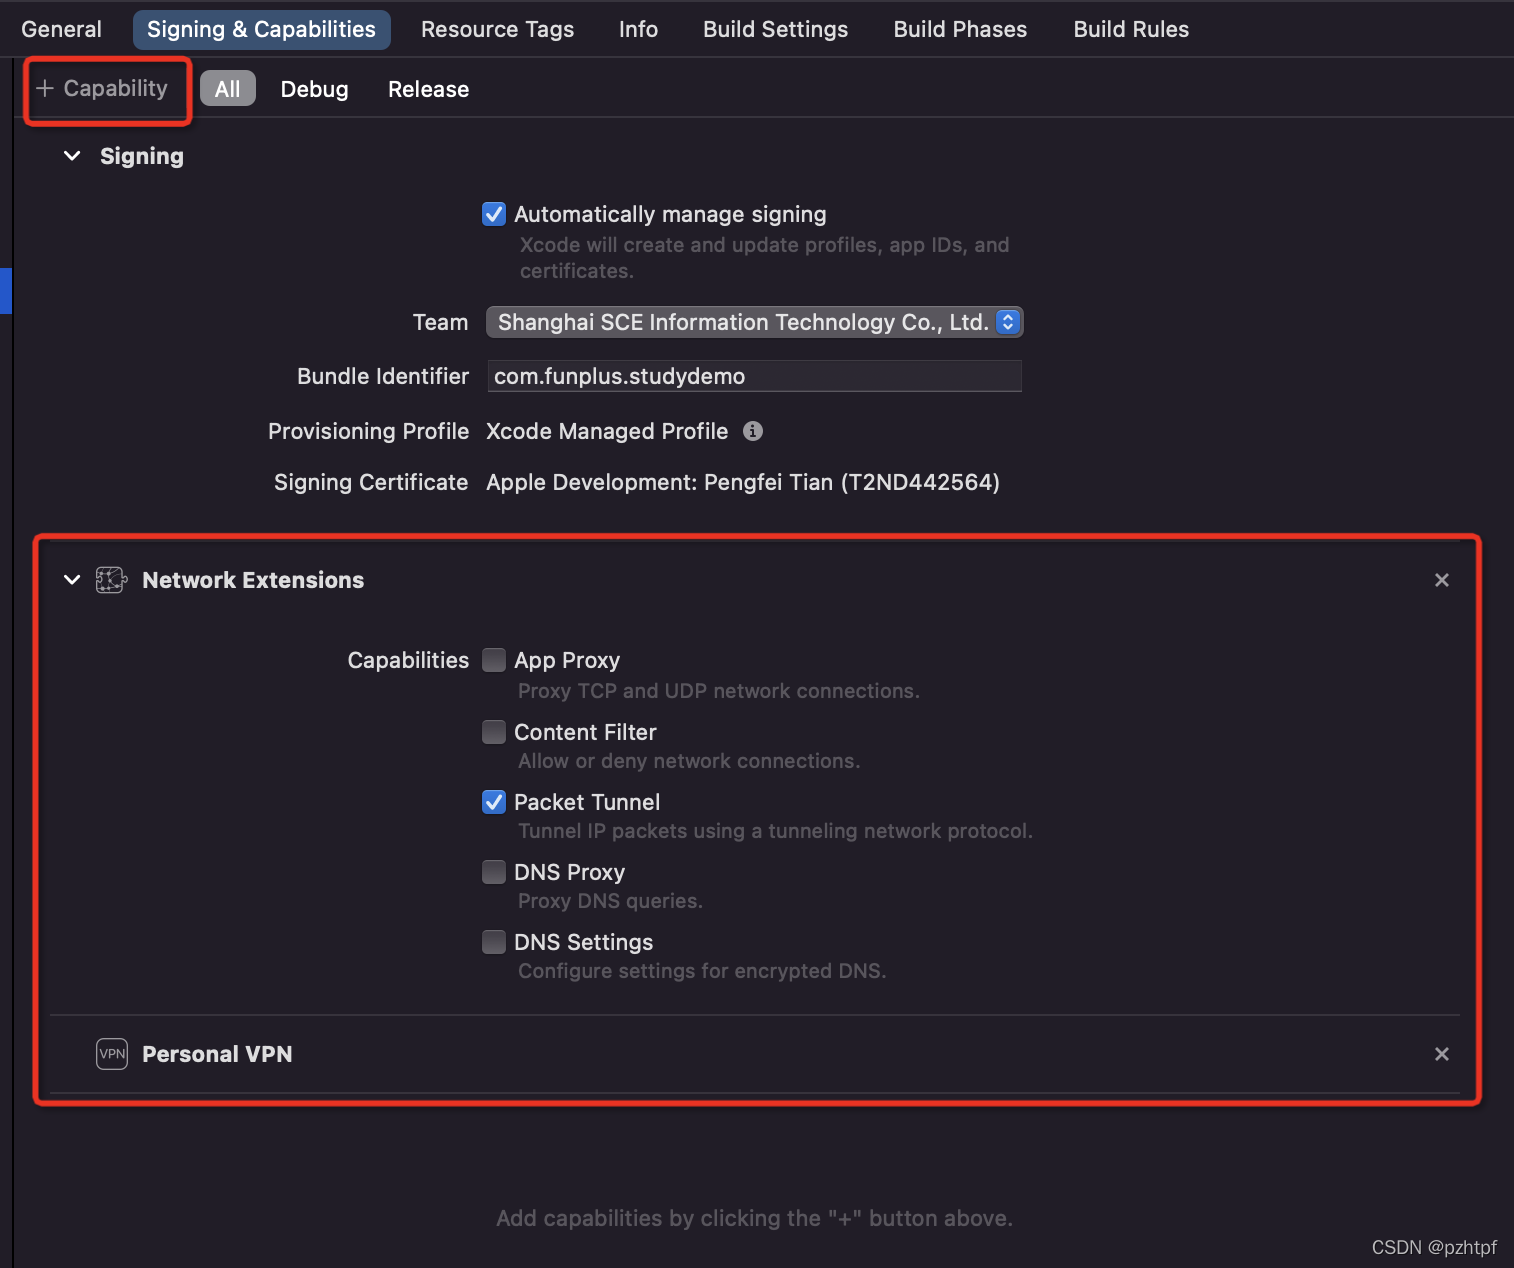
首先去苹果开发者中心给你的Bundle ID开启Network Extensions 和 Personal VPN这两项能力。
//
//  TPFVPNManager.m
//  iOS-Study-Demo
//
//  Created by Roc.Tian on 2022/1/6.
//

#import "TPFVPNManager.h"
#import "TPFVPN-Swift.h"

@implementation TPFVPNManager

- (void)dealloc {
    [[NSNotificationCenter defaultCenter] removeObserver:self];
}

- (id)init {
    self = [super init];
    if (self) {
        //添加VPN状态变化通知
        [[NSNotificationCenter defaultCenter] addObserver:self selector:@selector(onVpnStateChange:) name:NEVPNStatusDidChangeNotification object:nil];
        [self initConfig:^(NSError *error) {
        }];
    }
    return self;
}

- (void)initConfig:(void (^)(NSError *))completionHandler {
    NSLog(@"hello VPN");
    //将pwd放入钥匙串,因为我们读取密码的时候需要从钥匙串中读出
    KeychainService *keychainService = [[KeychainService alloc] init];
    [keychainService saveWithKey:@"vpnPwd" value:@"myUserPass"];

    [self.manager loadFromPreferencesWithCompletionHandler:^(NSError *_Nullable error) {
        if (error) {
            NSLog(@"VPN Preferences error:%@", error);
            if (completionHandler) completionHandler(error);
        } else {
            NEVPNProtocolIKEv2 *config = [[NEVPNProtocolIKEv2 alloc] init];
            config.authenticationMethod = NEVPNIKEAuthenticationMethodNone;
            VPNServerSettings *serverSettings = [[VPNServerSettings alloc] init];

            config.serverAddress = [serverSettings getVpnServerAddress];
            config.username =  [serverSettings getUserName];
            config.remoteIdentifier = [serverSettings getVpnRemoteIdentifier];
            config.localIdentifier = [serverSettings getVpnLocalIdentifier];
            config.passwordReference = [keychainService loadWithKey:@"vpnPwd"];

            config.IKESecurityAssociationParameters.diffieHellmanGroup = NEVPNIKEv2DiffieHellmanGroup14;

            config.useExtendedAuthentication = true;
            config.disconnectOnSleep = false;

            self.manager.protocolConfiguration = config;
            self.manager.localizedDescription = [serverSettings getLocalizedDescription];
            self.manager.enabled = true;
            self.manager.onDemandEnabled = false;

            NSLog(@"SAVE TO PREFERENCES...");
            //SAVE TO PREFERENCES...
            if (self.manager.connection.status != NEVPNStatusConnected) {
                [self.manager saveToPreferencesWithCompletionHandler:^(NSError *_Nullable error) {
                    if (error) {
                        NSLog(@"VPN Preferences error: %@", error);
                        if (completionHandler) completionHandler(error);
                    } else {
                        if (completionHandler) completionHandler(nil);
                    }
                }];
            }
        }
    }];
}

- (void)startVPN {
    [self.manager loadFromPreferencesWithCompletionHandler:^(NSError *_Nullable error) {
        if (error) {
            NSLog(@"VPN Preferences error:%@", error);
        } else {
            NSError *startError;
            [self.manager.connection startVPNTunnelAndReturnError:&startError];
            if (startError) {
                NSLog(@"start error %@", error.localizedDescription);
            } else {
                NSLog(@"Connection established");
            }
        }
    }];
}

- (void)stopVPN {
    // Add code here to start the process of stopping the tunnel
    [self.manager.connection stopVPNTunnel];
}

- (void)onVpnStateChange:(NSNotification *)Notification {
    NEVPNStatus state = self.manager.connection.status;

    switch (state) {
        case NEVPNStatusInvalid:
            NSLog(@"链接无效");
            break;
        case NEVPNStatusDisconnected:
            NSLog(@"未连接");
            break;
        case NEVPNStatusConnecting:
            NSLog(@"正在连接");
            break;
        case NEVPNStatusConnected:
            NSLog(@"已连接");
            break;
        case NEVPNStatusDisconnecting:
            NSLog(@"断开连接");
            break;

        default:
            break;
    }

    if (self.onVpnStateChange) self.onVpnStateChange(state);
}

#pragma mark getter
- (NEVPNManager *)manager {
    return [NEVPNManager sharedManager];
}

@end


@end
为什么要先把密码放入钥匙串,然后再从钥匙串取出来呢?我们来看看官方给passwordReference的注释:
/*!
 * @property passwordReference
 * @discussion The password component of the VPN authentication credential. The value is a persistent reference to a keychain item with the kSecClassGenericPassword class.
 */
@property (copy, nullable) NSData *passwordReference API_AVAILABLE(macos(10.11), ios(8.0)) API_UNAVAILABLE(tvos) __WATCHOS_PROHIBITED;
该值是对密钥链项的持久引用。处理工具keychainService的实现大家可在源码查看。
注意:我们在iOS的系统设置中VPN使用了用户名/密码的用户鉴定方式,所以我们要将useExtendedAuthentication属性设置为true
/*!
 * @property useExtendedAuthentication
 * @discussion A flag indicating if extended authentication will be negotiated. This authentication is in addition to the IKE authentication used to authenticate the endpoints of the IKE session.
 *   For IKE version 1, when this flag is set X-Auth authentication will be negotiated as part of the IKE session, using the username and password properties as the credential.
 *   For IKE version 2, when this flag is set EAP authentication will be negotiated as part of the IKE session, using the username, password, and/or identity properties as the credential depending on which EAP method the server requires.
 */
@property BOOL useExtendedAuthentication API_AVAILABLE(macos(10.11), ios(8.0)) API_UNAVAILABLE(tvos) __WATCHOS_PROHIBITED;
对于IKE版本2,设置此标志后,EAP身份验证将作为IKE会话的一部分进行协商,使用用户名、密码和/或身份属性作为凭据,具体取决于服务器需要的EAP方法。
我们使用的是IKEv2,所以按照版本2的注释去设置相应的值。
  TPFVPNManager *VPNManager = [[TPFVPNManager alloc] init];
  [VPNManager startVPN];
以上贴了一下关键代码,全部源码(包含Swift版本)请移步:
gitee(国内仓库打开会快一点):https://gitee.com/Roc.Tian/tpfvpn
操作:自作聪明将密码字符串直接转成NSData类型。然后赋值给passwordReference。
解决方案:将密码用钥匙串的方式存储,取出使用时标记为持久引用。可以直接使用项目中的KeychainService工具类。
操作:没有将useExtendedAuthentication设置为true。
解决方案:如果使用用户名/密码的授权方式,要将useExtendedAuthentication设置为true,并且将authenticationMethod 设置为 NEVPNIKEAuthenticationMethodNone。
操作:使用了IKESecurityAssociationParameters.diffieHellmanGroup的默认值。
解决方案:diffieHellmanGroup的默认值为NEVPNIKEv2DiffieHellmanGroup2,但iOS 14.2以后版本的默认值更改成了NEVPNIKEv2DiffieHellmanGroup14。
请参考:https://developer.apple.com/documentation/devicemanagement/vpn/ikev2/ikesecurityassociationparameters Diffie-Hellman密钥交换算法,服务器可能支持的是NEVPNIKEv2DiffieHellmanGroup14(猜测),但iOS 13以下的版本默认为NEVPNIKEv2DiffieHellmanGroup2,导致两端密钥交换算法不一致,所以无法建立连接。 所以需要我们显示的指定密钥交换算法: config.IKESecurityAssociationParameters.diffieHellmanGroup = NEVPNIKEv2DiffieHellmanGroup14;