什么是GraphQL? 官方的解释:GraphQL是一门为API和运行时而生的查询语言。是一个由Facebook提出的应用层查询语言.通俗点来说,可以理解为基于RESTful的一种封装,一种新的api标准。
为什么要使用GraphQL?
- 所见即所得,相对RESTful API依赖于后端隐式的被动的数据约定,GraphQL更加显式,在获取数据和更新数据时更加主动。
- 减少网络请求的使用,GraphQL可以实现对多个数据源的调用,合并成一份完整的数据给前端使用。
- 参数类型强校验,GraphQL提供了强类型的schema机制,从而确保了参数类型的合法性。
准备 Prerequisites(先决条件):nodeV6或以上的版本,es6的一些语法糖。(官网上说,这些事例在nodeV6之前的版本还是可以使用。目前node稳定版本都在10.16以上了,所以...)
- 新建项目
C:\Users\Administrator\Desktop\graphql>npm init
This utility will walk you through creating a package.json file.
It only covers the most common items, and tries to guess sensible defaults.

See `npm help json` for definitive documentation on these fields
and exactly what they do.

Use `npm install <pkg>` afterwards to install a package and
save it as a dependency in the package.json file.

Press ^C at any time to quit.
package name: (graphql) u-test1
version: (1.0.0)
description: graphql test
entry point: (index.js)
test command:
git repository:
keywords:
author: onsen
license: (ISC)
About to write to C:\Users\Administrator\Desktop\graphql\package.json:

{
  "name": "u-test1",
  "version": "1.0.0",
  "description": "graphql test",
  "main": "index.js",
  "scripts": {
    "test": "echo \"Error: no test specified\" && exit 1"
  },
  "author": "onsen",
  "license": "ISC"
}


Is this OK? (yes)
安装graphql
npm install graphql --save
编写代码,在根目录新建test-hello.js文件,输入:
var { graphql, buildSchema } = require('graphql');
// Construct a schema, using GraphQL schema language
var schema = buildSchema(`
  type Query {
    hello: String
  }
`);
// The root provides a resolver function for each API endpoint
var root = { hello: () => 'Hello world!' };
// Run the GraphQL query '{ hello }' and print out the response
graphql(schema, '{ hello }', root).then((response) => {
    console.log(response);
});
运行
node test-hello.js
结果:
C:\Users\Administrator\Desktop\graphql>node index.js
{ data: { hello: 'Hello world!' } }
过程分析:
- 创建一个 schema 来定义查询语句和类型,buildSchema() 方法需要传入的参数是字符串类型;
- 创建一个 root 处理器,处理对应的查询;
- 联合处理器和模型。
Express作为一个流行的Node.js Web应用程序框架,为此搭建Express GraphQL服务器是学习GraphQL挺必要的一个东西。
基于Express GraphQL服务器的hello world
安装包模块:
npm install express express-graphql graphql
新建文件test2-express.js,输入:
var express = require('express');
var graphqlHTTP = require('express-graphql');
var { buildSchema } = require('graphql');

var schema = buildSchema(`
  type Query {
    hello: String
  }
`);

var root = { hello: () => 'Hello world!' };

var app = express();
app.use('/graphql', graphqlHTTP({
    schema: schema,
    rootValue: root,
    graphiql: true,
}));

app.listen(4000, () => console.log('Now browse to localhost:4000/graphql'));
运行
node test2-express.js
打开浏览器,输入:http://localhost:4000/graphql 由于aphqlHTTP带着graphiql: true,此时打开上面的地址之后,会进入到GraphiQL工具输入查询的界面。然后在界面上输入:{ hello },点击运行,可以看到给出的一个结果,如下图所示:
使用客户端发送请求 在访问http://localhost:4000/graphql后,可以使用图形用户界面发送测试查询。如果要使用客户端发送请求则应当如何使用呢?
- 创建一个 schema 来定义查询语句和类型,buildSchema() 方法需要传入的参数是字符串类型;
- 创建一个 root 处理器,处理对应的查询;
- 实例化 express ,并且将路由转发给 graphqlHTTP 处理。
graphqlHTTP 中的三个参数介绍: schema:定义的查询语句和类型 rootValue:处理对应查询的处理器 graphiql:是否开启调试窗口,开发阶段开启,生产阶段关闭
apollo-server是一套可以用于各种node.js框架(Express, Connect, Hapi, Koa etc)的GraphQL服务器的包。
安装包模块: npm install apollo-server graphql
新建文件test2-apollo.js,输入:
const { ApolloServer, gql } = require('apollo-server');

var typeDefs = gql
    ` type Query {
        hello: String
     }
     schema {
         query: Query
     }`
;

var resolvers = {
    Query: {
        hello(root) {
            return 'world';
        }
    }
};

const server = new ApolloServer({ typeDefs, resolvers });
server.listen().then(({ url }) => {
    console.log(`🚀  Server ready at ${url}`);
  });
运行
node test2-apollo.js
C:\Users\Administrator\Desktop\graphql>node index.js
� Server ready at http://localhost:4000/打开浏览器,输入:http://localhost:4000/
然后在界面上输入:{ hello },点击运行,可以看到给出的一个结果,如下图所示:

var {graphqlExpress,graphiqlExpress}=require('apollo-server-express')将会得到报错:graphqlExpress is not a function,详情可以参考apollo-server 2.0之后的更改,这里使用npm安装的是[email protected]的: https://www.apollographql.com/docs/apollo-server/api/apollo-server
使用Apollo作为Express的中间件
修改test2-apollo.js文件为:
const { ApolloServer, gql } = require('apollo-server-express');

var typeDefs = gql
    ` type Query {
        hello: String
     }
     schema {
         query: Query
     }`
    ;

var resolvers = {
    Query: {
        hello(root) {
            return 'world';
        }
    }
};


const app = require('express')();

const server = new ApolloServer({ typeDefs, resolvers });
server.applyMiddleware({ app });
app.listen(4000, () => console.log('Now browse to localhost:4000/graphql'));
运行
node index.js
打开浏览器,输入:http://localhost:4000/graphql
然后在界面上输入:{ hello },点击运行,可以看到给出的一个结果,如下图所示:
几乎任何一门语言,都是具有类型的。GraphQL常用的类型有:
- 标量类型
- 列表和非空
- 枚举类型
- 对象类型
- 接口
- 联合类型
- 输入类型 ...
标量类型 GraphQL 自带一组默认标量类型:
- Int:有符号 32 位整数。
- Float:有符号双精度浮点值。
- String:UTF‐8 的字符序列。
- Boolean:true或false。
- ID:ID 标量类型表示一个唯一标识符,通常用以重新获取对象或者作为缓存中的键。ID 类型使用和 String 一样的方式序列化;
列表和非空 默认情况下,每种类型都会返回null作为任何标量。与此相对的可以使用感叹号(!)表示非空类型。例如:String!表示非空字符串。 和大多数语言类似的,使用中括号来代表列表,例如:[Int]表示一个整型的列表。
枚举类型 枚举类型是一种特殊的标量,它限制在一个特殊的可选值集合内。例如:
enum Episode {
  NEWHOPE
  EMPIRE
  JEDI
}
这表示了无论在schema中哪里使用了Episode ,其返回值肯定是NEWHOPE、EMPIRE、JEDI三个值其中一个。(注意,各种语言实现的 GraphQL 服务会有其独特的枚举处理方式。但对于JavaScript 在ES5中没有支持,些枚举值可能就被内部映射成整数值。但这都是内部的细节,并不会影响使用。)
对象类型 GraphQL schema 中的最基本的组件是对象类型。它就表示你可以从服务上获取到什么类型的对象,以及这个对象有什么字段。例如:
type Character {
  name: String!
  appearsIn: [Episode!]!
}
Character 是一个 GraphQL 对象类型,表示其是一个拥有一些字段的类型。
实例:修改test2-express.js中的hello world的demo为如下:
var express = require('express');
var graphqlHTTP = require('express-graphql');
var { buildSchema } = require('graphql');
// Construct a schema, using GraphQL schema language
var schema = buildSchema(`
    type objName {
        name:String
    }
    type Query {
        hello:objName
    }
`);
// The root provides the top-level API endpoints
var root = {
    hello: () => { return { name: 'hello world' } },
}
var app = express();
app.use('/graphql', graphqlHTTP({ schema: schema, rootValue: root, graphiql: true, }));
app.listen(4000); console.log('Running a GraphQL API server at localhost:4000/graphql');
执行node test2-express.js。打开浏览器的调试工具,输入:
{
  hello {
    name
  }
}
如图:

这里以官网的例子为例:
var express = require('express');
var graphqlHTTP = require('express-graphql');
var { buildSchema } = require('graphql');
// Construct a schema, using GraphQL schema language
var schema = buildSchema(`
    type Query {
         rollDice(numDice: Int!, numSides: Int): [Int] }
         `
);
// The root provides a resolver function for each API endpoint
var root = {
    rollDice: function ({ numDice, numSides }) {
        var output = [];
        for (var i = 0; i < numDice; i++) {
            output.push(1 + Math.floor(Math.random() * (numSides || 6)));
        }
        return output;
    }
};
var app = express();
app.use('/graphql', graphqlHTTP({ schema: schema, rootValue: root, graphiql: true, }));
app.listen(4000);
console.log('Running a GraphQL API server at localhost:4000/graphql');
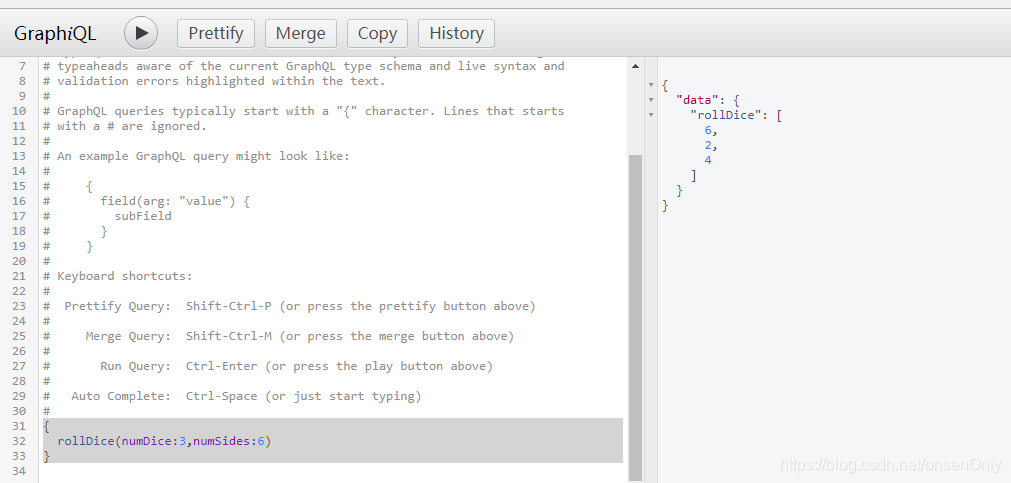
执行node test5-args.js。打开浏览器的调试工具,输入:
{
  rollDice(numDice:3,numSides:6)
}
如图:


来自官网对于对象类型的例子,新建一个test6-object.js文件:
var express = require('express');
var graphqlHTTP = require('express-graphql');
var { buildSchema } = require('graphql');
// Construct a schema, using GraphQL schema language
var schema = buildSchema(`
    type RandomDie {
         numSides: Int!
         rollOnce: Int!
         roll(numRolls: Int!): [Int]
        }
    type Query {
        getDie(numSides: Int): RandomDie
    } `
);
// This class implements the RandomDie GraphQL type
class RandomDie {
    constructor(numSides) {
        this.numSides = numSides;
    }
    rollOnce() {
        return 1 + Math.floor(Math.random() * this.numSides);
    }
    roll({ numRolls }) {
        var output = [];
        for (var i = 0; i < numRolls; i++) {
            output.push(this.rollOnce());
        }
        return output;
    }
}
// The root provides the top-level API endpoints
var root = {
    getDie: function ({ numSides }) {
        return new RandomDie(numSides || 6);
    }
}
var app = express();
app.use('/graphql', graphqlHTTP({
    schema: schema,
    rootValue: root,
    graphiql: true,
}));
app.listen(4000);
console.log('Running a GraphQL API server at localhost:4000/graphql');
执行node test6-object.js。打开浏览器的调试工具,输入:
{
  getDie(numSides:3){
    roll(numRolls:2)
    rollOnce
  }
}
如图:

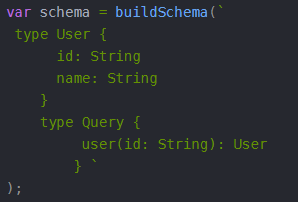
对于许多应用程序,您可以在应用程序启动时定义固定模式,并使用GraphQL模式语言对其进行定义。在某些情况下,以构造类型是很有用的。 而且,使用GraphQLSchema构造类型来构建架构,可以把对应的schema作为单独的对象创建,这样就方便我们的项目目录管理了。 直接上官网的例子来对比说明, 过往的方式:
var express = require('express');
var graphqlHTTP = require('express-graphql');
var { buildSchema } = require('graphql');
var schema = buildSchema(`
 type User {
      id: String
      name: String
    }
    type Query {
         user(id: String): User
        } `
);
// Maps id to User object
var fakeDatabase = {
    'a': {
        id: 'a',
        name: 'alice',
    },
    'b': {
        id: 'b',
        name: 'bob',
    },
};
var root = {
    user: function ({ id }) {
        return fakeDatabase[id];
    }
};
var app = express();
app.use('/graphql', graphqlHTTP({
    schema: schema,
    rootValue: root,
    graphiql: true,
}));
app.listen(4000);
console.log('Running a GraphQL API server at localhost:4000/graphql');
执行node test6-object.js。打开浏览器的调试工具,输入:
{
  user(id:"a"){
    name,
    id
  }
}
如图:

var express = require('express');
var graphqlHTTP = require('express-graphql');
var graphql = require('graphql');
// Maps id to User object
var fakeDatabase = {
    'a': {
        id: 'a',
        name: 'alice',
    },
    'b': {
        id: 'b',
        name: 'bob',
    },
};
// Define the User type
var userType = new graphql.GraphQLObjectType({
    name: 'User',
    fields: {
        id: {
            type: graphql.GraphQLString
        },
        name: {
            type: graphql.GraphQLString
        },
    }
});
// Define the Query type
var queryType = new graphql.GraphQLObjectType({
    name: 'Query',
    fields: {
        user: {
            type: userType,
            // `args` describes the arguments that the `user` query accepts
            args: {
                id: {
                    type: graphql.GraphQLString
                }
            },
            resolve: function (_, { id }) {
                return fakeDatabase[id];
            }
        }
    }
});

var schema = new graphql.GraphQLSchema({ query: queryType });
var app = express();
app.use('/graphql', graphqlHTTP({
    schema: schema,
    graphiql: true,
}));
app.listen(4000);
console.log('Running a GraphQL API server at localhost:4000/graphql');
对比一下buildSchema和GraphQLSchema的创建方式,可以明显的发现使用GraphQLSchema的方式其定义的类型和原来的buildSchema方式的类型不一样了,并且GraphQLSchema更接近OOP的面向对象的思想。

| 区别 | buildSchema | GraphQLSchema |
|---|---|---|
| 参数类型 | 字符串 | 对象 |
| 类名 | type 字符后面 | 参数对象的 name 属性 |
| 属性定义 | 定义在类型后,键值对形式 | 定义在参数对象 fields 属性中,值为对象,每个属性名为键名,值也是对象 |
同样GraphQLSchema 也有其对应的类型,例如: GraphQLEnumType、GraphQLFloat、GraphQLID。GraphQLInputObjectType。GraphQLInt、GraphQLInterfaceType、GraphQLList、GraphQLNonNull等等。 具体可以参考:https://graphql.org.cn/graphql-js/type.html
接口类型 接口是一个抽象类型,它包含某些字段,而对象类型需要实现该接口,必须包含这些字段,接口用interface表示。 这里直接引用官网的例子进行举例:
interface Character {
  id: ID!
  name: String!
  friends: [Character]
  appearsIn: [Episode]!
}

type Human implements Character {
  id: ID!
  name: String!
  friends: [Character]
  appearsIn: [Episode]!
  starships: [Starship]
  totalCredits: Int
}

type Droid implements Character {
  id: ID!
  name: String!
  friends: [Character]
  appearsIn: [Episode]!
  primaryFunction: String
}
两个类型都具备 Character 接口的所有字段,但也引入了其他的字段 totalCredits、starships 和 primaryFunction,这都属于特定的类型的角色。(即:如果返回的类型是Character,需要primaryFunction属性的话就会报错。)
联合类型 联合类型和接口十分相似,但是它并不指定类型之间的任何共同字段,用union表示。例如:
union SearchResult = Human | Droid | Starship
表示任何返回一个 SearchResult 类型的地方,都可能得到一个 Human、Droid 或者 Starship。或许简单点的来理解就是一个或的运算。
输入类型 为了更容易的传递复杂对象,特别是在变更(mutation)中特别有用,比如需要传递一整个对象的时候。input就是用在这个时候的关键字。例如:
input ReviewInput {
  stars: Int!
  commentary: String
}
变更 我们知道query在GraphQL中一个读的操作,那么想修改数据的时候,那又应该怎样呢? 在GraphQL中有这样一个约定来规范任何导致写入的操作都应该显式通过变更(mutation)来发送。 就如同查询一样,如果任何变更字段返回一个对象类型,你也能请求其嵌套字段。获取一个对象变更后的新状态也是十分有用的。我们来看看一个变更例子:
mutation CreateReviewForEpisode($ep: Episode!, $review: ReviewInput!) {
  createReview(episode: $ep, review: $review) {
    stars
    commentary
  }
}
注意 createReview 字段如何返回了新建的 review 的 stars 和 commentary 字段。这在变更已有数据时特别有用,例如,当一个字段自增的时候,我们可以在一个请求中变更并查询这个字段的新值。 这个例子中,我们传递的 review 变量并非标量。它是一个输入对象类型,一种特殊的对象类型,可以作为参数传递。
在官网上就有这样的一个章节叫 Mutations And Input Types的。可以看得出一般mutations比较适合和Input类型一起使用,这里直接上官网的例子,新建一个test8-mutation.js文件,输入:
var express = require('express');
var graphqlHTTP = require('express-graphql');
var { buildSchema } = require('graphql');
// Construct a schema, using GraphQL schema language
var schema = buildSchema(`
    input MessageInput {
        content: String
        author: String
    }
    type Message {
        id: ID!
        content: String
        author: String
    }
    type Query {
        getMessage(id: ID!): Message
    }
    type Mutation {
        createMessage(input: MessageInput): Message
        updateMessage(id: ID!, input: MessageInput): Message
    }
`
);
// If Message had any complex fields, we'd put them on this object.
class Message {
    constructor(id, { content, author }) {
        this.id = id;
        this.content = content;
        this.author = author;
    }
}
// Maps username to content
var fakeDatabase = {};
var root = {
    getMessage: function ({ id }) {
        if (!fakeDatabase[id]) {
            throw new Error('no message exists with id ' + id);
        }
        return new Message(id, fakeDatabase[id]);
    },
    createMessage: function ({ input }) {
        // Create a random id for our "database".
        var id = require('crypto').randomBytes(10).toString('hex');
        fakeDatabase[id] = input;
        return new Message(id, input);
    },
    updateMessage: function ({ id, input }) {
        if (!fakeDatabase[id]) {
            throw new Error('no message exists with id ' + id);
        }
        // This replaces all old data, but some apps might want partial update.
        fakeDatabase[id] = input;
        return new Message(id, input);
    },
};
var app = express();
app.use('/graphql', graphqlHTTP({ schema: schema, rootValue: root, graphiql: true, }));
app.listen(4000, () => { console.log('Running a GraphQL API server at localhost:4000/graphql'); });
在上面的例子中,我们可以看出这个文件中定义了三个操作方法,一个是getMessage(获取信息)、一个是createMessage(创建信息)、一个是updateMessage(更新信息)。
执行node test8-mutation.js。打开浏览器(localhost:4000/graphql)的调试工具,输入:
mutation{
    createMessage(input:{
      author:"andy",
      content:"hope is a good thing",
    }){id}
}
这里是创建一个信息。如图:

{
	getMessage(id:"20e68b77867e3a0dec9a") {
      id,
      author,
    }
}
如图:

mutation{
  updateMessage(id:"20e68b77867e3a0dec9a",input:{
    author:"andy123",
    # content:"hope is a good thing",
  }){id,author}
}
得到的操作结果,如图:

然后,我们把上面用buildSchema的方式同样根据第二章节的做法进行用对象的形式改写一下,修改test8-mutation.js的文件:
var express = require('express');
var graphqlHTTP = require('express-graphql');
var graphql = require('graphql');
// Maps id to User object
var fakeDatabase = {};
// Define the User type

class Message {
    constructor(id, { content, author }) {
        this.id = id;
        this.content = content;
        this.author = author;
    }
}

var messageType = new graphql.GraphQLObjectType({
    name: 'Message',
    fields: {
        id: {
            type: graphql.GraphQLString
        },
        author: {
            type: graphql.GraphQLString
        },
        content: {
            type: graphql.GraphQLString
        },
    }
});

var messageInputType = new graphql.GraphQLInputObjectType({
    name: 'MessageInput',
    fields: {
        id: {
            type: graphql.GraphQLString
        },
        author: {
            type: graphql.GraphQLString
        },
        content: {
            type: graphql.GraphQLString
        },
    }
});

// Define the Query type
var queryType = new graphql.GraphQLObjectType({
    name: 'Query',
    fields: {
        getMessage: {
            type: messageType,
            args: {
                id: {
                    type: graphql.GraphQLString
                }
            },
            resolve: function (_, { id }) {
                if (!fakeDatabase[id]) {
                    throw new Error('no message exists with id ' + id);
                }
                return new Message(id, fakeDatabase[id]);
            }
        }
    }
});

var mutationType = new graphql.GraphQLObjectType({
    name: 'Mutation',
    fields: {
        createMessage: {
            type: messageType,
            args: {
                input: {
                    type: messageInputType
                }
            },
            resolve: function (_, { input }) {
                var id = require('crypto').randomBytes(10).toString('hex');
                fakeDatabase[id] = input;
                return new Message(id, input);
            }
        },
        updateMessage: {
            type: messageType,
            args: {
                id: {
                    type: graphql.GraphQLString
                },
                input: {
                    type: messageInputType
                }
            },
            resolve: function (_, { id, input }) {
                if (!fakeDatabase[id]) {
                    throw new Error('no message exists with id ' + id);
                }
                // This replaces all old data, but some apps might want partial update.
                fakeDatabase[id] = input;
                return new Message(id, input);
            }
        }
    }
});

var schema = new graphql.GraphQLSchema({ query: queryType, mutation: mutationType });
var app = express();
app.use('/graphql', graphqlHTTP({
    schema: schema,
    graphiql: true,
}));
app.listen(4000);
console.log('Running a GraphQL API server at localhost:4000/graphql');
如上所示,我们把buildSchema中的type的Message和input的MessageInput分别用GraphQLObjectType和GraphQLInputObjectType表示,同时把Query读操作和变更操作的Mutations也用GraphQLObjectType表示。在Query中只有getMessage一个区域,在Mutations中有createMessage和updateMessage两个区域。 然后同样的执行node test8-mutation.js。打开浏览器(localhost:4000/graphql)的调试工具,输入上面测试用例进行调试即可。
新建一个文件夹,test9-query目录作为该项模拟的根目录。 新建schema目录,schema.js文件:
const graphql = require('graphql');
const queryType = new graphql.GraphQLObjectType({
   name: 'Query',
   fields: {
      greeting: {
         type: graphql.GraphQLString,
         resolve: () => 'Hello GraphQL  From TutorialsPoint !!',
      },
      sayHello: {
         type: graphql.GraphQLString,
         args: {
            name: {
               type: graphql.GraphQLString
            }
         },
         resolve: function (_, args) {
            return `Hi ${args.name} GraphQL server says Hello to you!!`
         }
      }
   }
});
这里的schema.js文件中,就新建了一个Query的GraphQL的类型,里面包含了greeting,sayHello两个业务。
在根目录新建server.js文件:
const express = require('express');
const cors = require('cors')
const graphqlHTTP = require('express-graphql');
const graphql = require('graphql');

const { queryType } = require("./schema/schema");

const schema = new graphql.GraphQLSchema({ query: queryType });
const app = express();
app.use(cors());
app.use('/graphql', graphqlHTTP({
    schema: schema,
    graphiql: true,
}));
app.listen(4000);
console.log('Running a GraphQL API server at localhost:4000/graphql');

module.exports = { queryType };
根据之前的逻辑建立起一个服务。 注意:这里较之前的代码新加了一个cors模块,用来处理服务端本地的跨域问题。需要安装:
npm install --save cors
服务端ok之后,同样可以使用自带的工具进行验证:
{
greeting,
sayHello(name:"test")
}
如图:

<!DOCTYPE html>
<html>

<head>
    <script src="https://code.jquery.com/jquery-3.1.1.min.js"></script>
    <script>
        $(document).ready(function () {

            $("#btnSayhello").click(function () {

                const name = $("#txtName").val();
                console.log(name);
                $("#SayhelloDiv").html("loading....");

                $.ajax({
                    url: "http://localhost:4000/graphql",
                    contentType: "application/json",
                    type: "POST",
                    data: JSON.stringify({
                        query: `{
                     sayHello(name:"${name}")}`
                    }),
                    success: function (result) {
                        console.log(JSON.stringify(result))
                        $("#SayhelloDiv").html("<h1>" + result.data.sayHello + "</h1>");
                    }
                });
            });

            $("#btnGreet").click(function () {
                $("#greetingDiv").html("loading....");
                $.ajax({
                    url: "http://localhost:4000/graphql",
                    contentType: "application/json",
                    type: "POST",
                    dataType: 'json',
                    data: JSON.stringify({
                        query: `{greeting}`
                    }),
                    success: function (result) {
                        $("#greetingDiv").html("<h1>" + result.data.greeting + "</h1>");
                    }
                });
            });
        });
    </script>
</head>

<body>
    <h1>Jquery Client </h1>

    <hr />
    <section>
        <button id="btnGreet">Greet</button>
        <br /> <br />
        <div id="greetingDiv"> </div>
    </section>

    <br /> <br /> <br />
    <hr />

    <section>
        Enter a name:<input id="txtName" type="text" value="kannan" />
        <button id="btnSayhello">SayHello</button>
        <div id="SayhelloDiv"> </div>
    </section>
</body>
</html>
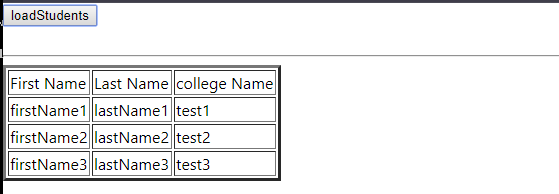
然后访问该文件,点击两个按钮,出现如图所示效果:

新建test10-react文件夹作为该模拟的项目子根目录。 新建react项目:
create-react-app hello-world-client
若是创建项目报not found的create-react-app的话,请自行安装脚手架工具(Create React App是FaceBook的React团队官方出的一个构建React单页面应用的脚手架工具)。
npm install -g create-react-app
然后在hello-world-client目录中,修改APP.js文件:
import React, { Component } from 'react';
import logo from './logo.svg';
import './App.css';

async function loadGreeting() {
  const response = await fetch('http://localhost:4000/graphql', {
    method: 'POST',
    headers: { 'content-type': 'application/json' },
    body: JSON.stringify({ query: '{greeting}' })
  })
  const rsponseBody = await response.json();
  return rsponseBody.data.greeting;
  console.log("end of function")
}

async function loadSayhello(name) {
  const response = await fetch('http://localhost:4000/graphql', {
    method: 'POST',
    headers: { 'content-type': 'application/json' },
    body: JSON.stringify({ query: `{sayHello(name:"${name}")}` })
  })
  const rsponseBody = await response.json();
  return rsponseBody.data.sayHello;
}

class App extends Component {

  constructor(props) {
    super(props);
    this.state = { greetingMessage: '', sayHelloMessage: '', userName: '' }
    this.updateName = this.updateName.bind(this);
    this.showSayHelloMessage = this.showSayHelloMessage.bind(this);
    this.showGreeting = this.showGreeting.bind(this);
  }

  showGreeting() {
    loadGreeting().then(g => this.setState({ greetingMessage: g + " :-)" }))
  }

  showSayHelloMessage() {
    const name = this.state.userName;
    console.log(name)
    loadSayhello(name).then(m => this.setState({ sayHelloMessage: m }))
  }

  updateName(event) {
    this.setState({ userName: event.target.value })
  }

  componentDidMount() {
    this.showGreeting();
  }

  render() {
    return (
      <div className="App">
        <header className="App-header">
          <img src={logo} className="App-logo" alt="logo" />
          <p>
            Edit <code>src/App.js</code> and save to reload.
        </p>
          <a
            className="App-link"
            href="https://reactjs.org"
            target="_blank"
            rel="noopener noreferrer"
          >
            Learn React
        </a>
        </header>
        <br />
        <section>
          showGreeting:{this.state.greetingMessage}
        </section>
        <br />
        <section>
          Enter a name:<input id="txtName" type="text" onChange={this.updateName}
            value={this.state.userName} />
          <button id="btnSayhello" onClick={this.showSayHelloMessage}>SayHello</button>
          <br />
          user name is:{this.state.userName}    <br />
          <div id="SayhelloDiv">
            <h1>{this.state.sayHelloMessage}</h1>
          </div>
        </section>
      </div>
    );
  }
}

export default App;
在上面的代码中,分别封装了loadSayhello和loadGreeting两个方法进行范文graphql的服务,这个服务是上面test9-jquery中启动的服务。在hello-world-client项目中启动:
npm start
此时会自动打开默认的浏览器访问3000端口,如端口被占用,启动的时候会自动询问是否更换3001端口访问的。如图:

.App {
  text-align: center;
  min-height: 100vh;
}

.App-logo {
  height: 40vmin;
}

.App-header {
  background-color: #282c34;
  min-height: 90%;
  display: flex;
  flex-direction: column;
  align-items: center;
  justify-content: center;
  font-size: calc(10px + 2vmin);
  color: white;
}

.App-link {
  color: #09d3ac;
}新建test11-apollo-react文件夹作为该模拟的项目子根目录。 新建server.js文件,这里和上面的server.js文件是一样的:
const express = require('express');
const cors = require('cors')
const graphqlHTTP = require('express-graphql');
const graphql = require('graphql');

const { queryType } = require("./schema/schema");

const schema = new graphql.GraphQLSchema({ query: queryType });
const app = express();
app.use(cors());
app.use('/graphql', graphqlHTTP({
    schema: schema,
    graphiql: true,
}));
app.listen(4000);
console.log('Running a GraphQL API server at localhost:4000/graphql');
同样的和上面的一样的新建schema文件夹,里面新建schema.js文件:
const graphql = require('graphql');

class Student {
   constructor(id, firstName, lastName, college) {
      this.id = id;
      this.firstName = firstName;
      this.lastName = lastName;
      this.college = college;
   }
}

students = [new Student('id1', 'firstName1', 'lastName1', { name: 'test1' }),
new Student('id2', 'firstName2', 'lastName2', { name: 'test2' }),
new Student('id3', 'firstName3', 'lastName3', { name: 'test3' })];

const collegeType = new graphql.GraphQLObjectType({
   name: 'College',
   fields: {
      id: {
         type: graphql.GraphQLString
      },
      name: {
         type: graphql.GraphQLString
      },
      location: {
         type: graphql.GraphQLString
      },
      rating: {
         type: graphql.GraphQLFloat
      }
   }
});

const studentType = new graphql.GraphQLObjectType({
   name: 'Student',
   fields: {
      id: {
         type: graphql.GraphQLString
      },
      firstName: {
         type: graphql.GraphQLString
      },
      lastName: {
         type: graphql.GraphQLString
      },
      college: {
         type: collegeType
      }
   }
});

const queryType = new graphql.GraphQLObjectType({
   name: 'Query',
   fields: {
      students: {
         type: graphql.GraphQLList(studentType),
         resolve: () => students,
      }
   }
});

module.exports = { queryType };
这里就提供了students一个业务。
同样的在子根目录下创建react项目:
create-react-app hello-world-client
在hello-world-client目录中,安装客户端的graphql库以及Apollo Boost包:
npm install apollo-boost graphql
修改APP.js文件:
import React, {Component} from 'react';

// apollo client
import {ApolloClient, HttpLink, InMemoryCache} from 'apollo-boost'
import gql from 'graphql-tag'

const endPointUrl = 'http://localhost:4000/graphql'
const client = new ApolloClient({
   link: new HttpLink({uri:endPointUrl}),
   cache:new InMemoryCache()
});

async function loadStudentsAsync() {
   const query = gql`
   {
      students{
         id
         firstName
         lastName
         college{
            name
         }
      }
   }
   `
   const {data} = await client.query({query}) ;
   return data.students;
}
export default class  App  extends Component {
   constructor(props) {
      super(props);
      this.state = {
         students:[]
      }
      this.studentTemplate =  [];
   }
   async loadStudents() {
      const studentData =  await loadStudentsAsync();
      this.setState({
         students: studentData
      })
      console.log("loadStudents")
   }
   render() {
      return(
         <div>
            <input type = "button"  value = "loadStudents" onClick = {this.loadStudents.bind(this)}/>
            <div>
               <br/>
               <hr/>
               <table border = "3">
                  <thead>
                     <tr>
                        <td>First Name</td>
                        <td>Last Name</td>
                        <td>college Name</td>
                     </tr>
                  </thead>

                  <tbody>
                     {
                        this.state.students.map(s => {
                           return (
                              <tr key = {s.id}>
                                 <td>
                                    {s.firstName}
                                 </td>
                                 <td>
                                    {s.lastName}
                                 </td>
                                 <td>
                                    {s.college.name}
                                 </td>
                              </tr>
                           )
                        })
                     }
                  </tbody>
               </table>
            </div>
         </div>
      )
   }
}
通过上面我们可以看到,通过apollo-boost,使用其ApolloClient, HttpLink, InMemoryCache三个模块。
ApolloClient: 使用Apollo Client,我们可以直接调用服务器而无需使用fetch API.此外,查询和突变不应嵌入使用反向刻度表示法的字符串中,这是因为, gql 函数直接解析查询.这意味着,在GraphiQL工具中编写查询时,程序员可以以相同的方式直接编写查询。 gql 是一个标记函数,它将后面的刻度表示法中的模板字符串解析为graphql查询对象. Apollo Client查询方法返回一个promise。
具体可以参考官网api解析: https://www.apollographql.com/docs/react/api/apollo-client/ https://www.apollographql.com/docs/react/caching/cache-configuration/
接口最终还是得持久化物理容器中做增删改查的操作。
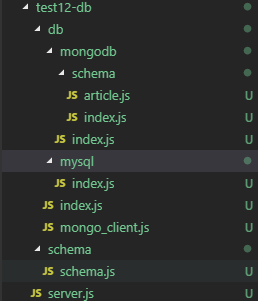
新建一下图片的目录,test12-db:
通常链接mongodb,我们使用mongoose模块来处理:
npm install --save mongoose
然后在db目录中封装了一个获取数据库链接对象的类MongoClient:
const mongoose = require('mongoose');

module.exports = class MongoClient {
    constructor({ uri, options, schemas } = {}) {
        this.schemas = schemas;
        this.uri = uri;
        this.options = options;
        this.models = {};
        this.connection = null;
    }

    async connect() {
        let { uri, options } = this;
        mongoose.set('useCreateIndex', true);
        mongoose.set('bufferCommands', false);
        mongoose.set('bufferMaxEntries', 0);
        mongoose.set('autoIndex', false);
        mongoose.connection.on('error', function () {
            console.error('connection error: uri is %s,options is %s', uri, JSON.stringify(options));
        });
        mongoose.connection.once('open', function () {
            console.info('connection success', uri);
        });
        let connection = await mongoose.createConnection(uri, options);
        this.connection = connection;
        console.info('Init mongoose success');
        return connection;
    }

    getCollection(key) {
        if (this.schemas[key]) {
            if (this.models[key]) {
                return this.models[key];
            }
            let model = this.connection.model(key, this.schemas[key]);
            this.models[key] = model;
            return model;
        }
        throw new Error("illegal key");
    }
}
在MongoClient中提供一个connect的方法返回链接对象,以面对多重链接的情况,同时提供getCollection提供给没有model首次链接的时候再获取链接对象,这种情况一般用于serverless的lambda函数,这里就直接拿着之前的封装直接来用了。 然后在mongodb目录下再提供了一个对象的index.js:
const MongoClient = require("../mongo_client");
const schemas = require("./schema");
const [uri, options] = [
    "mongodb://127.0.0.1:27017/onsen",
    {
        useNewUrlParser: true,
        useCreateIndex: true,
    },
]

const client = new MongoClient({ uri: uri, options: options, schemas: schemas });
module.exports = client;
注:这里的数据库,就需要自己去创建模拟数据了。
在根目录的server.js文件中,创建graphql的服务:
const express = require('express');
const cors = require('cors')
const graphqlHTTP = require('express-graphql');
const graphql = require('graphql');
const { queryType } = require("./schema/schema");

require("./db").mongodb.connect();

const schema = new graphql.GraphQLSchema({ query: queryType });
const app = express();
app.use(cors());
app.use('/graphql', graphqlHTTP({
  schema: schema,
  graphiql: true,
}));
app.listen(4000);
console.log('Running a GraphQL API server at localhost:4000/graphql');
相比之前的代码,可以看到增加了:
require("./db").mongodb.connect();安装mysql的模块:
npm install --save mysql
同样的类似于mongodb的封装一样,这里也封装了一个mysql的客户对象:
var mysql = require('mysql');

class MysqlClient {
    constructor(options = {}) {
        this.pool = mysql.createPool(options);
    }

    doQuery(query) {
        return new Promise((resolve, reject) => {
            this.pool.getConnection((err, conn) => {
                if (err) {
                    return reject(err);
                }
                console.info('getConnection ok')
                conn.query(query, (err, results, fields) => {
                    conn.release();
                    if (err) {
                        return reject(err);
                    }
                    return resolve(results || null);
                })
            })
        });
    }
}

const options = {
    connectionLimit: 1000,
    host: '127.0.0.1',
    password: 'password',
    database: 'yiibaidb',
    user: 'root',
}

module.exports = new MysqlClient(options);
具体有关mysql模块的,见: https://www.npmjs.com/package/mysql
做好了数据库的引用,然后就可以像前面一样,直接使用schema中写业务逻辑了,见schema.js:
const graphql = require('graphql');
const mongodb = require("../db").mongodb;
const mysql = require("../db").mysql;

const ArticleType = new graphql.GraphQLObjectType({
   name: 'Article',
   fields: {
      _id: {
         type: graphql.GraphQLString
      },
      title: {
         type: graphql.GraphQLString
      },
      source: {
         type: graphql.GraphQLString
      },
   }
});

const OrderType = new graphql.GraphQLObjectType({
   name: 'Order',
   fields: {
      orderNumber: {
         type: graphql.GraphQLInt
      },
      status: {
         type: graphql.GraphQLString
      },
      comments: {
         type: graphql.GraphQLString
      },
   }
});

const queryType = new graphql.GraphQLObjectType({
   name: 'Query',
   fields: {
      articles: {
         type: graphql.GraphQLList(ArticleType),
         resolve: async () => await mongodb.getCollection('Article').find({}),
      },
      orders: {
         type: graphql.GraphQLList(OrderType),
         args: {
            page: {
               type: graphql.GraphQLInt
            },
            pageSize: {
               type: graphql.GraphQLInt
            },
         },
         resolve: async (_, { page = 0, pageSize = 10 }) => await mysql.doQuery(`
             SELECT  * FROM orders limit ${((page - 1) < 0 ? 0 : (page - 1)) * pageSize},${pageSize};
         `),
      }
   }
});

module.exports = { queryType };
这里的业务提供了articles和orders的两个查询,分别用的是mongodb和mysql的数据库操作。
在工具上进行验证,输入:
{
  articles{
    _id,
    title,
    source,
  },
  orders(page:1,pageSize:5){
   orderNumber,
    status,
    comments,
  }
}


