Documentation English
Plugin provider: GLS Germany GmbH & Co. OHG
- Subject
- Installation
- Requirements for Operation
-
Scenarios
- How to check out with GLS Shipping
- How to Use Cash on Delivery
- How to Create a Domestic Shipping Label
- How to Create International Shipping Labels
- How to Access Shipping Labels
- How to Offer Value-added Services to Recipients
- How to Book Value-added Services as Merchant
- How to Track a Shipment
- How to Batch Process Shipments (Mass Action)
- How to Cancel a Shipment
- How to Review Order Fulfillment Status
- Data privacy
- Troubleshooting
- Uninstallation
- Technical Support
The official plugin GLS Shipping for Magento 2 allows to offer GLS as delivery method together with optional shipping services in checkout. GLS shipping labels can subsequently be created and printed directly from the Magento admin panel. The extension integrates the GLS WebAPI for parcel processing and cancellation into the order processing workflow of Magento.
Please note that GLS Shipping is a plugin for customers of GLS Germany GmbH & Co OHG.
The extension GLS Shipping for Magento 2 consists of multiple packages. As an integrator, you acquire the Composer package gls/shipping-m2 from the Magento Marketplace. Further packages will be installed as dependencies. Proceed with the installation via Magento Extension Manager or follow the command line installation procedure.
The installation steps can also be found in the README.md file included with the module.
It is advised to install the additional package netresearch/module-shipping-inventory if you experience issues with Magento Inventory (MSI) stock deductions when creating shipping labels.
The extension communicates with the GLS WebAPI. A GLS business customer contract is required for testing the integration in sandbox mode as well as using it in production.
You are not yet a GLS business customer and would like to receive an individual offer? Simply use the option which is most convenient for you:
- online form
- email to [email protected]
- +49 (0) 6677 / 646 38 6000 (Mon.–Fri. 8:00 a.m. to 5:00 p.m.)
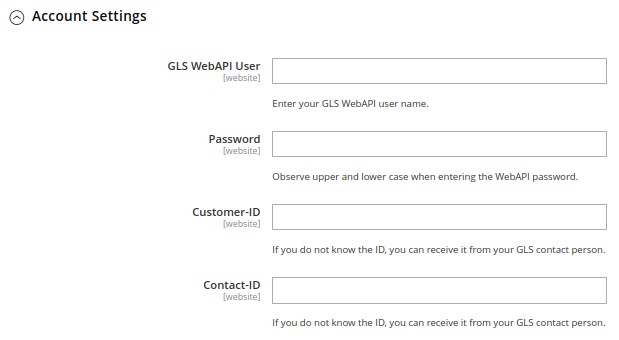
The following information is required to configure the extension:
- GLS WebAPI User
- Password
- Customer-ID
- Contact-ID
The following section describes common use-cases of shipping fulfillment. The individual chapters describe common requirements and how to achieve them.
The extension supports shipping from Germany only. It is essential to have the store configuration set up accordingly:
Stores → Configuration → General → General → Store-Information
- Store Name
- Store Contact Telephone
Stores → Configuration → Sales → Shipping Settings → Origin
- Country (must be Germany)
- Region / State
- ZIP / Postal Code
- City
- Street Address
Note that all addresses must be valid. Data like "test street 1234" will not work.
The extension GLS Shipping does not provide shipping rates calculation on its own. Instead, any installed delivery method can be configured as per individual requirements and linked to GLS. To set up rates for checkout, navigate to the Delivery Methods configuration section. The following example uses the built-in Flat Rate shipping method.
Stores → Configuration → Sales → Delivery Methods → Flat Rate
Configure the rates according to the method's capabilities. Make sure the method itself (in this example Flat Rate) is not enabled. Otherwise, the configured rates will be offered to consumers in addition to GLS – but without the option to create shipping labels for the order. GLS Shipping uses the values defined here even in deactivated state.

Preparing other delivery methods for use with GLS Shipping works in the same manner. Only one shipping method can be configured to serve as rates provider for GLS Shipping at the same time.
In order to enable GLS Shipping with the prepared delivery method, navigate to the module configuration.
Stores → Configuration → Sales → Delivery Methods → GLS Shipping
In the General Settings section, enable GLS Shipping by ticking the checkbox "Offer GLS Shipping as a shipping method in the checkout". Note that this only controls the shipping method availability in checkout. Actions succeeding order placement (shipment processing and tracking) are available regardless of this setting.

In the Checkout Presentation group, select the offline shipping method to be used for rates calculation (in this example: Flatrate).
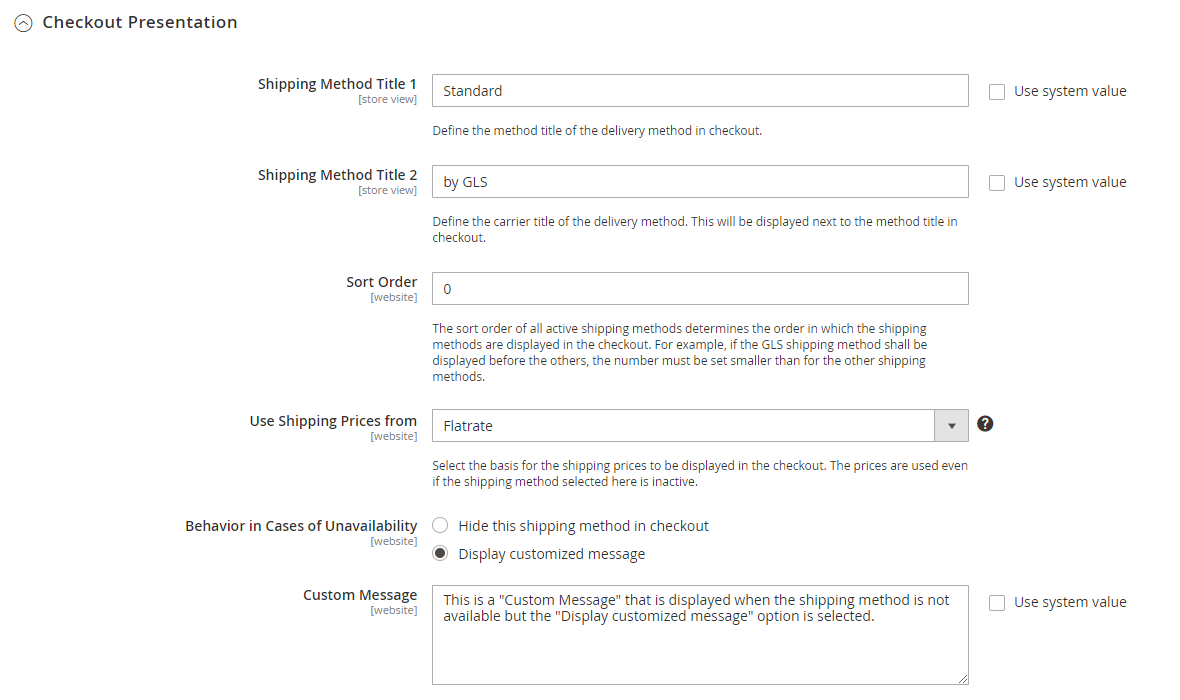
The display titles of the delivery method can also be changed here if desired.
GLS offers cash on delivery payment for parcels.
The collected amount will be transferred to the bank account associated with your GLS account. Please contact your GLS account representative to make additions or changes regarding your bank account.
For the use with GLS Shipping, installed payment methods must be explicitly marked as cash on delivery method. If the customer places an order with one of these methods, then a CoD indicator (CASHSERVICE) will be visible on the shipping label, and the courier will collect the payment from the recipient.
Stores → Configuration → Sales → Shipping Settings → Parcel Processing
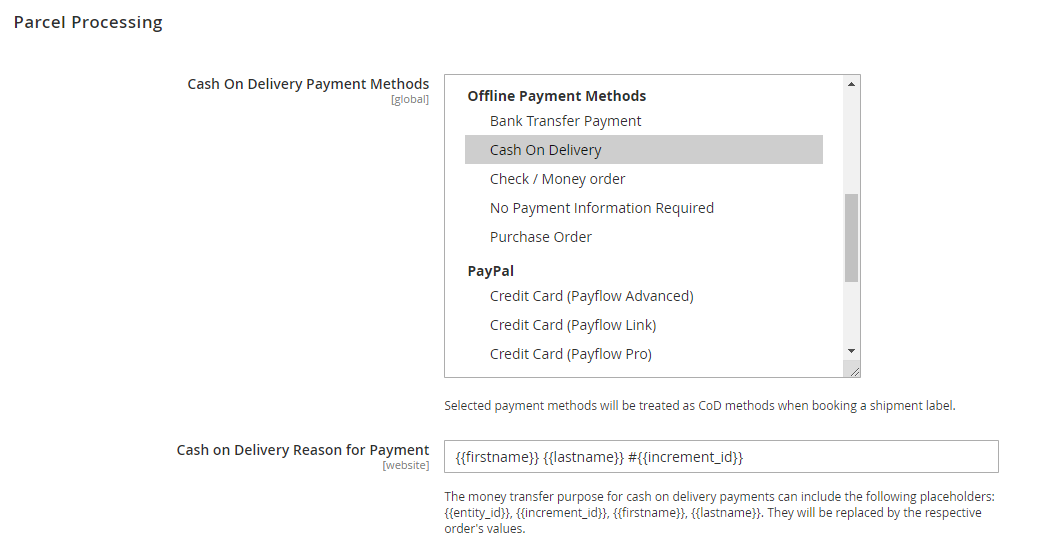
In the field "Cash On Delivery Payment Methods", select those payment methods that should lead to the order amount being collected by GLS. The field "Cash on Delivery Reason for Payment" is used to configure a text that is going to be used when GLS transfers the collected amount to your bank account. Placeholders will be replaced by the respective order's actual values.
Please note that payment methods marked as cash on delivery payment will be disabled during checkout if
- CoD payment is not supported for the customer's destination country, or
- incompatible value-added services were selected (e.g. place of deposit).
Note that orders with CoD payment cannot be split into multiple partial shipments.
As soon as the module configuration was completed, orders can be placed using the GLS shipping method.
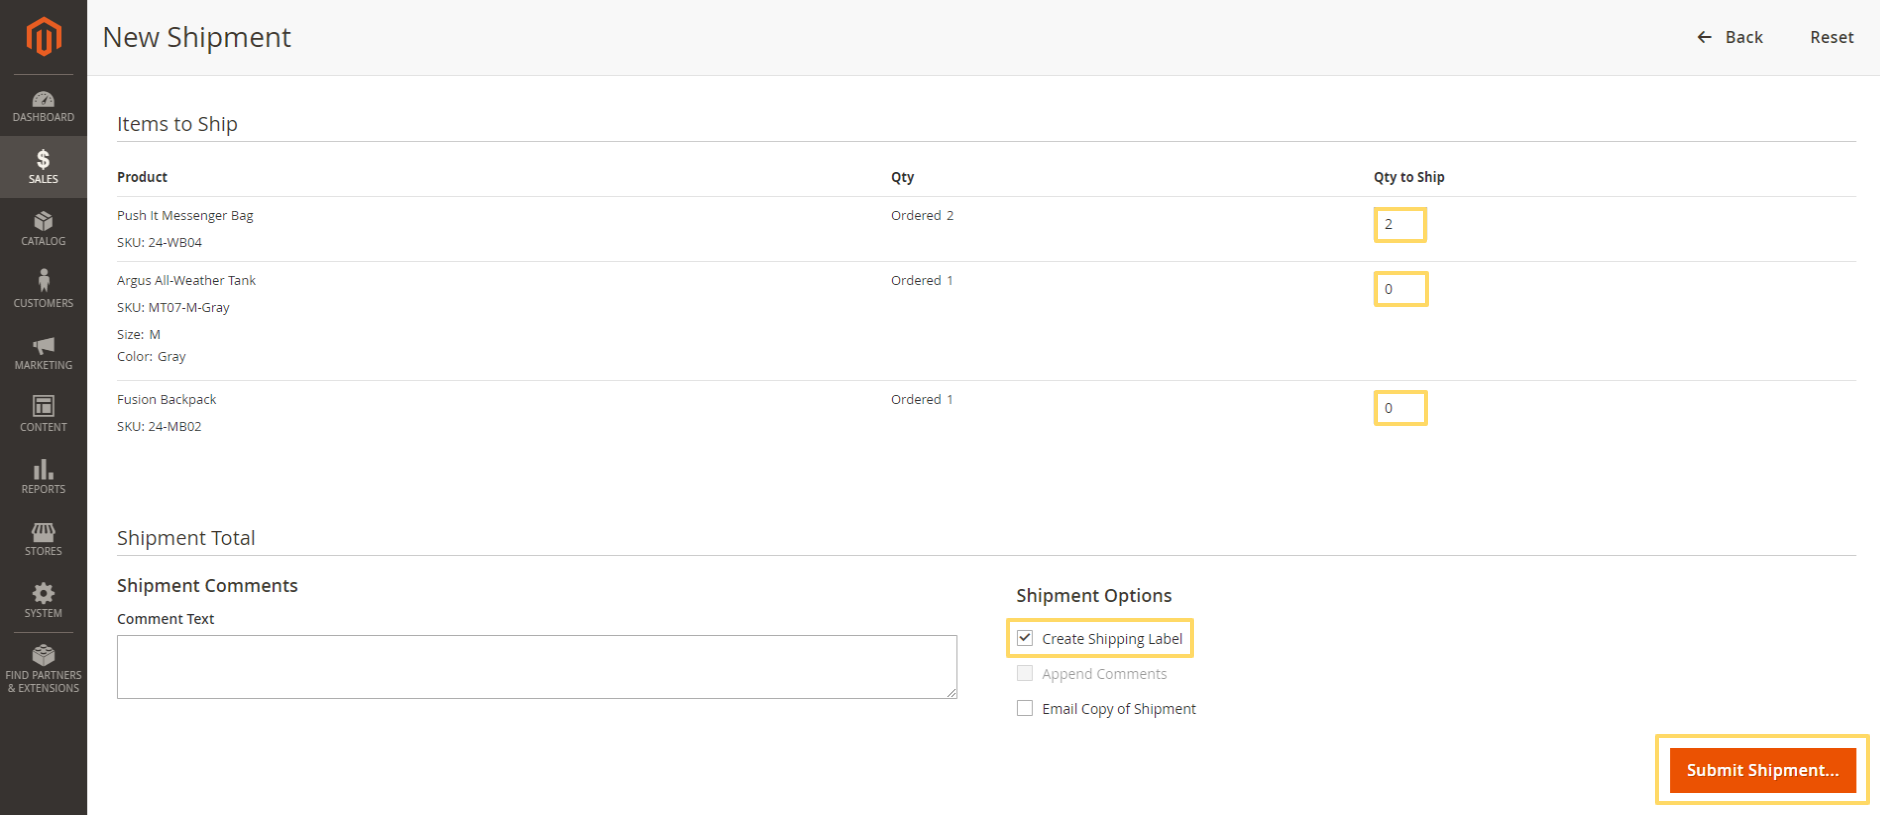
In order to retrieve a GLS shipping label, open one of these orders in the Magento admin panel and navigate to the New Shipment page. Specify the item quantities to ship and check the Create Shipping Label box.
Sales → Orders → View → Ship
When clicking the Submit Shipment… button, the GLS packaging popup opens. This form allows to allocate the shipment's items to parcels and to specify further shipping options.
Note that item allocation to different parcels will result in multiple shipping labels with no reference to each other. So-called multi-colli shipments are currently not supported by GLS.
The packaging popup is prefilled with default values from the catalog (product attributes, e.g. weight) and store configuration (e.g. weight unit). If everything is set up properly, the shipping label is just one click away: Review the form items and submit using the Create Shipping Label button.
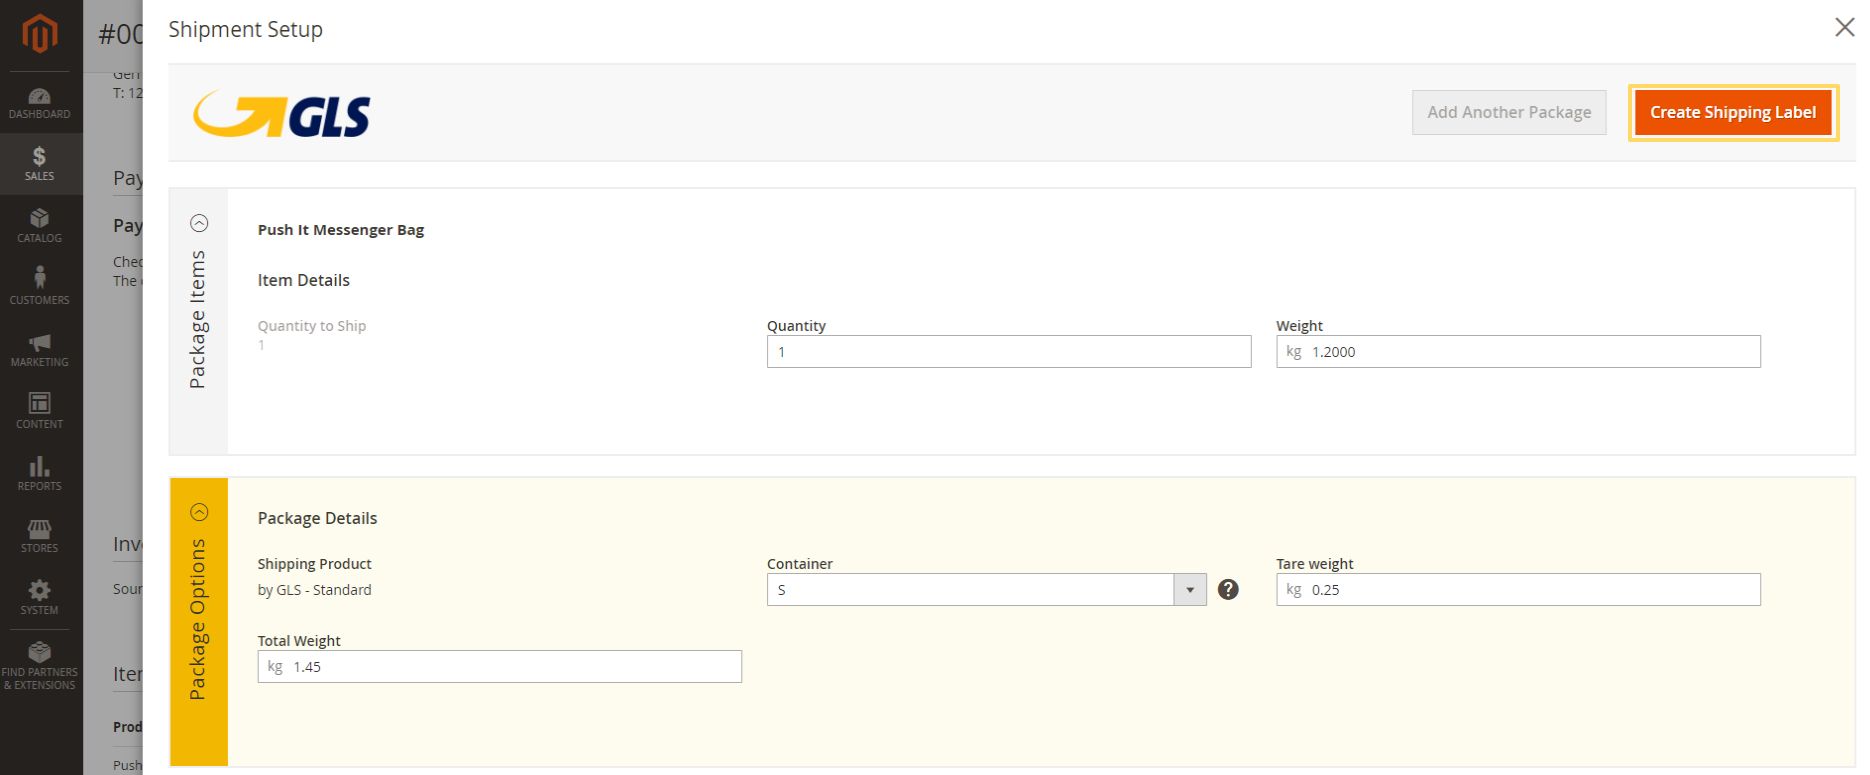
For domestic shipments, the most important parameters are:
- item weight
- package tare weight
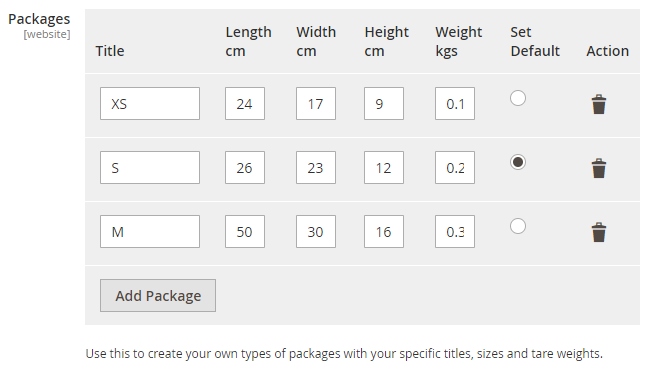
It is not necessary to specify these weight properties for every order again. The product weight can be prepared in the catalog and the tare weight can be specified in the module configuration:
Catalog → Products → Edit → Weight

Stores → Configuration → Sales → Shipping Settings → Parcel Processing → Packages
The sender's address printed on the shipping label is part of your (external) GLS account settings. In order to use the configured shipping origin as shipper address instead, check the option "Use Alternative Shipper Address" in the module configuration:
Stores → Configuration → Sales → Delivery Methods → GLS Shipping → Defaults for Label Creation
In case a shipment was already created without booking a GLS shipping label, the packaging popup can be accessed again from the shipment details page:
Sales → Shipments → View → Shipping and Tracking Information → Create Shipping Label...
Sales → Orders → View → Shipments → View → Shipping and Tracking Information → Create Shipping Label...
Creating a cross-border (international) shipment is similar to domestic shipments. In the packaging popup, the additional form field Incoterm appears. A default value for this field can be set via module configuration:
Stores → Configuration → Sales → Delivery Methods → GLS Shipping → Defaults for Label Creation → Incoterm
The Incoterm 18 is purely for shipping to the UK (goods with value up to 135 GBP). This value should therefore only be used as default for the autom. mass actions, if this actually corresponds to your use case. For other destination relations the Incoterm 18 has no function.
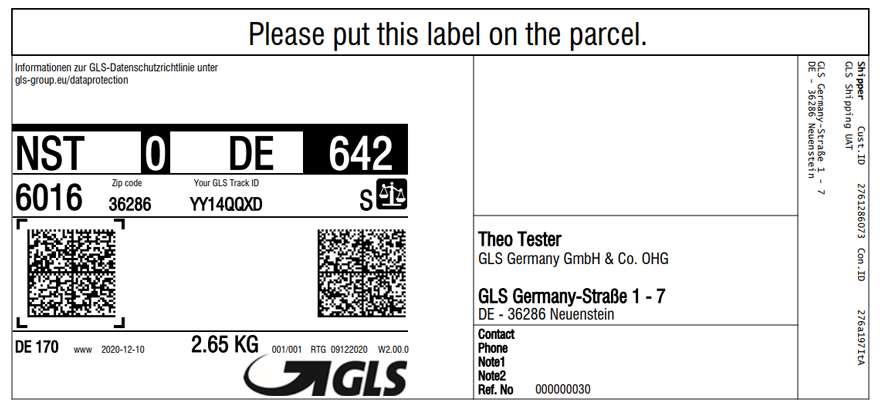
Shipping label PDFs can be accessed either individually per shipment or combined for multiple shipments (mass action).
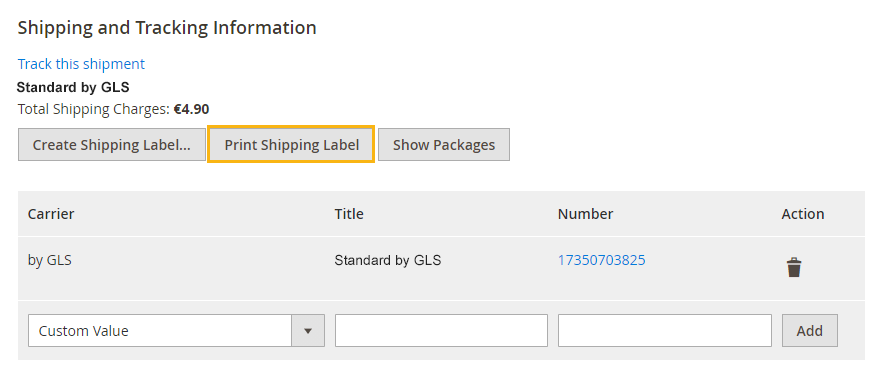
To access an individual shipment's label(s), go to the shipment details page and click the Print Shipping Label button in the Shipping and Tracking Information section.
Sales → Shipments → View
Sales → Orders → View → Shipments → View
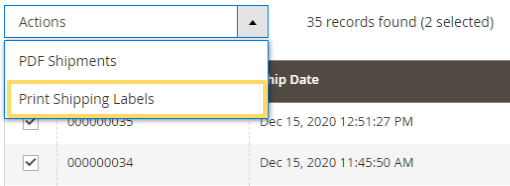
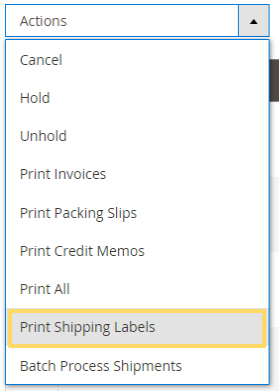
To access the shipping labels for multiple shipments at once
- navigate to either the orders list or shipments list,
- select the desired orders or shipments, and
- execute the Print Shipping Labels mass action.
Sales → Shipments
Sales → Orders
Please note that only shipping labels which are already stored in the shop system can be accessed.
GLS offers optional value-added services to parcel recipients. In the module configuration, you can specify which services should be offered in checkout:
Stores → Configuration → Sales → Delivery Methods → GLS Shipping → Shipping Options for Buyers in Checkout
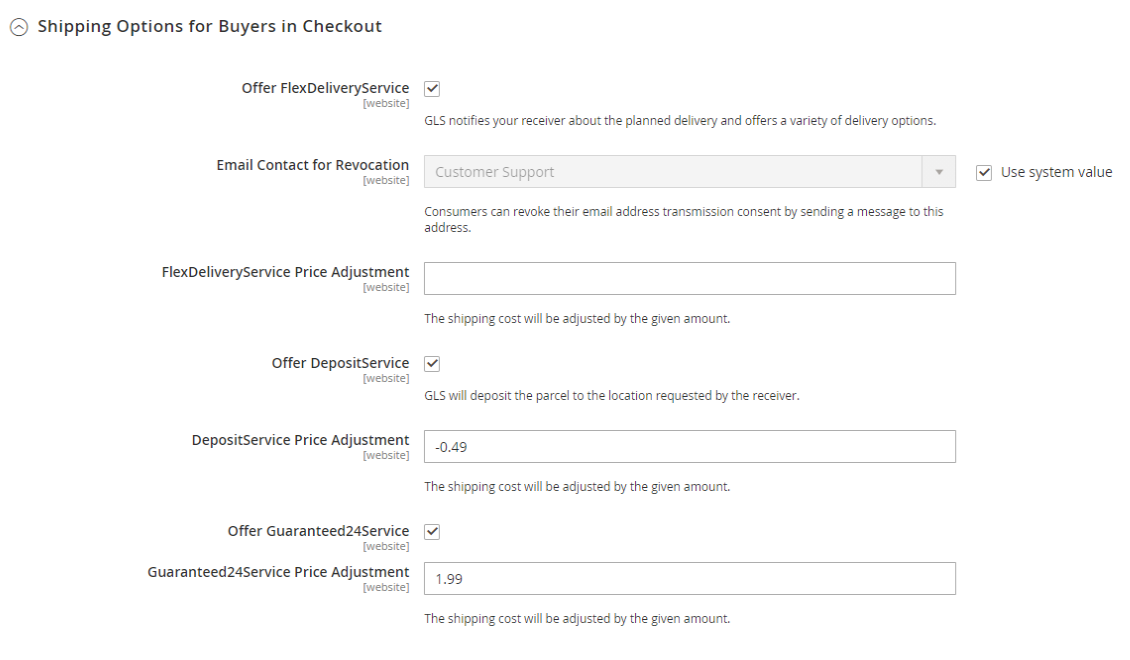
- The FlexDeliveryService transfers the buyer's email address to GLS. GLS informs your recipients about the expected delivery and provides a variety of delivery options.
- With DepositService, users can specify an alternative delivery location for their shipment. GLS will drop off the package at the recipient's desired location.
- With Guaranteed24Service, users can order delivery on the next working day (except Saturdays) – Germany-wide, excluding islands. To allow delivery in time, the parcel must be handed over to GLS on the same day. The module configuration setting "Latest Order Time for Same-Day Dispatch" is used to decide whether the service can be offered to the buyer or not.
Additional services may impact the actual shipping cost. As a merchant, you can decide to pass on the cost reduction or surcharge to your customers by specifying adjustment amounts in the module configuration. Shipping cost adjustments will be displayed as separate amount in checkout and order totals.
Note that discounts are only applied up to the configured shipping amount. That is, the sum of shipping amount and service adjustment will never fall below 0 (zero).
The aforementioned value-added services are only available in checkout. They cannot be booked with admin orders. When creating the shipping label, the user's selection can only be disabled completely. Service details, such as the selected place of deposit, cannot be changed.
In addition to the value-added services available to parcel recipients, GLS also offers services to parcel senders. The extension GLS Shipping integrates the following services:
- With LetterboxService booked, GLS delivers directly to the mailbox without the recipient's signature, if desired. Delivery to a mailbox is, of course, only possible for shipments that fit into a mailbox. The decision on this is the responsibility of the merchant.
- With ShopReturnService booked, you receive an additional return shipment label to be enclosed with the parcel. In case of a return, the recipient can drop off the parcel at any of the more than 5,500 GLS ParcelShops.
These services can be selected when creating a shipping label via the packaging popup:

To simplify recurring selection of services, default settings can be configured in the module configuration.
Stores → Configuration → Sales → Delivery Methods → GLS Shipping → Defaults for Label Creation
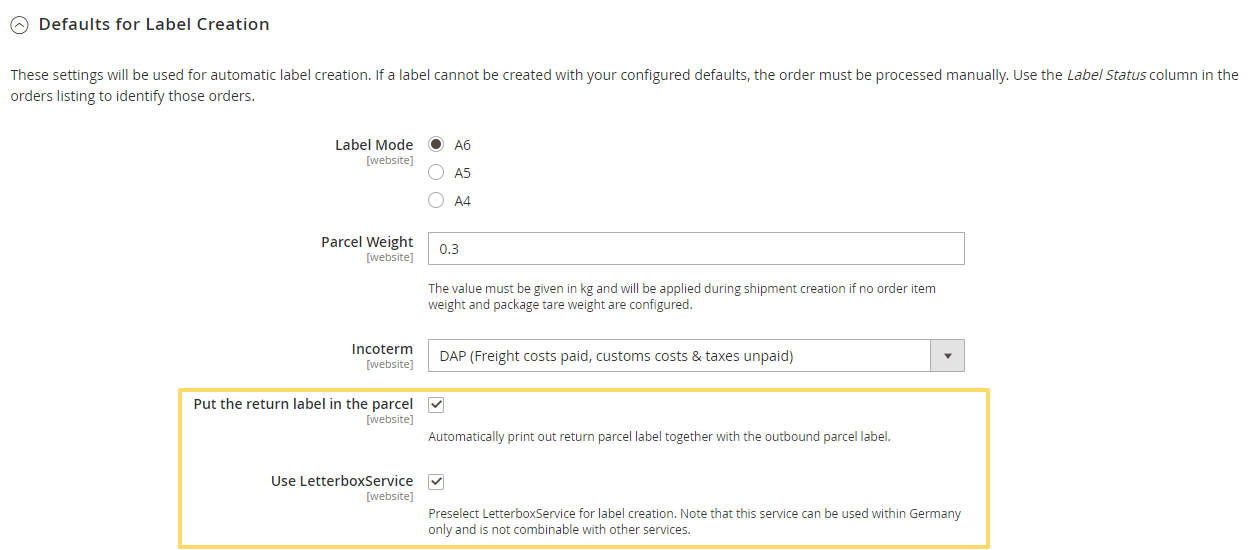
Per default, the address configured as shipping origin will be used as return shipment recipient. To have return shipments sent back to a different address, check the "Use Alternative Returns Address" box in the module configuration and specify the desired address.
Stores → Configuration → Sales → Delivery Methods → GLS Shipping → Defaults for Label Creation
To follow delivery progress, follow the link to the GLS parcel tracking website via the Magento tracking popup:
Admin panel users:
Sales → Orders → View → Shipping & Handling Information Section → Track Order
Sales → Orders → View → Shipments → View → Shipping and Tracking Information Section → Track this shipment
Sales → Orders → View → Shipments → View → Shipping and Tracking Information Section → [Tracking Number]
Sales → Shipments → View → Shipping and Tracking Information Section → Track this shipment
Sales → Shipments → View → Shipping and Tracking Information Section → [Tracking Number]
Registered users in shop frontend:
My Account → My Orders → Order Shipments → Track All Shipments
My Account → My Orders → Order Shipments → Track this shipment
My Account → My Orders → Order Shipments → [Tracking Number]
Guests in shop frontend:
Orders and Returns → Order Shipments → Track All Shipments
Orders and Returns → Order Shipments → Track this shipment
Orders and Returns → Order Shipments → [Tracking Number]
![]()
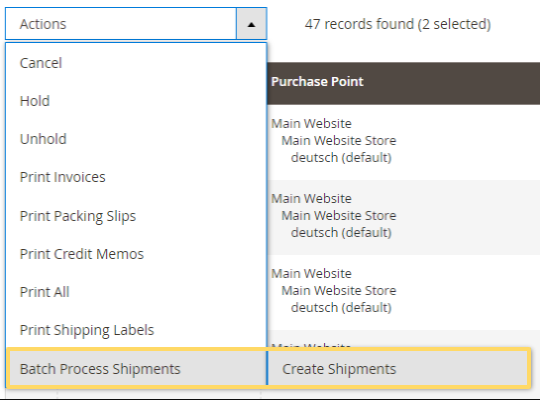
Creating shipments manually can be time-consuming for merchants with a high shipment volume. To solve this problem, the extension allows batch processing shipments either manually or fully automated.
Both variants require product attributes and module configuration defaults (additional services, customs settings, etc.) to be properly set. Shipments that require merchant interaction (because required shipping options are not pre-configured) cannot be mass-processed.
To process a list of orders manually, navigate to the orders list, select the orders to process, and use the Create Shipments mass action:
To process all pending orders automatically, set up cron and configure automated shipping label processing via
Stores → Configuration → Sales → Shipping Settings → Batch Processing → Shipping Label Automation
When using cron for fully automated processing, it is highly recommended to keep an eye on label statuses to avoid accumulation of failed label requests.
Labels created via the GLS WebAPI are due for payment during the next billing cycle – regardless of whether they were used or not. This does not apply to return shipment labels. The latter must only be paid for if they were actually used to return a parcel.
Regular labels can be cancelled free of charge as long as the billing cycle is not completed. To do so, navigate to the shipment details page and click the Cancel Labels button in the main actions toolbar:
Sales → Shipments → View
Sales → Orders → View → Shipments → View
If the cancellation of the shipment's tracking numbers did not entirely fail at the web service, then all GLS labels and tracks created for this shipment will be cancelled and removed. It is not possible to cancel individual labels of a multi-package shipment because Magento does not allow to recreate them individually.
Note that in the rare case of partial success (i.e. some of the shipment's tracking numbers could be cancelled but others could not) the labels and tracks will still be deleted from the system.
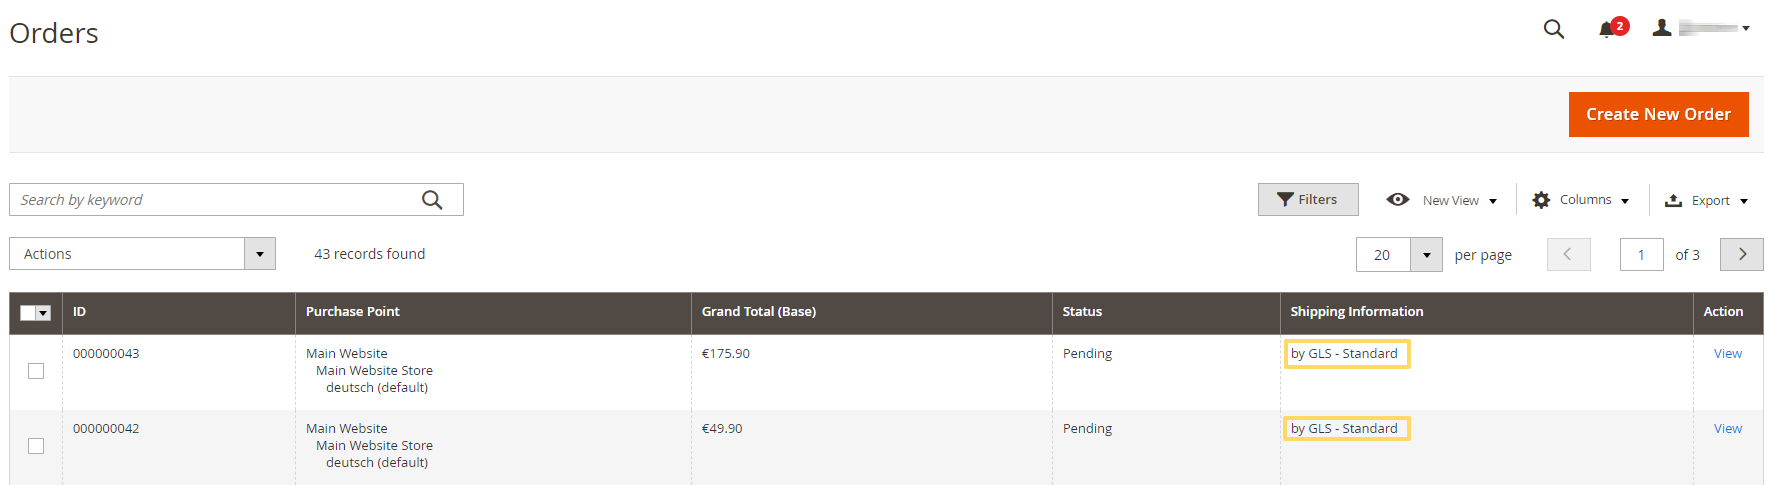
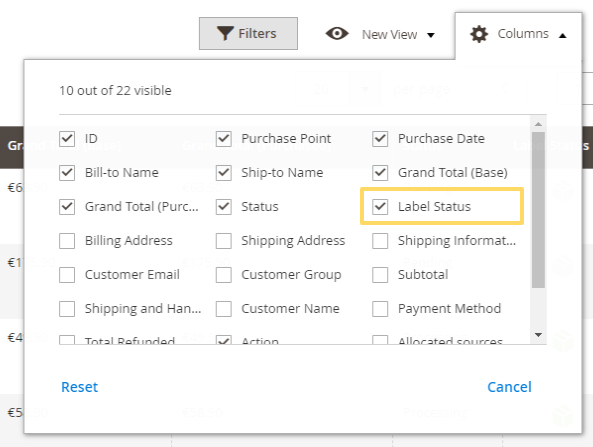
The Magento order status does not reflect whether or not a shipping label was created for an order. To overcome this, the extension introduces a separate Label Status column to the orders list. The possible statuses are:
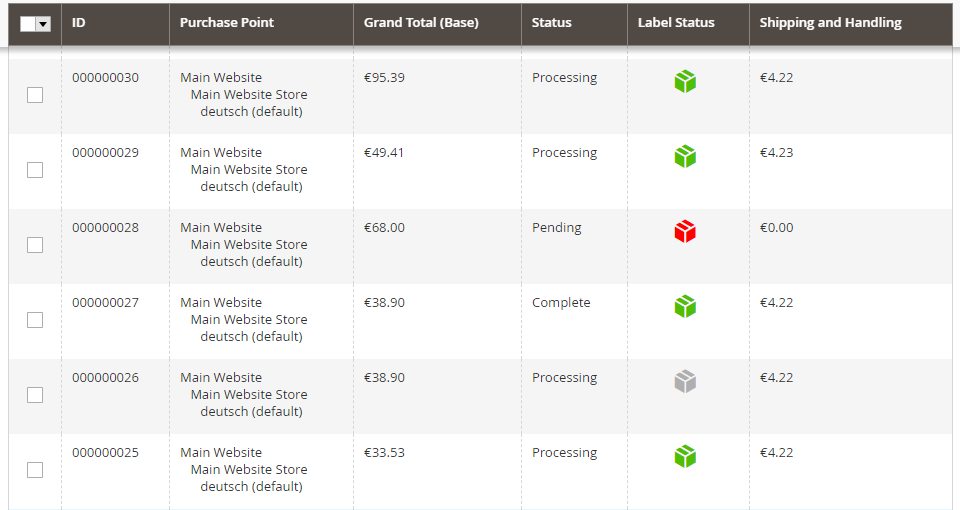
- Pending: Shipping labels for the order were either cancelled or not yet created. (grey)
- Partial: Shipping labels were successfully created for some order items. (yellow)
- Processed: Shipping labels were successfully created for all order items. (green)
- Failed: Shipping labels were requested but not successfully created. (red)
To display the label status column, enable it in the Columns grid action:
To search for particular statuses, select them in the Filters grid action:

The icon shows the respective label status at first glance:
The GLS Shipping extension sends user or recipient data to the GLS WebAPI for shipment fulfillment:
- To request a shipping label, the recipient's address is transmitted
- If the FlexDeliveryService service was selected, the email address is transmitted
- If the DepositService service was selected, the specified place of deposit is transmitted
- To request a return label, the recipient's address is transmitted
In addition to the Magento database schema, the extension stores consumer data in the following database tables:
-
nrshipping_recipient_street: Thesales_order_address.streetfield, split into parts (street name, street number, address addition) -
nrshipping_quote_address_shipping_option_selectionandnrshipping_order_address_shipping_option_selection: value-added service details specified during checkout, e.g.- the specified place of deposit if the DepositService was selected
- the notification email address if the FlexDeliveryService was selected
If logging has been enabled, the GLS log files in the Magento log directory may also contain the aforementioned data. Logging should be enabled for troubleshooting only, and the log files should be cleared regularly.
The Label Status column in the orders grid indicates when a label creation failed. This section describes different ways to track down and fix error causes. In case of any questions not answered in this section, please have a look at the Support Portal (FAQ).
When requesting a shipping label manually via the packaging popup, then possible GLS WebAPI error messages are displayed right at the top.

When requesting shipping labels via the orders grid's mass action, then possible GLS WebAPI error messages are displayed at the top of the page.
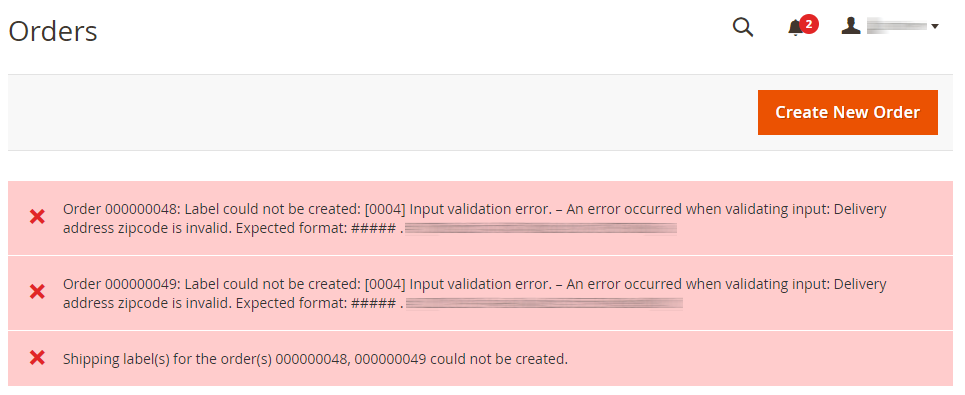
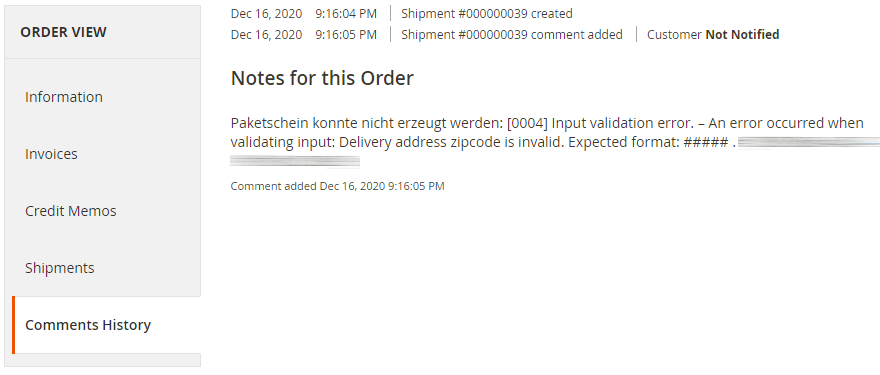
During bulk label creation, error messages are also added to the respective order's comments history. This is helpful in fully automated cron context where no user interaction happens.
The extension can be configured to log web service communication. Navigate to the module configuration and enable logging.
Stores → Configuration → Sales → Shipping Methods → GLS Shipping → General Settings → Logging
Stores → Configuration → Sales → Shipping Methods → GLS Shipping → General Settings → Log Level
The Log Level setting allows to filter the messages by severity:
- Errors: Failed interaction with the web service
- Info: Failed and successful interaction with the web service (all API communication)
Please note that the log level "Info" should only be set when solving problems, as this can lead to very large log files!

Log files can be found in the Magento log directory:
var/log/gls_shipping.log
At first, make sure that the web service credentials are configured in the module configuration.
In case the error message does not point to a general communication problem but instead indicates issues with a certain order, then the cause is in most cases a problem with the shipment data. Input data for label creation are assembled from the store configuration, module configuration, sender and recipient address, and the product catalog.
- The sender's address, if transmitted to the web service, is configured in the Magento shipping settings.
- The recipient address can be edited via the order detail page or the shipment detail page.
- Other shipping settings can be modified in packaging popup when creating the label manually.
Please see the file README.md for detailed uninstallation instructions.
In case of questions or problems, you can contact the support team by sending an email to [email protected]