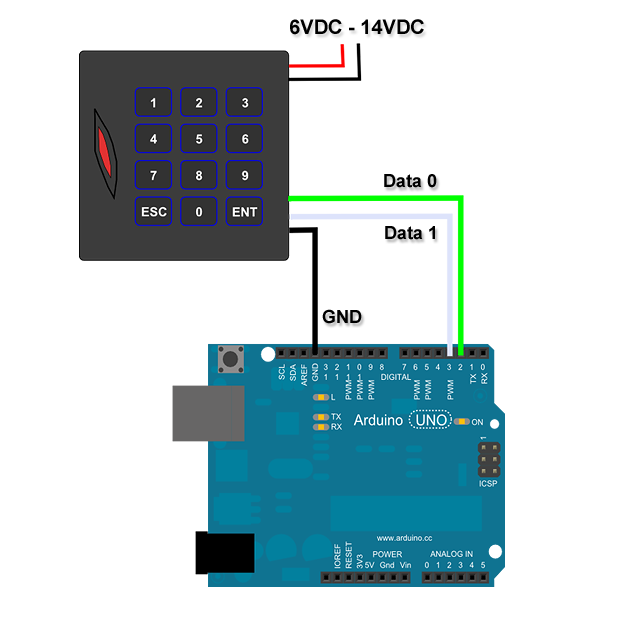
The Wiegand interface is a de facto standard commonly used to connect a card reader or keypad to an electronic entry system. Wiegand interface has the ability to transmit signal over long distance with a simple 3 wires connection. This library uses interrupt pins from Arduino to read the pulses from Wiegand interface and return the code and type of the Wiegand.
| Library | Description |
|---|---|
| Wiegand library | This is the easiest and cleanest library to use when only a single wiegand reader is needed. I strongly suggest to use this version if you only need one reader support |
| Wiegand NG library | This is another single reader library, however it uses dynamic memory to store the raw wiegand thus allowing unlimited bit length to be stored as long as your Arduino board has the memory to store it. I won't recommend to use this library unless you are facing a non-standard wiegand reader that sends out data that will not be decoded by the original Wiegand library. |
| Multi Wiegand library | This library uses pin change interrupt this allowing all the pin change interrupt supported pin to be used. With this, multiple readers can also be supported. Due to a workaround (hack) used to overcome the limitation with attachInterrupt not being able to be attached to class method directly, the initialisation of the sketch is more ugly and complicated. |
The following are needed
- Arduino - Any ATMEGA328 compatible board should work.
- Wiegand RFID Reader - The code was written for this reader however customers reported working with HID compatible readers.
- DATA0 of Wiegand connects to Arduino PIN 2 and DATA1 of Wiegand connects to Arduino PIN 3
Create a folder named Wiegand in Arduino's libraries folder. You will have the following folder structure:
cd arduino/libraries
git clone https://github.com/monkeyboard/Wiegand-Protocol-Library-for-Arduino.git Wiegand
Execute Arduino IDE, select Example-->Wiegand-->WiegandTest
#include <Wiegand.h>

WIEGAND wg;

void setup() {
	Serial.begin(9600);

	// default Wiegand Pin 2 and Pin 3 see image on README.md
	// for non UNO board, use wg.begin(pinD0, pinD1) where pinD0 and pinD1
	// are the pins connected to D0 and D1 of wiegand reader respectively.
	wg.begin();
}

void loop() {
	if(wg.available())
	{
		Serial.print("Wiegand HEX = ");
		Serial.print(wg.getCode(),HEX);
		Serial.print(", DECIMAL = ");
		Serial.print(wg.getCode());
		Serial.print(", Type W");
		Serial.println(wg.getWiegandType());
	}
}
softwarefoundry added library.properties
Francesco Uggetti (ugge75) improved this version of library to support multiple readers for ATMEGA2560. Please check out his version of multiple wiegand readers library here
Apollon77 improved interrupt safety and removed sysTick from global
paulfurley added 4 bit code
PaulStoffregen added Use digitalPinToInterrupt on newer Arduino software, if present
tholum Simpler Instructions
zanhecht Recognize 24- and 32-bit
luckymallari Simplified begin(D0, D1) for ESP(8266/32) devices.
Written by JP Liew
Project home: http://www.monkeyboard.org/tutorials/82-protocol/24-wiegand-converter
This library is free software; you can redistribute it and/or modify it under the terms of the GNU Lesser General Public License as published by the Free Software Foundation; either version 2.1 of the License, or (at your option) any later version.
This library is distributed in the hope that it will be useful, but WITHOUT ANY WARRANTY; without even the implied warranty of MERCHANTABILITY or FITNESS FOR A PARTICULAR PURPOSE. See the GNU Lesser General Public License for more details.
