OLED Stats Display Script For Raspberry Pi
Full setup instructions available on my blog - https://www.the-diy-life.com/add-an-oled-stats-display-to-raspberry-pi-os-bullseye/ Or my Youtube Channel - https://youtu.be/lRTQ0NsXMuw
The script is pre-configured for 128x64 I2C OLED Display, but can easily be modified to run on a 128x32 I2C OLED Display
| stats.py | monitor.py |
|---|---|
 |
 |
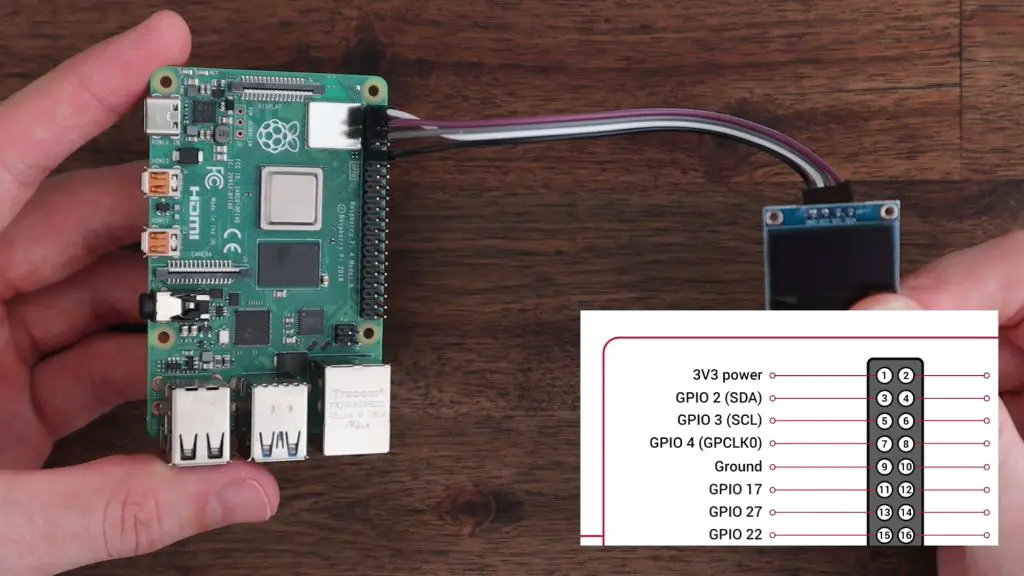
- Connect GND, VCC(3.3v), SCL, & SDA ports of the display according to the picture shown below:
- Upgrade your Raspberry Pi firmware and reboot:
    $ sudo apt-get update
    $ sudo apt-get full-upgrade
$ sudo reboot- Install python3-pip & upgrade the setuptools
    $ sudo apt-get install python3-pip
$ sudo pip3 install --upgrade setuptools- Next, we’re going to install the Adafruit CircuitPython library using the following commands:
    $ cd ~
    $ sudo pip3 install --upgrade adafruit-python-shell
    $ sudo reboot

    $ wget https://raw.githubusercontent.com/adafruit/Raspberry-Pi-Installer-Scripts/master/raspi-blinka.py
$ sudo python3 raspi-blinka.py- Check the
I2Cstatus using the command:
    $ sudo i2cdetect -y 1

        0  1  2  3  4  5  6  7  8  9  a  b  c  d  e  f
    00:                         -- -- -- -- -- -- -- --
    10: -- -- -- -- -- -- -- -- -- -- -- -- -- -- -- --
    20: -- -- -- -- -- -- -- -- -- -- -- -- -- -- -- --
    30: -- -- -- -- -- -- -- -- -- -- -- -- 3c -- -- --
    40: -- -- -- -- -- -- -- -- -- -- -- -- -- -- -- --
    50: -- -- -- -- -- -- -- -- -- -- -- -- -- -- -- --
    60: -- -- -- -- -- -- -- -- -- -- -- -- -- -- -- --
70: -- -- -- -- -- -- -- --- Next, we need to install the CircuitPython libraries specific to the display. Start by entering the following commands:
    $ sudo pip3 install adafruit-circuitpython-ssd1306
    $ sudo pip3 install psutil
    $ sudo reboot
$ sudo apt-get install python3-pil- Now we need to download the python script from out github:
    $ git clone https://github.com/mklements/OLED_Stats.git

    $ cd OLED_Stats
    $ cp PixelOperator.ttf ~/PixelOperator.ttf
    $ cp stats.py ~/stats.py

    $ cp psutilstats.py ~/psutilstats.py

    $ cp lineawesome-webfont.ttf ~/lineawesome-webfont.ttf
    $ cp monitor.py ~/monitor.py
- For activating the
crontabfollow the procedure:
$ crontab -eAdd this at the bottom:
Remember to change your username (pi below) if you're not using the default username
    @reboot python3 /home/pi/stats.py &

    OR

    @reboot python3 /home/pi/psutilstats.py &

    OR

    @reboot python3 /home/pi/monitor.py &
- At the end DELETE the OLED_Stats folder and reboot
    $ sudo rm -rf OLED_Stats
$ sudo rebootIf your display shows jumbled pixels/symbols instead of actual text - you may have a display which supports the SH1106 driver instead of more common SSD1306 driver. This script ONLY works for SSD1306 displays. If you have this issue, follow this guide instead: https://www.youtube.com/watch?v=LdOKXUDw2NY
