- AZ-204 Revise Note
- Develop Azure compute solution (25-30%)
- Develop Azure Storage (10-15%)
- Implement Azure Security (15-20%)
- Monitor, troubleshoot, and optimize Azure solutions (10-15%)
- Connect to and consume Azure services and third-party services (25-30%)
- Additional Tips and Resources
Compile checklist for creating a VM:
- Start with the network
- Name the VM
- Decide location of the VM
- Decide size of the VM
- Storage for the VM
- Select an Operating system
- Understand pricing model
-
Start with the network
- It is important to plan before creating resources because it is hard to change latter.
- If the VNet is to be connected to other VNets or on-premises networks, you must select address ranges that don't overlap.
- The IP addresses are private and can't be accessed from the Internet which is only true when using unrouteable IP address: 10.0.0.0/8, 172.16.0.0/12, or 192.168.0.0/16
- Azure reserves the first four and the last IP in each subnet for its own use.
- Security: By default, services outside VNets cannot access services inside VNets. However, services in different subnets of a VNets can talk to each other. We can use NSG to control the traffic flow to and from subnet; and to and from VMs.
- A VM must have at least one NIC but can have more than one. Each NIC attached to a VM must exist in the same location and subscription of the VM.
- Can change the subnet VM connected to but cannot change the VNet.
Terminologies: Virtual network (VNets), Subnet, Network security group (NSG), Network Interface (NIC), Network address translation (NAT), Private & Public IP.
More information: here
-
Plan for each VM
Checklist:
- What does the VM communication with?
- Which ports are open?
- Which OS is used?
- How much disk space is in use?
- What kind of data does this use? Are there any restrictions?
- What sort of CPU, memory, and disk IO load does the VM need?
Name the VM:
- It’s not trivial to change later.
- You should choose names that are meaningful and consistent which follow a sort of convention.
Decide location of the VM:
-
Criteria:
- Distance to users, legal, compliance requirements, etc.
- Each region has different hardware available, and some configurations are not available in all regions.
- Prices could be different between locations.
-
Learn more about Azure paired regions: here
Decide size of the VM:
Types:
- General purpose: Balanced CPU-to-memory ratio. Ideal for testing & development. Suit for small to medium databases and small to medium traffic web servers.
- Compute optimized: High CPU-to memory ratio. Good for medium traffic web servers, network appliances, batch processes, and application servers.
- Memory optimized: High memory-to-CPU. Great for relational database server, medium to large caches, and in-memory analytics.
- Storage optimized: High disk throughput and IO. Ideas for Big Data, SQL, NoSQL database, data warehousing and large transactional databases.
- GPU: Optimized for graphic rendering, machine learning.
- High performance compute: designed for HPC workloads.
Be careful about resizing production VMs - they will be rebooted automatically which can cause a temporary outage and change some configuration settings such as the IP address.
Storage for the VM:
-
All VM will have at least two virtual hard disks (VHDs). The first stores the operation system, and the second is used as temporary storage.
-
It’s common to create one or more data disks to manage the security, reliability, and performance of the disk independently.
-
Each VHD is held in Azure Storage as page blobs.
-
Two options for managing the relationship between the storage account and each VHD:
- Unmanaged disks: We create and manage our own storage accounts that are used to hold the VHDs. A single storage account has a fixed-rate limit of 20,000 I/O operations/sec which supporting 40 VHDs at full utilization. We need create more storage accounts if we want to scale out.
- Managed disks: Recommended model. Azure will manage the storage accounts for us. We can specify the size of the disk up to 4 TB. We can easily scale-out without worrying about storage account limits.
Select the OS:
- Azure bundles the cost of the OS license into the price.
- Scan Azure Marketplace to get the images for variety of stacks
Understand the pricing model:
- Compute and storage are charged independently
- Compute expenses are billed on a per-minute basis when a VM is up. The cost includes OS license cost. Linux-based VMs are cheaper because there is no license charge.
- Storage costs are billed even when a VM is stop or deallocated.
-
Basic commands to provision a VM
-
Create a new VM:
New-AzVm `
    -ResourceGroupName "myResourceGroupVM" `
    -Name "myVM" `
    -Location "EastUS" `
    -VirtualNetworkName "myVnet" `
    -SubnetName "mySubnet" `
    -SecurityGroupName "myNetworkSecurityGroup" `
    -PublicIpAddressName "myPublicIpAddress" `
-
Get Public Ip Address
Get-AzPublicIpAddress `
  -ResourceGroupName "myResourceGroupVM"  | Select IpAddress
-
-
Configure remote access to Linux VM
There are two approaches we can use to authenticate an SSH connection: username and password, or an SSH key pair.
- Using username and password to access VM leaves the VM vulnerable to brute-force attacks of passwords. The more secured method is using public-private key pair.
- But if we need to be able to access the Linux VM from a variety of locations, a username and password combination might be a better approach.
To connect to the VM via SSH key pair, we need:
- the public IP address of the VM (Note: it could be static or dynamic)
- the username of the local account on the VM
- a public key configured in that account
- access to the corresponding private key
- port 22 open on the VM
-
Configure remote access to Window VM
To connect to an Azure VM with an RDP client, we will need:
- The public IP address of the VM (or private if the VM is configured to connect to your network).
- Port 3389 open on the VM.
-
Enable just-in-time (JIT) access to VM
JIT is a feature of Azure Defender. It blocks down inbound traffic to a specific port such as 22 (SSH) and 3389 (RDP), etc to reduce the attach surface of a VM. Nevertheless, it still provides the access to legitimate users when needed.
By using JIT, we do not need to set rules for NSG or Firewall to access VM that apparently lets some ports be being opened all the time.
How to enable JIT for VM access:
- Enable Azure Defender for servers on the subscription in Security Center.
- Ensure all rules which are used for VM access such as 22 (SSH) and 3389 (RDP) are removed from NSG and Firewall. Otherwise, they will bypass JIT rules and let the ports are opened.
- Enable JIT for the VM in specific ports with Azure Portal or Azure Powershell. By that, Security Center will add a rule "deny all inbound traffic" to the selected ports in NSG and Firewall.
How does a user get access to the VM which has JIT applied:
- When a user request access to a VM, Security Center checks that the user has RBAC permissions for that VM.
- Security Center then configures NSG and Firewall to allow inbound traffic to the port and from the relevant IP (or range), for an amount of time.
- After the time has expired, Security Center restores NSG and Firewall to the previous state. Connections that are already established are not interrupted.
All setup steps could be found here
VMs are about to down and reboot because of serveral reasons: physical servers are down or outage, software and hardward update.
If this happens, Azure will move the VM to a healthy host server automatically. However, this self-healing migration could take several minutes, during which, the application(s) hosted on that VM will not be available.
Fault domain: a logical group of hardware in Azure that shares a common power source and network switch.
Update domain: a logical group of hardware that can undergo maintenance or be rebooted at the same time.
Avalability set: a logical group of VMs so that they aren't all subject to a single point of failure and not all upgraded at the same time during a host operating system upgrade in the datacenter. VMs in an avaiabilty set should also have the same funtionalities and have the same software installed.
Avalability set guarantees to spread VMs across Fault Domains and Update Domains.
Azure Backup is a backup as a service offering that protects physical or virtual machines no matter where they reside: on-premises or in the cloud.
Azure Backup is native support for Azure Virtual Machines, both Windows, and Linux.
Azure Backup is an automatic process which takes VM snapshots without shuting down the VM.
Resource Manager templates are JSON files that define the resources you need to deploy for your solution. ARM template features include declarative syntax and repeatable results.
Azure VM extensions are small applications that allow you to configure and automate tasks on Azure VMs after initial deployment. You bundle extensions with a new VM deployment or run them against an existing system.
Custom Script Extension downloads and executes scripts on Azure virtual machines. This extension is useful for post deployment configuration, software installation, or any other configuration or management tasks. Scripts can be downloaded from Azure storage or GitHub, or provided to the Azure portal at extension run time. We can use Custom Script Extension for both Window and Linux VM.
Cloud-init is a widely used approach to customize a Linux VM as it boots for the first time. You can use cloud-init to install packages and write files, or to configure users and security. As cloud-init runs during the initial boot process, there are no additional steps or required agents to apply your configuration.
-
Terms
-
Azure Container Registry: is a managed, private Docker registry service based on the open-source Docker Registry 2.0. Create and maintain Azure container registries to store and manage your private Docker container images and related artifacts.
-
Azure Container Regisitry Tasks: Build and push a single container image to a container registry on-demand, in Azure, without needing a local Docker Engine installation. Think
docker build,docker pushin the cloud. -
Azure Container Instances: offers the fastest and simplest way to run a container in Azure, without having to manage any virtual machines and without having to adopt a higher-level service.
-
-
Authenticate with an Azure container registry
Individual login with Azure AD: When working with the registry directly, such as pushing images and pulling images from development workstations.
az login
az acr login --name <acrName>
Service principal: your application or service can use it for headless authentication
Admin account: Each container registry includes an admin user account, which is disabled by default. You can enable the admin user and manage its credentials in the Azure portal, or by using the Azure CLI or other Azure tools. The admin account has full permissions to the registry.
The admin account is designed for a single user to access the registry, mainly for testing purposes.
-
Create and publish image
Create new image:
docker build <path_to_Dockerfile> <name_of_image>
Login in Azure Container Registry:
# Azure CLI
az acr login --name <acr_name>
Before publishing the image, we need to tag it:
- Query Login Server of the ACR:
# Azure CLI
az acr show --name <acr_name> --query loginServer --output table

# Output
Result
------------------------
<acr_name>.azurecr.io
- Tag the image with prefix is the login server:
docker tag <name_of_image> <loginServer>/<name_of_image>:<version>

# Example
docker tag myimage myacr.azurecr.io/myimage:v1
Publish the image to Azure Container Registry:
docker push <loginServer>/<name_of_image>:<version>
You then can list images in Azure Container Registry:
# Azure CLI
az acr repository list --name <acr_name> --output table

# Output
Result
----------------
myimage
To see the tags for a specific image:
az acr repository show-tags --name <acr_name> --repository <name_of_image> --output table
-
Create and publish container image with ACR Tasks
ACR Tasks will build our image in Azure and then publish it to ACR for us with one command:
# Azure CLI
az acr build --registry <acr_name> --image <name_of_image>:<version> <path_to_Dockerfile>
-
Deploy image to Azure Container Instance
Configure registry authentication with service principal:
ACR_NAME=<acr_name>

# SERVICE_PRINCIPAL_NAME: Must be unique within AD tenant
SERVICE_PRINCIPAL_NAME=<acr_name>-service-principal

# Obtain the full registry ID
ACR_REGISTRY_ID=$(az acr show --name $ACR_NAME --query id --output tsv)

# Create the service principal with rights scoped to the registry.
# Default permissions are for docker pull access. Modify the '--role'
# argument value as desired:
# acrpull:     pull only
# acrpush:     push and pull
# owner:       push, pull, and assign roles
SP_PASSWD=$(az ad sp create-for-rbac --name http://$SERVICE_PRINCIPAL_NAME --scopes $ACR_REGISTRY_ID --role acrpull --query password --output tsv)

SP_APP_ID=$(az ad sp show --id http://$SERVICE_PRINCIPAL_NAME --query appId --output tsv)
Deploy image:
az container create `
  --resource-group <myResourceGroup> `
  --name <container_name> `
  --image <loginServer>/<name_of_image>:<version> `
  -- cpu 1 --memory 1 `
  --registry-login-server <loginServer> `
  --registry-username $SP_APP_ID `
  --registry--password $SP_PASSWD `
  --dns-name-label <dns_name> `
  --ports 80
Verify deployment progress:
az container show `
  --resource-group <myResourceGroup> `
  --name <container_name> `
  --query instanceView.state
Azure App Service: fully managed web application hosting platform. This platform as a service (PaaS) offered by Azure allows you to focus on designing and building your app while Azure takes care of the infrastructure to run and scale your applications.
Limitation with Linux:
- App Service on Linux is not supported on Shared pricing tier.
- You can't mix Windows and Linux apps in the same App Service plan.
- Within the same resource group, you can't mix Windows and Linux apps in the same region.
App Service Environment: We can create an App Service Environment while creating an App Service plan by setting pricing tier to Isolation.
Continuous deployment to Azure App Service: To customize your deployment, include a .deployment file in the repository root. For more information, see Customize deployments and Custom deployment script.
Work with Azure App Service:
-
Create a web app with Azure CLI
# Create a App Service Plan
az appservice plan create --name <my_plan> --sku <SKU>

# Create a Web App
az webapp create --name <my_web_name> --plan <my_plan> --run-time <RUN_TIME>
-
Deploy code to web app
-
Use ZIP or WAR file deployment: We can use use the broswer to upload Zip file (for Windows), or Azure CLI, or REST APIs, Powershell.
# Azure CLI
az webapp deployment source config-zip --name <my_web_name> --src <path_to_zip_file>
-
What happens to my app during deployment?
All the officially supported deployment methods make changes to the files in the
/home/site/wwwrootfolder of your app.Thus, the deployment can failed because of locked files. Or web app might behave unpredictably during the deployment because not all the files updated at the same time.
-
How can prevent?
- Run your app from the ZIP package directly without unpacking it.
- Stop your app or enable offline mode for your app during deployment.
- Deploy to a staging slot with auto swap enabled.
-
-
Run from package: Require the app restart.
-
To enable: Set
WEBSITE_RUN_FROM_PACKAGEto1. Then when we use Zip deployment, it will not unpack all files towwwrootanymore. Instead, it mounts the zip file as read-only directory inwwwroot. -
We can run from the package at external URL by set
WEBSITE_RUN_FROM_PACKAGEto theExternal urlinstead.
-
-
Enable CORS
az webapp cors add --name <my_web_name> --allowed-origins Origin
-
Enable diagnostics logging
Azure provides built-in diagnostics to assist with debugging an App Service App. There are 5 types of built-in logging and tracing.
- Application logging: Logs message generated by application code.
- Web server logging: Logs HTTP request data.
- Detailed Error Messages
- Failed request tracing
- Deployment logging
To enable application log on Windows:
- We can use either File System or Blob Storage option to store logs.
- However, File System is for temporary debugging purposes, and turns itself off in 12 hours.
- The Blob option is for long-term logging. But we can only use storage accounts in the same region as the App Service.
- We can set also the Retention Period (Days) for the logs.
Enable application logs:
az webapp log config --name <appname> --resource-group <myResourceGroup> --application-logging azureblobstorage
Enable logs from Docker container:
az webapp log config --name <appname> --resource-group <myResourceGroup> --docker-container-logging filesystem
Stream Error logs:
az webapp log tail --name <appname> --resource-group <myResourceGroup> --filter Error
Alternatives to app diagnostics:
-
Azure Application Insights is a site extension that provides additional performance monitoring features, such as detailed usage and performance data, and is designed for production app deployments as well as being a potentially useful development too.
-
You can also view Metrics for your app. You can view CPU, memory, network, and file system usage, and set up alerts when a counter hits a particular threshold.
-
Move an app to another App Service Plan
- We can move an app to another AppService Plan as long as that plan is in the same resource group and the same geographical region with the current plan.
For more information, Azure deploys each App Service Plan to a deployment unit, called a webspace. Each region can have many webspaces, but your app can only move between plans that are created in the same webspace. All plans created with the same resource group and region combination are deployed into the same webspace.
If you're moving an app from a higher-tiered plan to a lower-tiered plan, such as from D1 to F1, the app may lose certain capabilities in the target plan. For example, if your app uses TLS/SSL certificates.
-
Create an ASP.NET Core app in a Docker container from Docker Hub using Azure CLI
-
Triggers and bindings concepts
-
Trigger defines how a function is invoked and a function must have exactly one trigger. Triggers have associated data, which is often provided as the payload for the function.
-
Binding to a function is a way of declaratively connecting another resource to the function. Bindings may be connected as output binding, input binding, or both. Data from bindings is provided to the function as parameters. Bindings are optional, a function might have one, or multiple bindings.
-
-
Handle Azure Functions binding errors
-
Use structured error handling: The top-most level of any function code should include a try/catch block. In the catch block, you can capture and log errors.
-
Retry policies (preview):
-
A retry policy is evaluated whenever an execution results in an uncaught exception. As a best practice, you should catch all exceptions in your code and rethrow any errors that should result in a retry.
-
Retry policy can be configured on the Host level or Function level.
-
The current retry count is stored in memory of the instance. It's possible that an instance has a failure between retry attempts, and the retry count is lost.
-
Using retry support on top of trigger resilience. For instance, if you used the default Service Bus delivery count of 10, and defined a function retry policy of 5. If the excution of one message failed, the function will retry 5 times before it requeues the message from Queue, and increments the delivery count to 2.
-
-
-
Durable Function
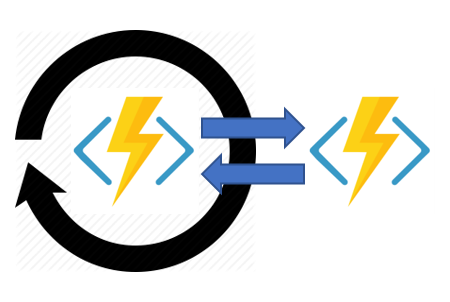
Durable Functions is an extension of Azure Functions that lets you write stateful functions in a serverless compute environment.
Orchestrator functions use event sourcing to ensure reliable execution and to maintain local variable state. The replay behavior of orchestrator code creates constraints on the type of code that you can write in an orchestrator function.
Constraint: Orchestrator functions must be deterministic: an orchestrator function will be replayed multiple times, and it must produce the same result each time.
- For instance,
DateTime.Nowin C# is not deterministic and cannot be used in orchsestrators. - Bindings are also nondeterministic.
- More constraints could be found here.
Versoning: Any code updates made to Durable Functions apps that affect unfinished orchestrations might break the orchestrations' replay behavior.
Common patterns:
-
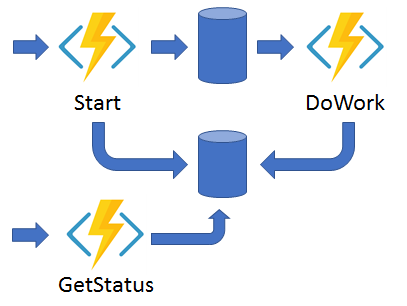
Function chaining:
In the function chaining pattern, a sequence of functions executes in a specific order. In this pattern, the output of one function is applied to the input of another function.
-
Fan out/fan in:
In the fan out/fan in pattern, you execute multiple functions in parallel and then wait for all functions to finish. Often, some aggregation work is done on the results that are returned from the functions.
-
Async HTTP APIs:
The async HTTP API pattern addresses the problem of coordinating the state of long-running operations with external clients. A common way to implement this pattern is by having an HTTP endpoint trigger the long-running action. Then, redirect the client to a status endpoint that the client polls to learn when the operation is finished.
-
Monitor:
You can use Durable Functions to create flexible recurrence intervals, manage task lifetimes, and create multiple monitor processes from a single orchestration.
-
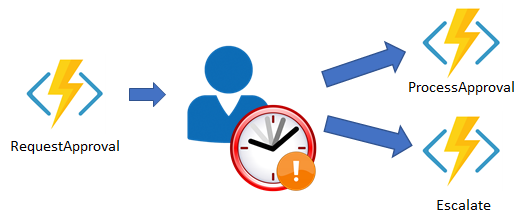
Human interaction:
You can implement the pattern in this example by using an orchestrator function. The orchestrator uses a durable timer to request approval. The orchestrator escalates if timeout occurs. The orchestrator waits for an external event, such as a notification that's generated by a human interaction.
-
Aggregator (stateful entities):
In this pattern, the data being aggregated may come from multiple sources, may be delivered in batches, or may be scattered over long-periods of time. The aggregator might need to take action on event data as it arrives, and external clients may need to query the aggregated data.
- For instance,


-
Select the appropriate API for your solution
Core (SQL) MongoDB Cassandra Azure Table Gremlin New project being created from scratch x Existing MongoDB, Cassandra, Azure Table, or Gremlin data x x x x Analysis of the relationships between data x All other scenarios x Ask the question: Are there existing databases or applications that use any of the supported APIs?
-
If there is, then you might want to consider using the current API with Azure Cosmos DB, as that choice will reduce your migration tasks, and make the best use of previous experience in your team.
-
If there isn't, then there are a few questions that you can ask in order to help you define the scenario where the database is going to be used:
-
Does the schema change a lot?
A traditional document database is a good fit in these scenarios, making Core (SQL) a good choice.
-
Is there important data about the relationships between items in the database?
Relationships that require metadata to be stored for them are best represented in a graph database.
-
Does the data consist of simple key-value pairs?
Before Azure Cosmos DB existed, Redis or the Table API might have been a good fit for this kind of data; however, Core (SQL) API is now the better choice, as it offers a richer query experience, with improved indexing over the Table API.
-
-
-
Implement partitioning schemes
Azure Cosmos DB uses partitioning to horizontal scale individual containers in a database to meet the performance needs of an application.
Logical partitions:
- A logical partition consists of a set of items that have the same partition key.
- A logical partition also defines the scope of database transactions.
- Each logical partition can store up to 20GB of data.
Physical partitions:
- Internally, one or more logical partitions are mapped to a single physical partition.
- The number of physical partitions in a container depends on the following configuration:
- The number of throughput provisioned (each individual physical partition can provide a throughput of up to 10,000 request units per second).
- The total data storage (each individual physical partition can store up to 50GB data).
- Throughput provisioned for a container is divided evenly among physical partitions. A partition key design that doesn't distribute requests evenly might result in too many requests directed to a small subset of partitions that become "hot".
Replica sets:
- Each physical partition consists of a set of replicas, also referred to as a replica set. A replica set makes the data stored within the physical partition durable, highly available, and consistent.
- A single physical partition have at least 4 replicas.
Choosing a partition key: Selecting a partition key in a container is a simple but important design decision. Once we select the partition key, it cannot be changed later. If we must to change it, we will have to move all the data to a new container with the new desire partition key. For all container, a partition key should:
- Be a property that has value which does not change. If a property is set as partition key, we cannot update its value.
- The property should have a wide range of possible values. If we don't have one available, consider using Synthetic partition key.
- Appear frequently in the predicate clause of queries.
- Spread request unit (RU) consumption and data storage evenly across all logical partitions.
-
Set the appropriate consistency level for operations
Distributed databases that rely on replication for high availability, low latency, or both, must make a fundamental tradeoff between the read consistency, availability, latency, and throughput.
Azure Cosmos DB offers five well-defined levels. From strongest to weakest, the levels are:
- Strong: Users are always guaranteed to read the latest committed write.
- Bounded staleness:
- The reads might return stale data by at most "K" versions (that is, "updates") of an item or by "T" time interval, whichever is reached first.
- It still honors the consistent-prefix guarantee.
- We can trade consistency for availability, latency and throughput or vice versa by adjusting the "K" or "T" variable.
- Session: Within a single client session reads are guaranteed to honor the consistent-prefix, monotonic reads, monotonic writes, read-your-writes, and write-follows-reads guarantees.
- Consistent prefix: Consistent prefix consistency level guarantees that reads never see out-of-order writes.
- Eventual: There's no ordering guarantee for reads. In the absence of any further writes, the replicas eventually converge.
Each level provides availability and performance tradeoffs. The following image shows the different consistency levels as a spectrum:
Note
There are no write latency benefits on using strong consistency with multiple write regions because a write to any region must be replicated and committed to all configured regions within the account. This results in the same write latency as a single write region account.
-
Implement server-side programming including stored procedures, triggers, and change feed notifications
Stored procedure: is a piece of application logic written in JavaScript that is registered and executed against a collection as a single transaction.
Trigger: is a piece of application logic that can be executed before (pre-triggers) and after (post-triggers) creation, deletion, and replacement of a document. Triggers are written in JavaScript.
Change feed: we can use it for sort of de-normalization and duplicating data to a different container with different partition key for optimizing query.
-
Quickstart: Build a .NET console app to manage Azure Cosmos DB SQL API resources
-
How to write stored procedures, triggers, and user-defined functions in Azure Cosmos DB

-
Choose a tool and strategy for copying blobs
Azure CLI:
- Using
az storage blob copy command. - This command runs asynchronously and uses the Azure Storage service to manage the copy process.
- This means we don't have to download and upload blobs via local storage to migrate them between accounts.
- We can put ETag and date condition option to specify which blobs will be copied from the source such as
--source-if-match,--source-if-modified-since, etc or which blobs will be overwrite at the destination such as--destination-if-match,--destination-if-modified-since, etc. - UseCase: You want to quickly upload the data in a collection of small files held in a local folder to blob storage. This is a one-off request. You don't want to overwrite blobs that have been modified in the last two days.
AZCopy:
- The AzCopy utility was written specifically for transferring data into, out of, and between Azure Storage accounts.
- A key strength of AzCopy over the Azure CLI is that they're recoverable. The AzCopy command tracks the progress of copy operations, and if an operation fails, it can be restarted close to the point of failure.
- The AzCopy command lacks the ability to select blobs based on their modification dates.
- AzCopy does provide comprehensive support for hierarchical containers and blob selection by pattern matching (two features not available with the Azure CLI).
- UseCase: You want to transfer a series of large files to blob storage. It may take several hours to upload each file, and you're concerned that if a transfer fails it shouldn't have to restart from the beginning
.NET Storage Client library:
- The .NET Storage Client library requires a development investment, and may not be suitable for quick, one-off jobs.
- If we have a complex task that is repeated often, and needs certain of customization and flexibility, then this investment could be worthwhile.
- UseCase: You want to move a set of blobs in Azure storage from one storage account to another. You want to organize the blobs in the destination account in different folders, according to the month in which each blob was last updated. You'll be performing this task at regular intervals.
- Using
-
Manage container properties and metadata with .NET
About properties and metadata:
- System properties: System properties exist on each Blob storage resource. Some of them can be read or set, while others are read-only.
- User-defined metadata: User-defined metadata consists of one or more name-value pairs that you specify for a Blob storage resource.
Retrieve container properties:
- GetProperties
- GetPropertiesAsync
Set metadata: You can specify metadata as one or more name-value pairs on a blob or container resource. To set metadata, add name-value pairs to an IDictionary object, and then call one of the following methods to write the values:
- SetMetadata
- SetMetadataAsync
-
Implement data archiving and retention
Store business-critical blob data with immutable storage:
- For the duration of the retention interval, blobs can be created and read, but cannot be modified or deleted.
- Time-based retention policy support: Users can set policies to store data for a specified interval. After the retention period has expired, blobs can be deleted but not overwritten.
- Legal hold policy support: If the retention interval is not known, users can set legal holds to store immutable data until the legal hold is cleared.
- Container and storage account deletion are also not permitted if there are any blobs in a container that are protected by a legal hold or a locked time-based policy.
- Locked time-based policies will protect against container deletion only if at least one blob exists within the container.
Access tiers for Azure Blob Storage - hot, cool, and archive:
-
Hot - Optimized for storing data that is accessed frequently.
-
Cool - Optimized for storing data that is infrequently accessed and stored for at least 30 days. It can be used for Short-term backup and disaster recovery datasets. It still provides a need to be available immediately when accessed but the cost will higher than Hot tier.
-
Archive - Optimized for storing data that is rarely accessed and stored for at least 180 days with flexible latency requirements (on the order of hours). It can be used for Long-term backup, secondary backup, and archival datasets
-
Notes:
- Only the hot and cool access tiers can be set at the account level. The archive access tier isn't available at the account level.
- Hot, cool, and archive tiers can be set at the blob level during upload or after upload.
- While a blob is in archive storage, the blob data is offline and can't be read, overwritten, or modified. To read or download a blob in archive, we must first rehydrate it to an online tier.
Rehydrate blob data from the archive tier:
-
There are two options to retrieve and access data stored in the archive access tier.
- Rehydrate an archived blob to an online tier - Rehydrate an archive blob to hot or cool by changing its tier using the Set Blob Tier operation.
- Copy an archived blob to an online tier - Create a new copy of an archive blob by using the Copy Blob operation. Specify a different blob name and a destination tier of hot or cool.
-
The process of rehydration can take hours to complete which depends on rehydrate priority:
- Standard priority: The rehydration request will be processed in the order it was received and may take up to 15 hours.
- High priority: The rehydration request will be prioritized over Standard requests and may finish in under 1 hour for objects under ten GB in size.
-
Snapshot and sof delete
Soft delete: When enabled, soft delete enables us to save and restore when blobs and blob snapshots are deleted. When soft delete is on and we overwrite a blob, a soft deleted snapshot will be generated to save the state of overwritten data.
Azure Database Migration Service is a fully managed service designed to enable seamless migrations from multiple database sources to Azure data platforms with minimal downtime (online migrations).
The following diagram is a high-level view of how the classic subscription administrator roles, Azure roles, and Azure AD roles are related.

Classic subscription administrator roles: Account Administrator, Service Administrator, and Co-Administrator are the three classic subscription administrator roles in Azure. Classic subscription administrators have full access to the Azure subscription. The following table describes the differences between these three classic subscription administrative roles.
| Classic subscription administrator | Limit | Note |
|---|---|---|
| Account Administrator | 1 per Azure account | Manage all subscriptions in an account. Change the Service Administrator |
| Service Administrator | 1 per Azure subscription | By default, for a new subscription, the Account Administrator is also the Service Administrator. The Service Administrator has equivalent access of a user who is assigned Owner role at the subscription code. The Service Administrator has full access to the Azure portal. |
| Co-Administrator | 200 per subscription | The Co-Administrator has the equivalent access of a user who is assigned the Owner role at the subscription scope. |
Azure roles: Azure RBAC is an authorization system built on Azure Resource Manager that provides fine-grained access management to Azure resources, such as compute and storage.
Azure AD roles: Azure AD roles are used to manage Azure AD resources in a directory such as create or edit users, assign administrative roles to others, reset user passwords, manage user licenses, and manage domains.
Differences between Azure roles and Azure AD roles: At a high level, Azure roles control permissions to manage Azure resources, while Azure AD roles control permissions to manage Azure Active Directory resources.
| Azure roles | Azure AD roles |
|---|---|
| Manage access to Azure resource | Manage access to Azure Active Directory resources |
| Support custom roles | Support custom roles |
| Scope can be specified at multiple levels (management group, resource group, resource) | Scope is at tenant level |
Global Administrator (an Azure AD role) can elevate their access by choosing the Access management for Azure resources switch in the Azure portal, the Global Administrator will be granted the User Access Administrator role (an Azure role) on all subscriptions for a particular tenant.
1. Permissions and consent in the Microsoft identity platform
2. Understand OAuth 2.0 and OpenID Connect protocols
3. Azure Active Directory app manifest
4. Resource forest concepts and features for Azure Active Directory Domain Services
-
Basic concepts and terminology
Azure CDN:
- Azure Content Delivery Network (CDN) offers developers a global solution for rapidly delivering high-bandwidth content to users by caching their content at strategically placed physical nodes across the world.
- It stores cached content on edge servers in point-of-presence (POP) locations that are close to end users, to minimize latency.
Video Streaming: Use Azure CDN along with Microsoft Azure Media Services (AMS), a solution can stream videos to the end-users with the low latency and reliable connectivity.
-
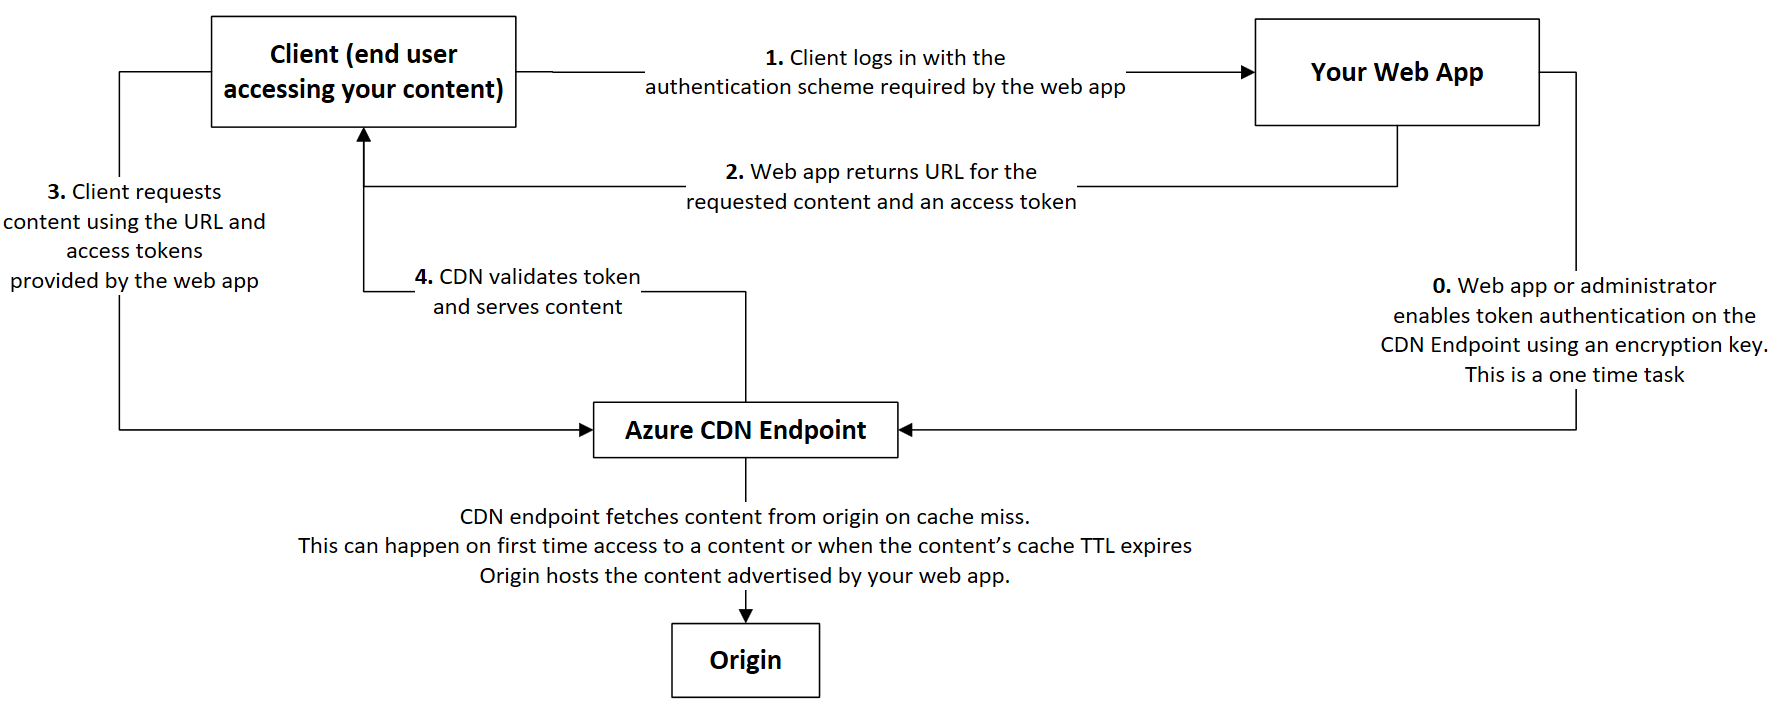
Securing Azure CDN assets with token authentication
Token authentication is a mechanism that allows you to prevent the Azure Content Delivery Network (CDN) from serving assets to unauthorized clients.
Token authentication verifies that requests are generated by a trusted site by requiring requests to contain a token value that holds encoded information about the requester.
Reference architecture:
-
Control Azure CDN caching behavior with caching rules
Caching behavior:
-
Bypass cache: Do not cache and ignore origin-provided cache-directive headers.
-
Override: Ignore origin-provided cache duration; use the provided cache duration instead. This will not override cache-control: no-cache.
-
Set if missing: Honor origin-provided cache-directive headers, if they exist; otherwise, use the provided cache duration.
Cache expiration duration:
- For the Override and Set if missing Caching behavior settings, valid cache durations range between 0 seconds and 366 days. For a value of 0 seconds, the CDN caches the content, but must revalidate each request with the origin server.
- For the Bypass cache setting, the cache duration is automatically set to 0 seconds and cannot be changed.
-
-
Basic concepts
Azure Cache for Redis provides an in-memory data store based on the Redis software.
Azure Cache for Redis can be used as a distributed data or content cache, a session store, a message broker, and more. It can be deployed as a standalone or along side with other Azure database services, such as Azure SQL or Cosmos DB.
Key scenarios:
Pattern Description Data cache Databases are often too large to load directly into a cache. It is common to use the cache-aside pattern to load data into the cache only as needed Content cache Many web pages are generated from templates that use static content such as headers, footers, banners. These static items shouldn't change often. Using an in-memory cache provides quick access to static content compared to backend datastores. Session store This pattern is commonly used with shopping carts and other user history data that a web application may want to associate with user cookies -
Best practices
Memory management:
- Choose an eviction policy that works for your application. The default policy for Azure Redis is volatile-lru, which means that only keys that have a TTL value set will be eligible for eviction.
- Set an expiration value on your keys. An expiration will remove keys proactively instead of waiting until there's memory pressure
-
High availability for Azure Cache for Redis
Normally, a Redis client communicates with the primary node in a Redis cache for all read and write requests. Certain Redis clients can be configured to read from the replica node.
Standard replication: An Azure Cache for Redis in the Standard or Premium tier runs on a pair of Redis servers by default.
Zone redundancy: Azure Cache for Redis supports zone redundant configurations in the Premium and Enterprise tiers
-
PerformanceCounters is only supported in Windows systems.
-
The recommended way to get system counters in Linux (and other non-Windows environments) is by using EventCounters.
-
Basic concepts and terminology
Logic App: is a cloud serverless service that helps you schedule, automate, and orchestrate tasks, business processes, and workflows when you need to integrate apps, data, systems, and services across enterprises or organizations.
Triggers: Every logic app workflow starts with a trigger, which fires when a specific event happens, or when new available data meets specific criteria. A logic app could contain more than one trigger (maximum is 10).
Actions: Each time that the trigger fires, the Logic Apps engine creates a logic app instance that runs the actions in the workflow. These actions can also include data conversions and workflow controls, such as conditional statements, switch statements, loops, and branching.
Connectors: Connectors provide quick access from Azure Logic Apps to events, data, and actions across other apps, services, systems, protocols, and platforms.
-
Integration Service Environment (ISE)
To access secured resources, such as virtual machines (VMs) and other systems or services, that are inside or connected to an Azure virtual network, we will need to create an Integration Service Environment (ISE).
Why use an ISE?
- Running logic apps in your own separate dedicated instance helps reduce the impact that other Azure tenants might have on your apps' performance, also known as the "noisy neighbors" effect.
- Direct access to resources that are inside or connected to your virtual network.
- Your own static IP addresses, which are separate from the static IP addresses that are shared by the logic apps in the multi-tenant service.
- Increased limits on run duration, storage retention, throughput, HTTP request and response timeouts, message sizes, and custom connector requests.
Dedicated versus multi-tenant:
- Built-in triggers and actions, such as HTTP, display the CORE label and run in the same ISE as your logic app.
- Managed connectors that display the ISE label are specially designed for ISEs and always run in the same ISE as your logic app.
- If an ISE connector is available for an on-premises system or data source, you can connect directly without using the on-premises data gateway.
- Managed connectors that don't display the ISE label continue to work for logic apps inside an ISE. These connectors always run in the multi-tenant Logic Apps service, not in the ISE.
Access to on-premises systems: Logic apps that run inside an ISE can directly access on-premises systems and data sources that are inside or connected to an Azure virtual network.
Note: if you need to access SQL Server from an ISE and use Windows authentication, you must use the connector's non-ISE version and the on-premises data gateway. The connector's ISE version doesn't support Windows authentication. For more information
On-premise data gateway:
-
B2B enterprise integration solutions with Azure Logic Apps and Enterprise Integration Pack (EIP)
Integration account:
- A separate Azure resource that provides a secure, scalable, and manageable container for the integration artifacts that we define and use with logic app workflows.
- We can create, store, and manage B2B artifacts, such as trading partners, agreements, maps, schemas, certificates, and batch configurations.
Why use the Enterprise Integration Pack?
- With the EIP, we can store all our artifacts in one place - the integration account.
- We can build B2B workflows and integrate with third-party software-as-service (SaaS) apps, on-premises apps, and custom apps by using Azure Logic Apps and connectors.
- We can create custom code for our logic apps with Azure functions.
High-level steps to get started building B2B logic apps:


-
Concepts and terminology
Azure API Management: is a way to create consistent and modern API gateways (front-door or facade) for existing back-end services. As a full-lifecycle API management solution, it also provides additional capabilities including a self-service developer portal for API discovery, API lifecycle management, and API analytics.

APIs and operations:
- Each API contains a reference to the back-end service that implements the API, and its operations map to the operations implemented by the back-end service.
- Operations in API Management are highly configurable, with control over URL mapping, query and path parameters, request and response content, and operation response caching. Rate limit, quotas, and IP restriction policies can also be implemented at the API or individual operation level.
Products: Products are how APIs are surfaced to developers. Products in API Management have one or more APIs, and are configured with a title, description, and terms of use. Products can be Open or Protected. Protected products must be subscribed to before they can be used, while open products can be used without a subscription.
Groups: Groups are used to manage the visibility of products to developers. API Management has the following immutable system groups:
- Administrators: Administrators manage API Management service instances, creating the APIs, operations, and products that are used by developers.
- Developers: Authenticated developer portal users. Developers are the customers that build applications using your APIs. Developers are granted access to the developer portal and build applications that call the operations of an API.
- Guests: Unauthenticated developer portal users. They can be granted certain read-only access, such as the ability to view APIs but not call them.
Developers: Developers represent the user accounts in an API Management service instance. Each developer is a member of one or more groups, and can subscribe to the products that grant visibility to those groups.
Developer portal: Your customers (developers) should use the Developer portal to access your APIs. The Developer portal can be customized.
Policies: Policies are a powerful capability of the system that allow the publisher to change the behavior of the API through configuration. Policies are a collection of Statements that are executed sequentially on the request or response of an API. We can use policies to have rate limiter, IP filtering, and transformation capacity, etc.
<policies>
<inbound>
    <!-- statements to be applied to the request go here -->
</inbound>
<backend>
    <!-- statements to be applied before the request is forwarded to
        the backend service go here -->
</backend>
<outbound>
    <!-- statements to be applied to the response go here -->
</outbound>
<on-error>
    <!-- statements to be applied if there is an error condition go here -->
</on-error>
</policies>
API Version and Revision:
- Revision: allow you to make changes to your APIs in a controlled and safe way. When you want to make changes, create a new revision. You can then edit and test API without disturbing your API consumers. When you are ready, you can then make your revision current.
- Versions: allow you to present groups of related APIs to your developers. Versions differentiate themselves through a version number (which is a string of any value you choose), and a versioning scheme (path, query string or header).
-
Except Developer tier, Virtual Network (VNet) support, Multi-region deployment, Multiple custom domain names and Self-hosted gateway are only available at Premium tier.
-
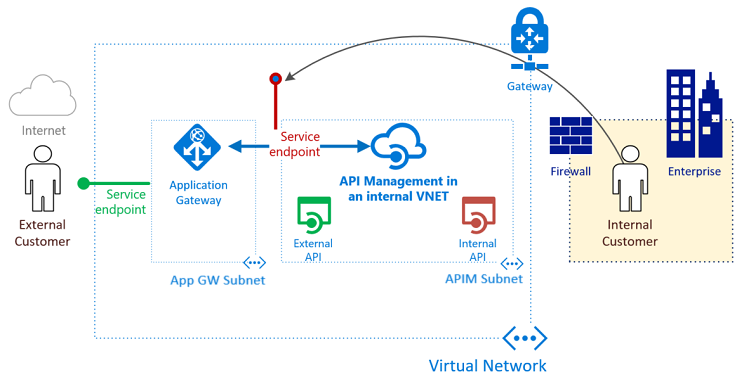
Deploy API Management in an internal VNnet while exposing sufficient capacities for external developers
To expose subset of of APIs and developer portal of the internal API Management to the Internet, we will need the Azure Application Gateway acts as reverse-proxy in front of the API Management.

-
Concepts, terminology and limitations
Event Grid is a serverless service and an eventing backplane that enables event-driven, reactive programming. It uses a publish-subscribe model. Event Grid isn't a data pipeline, and doesn't deliver the actual object that was updated.
Events:
- An event is the smallest amount of information that fully describes something that happened in the system.
- When posting events to an Event Grid topic, the array can have a total size of up to 1 MB. Each event in the array is limited to 1 MB. If an event or the array is greater than the size limits, then we will receive the response 413 Payload Too Large.
- Events over 64 KB are charged in 64-KB increments. For example, an event that is 130 KB would incur operations as though it were 3 separate events.
Topics:
- Provide an endpoint in which the source send events.
- System topics are built-in topics provided by Azure services such as Azure Storage, Azure Event Hubs, and Azure Service Bus.
- Custom topics are application and third-party topics which expose an endpoint where we can POST an event using HTTP/HTTPS.
- The Partner Events feature allows a third-party SaaS provider to publish events from its services so that consumers can subscribe to those events.
Event subscriptions:
- A subscription for a topic. When creating a subscription, we also provide an endpoint for handling the event.
- We can filter events that send to the endpoints.
- We can set an expiration for a subscription so that the event subscription is automatically expired after a date.
-
Event subscription filter
We have three options for filtering:
Event type: By default all event types for the event source are sent to the endpoint. We can provide an array with the event types, or specify
Allto get all event types for the event source. Example:"filter": { "includedEventTypes": [ "Microsoft.Resources.ResourceWriteFailure", "Microsoft.Resources.ResourceWriteSuccess" ] }
Subject begins with or ends with: specify a starting or ending value for the subject. The below example shows how we filter events for a specific file type
JPG, in a specific Blob storage containerimages:"filter": { "subjectBeginsWith": "/blobServices/default/containers/images", "subjectEndsWith": ".jpg" }
Advanced fields and operators: To filter by values in the data fields and specify the comparison operator. In advanced filtering, we specify the:
- operatorType: The type of comparison.
- key: The field in the event data that we're using for filtering. It can be a number, boolean, or string.
- values: The value or values to compare to the key.
If we specify multiple values in one filter, then the
ORoperation is applied. The below example filters events from both containerimagesandaudios:"advancedFilters": [ { "operationType": "StringContains", "key": "Subject", "values": [ "/blobServices/default/containers/images", "/blobServices/default/containers/audios" ] } ]
If we specify multiple filters, then the
ANDoperation is performed, so each filter condition must be met. Example:"advancedFilters": [ { "operatorType": "StringContains", "key": "Subject", "values": [ "/providers/microsoft.devtestlab/" ] }, { "operatorType": "StringContains", "key": "Subject", "values": [ "/providers/Microsoft.Compute/virtualMachines/" ] } ]
Advanced filtering has the following limitations:
- 5 advanced filters and 25 filter values across all the filters per event subscription.
- 512 characters per string value.
- 5 values for in and not in operators.
- Keys with . (dot) character in them. For example:
http://schemas.microsoft.com/claims/authnclassreferenceor[email protected]. Currently, there's no support for escape characters in keys.
-
Advanced features
Batch event delivery:
-
Event Grid defaults to send each event individually to subscribers. The subscriber receives an array with a single event.
-
We can enable Batch event delivery for each subscription by setting two parameters:
- Max events per batch: The maximum number of events that the subscription will include in one batch. However, Event Grid does not delay events in order to create a batch if fewer events are available. Must be between 1 and 5,000.
- Preferred batch size in kilobytes: Set the preferred upper bound of batch size in KB. An event whose size is large than this threshold will not be dropped. Must be between 1 and 1,000.
-
Setting with Azure CLI:
storageId = $(az storage account show --name <storage_account_name> --resource-group <resource-group> --query id --output tsv)
endpoint = https://$sitename.azurewebsites.net/api/updates

az eventgrid event-subscription create \
    --resource-id $storageId \
    --name <event_subscription_name> \
    --endpoint $endpoint
    --max-events-per-batch 1000 \
    --preferred-batch-size-in-kilobytes 512
Retry schedule and duration:
-
When receiving an error from an event delivery, EventGrid either retries, or dead-letter or drop the event based on the return error.
-
Bellow are errors that EventGrid will not retry and decides to drop the event if Dead-Letter is not configured for the subscription.
Endpoint Type Error Codes Azure Resources 400 Bad Request, 413 Request Entity Too Large, 403 Forbidden Webhook 400 Bad Request, 413 Request Entity Too Large, 403 Forbidden, 404 Not Found, 401 Unauthorized -
Event Grid uses an exponential backoff retry policy for event delivery.
-
By default, EventGrid expires all events that aren't delivered within 24 hours or 30 times. We can customize the retry policy by changing two settings
event-ttl(event time-to-live) andmax-deliver-attempts. In the bellow example, EventGrid will retry an event within 48 hours or the number of attempts are less than or equal 50:az eventgrid event-subscription create \ --resource-group <resource_group> --topic-name <topic> \ --name <event_subscription_name> \ --endpoint <endpointUrl> \ --event-ttl 2880 \ --max-deliver-attempts 50 -
To set dead-letter location for holding events that can't be delivered to an endpoint. We would need a Blob container. The examples get the resource ID of an existing storage account. They create an event subscription that uses a container in that storage account for the dead-letter endpoint.
containerName = deadLetter
resourceGroup = myResourceGroup

topicId = $(az eventgrid topic show --name myTopic --resource-group $resourceGroup --query id --output tsv)
storageAccountId = $(az storage account show --name myStorageAccount --resource-group $resourceGroup --query id --output tsv)

az eventgrid event-subscription create \
    --source-resource-id $topicId \
    --name <event_subscription_name> \
    --endpoint <endpointUrl> \
    --deadletter-endpoint $storageAccountId/blobServices/default/containers/$containerName
To turn off dead-lettering, rerun the command to create the event subscription but don't provide a value for deadletter-endpoint. We don't need to delete the event subscription.
Webhook Event delivery:
- When a new event is ready, Event Grid service POSTs an HTTP request to the configured endpoint with the event in the request body.
- Endpoint validation with Event Grid events:
- Synchronous handshake: At the time of event subscription creation, Event Grid sends a subscription validation event to the endpoint. The application behinds the endpoint must validate the
validationCodeinside the data portion of the event. - Asynchronous handshake: Starting with version 2018-05-01-preview, Event Grid sends a
validationUrlproperty in the data portion of the subscription validation event. To complete the handshake, find that URL in the event data and do a GET request to it. The provided URL is valid for 5 minutes.
- Synchronous handshake: At the time of event subscription creation, Event Grid sends a subscription validation event to the endpoint. The application behinds the endpoint must validate the
-
-
.NET library code samples
Publishing Events to an Event Grid Topic:
using Azure.Messaging.EventGrid;

// Creating and Authenticating EventGridPublisherClient
EventGridPublisherClient client = new EventGridPublisherClient(
    new Uri(topicEndpoint),
    new AzureKeyCredential(topicAccessKey));

// Publishing Events to Azure Event Grid
// Using EventGridEvent

List<EventGridEvent> eventsList = new List<EventGridEvent>
{
    new EventGridEvent(
        subject: "ExampleEventSubject",
        eventType: "Example.EventType",
        dataVersion: "1.0",
        data: "This is the event data")
};

await client.SendEventsAsync(eventsList);

// Use CloudEvent
List<CloudEvent> eventsList = new List<CloudEvent>
{
    // CloudEvent with populated data
    new CloudEvent(
        source: "/cloudevents/example/source",
        type: "Example.EventType",
        data: "This is the event data"),

     // CloudEvents also supports sending binary-valued data
    new CloudEvent(
        source: "/cloudevents/example/binarydata",
        type: "Example.EventType",
        data: Encoding.UTF8.GetBytes("This is binary data"),
        dataContentType: "example/binary")
};

await client.SendEventsAsync(eventsList);
Deserializing Events Delivered to Event Handlers:
// Regardless of the event handler, however, events are always sent as UTF-8 encoded JSON.

// Parse Events from JSON payload.
// Once events are delivered to the event handler, parse the JSON payload into list of events.

// Use EventGridEvent
EventGridEvent[] events = EventGridEvent.Parse(jsonPayload);

// Use CloudEvent
CloudEvent[] events = CloudEvent.Parse(jsonPayload);

// Deserialize Event Data
// We can access the event data by deserializing to a specific type using GetData<T>()
foreach (CloudEvent cloudEvent in cloudEvents)
{
    switch (cloudEvent.Type)
    {
        case "Contoso.Items.ItemReceived":
            // By default, GetData uses JsonObjectSerializer to deserialize the payload
            ContosoItemReceivedEventData itemReceived = cloudEvent.GetData<ContosoItemReceivedEventData>();
            Console.WriteLine(itemReceived.ItemSku);
            break;
        case "MyApp.Models.CustomEventType":
            // One can also specify a custom ObjectSerializer as needed to deserialize the payload correctly
            TestPayload testPayload = cloudEvent.GetData().ToObject<TestPayload>(myCustomSerializer);
            Console.WriteLine(testPayload.Name);
            break;
        case SystemEventNames.StorageBlobDeleted:
            // Example for deserializing system events using GetData<T>
            StorageBlobDeletedEventData blobDeleted = cloudEvent.GetData<StorageBlobDeletedEventData>();
            Console.WriteLine(blobDeleted.BlobType);
            break;
    }
}
-
Features and terminology
Namespace: A management instance for one of multiple Event Hub instances (or topics). It provides DNS integrated network endpoint, a range of access control and network integration management feature like IP filtering, virtual network service endpoint, and Private Link.
Event publishers:
- An entity sends events to an Event Hub is an event publisher (or event producer).
- Event publisher can send events using HTTPS, AMQP 1.0, or Kafka protocol.
- Event publisher uses Azure AD based-authorization with OAuth2-issued JTW tokens or an Event Hub-specific Shared Access Signature (SAS) token.
Publishing an event:
- AMQP has significantly higher performance for frequent publishers and can achieve much lower latencies when used with asynchronous publishing code.
- We can publish events individually or batched. A single publication has a limit of 1 MB, regardless of whether it is a single event or a batch. Publishing events larger than this threshold will be rejected.
- Event Hubs throughput is scaled by using partitions and throughput-unit allocations.
Event Retention:
- The default value and shortest possible retention period is 1 day (24 hours).
- With Standard tier, maximum retention period is 7 days.
- For Dedicated tier, the maximum retention period is 90 days.
Publisher policy: Enables granular control over event publishers through publisher policies. With that each publisher uses its own unique identifier when publishing events to an Event Hub. Developer can
Revoke-Accessto particular publisher and againRestore-Accessto that publisher using Management APIs.Capture: Event Hubs Capture enables us to automatically capture the streaming data in Event Hubs and save it to your choice of either a Blob storage account, or an Azure Data Lake Service account. Captured data is written in the Apache Avro format.
Event consumers: An entity which reads events from an Event Hub is an event consumer. The consumers connect via AMQP 1.0 and events are delivered through the session as they become available. The consumers do not need to pull for data availability.
Consumer groups:
-
The publish/subscribe mechanism of Event Hubs is enabled through Consumer groups.
-
A consumer group is a view (state, position or offset) of an entire Event Hub. Consumer groups enable multiple consuming applications to each have a separate view of the event stream, and to read the stream independently at their own pace and with their own offsets.
-
In a stream processing architecture, each downstream application equates to a consumer group.
-
For a Standard, maximum number of consumer groups are 20.
-
There can be at most 5 concurrent readers on a partition per consumer group; however it is recommended that there is only one active reader on a partition per consumer group. Otherwise, we must to deal with duplication events.
-
The following figure shows the Event Hubs stream processing architecture:
Checkpointing:
- Checkpointing is a process by which readers mark or commit their position within a partition event sequence.
- Checkpointing is the responsibility of the consumer and occurs on a per-partition basis within a consumer group.
- If a reader disconnects from a partition, when it reconnects it begins reading at the checkpoint that was previously submitted by the last reader of that partition in that consumer group. When the reader connects, it passes the offset to the event hub to specify the location at which to start reading.
-
Scaling with Event Hubs
There are two factors which influence scaling with Event Hubs.
- Throughput units
- Partitions
Throughput units:
- The throughput capacity of Event Hubs is controlled by throughput units. Throughput units are pre-purchased units of capacity. Capacity of single throughput:
- Ingress: Up to 1 MB per second or 1000 events per second (whichever comes first).
- Egress: Up to 2 MB per second or 4096 events per second.
- Beyond the capacity of the purchased throughput units, ingress is throttled and a
ServerBusyExceptionis returned. - Up to 20 throughput units can be purchased for an Event Hubs namespace and are shared across all event hubs in that namespace.
- The Auto-inflate feature of Event Hubs automatically scales up by increasing the number of throughput units, to meet usage needs. The Event Hubs service increases the throughput when load increases beyond the minimum threshold, without any requests failing with ServerBusy errors.
Partitions:
- The number of partitions is specified at creation and must be between 1 and 32 in Event Hubs Standard.
- The partition count can be up to 2000 partitions per Throughput Unit in Event Hubs Dedicated.
- Applications control the mapping of events to partitions in one of three ways:
- By specifying partition key, which is consistently mapped (using a hash function) to one of the available partitions.
- By not specifying a partition key, which enables to broker to randomly choose a partition for a given event.
- By explicitly sending events to a specific partition.
- Specifying a partition key enables keeping related events together in the same partition and in the exact order in which they were sent.
Partition strategy should based on how and what the data is ingested.
-
Samples for .NET library for Event Hubs
Publish events to an Event Hub: In order to publish events, you'll need to create an
EventHubProducerClient.using Azure.Messaging.EventHubs; string connectionString = "CONNECTION_STRING"; string eventHubName = "HUB_NAME"; await using (var producer = new EventHubProducerClient(connectionString, eventHubName)) { using EventBatchData eventBatch = await producer.CreateBatchAsync(); eventBatch.TryAdd(new EventData(new BinaryData("First"))); eventBatch.TryAdd(new EventData(new BinaryData("Second"))); await producer.SendAsync(eventBatch); }
Process events using an Event Processor client: For the majority of production scenarios, it is recommended that the
EventProcessorClientbe used for reading and processing events.// Since the EventProcessorClient has a dependency on Azure Storage blobs for persistence of its state, you'll need to provide a BlobContainerClient for the processor, which has been configured for the storage account and container that should be used. var cancellationSource = new CancellationTokenSource(); var cancellationSource.CancelAfter(TimeSpan.FromSeconds(45.0)); var storageConnectionString = "<< CONNECTION STRING FOR THE STORAGE ACCOUNT >>"; var blobContainerName = "<< NAME OF THE BLOB CONTAINER >>"; var eventHubsConnectionString = "<< CONNECTION STRING FOR THE EVENT HUBS NAMESPACE >>"; var eventHubName = "<< NAME OF THE EVENT HUB >>"; var consumerGroup = "<< NAME OF THE EVENT HUB CONSUMER GROUP >>"; // Create BlobContainerClient and EventProcessorClient var blobContainerClient = new BlobContainerClient(storageConnectionString, blobContainerName); var processorClient = new EventProcessorClient(blobContainerClient, consumerGroup, eventHubConnectionString, eventHubName); // Register handlers for incoming events and errors Task processEventHandler(ProcessEventArgs eventArgs) => Task.CompletedTask; Task processErrorHandler(ProcessErrorEventArgs errorArgs) => Task.CompletedTask; processorClient.ProcessEventAsync += processEventHandler; processorClient.ProcessErrorAsync += processErrorHandler; // Start processor await processor.StartProcessingAsync(); try { // The processor performs its work in the background; block until cancellation // to allow processing to take place. await Task.Delay(Timeout.Infinite, cancellationSource.Token); } catch (TaskCanceledException) { // This is expected when the delay is canceled. } try { await processor.StopProcessingAsync(); } finally { // To prevent leaks, the handlers should be removed when processing is complete. processor.ProcessEventAsync -= processEventHandler; processor.ProcessErrorAsync -= processErrorHandler; }

-
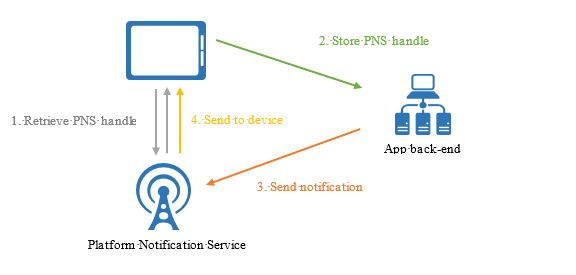
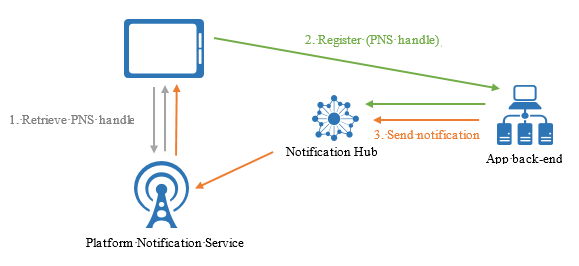
How do push notifications work?
Push notifications are delivered through platform-specific infrastructures called PlatForm Notification Systems (PNSes). They offers basic push functionalities to deliver a message to a device with the provided handle.
To send a notification to all customers across the Android, iOS, and Windows versions of an app, the developer must work separately with Apple Push Notification Service (APNS), Firebase Cloud Messaging (FCM), and Windows Notification Service (WNS).
At a high level, here is how push works:
-
Why use Azure Notification Hubs?
Notification Hubs eliminates all complexities associated with sending push notifications from the app backend. Its multi-platform, scaled-out push notification infrastructure reduces push-related coding and simplifies the backend.
-
Device registration Device registration with a Notification Hub is accomplished using a Registration or Installation.
Registrations: A registration associates the Platform Notification Service (PNS) handle for a device with tags and possibly a template. The PNS handle could be a ChannelURI, device token, or FCM registration ID.
Note: Azure Notification Hubs supports a maximum of 60 tags per device.
Installation: An Installation is an enhanced registration that includes a bag of push related properties. It is the latest and best approach to registering your devices. The following are some key advantages to using installations:
- Creating or updating an installation is fully idempotent.
- The installation model supports a special tag format
($InstallationId:{INSTALLATION_ID})that enables sending a notification directly to the specific device. - Using installations also enables you to do partial registration updates. The partial update of an installation is requested with a PATCH method using the JSON-Patch standard.
Registration management from the device:
When managing device registration from client apps, the backend is only responsible for sending notifications. Client apps keep PNS handles up-to-date, and register tags. The following picture illustrates this pattern.
- The device first retrieves the PNS handle from the PNS.
- Then it registers the handle with the notification hub directly.
- After the registration is successful, the app backend can send a notification targeting that registration.
In this case, we use only Listen rights to access your notification hubs from the device.
Registering from the device is the simplest method, but it has some drawbacks:
- A client app can only update its tags when the app is active. More generally, when tags are affected by multiple devices, managing tags from the backend is a desirable option.
- Since apps can be hacked, securing the registration to specific tags requires extra care.
Registration management from a backend:
Managing registrations from the backend requires writing additional code. The app from the device must provide the updated PNS handle to the backend every time the app starts (along with tags and templates), and the backend must update this handle on the notification hub. The following picture illustrates this design.
The advantages of managing registrations from the backend include the ability to modify tags to registrations even when the corresponding app on the device is inactive, and to authenticate the client app before adding a tag to its registration.
-
Security
When creating a hub, two rules are automatically created: one with Listen rights (that the client app uses) and one with all rights (that the app backend uses):
- DefaultListenSharedAccessSignature: grants Listen permission only.
- DefaultFullSharedAccessSignature: grants Listen, Manage, and Send permissions. This policy is to be used only in your app backend. Do not use it in client applications; use a policy with only Listen access.
-
.Net Library For Notification Hubs
NotificationHubClientis an instance to interact with Notification Hubs.

-
Concepts, terminology and limitations
Azure Queue Service:
- is a simple queue service which can contains millions of messages up-to the total capacity limit of a storage account. A single message is up-to 64 KiB in size.
- We can access to the Azure Queue Service via HTTP/HTTPS or using client libraries.
ULR format: Queues are addressable using the following URL format:
http://<storage account>.queue.core.windows.net/<queue>.Message: A message, in any format, of up to 64 KB. Before version 2017-07-29, the maximum time-to-live allowed is seven days. For version 2017-07-29 or later, the maximum time-to-live can be any positive number, or -1 indicating that the message doesn't expire. If this parameter is omitted, the default time-to-live is seven days.
Scale targets for Queue Storage:
Resource Target Maximum size of a single queue 500 TiB Maximum storage account capacity 5 PiB Maximum size of a message in queue 64 KiB Maximum request rate per storage account 20,000 messages per second, which assumes a 1-KiB message size Target throughput for a single queue (1-KiB message size) Up to 2,000 messages per second -
.NET library code samples: More could be found here.
Important
- The current library only supports
PeekandReceivemessage in batch. - Other operations:
Send,Update,Deleteare applied for a single message. - Visibility timeout cannot be larger than 7 days.
- To use Queue Trigger for Azure Function, we MUST encode the message to Base64String before sending it to Azure Queue Storage.
- Create a queue client to connect to Azure Queue Service.
using Azure.Storage.Queues;

QueueClient queueClient = new QueueClient(connectionString, queueName);
- Create a queue if not exists.
await queueClient.CreateIfNotExistsAsync();

if (queueClient.Exists())
{
    Console.WriteLine($"Queue created: '{queueClient.Name}'");
}
- Insert a message into queue. A message can be either a string (in UTF-8 format) or a byte array.
string message = "Hello World!";
await queueClient.SendMessageAsync(message);
- Peek at the next messages. We can peek at the messages in the queue without changing the visibility of them in the queue. If we do not set
maxMessagesparameter, the default is to peek at one message.
using Azure.Storage.Queues.Models; // Namespace for PeekedMessage

// Get only one message
PeekedMessage[] peekedMessage = await queueClient.PeekMessagesAsync();

// Get only many messages
PeekedMessage[] peekedMessages = await queueClient.PeekMessagesAsync(maxMessages: 32);
- Update an existing message in the queue. The following code updates the queue message with new contents, and sets the visibility timeout to extend another 60 seconds. This saves the state of work associated with the message, and gives the client another minute to continue working on the message.
// Get a message at top of the queue. The returned message becomes invisible to any worker which has accessed to the queue. By default, this message stays invisible for 30 seconds.
QueueMessage message = await queueClient.ReceiveMessageAsync();

await queueClient.UpdateMessageAsync(
    message.MessageId,
    message.PopReceipt,
    "Update content",
    TimeSpan.FromSeconds(60.0)); // Make it invisible for another 60 seconds
- Dequeue a message from a queue in two steps.
// Step 1:
// Get a message at top of the queue. The returned message becomes invisible to any worker which has accessed to the queue. By default, this message stays invisible for 30 seconds. We can set the visibilityTimeout parameter to change the invisible time.
QueueMessage message = await queueClient.ReceiveMessageAsync();

// TODO: Process the message here

// Step 2:
// To finish removing the message from the queue
await queueClient.DeleteMessageAsync(message.MessageId, message.PopReceipt);
- We can also add/update user-defined properties; and get system and user-defined property of a queue by:
// Set user-defined property
IDictionary<string, string> metadata = new Dictionary<string, string>();
metadata.Add("MyOwnProperty", "Hello World");

await queueClient.SetMetadataAsync(metadata);

// To retrieve all properties, use
QueueProperties properties = await queueClient.GetPropertiesAsync();
- The current library only supports
-
Concepts and terminology
Namespace:
- A namespace is a container of all messaging components which are queues and topics.
- Topics and Subscriptions feature is not supported in Basic tier.
Queue:
- Store messages until downstream applications are available to receive and process the messages.
- Messages on queue are ordered and timestamped on arrival.
- Messages are delivered in pull mode. The pull operation is long-lived and only complete once a message is available.
Topic:
- While Queue is point-to-point communication, Topics and Subscriptions are useful in publish/subscribe scenarios.
- A subscriber to a topic can receive a copy of each message sent to the topic.
Topic Filter:
-
We can config a filter condition for a subscription to specify which messages will be copied from the topic. There are 3 types of filter:
- Boolean Filter: the TrueFilter and FalseFilter either cause all arriving messages (true) or none of the arriving messages (false) to be copied to the subscription.
- SQL Filter: holds a SQL-like conditional expression in which the broker will evaluate against messages' user-defined properties or system properties. All system properties must start with
sys.in the conditional expression. - Correlation Filter: holds a set of conditions that are matched against one or more of an arriving messages' user and system properties. A match exists when a property's value is equal to the value specified in the correlation filter. In case string expression, the comparison is case-sensitive. We can combine multiple matched properties by the AND logical operation.
-
In most cases, if possible prefer to use Boolean Filter and Correlation Filter since SQL Filter causes lower message throughput.
-
Default Filter for a new subscription is True Filter.
Topic Action:
- A rule for a subscription contains not only filter conditions but also an action. The action can add, update, or delete properties from the original message to produce a "clone" message in the subscription.
- Whenever a message has matched against a rule which combines filter conditions and an action, a copy of message will be generated.
- It means if a subscription has N rules, and each rule has an action, then N messages will be produced on the subscription.
- This message will have a property called
RuleNamewhere the value is the name of the matching rule.
Message size: 256 KB / message in Standard tier, 1 MB / message in Premium tier.
Premium tier:
- Provides resource isolation at the CPU and memory level so that each workload runs in isolation.
- At the Premium tier, we need specify the number of messaging units (minium is 1) and are able to enable Zone redundancy.
- To choose the correct number of messaging units:
- Start with 1 or 2 messaging units.
- If the CPU usage is bellow 20%, then scale down.
- If the CPU usage is above 70%, then scale up.
- We can set rules for auto scale up or down like the way we set up for App Service Plan.
- With Topics and Subscriptions, Premium tier also allows creating volatile subscriptions that exist for the duration of the connection.
Billing: by hours and number of operations. In Basic tier, it only charges on number of operations.
-
Advanced features.
Message session: To create FIFO guarantee in Service Bus.
- The Basic tier does not support Session.
- When Session is enabled, the client application can no longer receive or send regular messages. All messages must be sent as part of a session (by setting sessionId) and received by receiving the session.
- To allow for handling sessions in high-scale, high-availability systems, the session feature also supports to set/get a session state. This feature allows the workflow process associated with a session can recover from unexpected failures. We can think it is like a Checkpoint.
- The message session state can hold data of the size of one message (i.e. 256 KB for Standard, and 1 MB for Premium).
Auto forwarding:
-
The Basic tire does not support Auto forwarding.
-
Service Bus automatically remove messages that are placed in the first queue or subscription (source) and put them into the second queue or topic (destination). Such moves are done transactionally.
-
Usage patterns:
-
Overcome the limitation of number subscriptions per topic (2000) by creating second-level topics.
-
To decouple message senders from receivers.
-
-
Considerations:
- When the destination exceeds the quota, or it is disabled, the source entity adds messages to its dead-letter queue.
- To maximize the throughput of fan-out, it is a recommended that we have moderate number of subscriptions on the first-level topic (E.g 20 subscriptions), each of them chains with the second-level topics with a large number of subscriptions (E.g. 200 subscriptions).
- Don't create a chain that exceeds 4 hops. Messages that exceed 4 hops are dead-lettered.
- To create a chain, the creator of the subscription must have Manage permissions on both the source and the destination entity.
-
We can enable auto forwarding by setting the
QueueDescription.ForwardToandSubscriptionDescription.ForwardToproperties of the source. Example:SubscriptionDescription srcSubscription = new SubscriptionDescription (srcTopic, srcSubscriptionName); srcSubscription.ForwardTo = destTopic; namespaceManager.CreateSubscription(srcSubscription);
Dead-letter Queue:
-
All queues and topic subscriptions have an associated DLQ. DLQ holds messages which meets those criterial:
- They can't be delivered successfully to any receiver (Default maximum deliver count is 10).
- They timed out (exceed TimeToLive).
- They're explicitly sidelined by the receiving application.
-
Path to DLQ:
<queue path>/$deadletterqueue
<topic path>/Subscriptions/<subscription path>/$deadletterqueue
Scheduled deliver:
- We can set a time when a message in a queue or subscription will become available for the consumer.
- Scheduled messages can also be canceled. Cancellation deletes the message.
- We can scheduled a message by setting the
ScheduledEnqueueTimeUtcin theMessageobject or explicitly with theScheduleMessageAsyncAPI. The latter immediately returns the scheduled message's SequenceNumber, which we can use later to cancel the scheduled message if needed.
// Set ScheduledEnqueueTimeUtc
byte[] content = Encoding.UTF8.GetBytes("Hello World!");
Message message = new Message(content);
message.ScheduledEnqueueTimeUtc = DateTime.UtcNow.AddMinutes(10);

await queueClient.SendAsync(message);
// Use ScheduleMessageAsync to schedule a message. If you want to schedule a batch of message, use the above approach.
byte[] content = Encoding.UTF8.GetBytes("Hello World!");
Message message = new Message(content);

long messageSequenceNumber = await queueClient.ScheduleMessageAsync(message, DateTimeOffset.UtcNow.AddMinutes(10));

// Cancel the scheduled message
await queueClient.CancelScheduledMessageAsync(messageSequenceNumber);
Message deferral:
- When a queue or subscription client receives a message that is willing to process, but due to the state inside of the application, it has an option of "deferring" retrieval of the message to the later point.
- The deferred message is still in the main queue or subscription (not in DLQ) but it is set aside.
- To retrieve a deferred message, the application is responsible for remembering the SequenceNumber of the message, and later can receive explicitly the message with
Receive(sequenceNumber). - Deferred messages can be discovered via message browsing if an application loses track of them.
- Deferred messages will not be automatically moved to the dead-letter queue after they expire. This behaviour is by design.
using Microsoft.Azure.ServiceBus.Core;

MessageReceiver messageReceiver = new MessageReceiver(serviceBusConnectionString, queueName, ReceiveMode.PeekLock);

// Defer a message
long sequenceNumber = await messageReceiver.DeferAsync(message.SystemProperties.LockToken);

// Receive message
var deferredMessage = await messageReceiver.ReceiveDeferredMessageAsync(sequenceNumber);
Transactions:
- Service Bus allows you to group operations against multiple messaging entities within the scope of a single transaction.
- A transaction times out after 2 minutes. The transaction timer starts when the first operation in the transaction starts.
Receiveoperation cannot be included in a Transaction.
var connection = new ServiceBusConnection(connectionString);
var sender = new MessageSender(connection, QueueName);
var receiver = new MessageReceiver(connection, QueueName);

var receivedMessage = await receiver.ReceiveAsync();

using (var ts = new TransactionScope(TransactionScopeAsyncFlowOption.Enabled))
{
    try
    {
        if (receivedMessage != null)
        {
            // do some processing
            await receiver.CompleteAsync(receivedMessage.SystemProperties.LockToken);
        }

        var myMsgBody = new MyMessage
        {
            Name = "Some name",
            Address = "Some street address",
            ZipCode = "Some zip code"
        };

        // send message
        var message = myMsgBody.AsMessage();
        await sender.SendAsync(message).ConfigureAwait(false);
        Console.WriteLine("Message has been sent");

        // complete the transaction
        ts.Complete();
    }
    catch (Exception e)
    {
        // This rolls back send and complete in case an exception happens
        ts.Dispose();

        // handle error
    }
}
Duplicate detection:
- The Basic tire does not support Duplicate detection.
- Service Bus keeps track of the MessageId of all messages sent to a queue or topic during a specified time window.
- If any new message is sent with MessageId that was logged during the time window, the newly sent message is instantly ignored and dropped. However, the send operation succeeds
Important
- When partitioning is enabled, MessageId+PartitionKey is used to determine uniqueness. When sessions are enabled, partition key and session ID must be the same.
- When partitioning is disabled (default), only MessageId is used to determine uniqueness.
- You can't enable/disable duplicate detection after the queue is created. You can only do so at the time of creating the queue.
Partitioned queues and topics:
-
Partitioning is available at entity creation for all queues and topics in Basic or Standard SKUs. It is not available for the Premium messaging SKU.
-
A partition composes of a message broker and a storage hence the overall throughput is no longer limited by the performance of a single message broker or capacity of a message store.
-
A receiving client is not aware of the partitioning. It receives message from a partitioned entities like the way it works with regular entities.
-
When Partitioning is enabled, Service Bus routes the message to a partition based on Partition Key if it is specified, however, there are special cases:
- If Message Session is enabled, Service Bus will use SessionId as the partition key to ensure the ordering of all messages in the same session. In case the Partition Key is also specified, it must be the same as SessionId. Otherwise, Service Bus will throw
InvalidOperationException. - If Duplication Detection is enabled, and the Partition Key and SessionId are not set, Service Bus use MessageId as the partition key.
- In the absence of the Partition Key, Service Bus distributes messages in a round-robin fashion to all the partitions of the partitioned queue or topic.
- If Message Session is enabled, Service Bus will use SessionId as the partition key to ensure the ordering of all messages in the same session. In case the Partition Key is also specified, it must be the same as SessionId. Otherwise, Service Bus will throw
-
To Partitioning can work with other features, we need to adhere to the bellow requirements:
- All messages of the same session must be handled by a single message broker (i.e. same partition) to ensure the ordering.
- All messages which have the same MessageId must be handled by a single message broker to remove duplicated messages.
- All messages that are sent as part of the same transaction must specify the same partition key. If we attempt to send a message without a partition key within a transaction, Service Bus returns an invalid operation exception. If you attempt to send multiple messages within the same transaction that have different partition keys, Service Bus returns an invalid operation exception.
-
Limitation: Service Bus currently allows up to 100 partitioned queues or topics per namespace
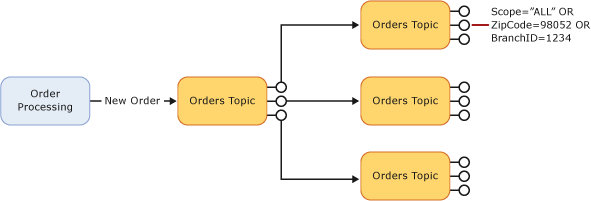
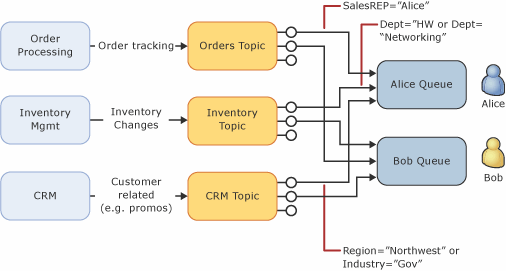
Mock test examples: https://www.examtopics.com/exams/microsoft/az-204/view/