→ get started/ setting up GitHub, for details take a look here: https://malikaihle.github.io/Introduction-RStudio-Git-GitHub/ → Also look for Help at this Tutorial: https://docs.github.com/en/get-started/quickstart/hello-world
There are very very many ways to use Git/GitHub. Tooling is at once, very important and irrelevant. It is important that you understand the concepts so that you are able to get things done in every environment. However, being quick about things is also important, so make sure you are comfortable with the tooling that you use.
Options used in the team are:
- RStudio
- Visual Studio Code
- GitHub Desktop
- plain git cli
- github gh cli
Work in GitHub is organized in Repositories - short: Repos. Those come in different shapes and sizes if you so will and can be created at different places.
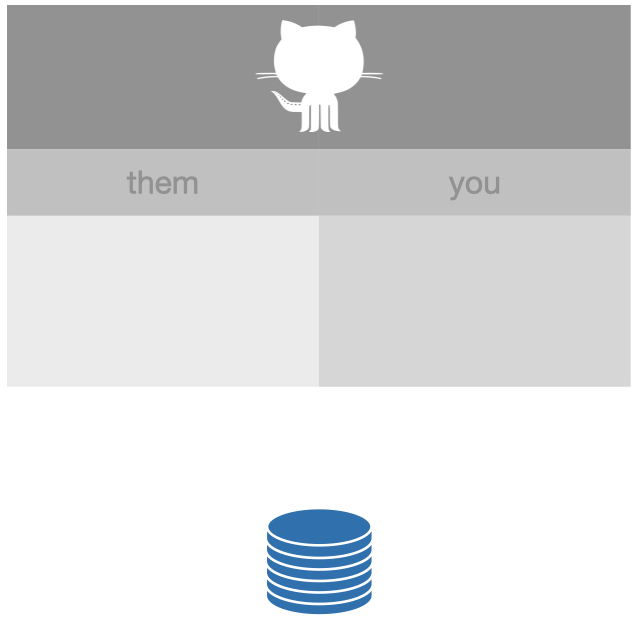
When you imagine a local repository on your computer that is not yet connected to GitHub - the mental model could look something like this:
Here your Git repo, looks like a stack of coins. It is blue, which indicates you have write permission.
Visualization from Happy Git with R licensed under CC-BY-SA: https://happygitwithr.com/common-remote-setups.html
When you imagine a local repository on your computer with a copy/source on GitHub, owned by you - the mental model could look something like this:
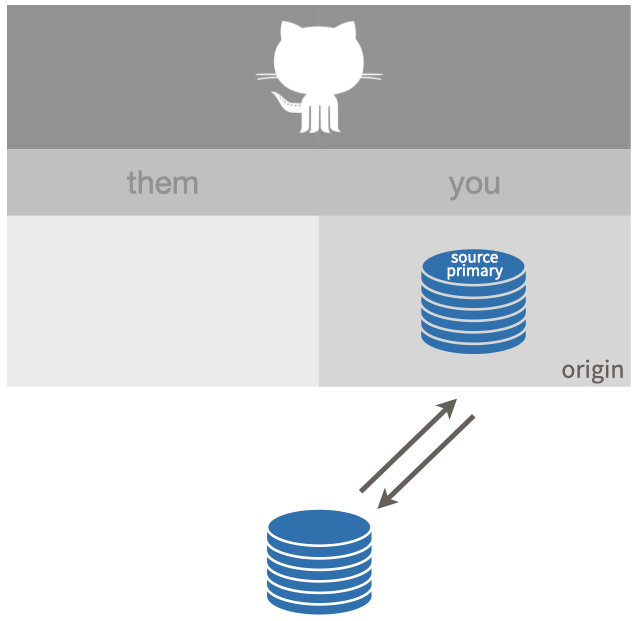
Here you see a remote named: "origin", which you have permission to push to (and to pull from). That’s why origin is colored blue and there are solid arrows going both directions. The origin remote on GitHub is called a "source repo", meaning it is not a fork (i.e. copy) of anything else on GitHub.
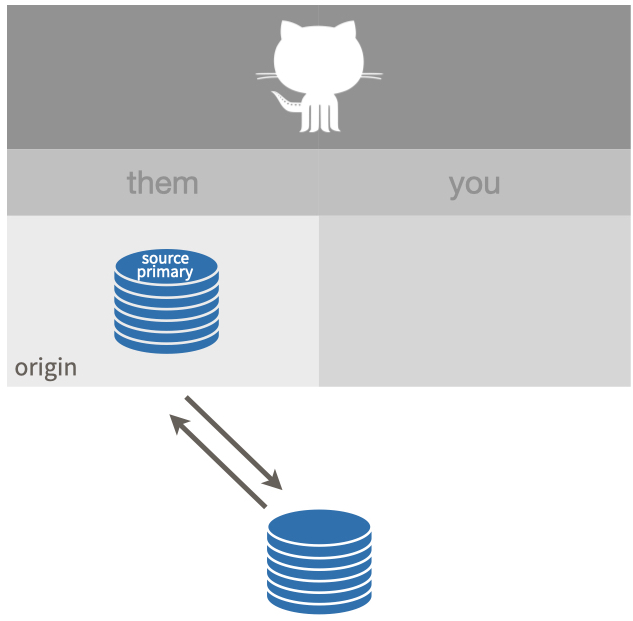
When you imagine a local repository on your computer with a source on GitHub, owned by someone else - the mental model could look something like this:
Here an origin is configured and you can push to (and pull from) origin. The origin remote is, however, not owned by you. Instead it’s owned by another GitHub user or organisation. origin is also your primary repo in this setup.
Visualization from Happy Git with R licensed under CC-BY-SA.
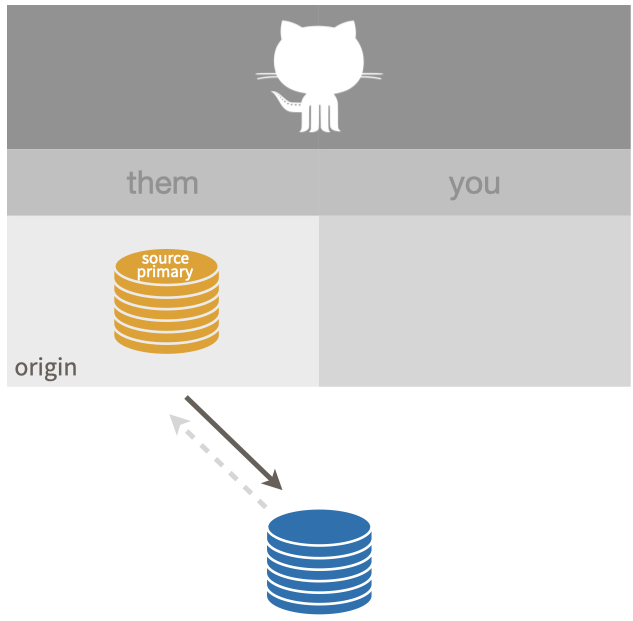
When you imagine a local repository on your computer with a source on GitHub, owned by someone else - the mental model could look something like this:
Here an origin is configured and you can NOT push to (and pull from) origin. This is indicated by the orange color of origin and the greyed out, dashed “push” arrow. This origin is read-only for you, there is no way to get changes back into the source repo, since you cannot push to it and you haven’t created a fork, which is necessary for a pull request.
Visualization from Happy Git with R licensed under CC-BY-SA.
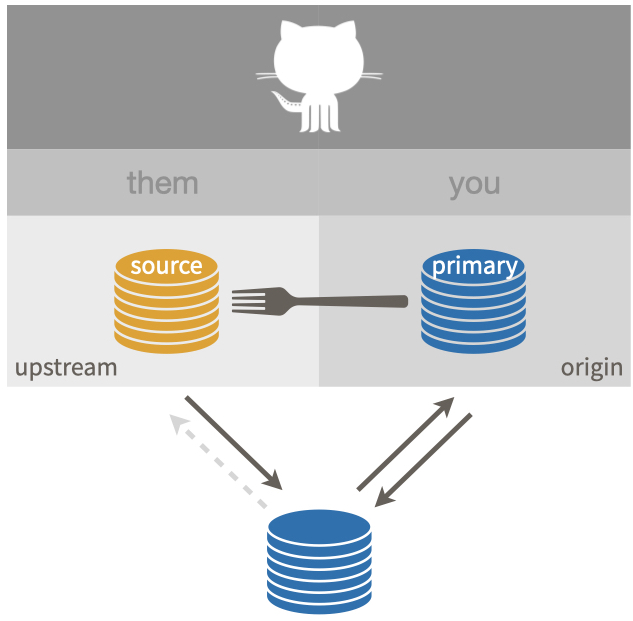
When you imagine a local repository on your computer with a source on GitHub, owned by someone else, and a fork owned by you - the mental model could look something like this:
This shows a successful “fork-plus-clone”. The upstream you can NOT push to (and pull from). But you have a fork of the source repo (a very special copy, on GitHub) and it is configured as origin. The origin is your primary repo. You can push to and pull from origin. You can make a pull request back to the source repo via your fork.
Visualization from Happy Git with R licensed under CC-BY-SA.
Here is a list of constellations a repo can have:
- a single local repo
- has no remote / is not uploaded to github
- a single remote repo
- lives on GitHub but no local copy
- a project with no collaborators
- you work on a local copy
- you have GitHub as a remote
- you have write-access to the remote
- an improper fork
- you cloned a repo for which you have no write access
- file there is a remote, you can not upload anything
- a proper fork
- you have a local copy with two remotes
- one remote is the copy on GitHub in your username called origin where you have write access
- another remote is the original repository on GitHub called upstream where you have no write access
- a project with collaborators
- a local copy with a remote that is shared with others
- while you have write access and could overwrite anything, you are considered and do PRs
But how is this done/ achieved?
You can clone a GitHub repository to create a local copy on your computer. In your local repository, you can commit and create a pull request to update the changes in the upstream repository. This might serve the purpose of making it easier to resolve merge conflicts, add or remove files, and push large commits.
Cloning a repository retrieves a complete copy of all repository data that GitHub.com has at that time, including all versions of every file and folder for the project. You can push your changes to the remote repository on GitHub.com or retrieve other users' changes from GitHub.com.
You can clone your own repository or someone else's repository.
- Navigate to the main page of the repository and click above the list of files on "Code"
- Copy the URL for the repository / Open in Github Desktop
- To clone a repository via HTTPS, click under "HTTPS"
- To clone a repository using the GitHub CLI, click GitHub CLI and then follow.
- Open the application you are using git locally with. (Change the current working directory to the location where you want the cloned directory)
- select that you want to create a cloe, or a repository, then paste the URL you copied earlier!
- You now should have your own lokal version of the repository
- You can now upload your cloned repo in your online Git-hub
A fork is a new repository that uses the same code and visibility settings as the original "upstream repository". Forks can be used to review ideas or changes before they are proposed for the upstream repository, for example when a user does not have write access to the upstream repository. Instead of creating issues, you can use forks to suggest changes related to fixing a bug as well.
It is advisable to regularly synchronise your fork with the upstream repository. For this purpose, you need to use Git on the command line.
- For this purpose, you need to use Git in the command line.
- Navigate to the repository on GitHub.com
- Click on Fork in the upper right corner of the page.
- Select an owner/ creator for the forked repository.
- Name Your Fork
- Optional: add a description to your fork
- Select whether only the main or all branches are to be copied into the new fork.
- Click on "Create Fork"
- Hint: You now have a fork, but no local copy of the remote repo.. this you can get by cloning
- You can now make any changes to the fork, including:
- Creating Branches: Branches allow you to create new features or try out ideas without compromising your main project.
- Opening pull requests: If you want to contribute to the upstream repository, you can send the original author a request to populate your fork into their repository by submitting a pull request.
Each repository has one default branch, and can have multiple other branches. You can merge a branch into another branch using a pull request. Branches allow you to develop features, fix bugs, or safely experiment with new ideas in a contained area of your repository.
You always create a branch from an existing branch. Typically, you might create a new branch from the default branch of your repository. You can then work on this new branch in isolation from changes that other people are making to the repository. A branch you create to build a feature is commonly referred to as a feature branch or topic branch. For more information, see: https://docs.github.com/en/pull-requests/collaborating-with-pull-requests/proposing-changes-to-your-work-with-pull-requests/about-branches
When you create a repository on GitHub, GitHub creates the repository with one single branch. The default branch is the branch that GitHub displays when anyone visits your repository. The default branch is also the initial branch that Git checks out locally when someone clones the repository. Unless you specify a different branch, the default branch in a repository is the base branch for new pull requests and code commits.
By default, GitHub names the default branch 'main' in any new repository.
- Creating a Branch in an existing Repo
- "Main" -> either choose an existing branch other than the main branch, or create a new branch (preferably with a name saying what its for)
- Creating a new file
- "Add file" or upload code from R-Studio/ Vs Code - including a model in Lavaan, from one of the models below
- Create a pull request from the branch to the main branch
- --> For detailed instructions for steps 1-4 take a look here: https://malikaihle.github.io/Collaborative-RStudio-GitHub/


- create an empty folder,
git initgit add README.mdgit commitrinse and repeat → a single local repo - take a look at a repo on github → a single remote repo
- clone that repo → an improper fork
- fork that repo → a single remote repo
- clone that fork → a proper fork
- suggest changes via PR
- add a collaborator to that fork, change / add remote on the side of the collaborator
- tag the others in the issues to keep them updated and to make them aware of the issue
- assign someone to a project
- discuss the issues, using the commentary function beneath the issues
- PR reviewen
- PR revisen
- PR mergen
- PR merge conflicts beheben
- PR in project management software
- You should by then be owner of your repository, should be collaborating on the merged repository, and ideally should have reviewed repositories, when issues came up(owner, collaborator, reviewer).
Please create a shared Repo where you all have writing access to - and use this to write the answers to the following questions down to!
- What is a fork?
- What is a clone?
- Is a fork something on GitHub or on your local machine?
- What is a origin?
- What is meant with upstream?
- What is a branch?
- How is forking different from a clone?
- What is a remote?
- Can you have more than one remote?
- Why do you need a fork?
Please use the same Repo to make a file in which you combine the previous lavaan models into one model that inherits all of the others!
Try to transmit the model you created in another much more compact/ efficient language!
- --> Find the Stenographs package here: https://github.com/aaronpeikert/StenoGraphs.jl
- -> open VS-Code -> create a new script and select Julia as language -> install the package
With Git/ Github there are many possible ways to do stuff and to reach your goals. Nevertheless somethings regarding good practice dont change and they will be of service to you in the future. You will notice, that some of those practices are more convenient depending on the tool you use, but they overall apply regardeless.
- Never commit changes directly onto the 'main' branch
- Give Comments, pushes and honestly everything a name/ comment on what the sction was about (makes collabs easier big way)
- working locally and commiting to a remote version later on (when you are done) is the safest way to work
- try to commit as small chunks of work as possible
- document your work/ the projects work in a readme
- uvm.
- What would seem important to you as for right now?