Vroom is a local bike/scooter rental app that lets you book your two wheeler on availabilty and lets you choose the desired time based on the availablity. This app uses the IBM App Launch Service that helps you control your application features. It demoes the following feaure of App Launch Service :
- Remote App Customisation.
- Remote Feature Toggle.
- Vary App Customisation by percentage of Users.
- App Customisation by audiences
A most common use case is where an app developer would want to change app theme, a button text or certain widget placement in the app once after the app is published to the Appstore. Another Appstore publish might be an overkill, hence developers would prefer an over-the-air update. This gives developers a much-needed flexibility to manipulate app behavior. Let's say we would like to change the app layout from grid to a list. The App Launch Service lets you do this in a series of simple steps where you can define your set of audience and the feature(sticky button) and just roll it out!
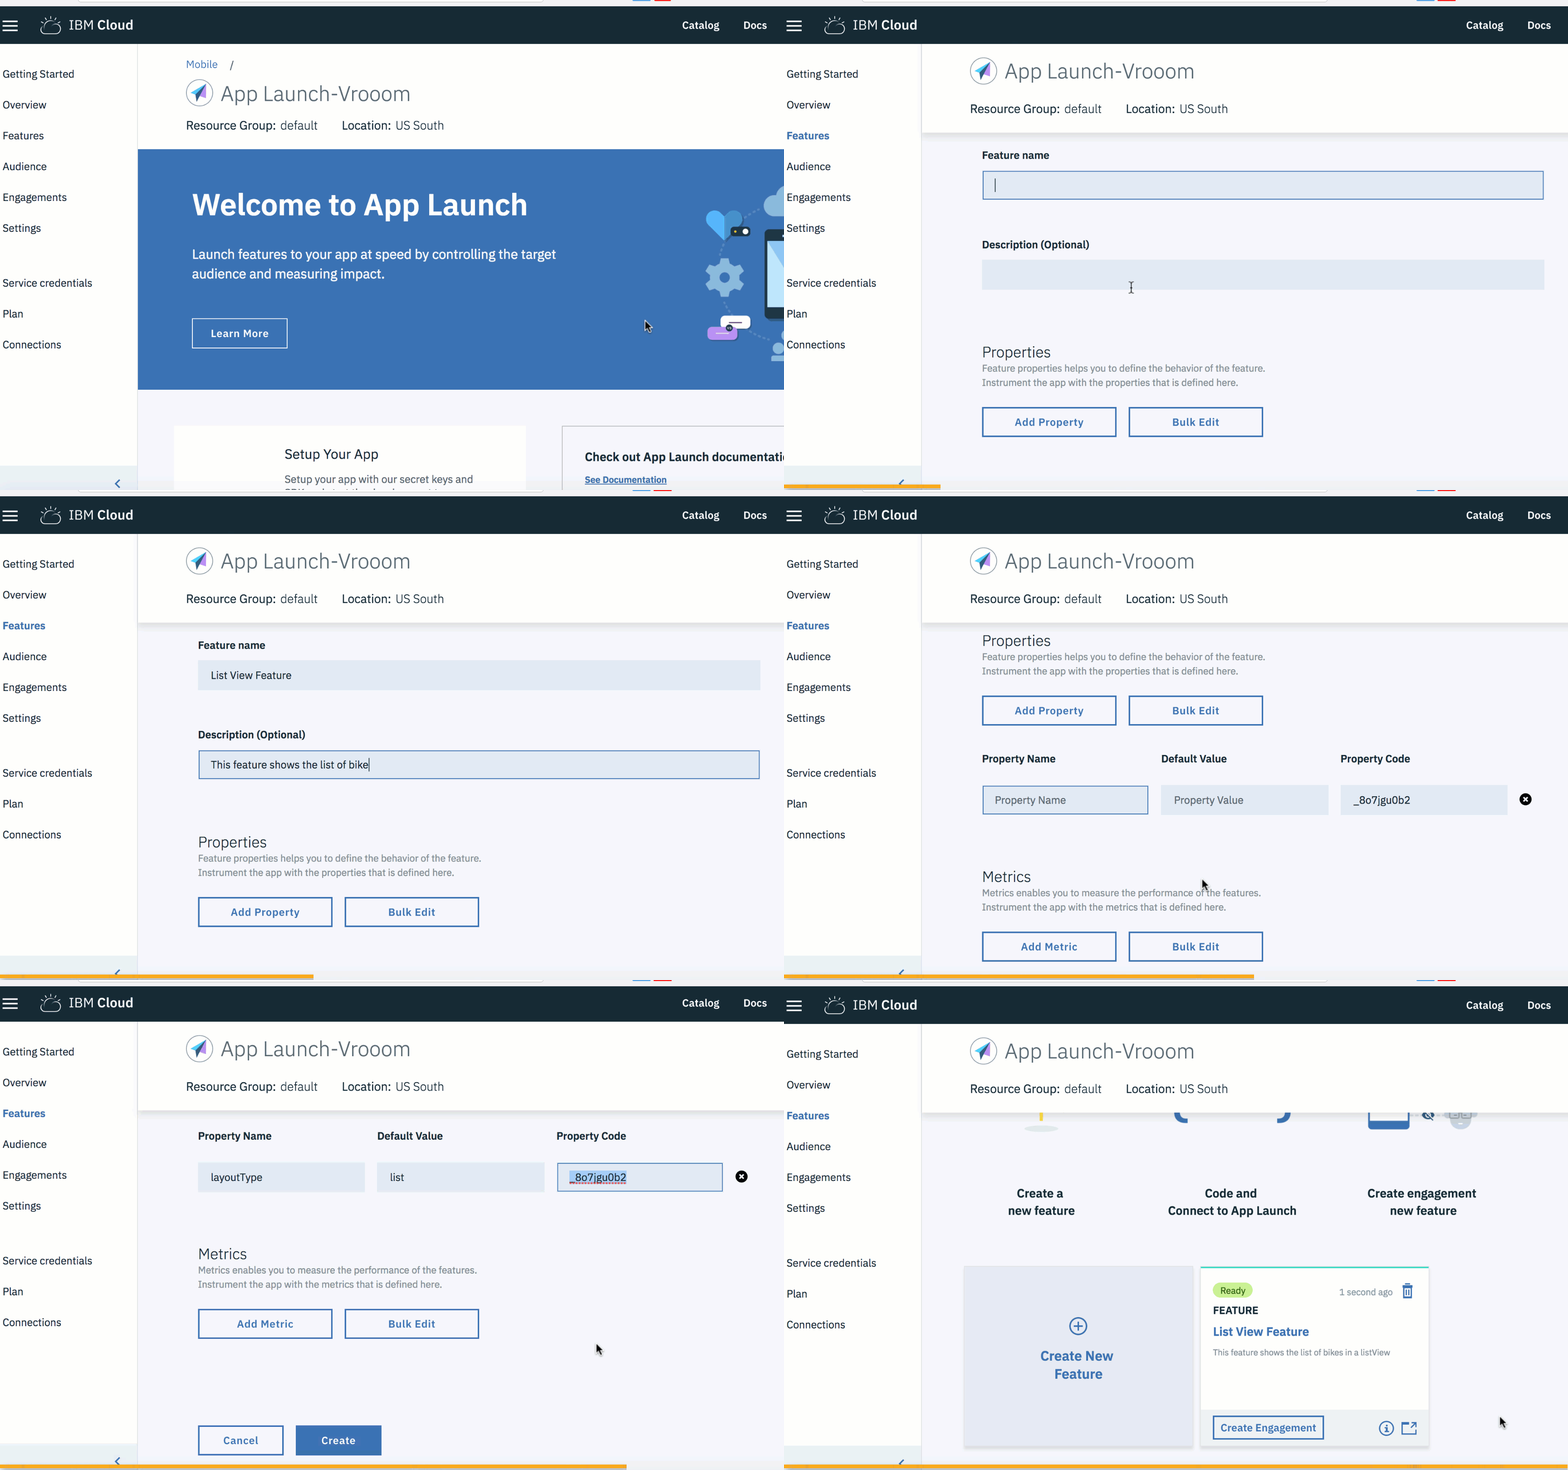
- Feature - A feature is equivalent to a Java class where you define class members.
- Let's call this feature - List View Feature
- Define properties in this feature
- property - layoutType(default value - 'list').
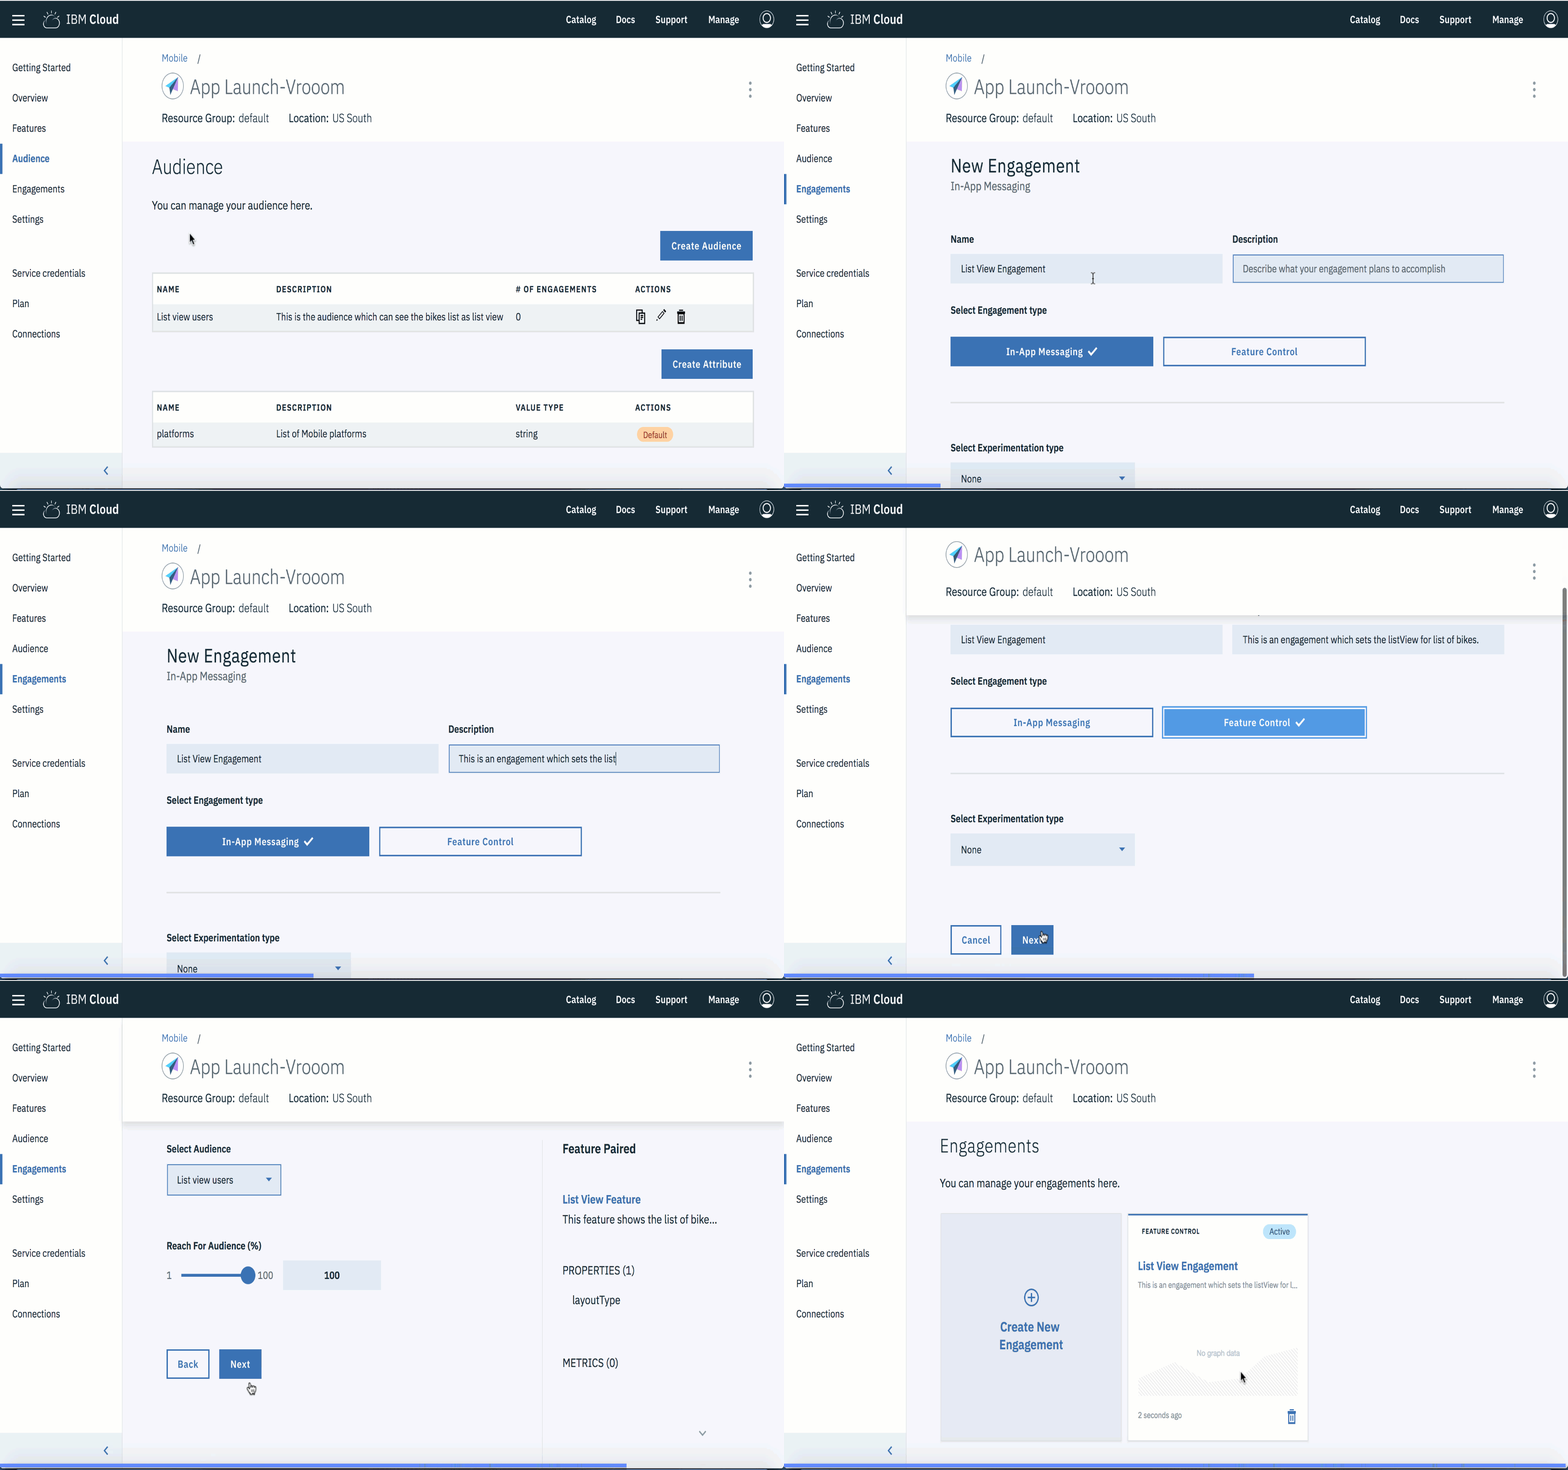
- Engagement - An engagement is an instantiation of a Feature with properties initialized and attaching one of the pre-defined audiences. For our List View feature, we will,
- Create an Engagement, called - List View Engagement
- Select the List View Feature with the below properties:
- layoutType = "list"
- Initialize Audience,
- Audience="List View Users"
- Select the List View Feature with the below properties:
- Create an Engagement, called - List View Engagement
Once the above is defined in the Console, in your code you will initialize the service and call the registration API
applaunchService.initialize('us-south', 'ad237ea7-f850-49d2-9f79-d926477dce19', 'f8adac30-ca10-4d72-96dc-afc47936a043', deviceId, null, { userId: this.state.userName, platform: Platform.OS }, null).then((res) => {
     console.log(`init ${JSON.stringify(res)}`);
   }).catch((err) => {
     console.log(`err ${JSON.stringify(err)}`);
After the initialization, configure the appLaunch service in your component like this :
componentDidMount() {
    applaunchService.hasFeatureWith('_na7ls6quw', (val) => {
      if (val) {
        applaunchService.getValueFor('_na7ls6quw', '_3sajr5825', (err, value) => {
          if (value) {
            this.setState({
              interfaceType: value,
            });
          }
        });
      }
    });
  }
Note - The interfaceType here refers to list or grid view.
The app can now be coded to utilize these Feature parameters to set the view for the bikes/scooters list as list view. That's it - the app will load the Feature paramteres during app initialization. If the property is updated to grid again, it will update the app during the next app initialization.
This is one of the most often asked feature and the easiest to accomplish using the App Launch Service.
Let's say we would like to introduce a new feature for booking the test drives for the vehicles available.
- Feature - Let's call this feature - Test Drive Feature
- Define properties in this feature
- buttonText - 'Book a test drive'.
- buttonColor - '#FF5722'.
- Define properties in this feature
- Audience - No change.
- Engagement -. For our Test Drive feature, we will,
- Create an Engagement, called - Test Drive Engagement
- Select the Test Drive Feature with the below properties, you can also override these properties in your engagement:
- buttonText - 'Book a test drive'. - buttonColor - '#FF5722'.
- Initialize Audience,
- Audience= No change
- Select the Test Drive Feature with the below properties, you can also override these properties in your engagement:
- Create an Engagement, called - Test Drive Engagement
Once the above is defined in the Console, in your code confiure the App Launch service as below:
 applaunchService.hasFeatureWith('_tr40xzif0', (val) => {
      if (val) {
        this.setState({ hasTestDriveFeature: true });
        applaunchService.getValueFor('_tr40xzif0', '_hxrp9jh49', (err, buttonText) => {
          if (text) {
            this.setState({ testDriveButtonText: buttonText });
          }
        });
		applaunchService.getValueFor('_tr40xzif0', '_hxrp9jh50', (err, buttonColor) => {
          if (text) {
            this.setState({ testDriveButtonColor: buttonColor });
          }
        });
      }
    });
That's it - Now when your app reinitializes, it will show the 'Book a test drive' button with the color as '#FF5722' to the audience you have targeted.
Often Developers would want to create multiple variants of Feature properties and apply them to a different percentage of users. For example, in Vrooom App,you may wish to present the Book button as sticky to one set of users and as a non-sticky to the other set.The idea is to perform an A/B test on users to implement the design on basis of what is more engaging.
- Feature - Let's call this feature - Sticky Book Button Feature
- Define properties in this feature
- bookingPosition - 'sticky'.
- buttonColor - '#FF5722'.
- Define properties in this feature
- Audience - Let's say you'd like to target to only beta users, then you will define an Audience, called Beta Users with a new boolean attribute 'betaUserAttribute'.
- Let's define an audience called, Beta Users
- Select the 'betaUserAttribute' and set its value to true.
- Engagement - Engagement allows you to create multiple Feature instances (variations) by setting a percentage for each instance. We'll choose the experimentation type as A/B Testing in the console, and add two variants in the feature. For example,
- Variant 1 (50%)
- bookingPosition - 'sticky' (default).
- Variant 2 (50%)
- popUpText - 'non-sticky'.
- Variant 1 (50%)
Once the above is defined in the Console, in your code confiure the App Launch service as below:
componentDidMount(){
	applaunchService.hasFeatureWith('_f4dn5s8pu', (val) => {
      if (val) {
        applaunchService.getValueFor('_f4dn5s8pu', '_bllfx2mda', (err, text) => {
          if (text) {
            this.setState({ bookingPosition: text });
          }
        });
      }
    });
  }
}
That's it - Now when your app reinitializes, it will show the Book button as sticky to 50% of the users and to the other 50% it will show the button as non-sticky.
This is perhaps the most advanced and the most powerful feature that App Launch Service supports. Take Book Test Drive Feature, for example, if you would like to create two audiences, Android users and iOS users and tailor app customisation for each audience then user experience can be customised for different devices.
- Feature - Same as concept 2.
- Audience - Same as concept 1.
- Engagement - As defined in Concept 1 an engagement instantiates a feature by setting values. In this case, we will create a new engagement to target the new audience.
- Create an Engagement, called - BetaUsersTestDrive
- Select the Test Drive Feature with the below properties, you can also override these properties in your engagement:
- buttonText - 'Book a test drive'.
- buttonColor - '#FF5722'
- Initialize Audience,
- Audience="Beta Users"
- Select the Test Drive Feature with the below properties, you can also override these properties in your engagement:
- Create an Engagement, called - BetaUsersTestDrive
Note - As your target audience has changed, you will need to reinitalize the App launch service to target the new set of audience i.e beta users.
Once the above is defined in the Console, in your code you will initialize the service and call the registration API
 let betaTester = false;
    if (this.state.userName === 'Chethan') {
      betaTester = true;
    }

applaunchService.initialize('us-south', 'ad237ea7-f850-49d2-9f79-d926477dce19', 'f8adac30-ca10-4d72-96dc-afc47936a043', deviceId, null, { userId: this.state.userName, platform: Platform.OS }, { 'beta users': betaTester }).then((res) => {
      console.log(`init ${JSON.stringify(res)}`);
    }).catch((err) => {
      console.log(`err ${JSON.stringify(err)}`);
    });
  }
Let's configure the component with to set the feature properties the same way as we did in concept 2.
 applaunchService.hasFeatureWith('_tr40xzif0', (val) => {
      if (val) {
        this.setState({ hasTestDriveFeature: true });
        applaunchService.getValueFor('_tr40xzif0', '_hxrp9jh49', (err, buttonText) => {
          if (text) {
            this.setState({ testDriveButtonText: buttonText });
          }
        });
      }
    });

    applaunchService.hasFeatureWith('_f4dn5s8pu', (val) => {
      if (val) {
        applaunchService.getValueFor('_f4dn5s8pu', '_bllfx2mda', (err, buttonColor) => {
          if (text) {
            this.setState({ bookingPosition: buttonColor });
          }
        });
      }
    });
  }
That's it - Now when your app reinitializes, it will show the 'Book a test drive' button with the color as '#FF5722' only to the Beta Users of your app.
A hidden gem inside App Launch Service is collecting metrics. App Launch Service allows extensive support to embed metric collection hooks, across all the above four concepts. These metrics will help you evaluate results of A/B testing, Feature performance, etc.
MIT © IBM Mobile


