Troubleshooting Instructions
In this page you will find a list of common problems and their solutions.
Click to expand or collapse this solution.
The first step is to connect to the cluster using a terminal.
Then follow the appropriate steps bellow according to the automatically detected or user selected scheduler.
Run the command:
sinfo --all
You will get results similar to the following:
PARTITION AVAIL TIMELIMIT NODES STATE NODELIST
batch*       up  infinite     1  idle c01n01
The suffix * identifies the default partition. Copy this name, without the asterisk (batch in this case), to the Slurm Workload Manger partition text field of New job dialog.
Run the command qmgr -c "print server" | grep 'default_queue'
You will get result similar to the following:
set server default_queue = qexp
Copy the name on the right hand side of the equals sign, (qexp in this case).
Run the command bqueues -l
In the results you will find some lines similar to the following snippet that contain the phrase "This is one of the default queues":
...
-------------------------------------------------------------------------------

QUEUE: normal
  -- For normal low priority jobs, running only if hosts are lightly loaded.  This is one of the default queues.
...
Copy the name on the right hand side of the QUEUE: text, (normal in this case).
Paste the name you copied to the queue or partition text field of the New job dialog of HPC Workflow Manager.
Click to expand or collapse this solution.
From the Fiji menu bar select the following menu items:
Plugins > HPC-ParallelTools > Paradigms Profiles Configurator
On the new window press the corresponding buttons to either Create New SSH parallel paradigm or Edit an existing one.
Either way the SSH Settings window will open.
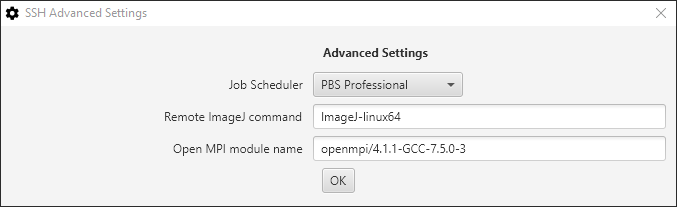
In the SSH Settings window of your desired SSH paradigm profile:
- Set the
Advanced settingscheckbox. - The
SSH Advanced Settingswindow will open. - Select the
Job Schedulerthat is present in the remote cluster. - Fill-in the
Remote ImageJ commandfield with the name of the executable of Fiji. Unless the executable has been renamed, the name is most likelyImageJ-linux64. - Lastly you must specify the
Open MPI module name, you must find out a valid module name for your cluster. One way to do this is login to the cluster using a terminal and attempt to list all available modules using the commandmodule availand attempt to locate Open MPI. Another is to locate the documentation of the remote cluster you are using, this is very important information it it must be listed there.
Click to expand or collapse this solution.
The following steps will help you create a custom Open MPI module on your remote cluster.
⚠️ You may need to adjust the commands based on the configuration of your remote cluster (IT4Innovation's Barbora supercomputer is used in this example).
-
Login to the remote cluster using a terminal.
-
Configure, compile from source code, and install Open MPI manually to your home directory.
-
Load modules for the prerequisites.
- Load the GNU C compiler module:
module load GCC/10.3.0
- Load the GNU C compiler module:
-
Download Open MPI from www.open-mpi.org and extract it:
wget https://download.open-mpi.org/release/open-mpi/v4.1/openmpi-4.1.1.tar.gztar xvfz openmpi-4.1.1.tar.gz
-
Configure the Open MPI to install to a directory in your home directory.
-
cd openmpi-4.1.1 -
./configure --prefix=$HOME/openmpi-4.1.1-GCC10.3.0 --enable-shared --enable-mpi-thread-multiple --with-verbs --enable-mpirun-prefix-by-default --with-hwloc=$EBROOTHWLOC --with-tm=/opt/pbs --enable-mpi-cxx --with-ucx=$EBROOTUCX -
If there is this warning as a result of the configuration process:
configure: WARNING: Expected file /opt/pbs/include/tm.h not foundThen thre is a critical error as this message prints:
configure: error: Cannot continueAnd Open MPI will fail. The solution is to build and install Open MPI using an interactive job. (You can start an interactive job with this command:
qsub -q qexp -l select=1 -I)
-
-
Compile and install the binaries:
make install
-
if you get warnings like this one
WARNING: There was an error initializing an OpenFabrics device.while running a job append the linebtl_openib_allow_ib = trueat the end of the fileopenmpi-mca-params.confin theetcdirectory of Open MPI:- You can use this command:
echo 'btl_openib_allow_ib = true' >> $HOME/openmpi-4.1.1-GCC10.3.0/etc/openmpi-mca-params.conf
- You can use this command:
-
-
Create the directory of the modules in your home directory:
mkdir -p $HOME/Modules/modulefiles/OpenMpi
-
Create the module file, it is the naming convention to use the version of the Module and the compiler used to compile it:
-
nano 4.1.1-GCC10.3.0 -
Copy and paste the following text as the content of the file, you may need to change the names of the GCC and/or the Java module in the last two lines:
-
#%Module 1.0
#
#  Open MPI module for use with 'environment-modules' package:
#
conflict mpi
set basedir "${HOME}/openmpi-4.1.1-GCC10.3.0/"
prepend-path PATH "${basedir}/bin"
prepend-path LD_LIBRARY_PATH "${basedir}/lib"
module load GCC/10.3.0
module load Java/1.8.0_221
-
-
-
Add the following line at the end of the
$HOME/.bashrcfile. This line will make the custom module available in Environment Modules for this user.module use --append $HOME/Modules/modulefiles
-
Test this by using the command
module avail openmpi. In addition to all the existing Open MPI modules available in your cluster, you should now see the module you created under the location of your private modules.-
------------------------ /home/user/Modules/modulefiles -------------------------
   OpenMpi/4.1.1-GCC10.3.0 (L)
-