This repo is for Manabu's REST API backend. For client-side code, refer to the Manabu Client repo. If you are full-stack, you will have to create a client folder in the root directory when cloning the Manabu Client repo.
These instructions will help you get a copy of the project up and running for development and testing purposes.
- VSCode + extensions (ESLint, Prettier)
- Node.js (latest)
- MongoDb
- Redis + RedisInsight
git clone https://github.com/edshen17/manabu-server.git --branch ts-refactor --single-branch --config core.autocrlf=false.npm install.- Create a .env file in the root directory to add secret API keys. Please ask the project manager for them.
Note: Refer to this if you get any CRLF lint errors.
To run the test suite, run npm t.
To start the backend server, type npm run server. Please refer to package.json for additional commands.
NOTE:
When running tests, avoid stopping them mid-way through commands like CTRL + C because it stops data cleanup. When this happens (and you use Windows), a data dump will be created in your \Users\~\AppData\Local\Temp folder so make sure to occasionally check and clear it. Also, the tests are quite CPU intensive and may cause lag spikes since they run concurrently.
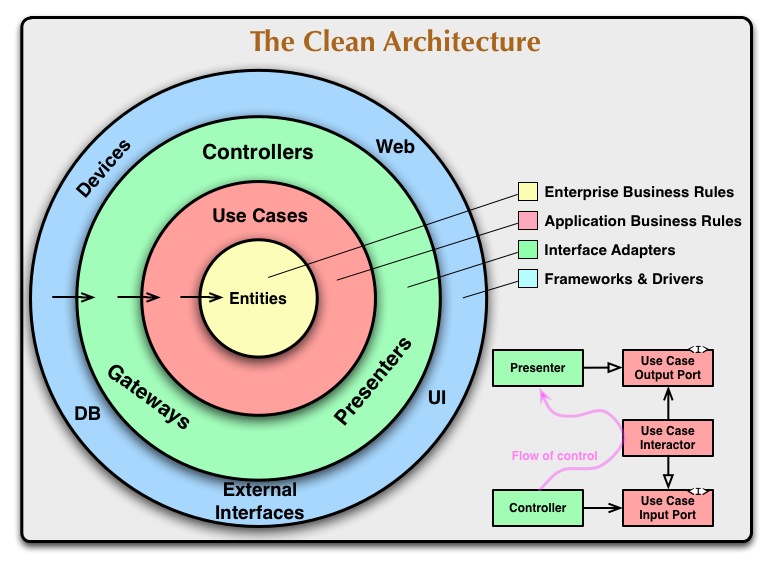
This project revolves heavily around the concepts of dependency injection and the single-responsibility principle. Please refer to this diagram.
As you can see, entities, or core business logic, is at the very center of the circle. Thus, even if we change the frameworks or technology we use, our logic will not change. This enables us to easily change our code as our stack evolves. Furthermore, by using dependency injection, we can quickly prototype but and also throw away code that is no longer needed (eg. when business rules/strategy change). For more information on this clean architecture, refer to this video.
We should strive to write code that is as clean as possible. However, first implementations are often not the best or cleanest, so refactoring is crucial. This is why we use the TDD paradigm, meaning we must write tests first before doing anything else. This not only helps document our code, but also makes it easy to modify.
To deploy on Heroku, follow the following steps:
- Run
npm buildon the client code (cd to client folder). - Run
npm buildfor the server code. - Push the code and merge the development branch with the
masterbranch.