Arenas Setup
Arena Setup is simple as eating mango. Thanks to our Arena Editor Menu!
IMPORTANT: Please use command '/arena save {ARENA NAME}' or '/arena saveall' to save the arena after you finish to edit your arena. And make sure the arena and the lobby is in the same world. Otherwise something will break.
First of all, you need to create an empty arena. You can use command '/arena create {ARENA NAME}' to create a empty arena. In this example, I will create a world called "Pokemon". If success, the chat will display:

Now you have an empty arena. You will need to paste the arena into your world. Your arena world can be different to lobby world, but we recommend to put/combine them into a single world to prevent the "dirt screen" when teleporting. You can use whatever tool to paste your arena into the world. Here I will use FastAsyncWorldEdit to paste by arena.

You are almost there! After pasted your arena, you need to specify the location of A-Position(The first team/player's spawn location), B-Position(The second team/player's spawn location), Minimum-Location(The arena diagonal low point) and Maximum-Location(The arena diagonal high point). The Minimum-Location and Maximum-Location is just like how you setup a rectangle with WorldEdit. An example of the "diagonal point" is:
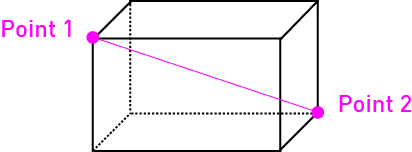
(Image from WorldEdit Documentation)
Use the command '/arena edit {ARENA NAME}' to open the Arena Editor Menu. The menu should look like this:

Stand on the location you want the first team/player to spawn. And open the editor menu. Then press the Position-A button to set your standing location as Position-A

Do the same thing with Position-B. After that, you need to set the cuboid of the arena by setting the Minimum-Location and Maximum-Location. Open the editor menu again, but this time click on the Minimum-Location button

Unlike Position-A and Position-B, you have to break a block after clicking on the button.

After setting up the Minimum-Location, do the same thing with Maximum-Location too.
So now you have already setup all the locations. There's also some settings you might want to set before enable the arena.
Y-Limit means what is the Y-Level player cannot go below. Player who is under this Y-Level will receive 99999 damage(Instant Death). This settings is very useful for Kit-Specific Arena like BattleRush, Bridge, etc.

Build-Limit means what is the highest Y-Level player can build in this map. Players who tries to build over the Build-Limit will not allowed to place any blocks. This settings is useful for kits which allows to build and prevent players to skybase.

Allowed-Kits means what kit should be allowed in this arena. For example, players who tries to play with BuildUHC kit will not be allowed to play on NoDebuff maps. This settings is important. Remember to set a kit before enable the arena.
Kit name doesn't mean the display name of the kit. It means the "ID" you create when using the command '/kit create {ID}'. If you wish to remove a kit from Allowed-Kits. Simply click on the button and insert the kit ID you wish to remove.

Now you have every location set up. You need to save the arena first by using command '/arena save {ARENA NAME}' to save a specific arena or '/arena saveall', or click on the Save Arena button in the Arena Edit Menu to save all existing arenas. Important: Everytime you modify a value of the arena, you need to save the arena!. Then restart the server. The reason why restart server is required is because the plugin needs to save all the chunks which is located in the arena. These chunks are used to reset the arena afterwards. After the restart, you can enable the arena by clicking on Arena Status button


Your arena is now ready to use! Again, remember to save your arena!
Before starting this section, make sure your arena locations and values are correct. After cloning, you are not allowed to edit those unless you delete all the cloned arenas!
First of all, you need to open the Arena Clone Menu. The menu can be open by using command '/arena edit {ARENA NAME}' and click on the Arena Clone button.

It should display a menu like this:

Here you can find the original arena and all the cloned arenas. If you wish to clone the selected arena, click on the dirt button.

It will automatically find an empty space and paste the arena. Note that it might lag the server a little bit when cloning the arena. We strongly recommend to do this action when the server doesn't have other players. Otherwise it might affect player's gameplay experience.

If you see the above message, congratulations! You successfully cloned an arena. To check if the arena has pasted successfully, click on the red message, or open the Arena Clone menu, and select the arena which you just cloned.


To remove an cloned arena, open the Arena Clone menu, and left click on the cloned arena you wish to remove. It will automatically delete the arena (including the blocks which is in the arena). Remember to use command '/arena save {ARENA NAME}' or '/arena saveall' to save your arena after the deletion!