
Hi, my name is Sander. I'm a web developer from Belgium.
If you ever want to get in touch, feel free to contact me.

This document is (currently) licenced with a CC Attribution-NonCommercial 4.0 International. Please contact me in case you want to use parts of the documentation.
Since this text is constantly in progress. This means it still contains some typos and spelling mistakes.
Recently, I added some example code in the repo to get you started. The example (awesome) theme can be found in the src folder. Have fun with it. Happy Drupal 8 theming.
Get Twiggy with it!
Drupal 8 is going to be a huge change for the entire community. In order to get front-end developers ready for Drupal 8, I created this theming guide. It contains an overview of how you can build a Drupal 8 theme, using modern front-end tools. If you find any mistakes or outdated documentation, feel free to add a pull request.
[@todo: Add table of content]
Let's kick of with some major changes that you, as a Drupal themer, must be aware of. This is especially useful if you've been involved in Drupal 7 theming in the past.
-
The markup in Drupal 8 is now HTML5. New tags like
header,nav,articleare used in core. -
WAI-ARIA Roles are added. They are a set of roles, states, and properties, which can be applied to markup to provide rich semantics, increasing accessibility and interoperability. Although WAI-ARIA properties were not valid in xhtml 1.0, they are valid in HTML5, and can therefore be applied in the markup of Drupal 8. By using the role attribute with an HTML element, authors can provide more information about the purpose of components on the page.
-
<DIV ID="BAD-PRACTICE">...</DIV>. Drupal 8 now has 75% less ID's than the Drupal 7 CSS! In other words: kill all the #ids! -
The CSS (File) Structure is based on SMACSS & BEM.
-
The default settings and config are changed to be fast and safe production values. This is important because in a default Drupal 8 installation, CSS and JS aggregation is enabled. On your local development environment, you "might" want to disable this.
-
A completely new theme/template system: Twig Twig is a completely new theme/template system. This means the
theme_*functions and PHP-based*.tpl.phpfiles have been completely replaced in D8. -
Drupal 8 does not support browsers that do not support SVG Drupal 8 uses SVG in place of PNG to provide resolution independent icons in the admin UI. No effort is made to cater for browsers that do not support SVG. This includes IE8 and below and Android Browser 2.3 and below.
-
Due to the fact that these older browsers are no longer supported, the css in Drupal core is able to move a big step forward. Instead of adding classes like odd, even, first and last; we are now able to use pseudo selectors. Most first/last/odd/even classes removed in favor of CSS3 pseudo selectors
-
An new, empty core theme Read more on classy, a new core theme below.
Drupal core themes live inside core/themes. Inside this folder we can find the four Drupal 8 core themes:
- bartik: A flexible, recolorable theme with many regions and a responsive, mobile-first layout.
- seven: The default administration theme for Drupal 8 was designed with clean lines, simple blocks, and sans-serif font to emphasize the tools and tasks at hand.
- stark: An intentionally plain theme with almost no styling to demonstrate default Drupal’s HTML and CSS.
You might remember these three themes from Drupal 7. But wait, there's more ...
- classy: [meta] Results of Drupalcon Austin's Consensus Banana: At DrupalCon Austin (2014) the need for a new core theme came up.

Bartik was introduced in Drupal 7 as a new, clean and simple theme. The theme has some new cool features in Drupal 8 and is also completely responsive.

Seven was also introduced in Drupal 7. It is the default administrative theme. The theme was created to improve the Drupal 7 user experience. For Drupal 8, a style guide for Seven was introduced to improve this experience even more and give it a refreshing look.
Some people might be wondering if this theme should be renamed to
eight? The answer is no.

Stark is core theme that demonstrates Drupal's default markup. It does not contain any template files, so it outputs the layout that come straight out of other (core) modules. This is of course very useful for a developer:
- you can code against Stark when writing CSS for modules
- as a theme developer, you can check against Stark, to see if a layout issue comes from the theme or another module.

At DrupalCon Austin (2014) the need for a new core theme came up. Here's a brief overview of the meta issue:
Create a new core theme (code name "classy") that contains a copy of the all current core template files; this is for the "sensible 2/3" camp. And then modify all of the core/modules template files to contain minimal classes (only those needed for functionality); this would be for the "clean 1/3" camp. To ensure that Seven and Bartik continue to function properly, they should use "classy" as their base theme.
Classy will be a base theme which Bartik and Seven will extend from.
Add classy.info.yml to core, set Classy as base theme for Bartik and Seven
At DrupalCon Amsterdam, the classy.info.yml got commited into Drupal 8 core by Dries. The change record can be found here.
It's important to know and follow the Drupal coding standards, especially when you want to get involved into Drupal core (theme) development. Yet, it's might be useful as well to follow these standards in your own projects.
There are coding standards for css, javascript and the new Twig template engine:
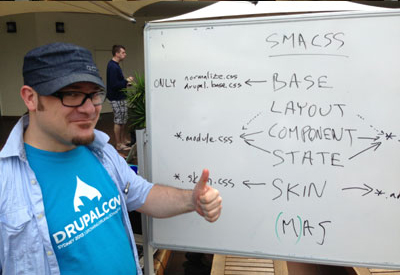
Drupal 8 uses the SMACSS system to conceptually categorize CSS rules.
- Base
- Layout
- Component (The official SMACSS theminoly for this is modules. Since modules have a different meaning in Drupal, this component was rename to component, to avoid confusion.)
- State
- Theme
BEM (Block Element Modifier) is a naming convention.
.block__element--modifier
- A block is an independent entity with its own meaning that represents a piece of interface on a page.
- An element is a part of a block, tied to it semantically and functionally. It has no meaning outside of the block it belongs to. Not all blocks have elements.
- Modifiers are flags set on blocks or elements; they define properties or states. They may be boolean (for example, visible: true or false) or key-value pairs (size: large, medium, small) — somewhat similar to HTML attributes, but not exactly the same. Multiple modifiers are allowed on a single item if they represent different properties.
Source: Smashing Magazine
Inside the core/themes lives a fourth folder (besides bartik, seven and stark), called engines. This folder contains the theme engines. In Drupal 8, the default template engine is Twig. The default template engine from Drupal 7, PHPTemplate, does still exist. Although it's not recommended to continue using the engine, it might be useful when you're migrating your Drupal 7 site to Drupal 8.
A theme engines (template engine, template processor or template parser) is a software components that combines data with templates from themes and shows the result - the final HTML - to the user.

Twig is a modern template engine for PHP. All of the theme_* functions and PHPTemplate based *.tpl.php files have been completely replace in Drupal 8 by Twig template files. The template files now have a new (Twig) extension, *.html.twig.
This is the official change record.
-
Twig is more secure, due to the fact that only a number of tags can be used. In the previous PHPTemplate, it was possible for a template file to execute the following code:
  <?php
    db_query('DROP TABLE {users}');
  ?>
This should of course not be the case. In case you're wondering what it does: it removes the entire
userstable from your database. Not good, right? -
There now is a clear separation between the logic and the view. This means: no more PHP code inside your template files.
-
The syntax is very easy to understand, making the code more readable as well. Also, many IDE's have syntax highlighting for
*.twigfiles. -
Template files are reusable, thanks to Twig includes.
-
Debugging is much more easy. First of all, Twig outputs a helpful message with the filename and the line number whenever there is a syntax problem within a template. Secondly, you can turn on a Twig debug function. More on that later.
-
Twig is very well documented. Go ahead and start reading the official documentation here.
-
It's not only used in Drupal core, so it's no a Drupaly-thing.
- Although the syntax is very easy to read and understand, it's a new syntax you have to learn before getting started.
A quick tutorial to get started with Twig template files.
Twig autoescape enabled by default. This means that every string printed from a Twig template (anything between {{ }}) gets escaped.
Escape a string means to reduce ambiguity characters in a string.
To print a simple variable in a template, use {{ variable }}. It's possible to let the varible go through a filter before printing it. This can be done using {{ varible|filter }}.
|length, returns the number of items of a sequence or mapping, or the length of a string.|lower, converts a value to lowercase.|upper, converts a value to uppercase.- …
A complete list of default Twig filters can be found here.
Drupal has added some extra filters available to use in a template.
-
twill run the variable through the Drupalt()function, which will return a translated string. An example:<a href="{{ url('<front>') }}" title="{{ 'Home'|t }}" rel="home" class="site-logo"></a> -
passthrough -
placeholder
To safely escape all of the Twig variables detected in a {% trans %} tag, the variables are sent with an @ prefix by default. To pass-through a variable (!) or use as a placeholder (%), the passthrough or placeholder filters are used.
- passthrough gets no sanitization or formatting and should only be used for text that has already been prepared for HTML display.
- placeholder gets escaped to HTML and formatted using drupal_placeholder(), which makes it display as emphasized text.
drupal_escapeis a replacement function for Twig's escape filter. See twig_drupal_escape_filter
safe_jointo safely joins several strings together. See twig_drupal_join_filter
withoutcreates a copy of the renderable array and removes child elements by key specified through filter's arguments. The copy can be printed without these elements. The original renderable array is still available and can be used to print child elements in their entirety in the twig template.
clean_classclean_id
The Twig i18n extension allows marking parts of a template as translatable. Let's start of with an easy example:
`{%trans %} Hello world {% endtrans %}`
It's possible to embed a variable in a translatable string, using the {{ variable }} syntax.
`{%trans %} Hello {{ name }} {% endtrans %}`
To apply a filter to a variable, used in a translatable block you first need to assign the result to a variable.
{% set name = name|capitalize %}

{% trans %}
	  Hello {{ name }}!
{% endtrans %}
A translatable string can be pluralized. Implementing a {% plural ... %} switch makes this possible.
{% trans %}
  Hello star.
{% plural count %}
  Hello {{ count }} stars.
{% endtrans %}
[@todo:] {% trans %} debugging
{# Comments go inside these brackets. #}
An if function.
{% if site_slogan %}
  <div class="site-slogan">{{ site_slogan }}</div>
{% endif %}
A for function. The output for this is 0, 1, 2, 3.
The
rangefunction returns a list containing an arithmetic progression of integers.
{% for i in range(0, 3) %}
  {{ i }},
{% endfor %}
Another example, from the field--node--title.html.twig template:
{%- for item in items -%}
  {{ item.content }}
{%- endfor -%}
Sometimes it might be useful to define variables in a template file. {% set foo=“bar” %} declaires a variable foo and assigns the value bar to it. Later in the template, the variable can be printed out using {{ foo }}.
All right. Now is the time to get really excited. We're about to create a Drupal 8 theme! The question that raises is: where should this theme be located, where should I put the files?
If you're familiar with Drupal 7 theming, the first place for you to look at would be
drupal/sites/all/themes/{custom/}(the place where all your custom themes lived in Drupal 7).
In Drupal 8, this location has changed. Custom and contrib themes now live in drupal/themes. Also notice that (custom and contrib) modules now live inside drupal/modules (instead of drupal/sites/all/modules/).
Did you notice {custom}? It's always a good practice to separate the contrib themes (the one's you've been downloading from d.o) and the ones you've written yourself. This can simply be done by creating two folders inside the
themesdirectory:
contrib: for contrib themes
custom: for custom themes
Let's create an example directory inside themes/custom, resulting in themes/custom/example. Inside this directory, all the code for our custom theme will live.
When creating your theme, you have two possibilities. You can create a theme…
- using Classy as base theme. This will result in some default classes and markup in your template files (since the template files from Classy will be used). Of course, you can still override these template files with your own.
- without Classy as base theme. No default markup and classes will be added to the template files. This way, you have full control of all the markup and classes. This is the default option!
In the following example, we have two custom themes. The first theme, Awesome, uses Classy as a base theme. The second theme, Kitten, doesn't use Classy as a base theme.
In order to extend from Classy in a custom theme, check the documention below (# Using a base theme).

Again, if you're familiar with Drupal 7 theming, your first idea might be to start with creating an .info file. In Drupal 8, .info files are replaced by .info.yml files (read the change record). These files are parsed using the Symphony YAML Component. This change also applies for modules and installation profiles. They both require a .info.yml now, instead of the old .info file. Once you've created the file, it's time to add the write the first line of code.
name: Awesome Theme
Fairly simple. This is the name of the theme. It's the name that also appears on the Appearance page, where you can activate your theme.
description: 'An awesome D8 theme.'
A theme description. This description is also displayed on the Appearance page.
package: Custom
The package in which your theme lives. For the core themes, this package is of course core.
type: theme
Since the info.yml files are used for besides themes also used for modules and profiles, this line lets Drupal know if it's a theme, module or a profile.
version: 1.0
The version of the theme.
core: 8.x
The version of Drupal core the theme requires.
base theme: classy
The line above gives you the power to extend from a base theme. This line can be found in both bartik.info.yml and seven.info.yml, since these two core themes extend Classy.
To wrap things up, this is our .info.yml file so far:
name: Awesome Theme
description: 'An awesome D8 theme.'
base theme: classy
package: Custom
type: theme
version: 1.0
core: 8.x
Save this as {theme_name}.info.yml (awesome.info.yml) inside the created custom theme directory (eg. themes/custom/example/example.info.yml). Now navigate to admin/appearance and see your theme displayed. You can now even enable the theme. Hooray!
When navigation to the appearance page, you might notice a no screenshot image for our theme. This is because no screenshot has been found (duh!). A screenshot is automatically detected and displayed if the filename is screenshot.png. If we add this file, we would see the screenshot on the appearance page.
Otherwise you can manually add a screenshot with the following line:
screenshot: otherfilename.png
If everything went well, you should be able to see the screenshot:

Conclusion: the filename for a screenshot does not have to be screenshot.png, as long as it is defined in the {theme}.info.yml file.
It's of course important to know how to add stylesheets to your theme. Let's add a css file called styles.css (that lives inside the css directory: /css/styles.css) to our theme.
# Adding styles.css to our theme.
stylesheets:
  all:
    - css/styles.css
In Drupal 7, this could be achieved by adding the following line:
stylesheets[all][] = css/style.css
The css file is now added. The all keyword stands for the media tag inside the html link element that is used to add stylesheets:
<link rel="stylesheet" href="[stylesheet]" media="all" />
So ... now that you know this, it's very easy to add a print stylesheet to our theme as well:
# Adding a print stylesheet to our theme.
stylesheets:
  print:
    - css/print.css
Inside the html:
<link rel="stylesheet" href="[stylesheet]" media="print" />
In Drupal 8, drupal.base.css has been replaced with normalize.css (see this change record). If you want to include a different version of normalize.css, you can override this file.
# Remove a CSS file:
stylesheets-override:
- normalize.css
Alternatively, we can also completely remove a css file.
# Remove a CSS file:
stylesheets-remove:
- normalize.css
Regions can be defined using the regions tag. Here is an example where 3 regions are defined: a header, a content and a footer region:
# Regions
regions:
  header: 'Header'
  content: 'Content'
  footer: 'Footer'
Regions hidden
The regions_hidden can be applied to any previous defined regions. Regions with this attribute will not show up on the block administration page. This means they can't have blocks assigned to them by ordinary mechanisms. For example, Drupal uses this feature to protect the special 'page_top' and 'page_bottom' regions from adventurous themers. This can be used by module writers and theme writers to protect a given region from having unexpected content inserted into the output. The seven.info.yml contains this tag, in order to hide the 'Sidebar First' region.
regions_hidden:
  - sidebar_first
Drupal 8 doesn't load any additional scripts. This also means that by default a library like jQuery is not included. You have to declare it as a dependency for your script in order to use it. In the early stages of Drupal 8, this was done using hook_library_info. Since this was one of the last remaining hooks in Drupal 8, it got replaced by a *.libraries.yml file.
Since Drupal 8 does not support IE8 and below, and because Javacript has evolved, you might not need jQuery. If hovever you do want to use jQuery, make sure to look up some of the best practices for using jQuery.
Let's add some custom javascript to our theme. Our script will location in the js folder inside our theme (/js/awesome.js). Next, we create a *.libraries.yml file. Let's call this awesome.libraries.yml ({theme-or-module-name}.libraries.yml) and save it into the root of our theme.
base:
  version: 1.x
  js:
    js/awesome.js: {}
  dependencies:
    - core/drupal
    - core/jquery
    - core/jquery.once
We need
core/drupalin order to take advantage of theDrupal.behaviors. To include the Drupal core version of jQuery, we addcore/jquery. The final dependency iscore/jquery.once, a jQuery plugin allowing to only apply a function once to an element.
Back in our awesome.info.yml file, we now add the following lines, to include the new declared library into our theme.
libraries:
  - awesome/base
This includes our the custom javascript and the dependencies into our theme. In this example, both the custom script and the jQuery library are now included in our theme.
Drupal.behaviors are still part of javascript in core. Let's open the awesome.js and add a little behavior.
(function ($) {
  "use strict"
  Drupal.behaviors.mymodule = {
        attach: function (context, settings) {
          $('main').once('awesome').append('<p>Hello world</p>');
        }
  };
}(jQuery));
Let's have a quick look at what this does.
The behavior has to have a unique namespace. In the example the namespace is awesome (Drupal.behaviors.awesome). The context variable is the part of the page for which this applies. This is especially useful when working with AJAX. The settings variable is used to pass information from the PHP code to the javascript. Next is some custom code that creates a paragraph-tag, with the text Hello world, and appends it to the main-tag. Using the .once('awesome') will make sure the code only runs once. It adds a processed- class to the main tag (<main role="main" class="awesome-processed">) in order to accomplish this.
Some libraries both have javascript (js) and stylesheets (css). It's possible to include these stylesheets as well. As an example, here's how to include Picker (version 3.1.0) into the awesome theme. Most of the parameters are the same, but this time we add a remote and css tag. Using the remote parameter, allows you to define an external link to the library. The css tag will include the css file from the library. The level underneath, theme is necessary due to the SMACSS standard; used for CSS file organisation.
picker:
  version: 3.1.0
  remote: http://formstone.it/components/picker
  js:
    lib/picker/js/jquery.fs.picker.js: {}
  css:
    theme:
      lib/picker/css/jquery.fs.picker.css: {}
  dependencies:
    - core/jquery
All of the javascript code must be declared inside a closure wrapping the whole file. This closure must be in strict mode.
(function () {
  "use strict";
  // Custom javascript
})();
The "use strict" directive is new in JavaScript 1.8.5 and ignored by previous versions of javascript. The purpose of "use strict" is to indicate that the code should be executed in "strict mode". As an example, in scrict mode, you cannot use undeclared variables.
As of Drupal 8, we use ESLint to make sure our JavaScript code is consistent and free from syntax error and leaking variables and that it can be properly minified.
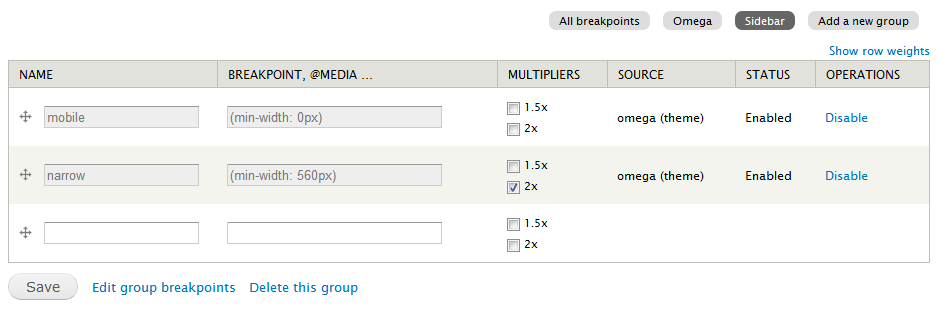
The Breakpoints module keeps track of the height, width, and resolution breakpoints where a responsive design needs to change in order to respond to different devices being used to view the site. The Breakpoints module standardises the use of breakpoints, and enables modules and themes to expose or use each others' breakpoints.
Both themes and modules can define breakpoints by creating a configuration file called {name}.breakpoints.yml where {name} is the name of your theme or module.
To get a good example, let look at bartik.breakpoints.yml:
bartik.mobile:
  label: mobile
  mediaQuery: '(min-width: 0px)'
  weight: 0
  multipliers:
    - 1x
bartik.narrow:
  label: narrow
  mediaQuery: 'all and (min-width: 560px) and (max-width: 850px)'
  weight: 1
  multipliers:
    - 1x
bartik.wide:
  label: wide
  mediaQuery: 'all and (min-width: 851px)'
  weight: 2
  multipliers:
    - 1x
[@todo]
[@todo] Installing image styles directly with your theme using CMI.
This section is dedicated to all people who have been dealing with theme-functions in Drupal 7. All of the theme-function are gone and have been replaced with template files. The next section goes into detail about how you can modify and override them. It also handles how you can complety control all the classes add to the layout.
As you're reading this, it might be possible that some of the theme_ functions still exists. The goal would be to have all of them removed completly by a first release canditate.

Twig is a PHP-based compiled templating language. When your web page renders, the Twig engine takes the template and converts it into a 'compiled' PHP template which it stores in a protected directory in sites/default/files/php_storage/... The compilation is done once. Template files are cached for reuse and are recompiled on clearing the Twig cache.
The theme-functions are gone. Almost all the core themes (and modules) now contain a new folder called templates. In this folder, the Twig template files are stored.
[@todo:] Document the new folder, that contains all the templates files instead of all the theme_-functions.
An awesome new feature from the Twig engine is the debug tool. It allows you to trace where the template comes from. To enable Twig Debugging, all you have to do is set the debug variable in the twig.config to true. Navigate to sites/default/services.yml to change the it:
parameters:
  twig.config:
  debug: false
[@todo:]
- How to find the active template
- Overriding template
- Debug array.
- Part of a template, you can modify on; extending twig template files.
[@todo]
[@todo:] Document this template file.
A new trend, you might have heard by new, is headless Drupal.
[@todo]