release habitat package
The following release process will upload the build Habitat package to the Habitat Depot as specified in the Habitat Origin endpoint.
-
Click on the 'Build and Releases' button at the top of the page and select 'Releases'.
-
Click on 'New Definition'.
-
Select 'Agent Phase' on the left hand side and in the 'Queue' on the right select the name of the agent pool that will perform this release.
-
Click on the '+' to the right of the 'Agent phase' to add the Release task.
-
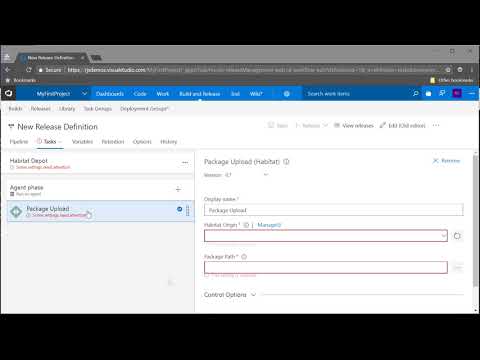
Add the following tasks:
- Package Upload (Habitat)
- Set the 'Habitat Origin' to the service endpoint created in the previous section.
- In the 'Package Path' add something similar to the following. This uses variables so that it is not explicitly defined (which is what would happen if you use the ellipsis at the end of the text field).
$(System.DefaultWorkingDirectory)/MyFirstProject-CI/drop/russellseymour-vstst-habitat-extension-demo-$(Build.BuildNumber)-*-x86_64-linux.hart - Package Upload (Habitat)
-
Click 'Save' at the top of the page. Optionally add any comments to describe what has changed.
-
Click on 'Pipeline' from the 'New Release Definition' toolbar.
-
Click the circle entitled 'Add Artifact'.
-
In the 'Source (Build Definition)' select the build artifact to release from the drop down menu. Check the other settings, these can normally be left as default.
-
Click 'Add'.
-
Click 'Save' to save the changes
-
Click on 'Release' and select 'Create Release'.
-
Ensure that the correct artifact it selected for the release and click 'Queue'.
-
Monitor the progress of the build using the link that is provided at the top of the page.
Once the release has completed it should be possible to login to the Habitat Depot and see the newly uploaded package on the dashboard.