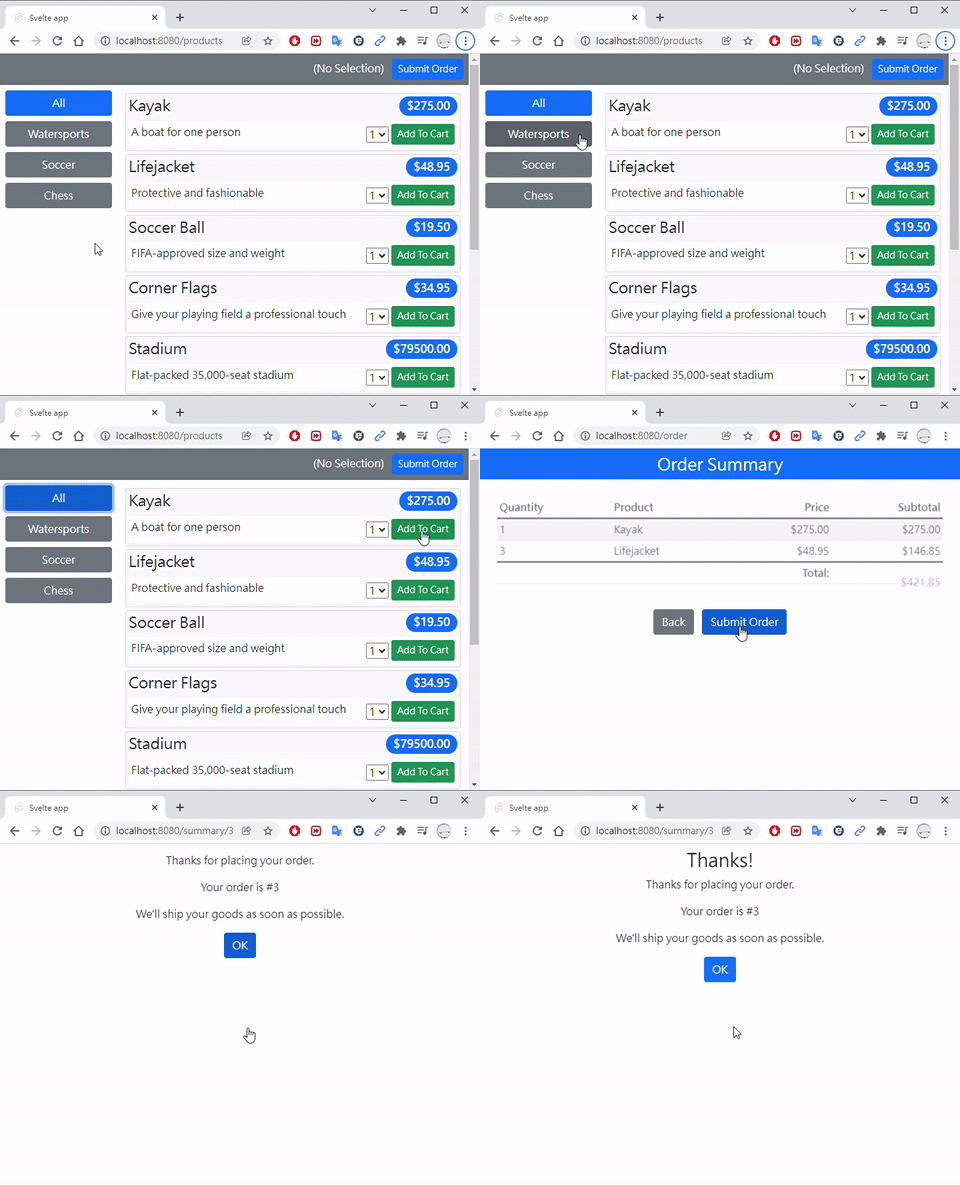
This is a simple shopping demo app, based on the same Angular/React/Vue.js examples in Essential Typescript by Adam Freeman:
- Front-end: (
/src)- TypeScript
- Component framework: Svelte 5 (upgraded to Svelte 5 syntax)
- Application framework: SvelteKit 2
- Static site generation: @sveltejs/adapter-static
- CSS styles: Bootstrap 5
- Back-end: (
/backend)- Golang
- Static web server/RESTful web services: gin
- SQLite driver: go-sqlite3
- Database: (
/db)
The project comes with a Dockerfile that can create a single small container with multi-stage builds (image size ~25 MB) and also support to be opened in DevContainer/CodeSpace.
A Github Action workflow is created to run build test for dependabot's pull-requests for dependency updates.
The purpose of project is a demonstration to build a small and self-contained full-stack monolithic application with modern frameworks, but not meant to be a practical template for any real world applications. For example, error handlings between front-end and authentication are mostly ignored.
A similar version using Vue.js, Express, MongoDB and Docker Compose can be found here (no longer maintained).
The Svelte app has the following routes:
| Route | Page |
|---|---|
/ |
Index (will redirect to /products) |
/products |
Browse and add products to shopping cart |
/order |
View and checkout order |
/summary/{id} |
Order result |
- When the app is opened at
/, it will immediately redirect to/products. /productsloads the list of products from an API service and display the categories and items.- The user can filter items using the category buttons.
- When the user clicks
Add To Carton any items, it will be added to the cart (global state arrayorderLines). - When the user clicks
Submit Orderon/products, the app will redirect to/order, whcih will show the detail of the order. - When the user clicks
Submit Orderon/order, the app will send the order to an API service and get the order ID. - After the order is "sent", the app will redirect to
/summary/[id]as the result.
The backend creates two RESTful-like APIs:
| API | Function |
|---|---|
GET /api/products |
Query DB and return product data |
POST /api/orders |
Write order data into DB and return new order ID |
Adam Freeman's original projects use json-server on an Express server as mock API services. I keep the input/output spec of the services for the sake of demonstration. Right now, like all the original examples, the app only reads product lists and write order data. The Axios package used in the original examples is also replaced with fetch.
SvelteKit also has a feature to create "backend APIs". However the Golang server here is enough, so we don't really need to create duplicated APIs.
Return a list of products from the database. The category will be used to create category filter buttons on the app.
Example request body:
(none)
Example response body:
[
	{
		"id": 1,
		"name": "Kayak",
		"category": "Watersports",
		"description": "A boat for one person",
		"price": 275.0
	},
	{
		"id": 2,
		"name": "Lifejacket",
		"category": "Watersports",
		"description": "Protective and fashionable",
		"price": 48.95
	}
]Write ordered item and quantities. The service will create a new order ID and associate it with the ordered products.
Example request body:
{
	"lines": [
		{
			"productId": 1,
			"productName": "Kayak",
			"quantity": 2
		},
		{
			"productId": 2,
			"productName": "Lifejacket",
			"quantity": 4
		}
	]
}
Example response body:
{
	"id": 42
}The SQLite database (./db/data.sqlite3) in this repo already contains the table products with 9 product records (which can be found in many Adam Freeman's books) and an empty table orders. You can use DB Browser for SQLite to read the database. There is also a backup file in case you need to restore the database.
Here's the SQL statements to recreate them:
CREATE TABLE "products" (
    "id"    INTEGER NOT NULL UNIQUE, -- product ID
    "name"    TEXT NOT NULL,
    "category"    TEXT NOT NULL,
    "description"    TEXT,
    "price"    REAL NOT NULL,
    PRIMARY KEY("id" AUTOINCREMENT)
);

CREATE TABLE "orders" (
    "id"    INTEGER NOT NULL, -- order ID
    "product_id"    INTEGER NOT NULL, -- product ID
    "quantity"    INTEGER NOT NULL
);

INSERT INTO "main"."products" (
    "id",
    "name",
    "category",
    "description",
    "price"
)
VALUES
    ('1', 'Kayak', 'Watersports', 'A boat for one person', '275.0'),
    ('2', 'Lifejacket', 'Watersports', 'Protective and fashionable', '48.95'),
    ('3', 'Soccer Ball', 'Soccer', 'FIFA-approved size and weight', '19.5'),
    ('4', 'Corner Flags', 'Soccer', 'Give your playing field a professional touch', '34.95'),
    ('5', 'Stadium', 'Soccer', 'Flat-packed 35,000-seat stadium', '79500.0'),
    ('6', 'Thinking Cap', 'Chess', 'Improve brain efficiency by 75%', '16.0'),
    ('7', 'Unsteady Chair', 'Chess', 'Secretly give your opponent a disadvantage', '29.95'),
    ('8', 'Human Chess Board', 'Chess', 'A fun game for the family', '75.0'),
('9', 'Bling Bling King', 'Chess', 'Gold-plated, diamond-studded King', '1200.0');For local development you'll need
- Git
- Node.js (for dev or production)
- Golang (for production)
- Docker (only required for generating the container)
Note: the
go-sqlite3package requires GCC to compile with the environment variableCGO_ENABLED=1.For Windows users, it can be installed with MinGW (unzip and add
\mingw64\binto$PATH, then restart VS Code). On Linux it can be installed with the packagebuild-essential.
git clone https://github.com/alankrantas/svelteapp-typescript-go.git
cd svelteapp-typescript-go
npm i -g yarn@latest
yarn setup-full
And install/upgrade yarn:
npm i -g yarn@latestRun the Svelte app in development mode. The app will not call any backend APIs, instead it returns mock product data and the returned order number is always 42.
yarn devThe app will be open at http://localhost:3000.
# download frontend dependencies
yarn

# download backend dependencies
yarn setup-server

# download both dependencies
yarn setup-full
# or
# yarn setup-all# upgrade frontend dependencies
yarn upgrade-app
# upgrade backend dependencies
yarn upgrade-server
# upgrade both dependencies
yarn upgrade-full
# or
# yarn upgrade-allInstall dependencies, build both front-end and back-end apps and run the local server:
# build frontend app
yarn build-app

# build backend server (which will set CGO_ENABLED=1)
yarn build-server

# build both
yarn build-full
# or
# yarn build
# yarn build-all# serve in macOS or Linux
yarn serve
# serve in Windows
yarn serve-winThe app would open at http://localhost:8080.
# build container
yarn docker

# run container
yarn docker-run
The app would open at http://localhost:8080.
