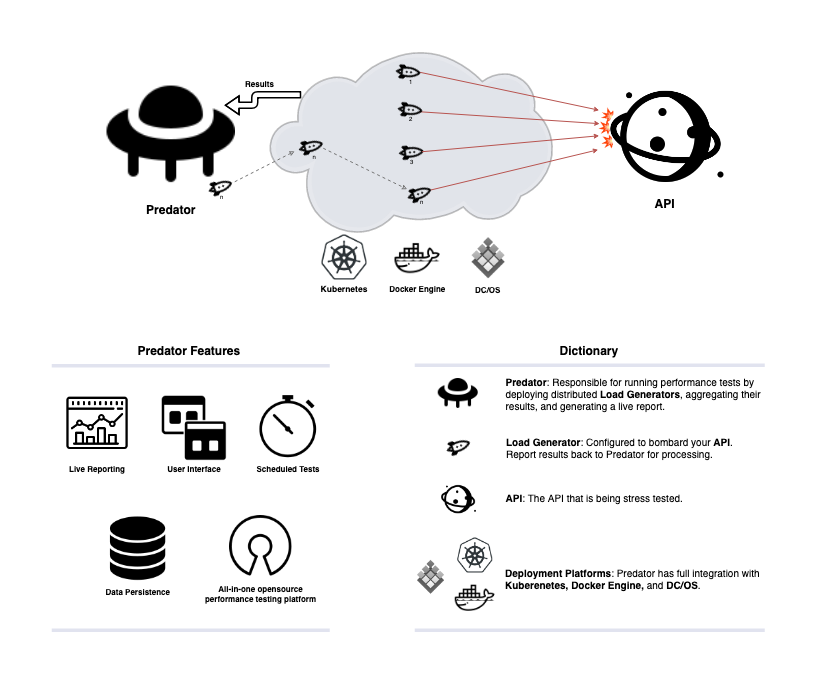
Predator manages the entire lifecycle of stress-testing servers, from creating performance tests, to running these tests on a scheduled and on-demand basis, and finally viewing the test results in a highly informative and live report.
It has a simple, one-click installation, built with support for Kubernetes, DC/OS and Docker Engine, and can persist the created performance tests and their reports in 5 different databases. It also supports running distributed load out of the box. Bootstrapped with a user-friendly UI alongside a simple REST API, Predator helps developers simplify the performance testing regime.
Installation | Site | Documentation | API Reference | API Tests Examples
| Distributed Load | ❇️ | Predator supports an unlimited number of load generators that produce multiple load runners concurrently. |
| Functional Testing | 🆕 | Run functional tests with various types of assertions and later on see the results in the report page. |
| Streaming Integration | 🆕 | Produce predator resources to Kafka easily and seamlessly. |
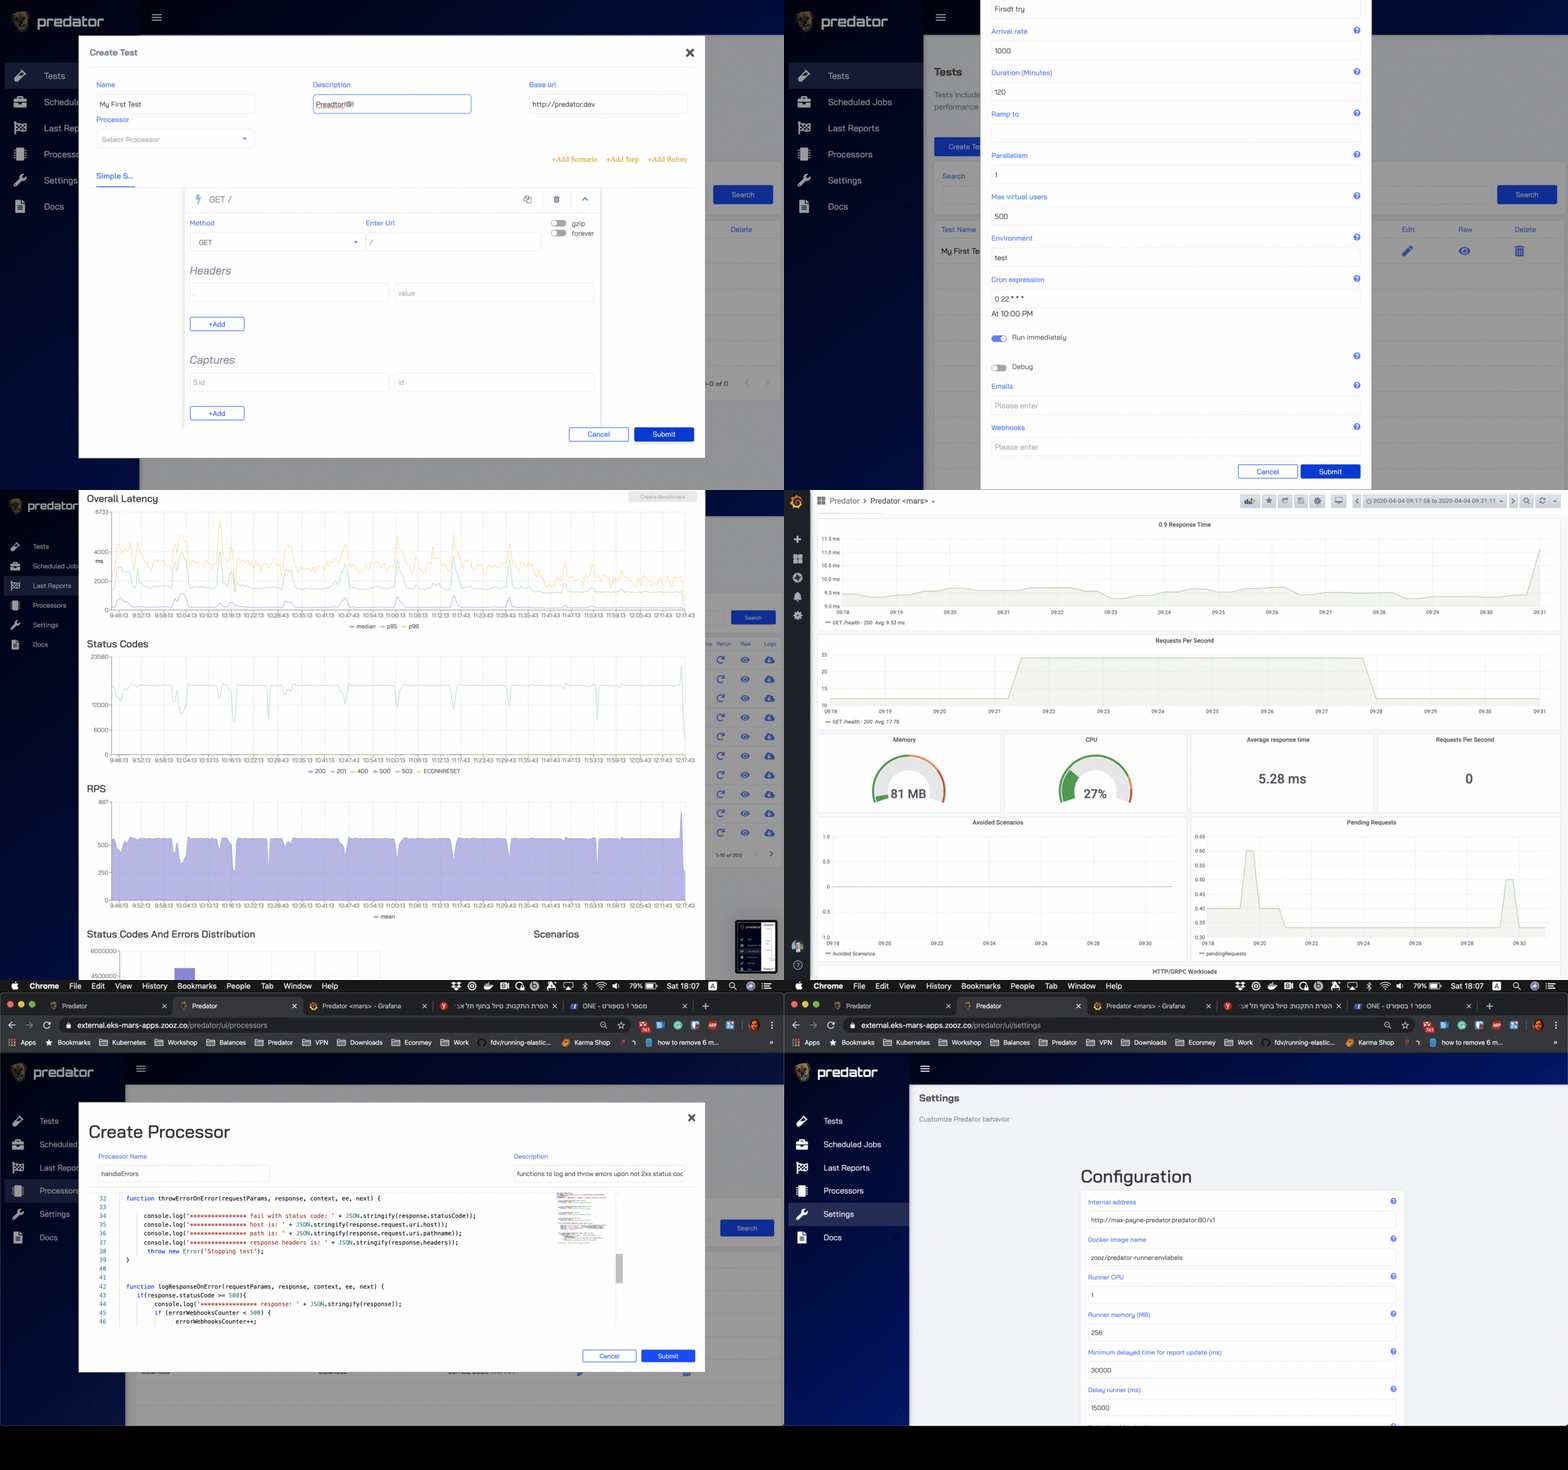
| Rich UI | ❇️ | Predator offers a rich UI where you can write tests, run them and compare results. |
| Reports && Tests Persistence | ❇️ | Predator provides out-of-the box functionality for persisting data in Postgres, MySQL, MSSQL and SQLITE. |
| Real time reports | ❇️ | Predator aggregates all concurrent runs into a single beautiful report in real time (latency, rps, status codes and more). |
| CSV Datasets | ❇️ | Predator support uploading files like csv to provide dataset for test inputs |
| Scheduled runs | ❇️ | Predator can run recurring tests using cron expressions. |
| REST API | ❇️ | Full REST API to integrate Predator with CI/CD frameworks |
| Benchmarks | ❇️ | Set benchmarks to compare test runs to ensure performance degradation is discovered early in development. Allows to measure every build and release against specified baseline results guaranteeing safer releases to production. |
| Cloud Native | ❇️ | Predator is built to take advantage of Kubernetes and DC/OS. It's integrated with those platforms and can manage the load generators lifecycles by itself. |
| Prometheus/Influx integration | ❇️ | Predator comes integrated with Prometheus and Influx. Simply configure it through the predator REST API or using the UI. |
| Compare Multiple tests results | ❇️ | Built-in dashboard to compare multiple test runs at once. |
| Webhooks API | 🆕 | Supported in Slack, Microsoft Teams, Discord or JSON format for an easy server to server integration. |
| Chaos Mesh integration | 🆕 | Integration with Kubernetes Chaos Mesh, to create chaos experiments and integrate them with your performence/load tests. |
- Chaos Mesh integration for conducting chaos experiments in Kubernetes environments. This enhancement improves testing by simulating faults and failures to ensure application resilience. Results of these experiments are now visible in the reporting section, offering insights into the impact on test outcomes
Create Chaos experiments by submitting Kubernetes JSON formatted CRD, check out our API documentation for more details.
3. New Webhooks API will break the current webhooks feature implemented in <= v1.4. POST /jobs API will now include in the body webhook_id field instead of webhook_url.
To see the progress of v1.5.0 click here
- Predator's support of Cassandra will be dropped. Before opensourcing Predator and using an ORM abstraction in order to support multiple databases, Predator was only integrated with Cassandra as a backend storage. Since Cassandra's pros are not fully leveraged in the usecases of Predator's integration with a database and because it was delaying our development on new features, we decided to fully drop support of it. We plan to provide migration scripts to our other supported databases.
- Functional tests support will break the
POST /jobsAPI. A new parametertypeto the create job body will be added and will require either a value ofload_testorfunctional_test, check out our API documentation for more details. - New Webhooks API will break the current webhooks feature implemented in <= v1.4.
POST /jobsAPI will now include in the bodywebhook_idfield instead ofwebhook_url.
To see the progress of v1.5.0 click here
Predator is production ready and fully tested and can be deployed in all of the following platforms listed. Please follow these guidelines when deploying Predator:
- Deploy Predator using only tagged releases and not
latest. - Predator-Runner docker image version (
zooz/predator-runner:$TAGGED_VERSION) must match the Predator'smajor.minorversion running in order to be fully compatible with all features. Patched versions don't have to match, but it is recommended to use latest patch version.- For example, Predator version 1.6 (
zooz/predator:1.6) should run Predator-Runner version 1.6 as well (zooz/predator-runner:1.6).
- For example, Predator version 1.6 (
- For notes on which version to deploy, read our versioning section.
Predator is designed to seamlessly deploy into your Kubernetes cluster. Install Predator from the Helm Hub
Predator is included in Mesosphere Universe. Please refer to https://universe.dcos.io/#/package/predator/version/latest for a quick start guide and examples for installing the package.
Without persisted storage:
docker run -d -e JOB_PLATFORM=DOCKER -e INTERNAL_ADDRESS=http://$MACHINE_IP:80/v1 -p 80:80 --name predator -v /var/run/docker.sock:/var/run/docker.sock zooz/predator
With persisted storage:
docker run -d -e SQLITE_STORAGE=db/predator -e JOB_PLATFORM=DOCKER -e INTERNAL_ADDRESS=http://$MACHINE_IP:80/v1 -p 80:80 --name predator -v /var/run/docker.sock:/var/run/docker.sock -v /tmp/predator:/usr/db zooz/predator
where $MACHINE_IP is the local ip address of your machine (not localhost, but actual ip address - it is your local network address).
To run and debug Predator locally run:
npm run setup-local-envThis script will clean your node_modules, run npm install, build the ui (webpack) and set .env file with minimal required params.
After that you will be able to start Predator with:
npm run start-localIn case your IP changes, you will need to change it in .env file.
cd ui
PREDATOR_URL=http://localhost:3000/v1 npm startnpm testThe script runs the following tests:
- lint
- unit-tests
- integration-tests
The path for accessing the Predator UI is: http://localhost:3000/ui (in the case that Predator is running locally under port 3000)
In case Predator is not running under the root domain, (for example, running under http://your.domain.com/example-path) in order to access the UI follow the below steps:
docker build --build-arg BUCKET_PATH=example-path . -t predator- Deploy the tagged docker image to your preferred platform
- Access the Predator UI at http://your.domain.com/example-path/ui
In case you host Predator's docs website on a different URL ( for example, Predator runs in a closed network without access to the internet ) you can configure the docs link in the UI using the PREDATOR_DOCS_URL build-arg.
if PREDATOR_DOCS_URL was not specified, the default value is https://zooz.github.io/predator.
docker build --build-arg PREDATOR_DOCS_URL=http://your.predator.docs.com/example-path . -t predator- Deploy the tagged docker image to your preferred platform
- One should be redirected to
http://your.predator.docs.com/example-pathwhen clicking the on the docs link in the UI side menu.
Please read CONTRIBUTING.md for details on our code of conduct, and the process for submitting pull requests to us.
We use SemVer for versioning. For a complete list of Docker images of this project please visit our docker hub repository.
Predator tagged images are maintained in two ways:
- MAJOR.MINOR (for example zooz/predator:1.5)
- MAJOR.MINOR.PATCH (for example zooz/predator:1.5.4)
Everytime a certain tag MAJOR.MINOR.PATCH is released, the initial MAJOR.MINOR version (of the same major and minor versions) will also be updated with the new patched updates.
Therefore to always stay updated to the latest patched version, use tag convention MAJOR.MINOR, otherwise use tag convention MAJOR.MINOR.PATCH
For topics that are better discussed live, please join the Predator Slack workspace.
This project is licensed under the Apache License 2.0 - see the LICENSE.md file for details


