Bootstrapping the BeagleBone Black
WARNING: These instructions will walk you through installing the steward on Angstrom Linux. The resulting system works, but is extremely fragile due to third party library problems. Instead of following these instructions we advise you to build a Debian Wheezy distribution instead, and boot from the SD card rather than from the internal eMMC disk.
If you do not want to go through the manual installation steps below we supply a disk image for the Beaglebone Black. The disk image is the latest version of Debian Wheezy with the steward and its dependancies already installed. The steward will auto-start when the Beaglebone is booted, although especially on the first boot it may take a few moments to start as it has to generate an RSA key on startup. Download the disk image, and install it as you would a normal version of the operating system.
Starting with a new board the first step is to plug the board into your laptop using the mini-USB cable provided. The BeagleBone has two USB ports, a full sized USB-A port, and a mini-USB port. The mini port is located on the reverse side of the board near the Ethernet jack.
The board should boot and you should see a solid blue light next to the 5V power jack. When startup is completed, a new mass storage device called BEAGLEBONE should appear on your desktop.
Open up the mass storage device and click on the START.htm file to open it in a browser. You should probably read through this file to familiarise yourself with the BeagleBone's capabilities.
NOTE: You should use the mini USB port on the underside of the board to connect the BeagleBone to your computer, this is located on the underside of the board to the left of the Ethernet jack.
NOTE: The board uses the same power supply as the previous BeagleBone. 5VDC, 1A, 2.1mm, center positive. The power supply is not supplied with the board. However if you are going to configure the board to use a WiFi adaptor you should use a supply with a 2A rating otherwise you'll get intermittent crashes due to brown outs.
The main difference from the Raspberry Pi for setup is that the BeagleBone ships with the Angstrom Linux distribution and boots from onboard flash memory. That means we don't have to up do an initial OS installation before talking to the board. However, it's advisable to go ahead and update the OS before continuing in any case.
###Downloading the Operating System
Download the latest image of the Angstrom Distribution, currently that's BBB-eMMC-flasher-2013.09.04.img.xz.
The image comes as a .xz file. You can install the XZ Utils which will let you unzip the compressed archive by using MacPorts or Homebrew.
xz -d BBB-eMMC-flasher-2013.09.04.img.xz
After decompression is should be around 3.4GB, so you will need a micro SD card at least 4GB in size to handle the image. Go ahead and insert the microSD card in its adaptor into your Macbook.
Open up a Terminal window and type df -h, remember the device name for your micro SD Card. In my case it's /dev/disk1. We'll need to use the raw device, /dev/rdisk1.
Filesystem      Size   Used  Avail Capacity  iused    ifree %iused  Mounted on
/dev/disk0s2   699Gi  367Gi  332Gi    53% 96214802 86992771   53%   /
devfs          206Ki  206Ki    0Bi   100%      714        0  100%   /dev
map -hosts       0Bi    0Bi    0Bi   100%        0        0  100%   /net
map auto_home    0Bi    0Bi    0Bi   100%        0        0  100%   /home
/dev/disk1s1    59Gi   33Gi   26Gi    57%  8739054  6768902   56%   /Volumes/SD Card
Unmount the card,
sudo diskutil unmount /dev/disk1s1
rather than ejecting it by dragging it to the trash. Then in the Terminal change directory to your downloads folder and type
sudo dd bs=1m if=BBB-eMMC-flasher-2013.09.04.img of=/dev/rdisk1
if the above command report an error "dd: bs: illegal numeric value", change bs=1m to bs=1M. The card should automatically remount when dd is done.
Eject the card with the command,
sudo diskutil eject /dev/rdisk1
###Flashing the BeagleBone Black
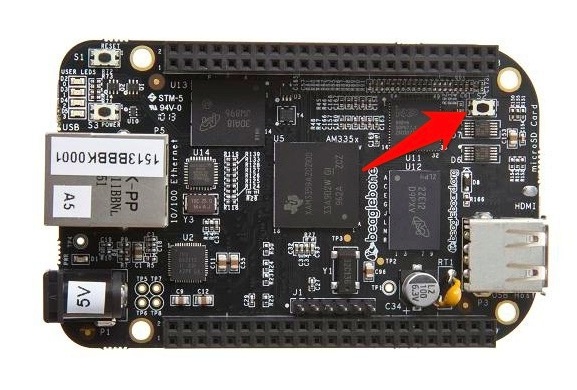
Power the BeagleBone Black down and locate the "User Boot" button. It's located on the top side of the board, directly above the micro SD card slot which is located on the reverse side along with the mini and micro USB sockets.
Insert the micro SD card in the slot and, whilst holding the "User Boot" button down, plug the board into mini-USB connector. Hold the button down until you see the bank of 4 LEDs light up for a few seconds. You can now release the button.
It will take anywhere from 30 to 45 minutes to flash the image onto the on-board flash storage. Once done, the bank of 4 LEDs near the Ethernet jack will all light up and stay lit up. Power down the board at this point.
The BeagleBone Black comes with both Network and Serial drivers for Mac OS X. The first gives you network-over-USB access to your BeagleBone, the second direct serial access. You'll need both sets of drivers.
Plug the board into your computer using the USB cable, wait while the board boots. Open up the BEAGLEBONE volume and click on the START.htm file, go to Step #2 in the file.
Grab the Network (HoRNDIS-rel4.pkg) driver file from the BeagleBone's mass storage device by clicking on the link in the START.htm file. Install the driver on your Mac by clicking on the pkg file and following the instructions.
After installation you should at this point be able to access the onboard web server of the BeagleBone Black over the USB cable by going to http://192.168.7.2/ in a browser.
NOTE: In some cases you may not be able to directly access the board using SSH at this point. There seems to be a problem in some versions of the stock image that causes some boards to fail to bring up the SSH server properly.
Grab the Serial (FTDI_Ser.dmg) driver file from the BeagleBone's mass storage device by clicking on the link in the START.htm file. Install the driver on your Mac by opening the dmg file and clicking on the enclosed pkg file and following the instructions.
NOTE: The enclosed driver is a patched version of the stock FTDI drivers. Even if you've installed FTDI serial drivers before you need to follow this step. The BeagleBone won't be accessible otherwise.
There are four methods to connect to the board: USB Serial, FTDI Serial, TCP over USB and Ethernet.
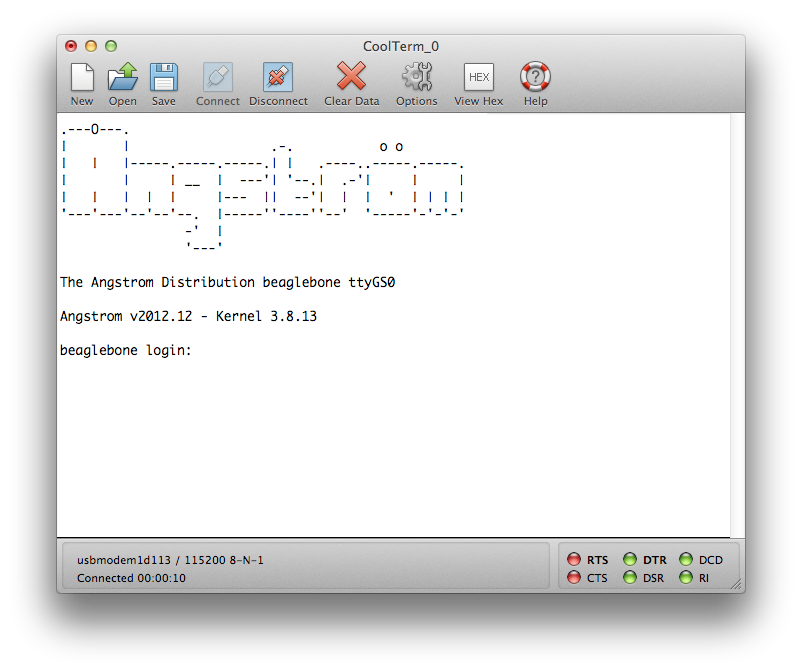
NOTE: When you connect to the board the default root password is blank so just hit return to login to the board.
Several /dev/tty.usbmodem* devices should be present when the board is plugged in via the mini-USB cable.
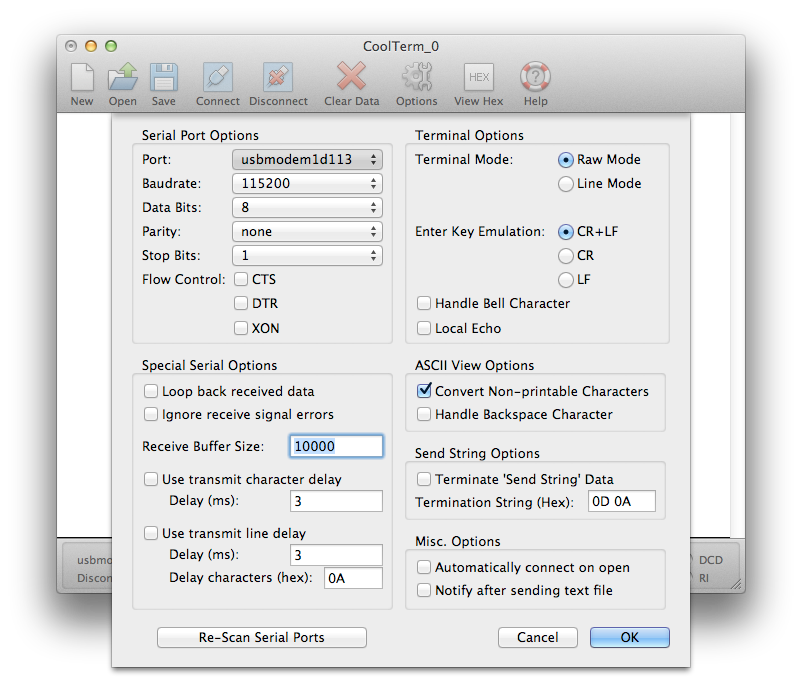
Open up CoolTerm or a similar program and you can connect to your board at 115,200 8-N-1 (Local Echo should be off) on one of these ttys offered by the board. Of the five offered by the board,
crw-rw-rw-  1 root  wheel   18,  22  4 Sep 22:43 /dev/tty.usbmodem11
crw-rw-rw-  1 root  wheel   18,   8  4 Sep 20:11 /dev/tty.usbmodem1d111
crw-rw-rw-  1 root  wheel   18,  24  4 Sep 22:43 /dev/tty.usbmodem1d113
crw-rw-rw-  1 root  wheel   18,  12  4 Sep 20:12 /dev/tty.usbmodem6
crw-rw-rw-  1 root  wheel   18,  18  4 Sep 20:14 /dev/tty.usbmodem9
only /dev/tty.usbmodem1d113 connected for me. Your milage may vary at this point.
Alternatively you can use a 3.3V FTDI-to-USB cable to connect to the debug (J1) header block. Pin 1 on the cable is the black wire and connects to pin 1 on the board, the pin with the white dot next to it.
Open up CoolTerm again and you can connect to your board at 115,200 8-N-1 (Local Echo should be off) via the usbserial port offered by the cable, e.g.
crw-rw-rw- 1 root wheel 18, 12 31 May 20:40 /dev/tty.usbserial-FTE4XVKD
While I've had this method up and working, I've had intermittent luck with it - USB Serial seems to be more reliable once you have the FTDI drivers installed and working on your Mac.
###Connecting via network over USB
Plug the BeagleBone back into the mini-USB cable connected to your Mac, and wait for it to boot back up. When it has finished booting, you should be able to once again reach the onboard webpages at http://192.168.7.2/ in your browser, but you should also be able to SSH to the board,
 ssh [email protected]
 [email protected]'s password:
 root@beaglebone:~#
###Connecting via the local network
Plug an Ethernet cable into the jack on the board. After a moment the two lights on the jack (green and yellow) should go live and indicate that it is on the network. You can either login to your board via one of the methods above to find out what its IP address is, or check your router.
root@beaglebone:~# ifconfig
eth0      Link encap:Ethernet  HWaddr C8:A0:30:AF:C2:18
          inet addr:192.168.1.90  Bcast:192.168.1.255  Mask:255.255.255.0
          inet6 addr: fe80::caa0:30ff:feaf:c218/64 Scope:Link
          UP BROADCAST RUNNING MULTICAST  MTU:1500  Metric:1
          RX packets:1843 errors:0 dropped:1 overruns:0 frame:0
          TX packets:83 errors:0 dropped:0 overruns:0 carrier:0
          collisions:0 txqueuelen:1000
          RX bytes:150073 (146.5 KiB)  TX bytes:12398 (12.1 KiB)
          Interrupt:56

lo        Link encap:Local Loopback
          inet addr:127.0.0.1  Mask:255.0.0.0
          inet6 addr: ::1/128 Scope:Host
          UP LOOPBACK RUNNING  MTU:65536  Metric:1
          RX packets:4 errors:0 dropped:0 overruns:0 frame:0
          TX packets:4 errors:0 dropped:0 overruns:0 carrier:0
          collisions:0 txqueuelen:0
          RX bytes:280 (280.0 B)  TX bytes:280 (280.0 B)

usb0      Link encap:Ethernet  HWaddr 06:74:70:BE:E7:97
          inet addr:192.168.7.2  Bcast:192.168.7.3  Mask:255.255.255.252
          UP BROADCAST RUNNING MULTICAST  MTU:1500  Metric:1
          RX packets:4688 errors:0 dropped:0 overruns:0 frame:0
          TX packets:4537 errors:0 dropped:0 overruns:0 carrier:0
          collisions:0 txqueuelen:1000
          RX bytes:316153 (308.7 KiB)  TX bytes:675250 (659.4 KiB)
If your router is capable you might want to configure it so that the BeagleBone's IP address is fixed in future and that it's got a local name that you can use rather than a raw IP address.
##Updating the Operating System
NOTE: To update the Operating System you have be connected using the local network method (using an Ethernet cable), otherwise the BeagleBone won't be able to reach the Internet to download new software.
Despite installing the latest image, we should upgrade the installed packages to the latest versions. Go ahead and login to BeagleBone via the local network.
Before we update the operating system you should add a default nameserver in the /etc/resolv.conf file as updating the kernel can cause the BeagleBone to have DNS problems. We can work around this by adding an extra nameserver to /etc/resolv.conf as follows,
cat <<EOF >>/etc/resolv.conf
nameserver 8.8.8.8
EOF
Then go ahead and type,
opkg update
then
mkdir /home/root/tmp
opkg -t /home/root/tmp upgrade
This will take some time. You might want to go make a cup of coffee and maybe another grilled cheese sandwich. After the upgrade is finished reboot the BeagleBone before proceeding, and reconnect.
NOTE: The BeagleBone Black is still under heavy development and as a result the repositories can be somewhat unstable. This stage can therefore sometimes generate a lot of errors depending on the state of the repositories. As a result you MAY WISH TO SKIP THIS STEP and not attempt to upgrade the OS at this time.
##Enabling NTP
The BeagleBone ships with no ntp installed, and no battery backed up clock. That means that the date is set on boot to Jan 1 2000. This causes all sort of problems, including making SSL certificates invalid.
We want to install ntp,
okpg install ntp
Next, find a NTP server that is close to your location. We need to do this as it is not a good idea to use a NTP root server. Go to http://www.pool.ntp.org and find servers in your zone. I'm in the United Kingdom so I want to use,
server 0.uk.pool.ntp.org
server 1.uk.pool.ntp.org
server 2.uk.pool.ntp.org
server 3.uk.pool.ntp.org
Replace the default /etc/ntp.conf file with the following,
#ntp configuration file

# The driftfile must remain in a place specific to this machine
driftfile /etc/ntp.drift
logfile /var/log/ntpd.log

# NTP Servers for United Kingdom from www.pool.ntp.org
server 0.uk.pool.ntp.org
server 1.uk.pool.ntp.org
server 2.uk.pool.ntp.org
server 3.uk.pool.ntp.org

# Using local hardware clock as fallback
# Disable this when using ntpd -q -g -x as ntpdate or it will sync to itself
# server 127.127.1.0
# fudge 127.127.1.0 stratum 14

# Defining a default security setting
restrict 192.168.1.0 mask 255.255.255.0 nomodify notrap
Next you need to set your local time, again mine is in the United Kingdom. By default the BeagleBone is in UTC, so
rm /etc/localtime
ln -s /usr/share/zoneinfo/Europe/London /etc/localtime
If you're not in the United Kingdom drill down into the /usr/share/zoneinfo/ directory structure to find your local time file.
Now go ahead and setup the ntp service,
systemctl enable ntpdate.service
systemctl enable ntpd.service
You now need to go ahead and edit the /lib/systemd/system/ntpdate.service file, changing the line
ExecStart=/usr/bin/ntpdate-sync silent
to read
ExecStart=/usr/bin/ntpd -q -g -x
ExecStart=/sbin/hwclock --systohc
since the BeagleBone doesn't have a time-of-year (TOY) chip to maintain the time during periods when the power is off, and if we don't do this ntp would assume something is terribly wrong and shuts itself down.
You now need to restart your BeagleBone_ to get ntp working.
##Fixing Git
You'll need to configure your Git identity before checking out the source otherwise things won't go smoothly,
git config --global user.name "Alasdair Allan"
git config --global user.email [email protected]
however there is also a problem with SSL connections and certificates for Git. Go ahead and set the following options,
git config --global http.sslVerify true
git config --global http.sslCAinfo /etc/ssl/certs/ca-certificates.crt
git config --global http.sslCApath /etc/ssl/certs/ca-certificates.crt
which should fix things and allow us to clone from https repositories.
NOTE: This fix doesn't always seem to work depending on the state (updates/upgrades) of the OS at the time. It's possible that Git is using gnutls rather than openssl which is more fussy about the state of order of chained certificates in the certificates file, and I'm still poking around to see if I can get it in better order. If this doesn't work for you I'd recommend turing sslVerify off for now, although if you do so you should be aware of the security implications of doing so before proceeding.
##Installing the Python Compiler
The BeagleBone doesn't come with the Python compiler, which is need for Node to build, so
opkg install python-compiler
opkg install python-misc
opkg install python-multiprocessing
opkg install python-distutils
opkg install python-setuptools
opkg install python-simplejson
before continuing.
NOTE: You may get an post install error for the "bonescript" package. We can probably ignore this problem for now as we aren't using bonescript.
##Installing Node.js
Go ahead and checkout Node.js
git clone https://github.com/joyent/node.git
change directory and switch to v0.10.22 release.
cd node
git checkout v0.10.22 -b v0.10.22
Now go ahead and build,
./configure --without-snapshot
make
This will take a long time, so go make a coffee or a toasted sandwich.
Now go ahead and install node and npm,
make install
##Installing Node Version Manager
Go ahead and install the node version manager (nvm),
git clone git://github.com/creationix/nvm.git ~/.nvm
echo ". ~/.nvm/nvm.sh" >> ~/.bashrc
. ~/.nvm/nvm.sh
make our version of Node the default
nvm alias default v0.10.22
##Installing node-gyp
We might also need node-gyp the Node.js native addon build tool
git clone https://github.com/TooTallNate/node-gyp.git
cd node-gyp
npm install -g node-gyp
this will be needed if we run into problems and need to rebuild any add on modules with code changes.
##Installing Other Dependances
We'll also need some other libraries that aren't installed by default in on the BeagleBone. You should go ahead and install these now,
opkg install libpcap-dev
opkg install sqlite3
Unlike the Raspberry Pi, the stock BlueZ installed on the BeagleBone is 4.101. This is the version we need for the noble library used by the steward, so no special steps are needed to install BlueZ on the BeagleBone
NOTE: You may get an post install error for the "bonescript" package. We can probably ignore this problem for now as we aren't using bonescript.
##Manually Installing avahi-compat
The avahi daemon distributed with Angstrom Linux comes without any support for avahi-compat which is needed by the node mdns package.
NOTE: See this discussion of the issues with the avahi-compat package for further details.
###Installing libdaemon
Avahi depends on libdaemon which doesn't appear to be available as a package under Angstrom, we need to download, build and install it from source.
opkg install texinfo
git clone git://git.0pointer.de/libdaemon
cd libdaemon
autoreconf -i
autoconf configure.ac > configure
chmod uog+x configure
./configure
make
make install
###Rebuiling Avahi
We therefore have to recompile avahi from scratch and copy the relevant compat libraries into the existing avahi distribution.
cd ~
mkdir avahi
cd avahi
wget http://avahi.org/download/avahi-0.6.31.tar.gz
tar -zxvf avahi-0.6.31.tar.gz
cd avahi-0.6.31
export PTHREAD_CFLAGS='-lpthread'
opkg install libssp-dev
opkg install intltool
export LIBDAEMON_CFLAGS=-I/usr/local/include
export LIBDAEMON_LIBS=-L/usr/local/lib
./configure --disable-static --disable-mono --disable-monodoc --disable-gtk3 --disable-gtk --disable-qt3 --disable-python --disable-qt4 --disable-core-docs --enable-compat-libdns_sd --disable-tests --with-distro=none
make
NOTE: Do not run "make install" as we want to copy the relevant files into the existing distribution rather than attempting to replace it.
cd avahi-compat-libdns_sd/.libs/
cp libdns_sd.so /usr/lib
cd ..
cp dns_sd.h /usr/include
##Installing the Steward
NOTE: We're extremely tight for space on the internal eMMC, you should go ahead and clean up all of the source code and build directories in the root home directory before proceeding at this point.
Check out the steward from its Git repository,
git clone https://github.com/TheThingSystem/steward.git
cd steward/steward
Delete the node_modules directory if it exists, as the depending on the last build these may be for OS X,
rm -rf node_modules
Then go ahead and build and install the libraries,
npm install -l
NOTE: If you get an error "dns_sd.h: No such file or directory" error at this stage see above for how to rebuild the avahi daemon.
This will definitely take a while. Go make coffee.
After the installation has been completed you'll need to go into the node_modules/ directory and rebuild the node_sqlite3 module by hand,
cd node_modules/
rm -rf sqlite3
git clone git://github.com/developmentseed/node-sqlite3.git sqlite3
cd sqlite3
./configure
make
npm install -l
NOTE: If you don't rebuild sqlite3 by hand you'll get a "Error: Cannot find module '../build/Release/node_sqlite3.node'" error when the steward starts.
###Starting Bluetooth LE
Unlike the Raspberry Pi the BeagleBone Black comes with BlueZ 4.101 installed. However by default the connman service on the BeagleBone is set up to stop you bringing your Bluetooth device up, you'll need to edit the /var/lib/connman/settings file to enable Bluetooth,
[global]
Timeservers=0.angstrom.pool.ntp.org;1.angstrom.pool.ntp.org;2.angstrom.pool.ntp.org;3.angstrom.pool.ntp.org
OfflineMode=false

[Wired]
Enable=true

[WiFi]
Enable=true

[Bluetooth]
Enable=true
The go ahead and restart connman using systemctl,
systemctl restart connman.service
or alternatively reboot your BeagleBone to restart the service.
NOTE: In some cases restarting the connman.service can cause the BeagleBone to freeze, in which case you'll have to power cycle the board.
####Manually starting the bluetooth deamon
Make sure your Bluetooth 4.0 USB adaptor is plugged into the Pi, then type
hciconfig
you should see something like this,
hci0:    Type: BR/EDR  Bus: USB
	     BD Address: 00:1A:7D:DA:71:0C  ACL MTU: 310:10  SCO MTU: 64:8
     DOWN
     RX bytes:467 acl:0 sco:0 events:18 errors:0
     TX bytes:317 acl:0 sco:0 commands:18 errors:0
This shows that the device is in a down state. To bring it up you can issue the following command,
hciconfig hci0 up
then type
hciconfig
and you should see something more like this,
hci0:   Type: BR/EDR  Bus: USB
    BD Address: 00:1A:7D:DA:71:0C  ACL MTU: 310:10  SCO MTU: 64:8
    UP RUNNING
    RX bytes:979 acl:0 sco:0 events:43 errors:0
    TX bytes:910 acl:0 sco:0 commands:43 errors:0
Just to check things are working correctly type,
hcitool lescan
and you should see any Bluetooth LE peripherals that are within range, e.g.
LE Scan ...
78:C5:E5:6C:D5:EA (unknown)
78:C5:E5:6C:D5:EA Hone
Hit ^C to stop the scan. You can now start the bluetoothd daemon by typing,
bluetoothd
or if you want to attach the log interface to the current console do this with,
bluetoothd -n
##Instructions for starting the Steward
In the steward directory type
./run.sh
Then follow these instructions for starting the steward.