| description | title | keywords | image | slug | last_update | |||||
|---|---|---|---|---|---|---|---|---|---|---|
TBD |
TBD |
|
TBD |
xiao matrix |
|
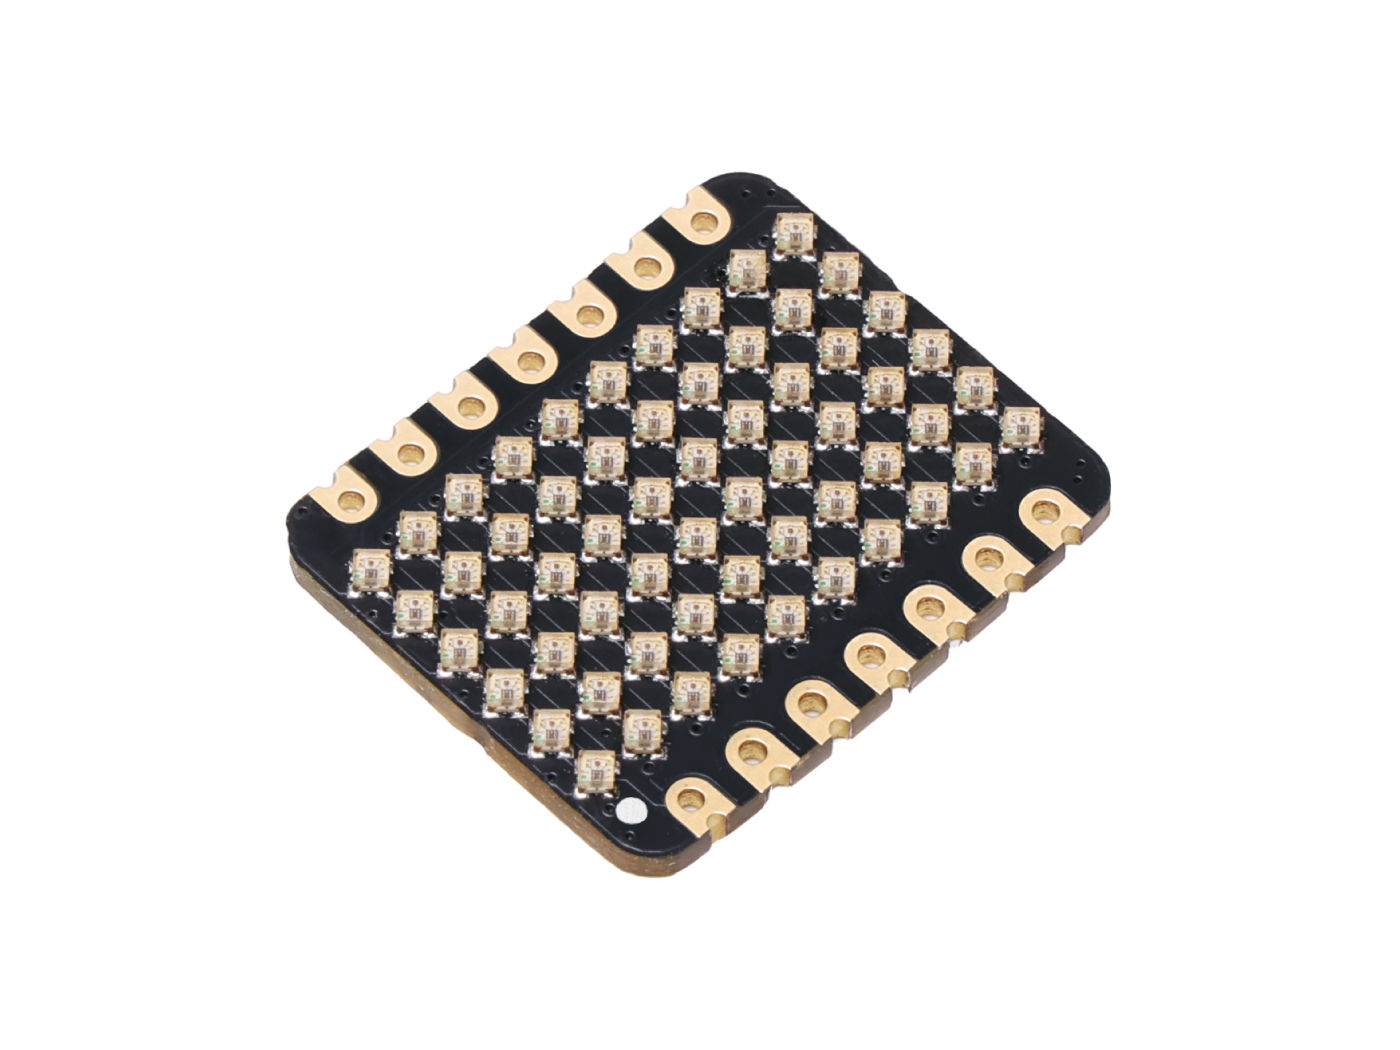
Introducing the "6x10 RGB-MATRIX for XIAO" - a dazzling addition to the XIAO product series by Seeed Studio. The XIAO series, where "XIAO" translates to "small" or "little", represents the pinnacle of compact design with its development boards that are as tiny as a fingernail. These boards have showcased Seeed Studio's dedication to offering clear, easy-to-understand, and versatile solutions for developers. Now, with the 6x10 RGB-MATRIX, you have the power to illuminate your projects with a spectrum of colors. Comprising 60 meticulously arranged WS2812 LEDs, this matrix isn't just about aesthetics; it's a tool to bring your creative visions to life. Whether you're crafting an interactive art piece, designing a dynamic notification system, or simply wish to add a splash of color to your creations, this matrix is your canvas. Tailored for seamless integration with the XIAO main controller, its adaptability is further highlighted with the inclusion of VCC, GND, and DIN solder pads, ensuring flexibility across a multitude of scenarios.

- 60 WS2812 LEDs: Arranged in a 6x10 grid, these LEDs are perfect for creating vibrant displays.
- Compact Design: Each LED is just 10mm x 10mm, offering a high-density display without taking up much space.
- Versatile Connection: While it's designed for the XIAO main controller, we've also included VCC, GND, and DIN solder pads for broader applications.
- RGB Capabilities: Each LED can display a wide range of colors, giving you the freedom to create dynamic and colorful displays.
- LED Type: WS2812
- Number of LEDs: 60
- Arrangement: 6 rows x 10 columns
- LED Size: 10mm x 10mm
- Connection Port for XIAO: D0
- Additional Pads: VCC, GND, DIN, DOUT
- Interactive Displays: Use the LED matrix for dynamic visual feedback in your projects.
- Notifications: Create colorful notifications or alerts for your devices.
- Art Installations: Incorporate the LED matrix into art pieces for a modern touch.
- Wearable Tech: Integrate into clothing or accessories for a futuristic look.
- Gaming: Enhance gaming experiences with vibrant visual effects.
- General Lighting: Use for ambient lighting or mood-setting in various environments.
Welcome to the quick start guide for the 6x10 RGB-MATRIX for XIAO. This guide aims to help you set up and get started with your new LED matrix expansion board in conjunction with the XIAO RP2040 main controller.
Upon receiving your product, some soldering will be required. We've provided two pin headers with the package. You'll need to solder these headers onto the expansion board. Refer to the image provided in the documentation for a visual guide.

Once the soldering is complete, you can proceed to connect the expansion board to the XIAO RP2040 main controller. Again, refer to the accompanying image in the documentation for clarity.
For programming the XIAO RP2040, you'll need a TYPE-C USB data cable. Connect one end to the XIAO RP2040 and the other to your computer. For a detailed guide on programming the XIAO RP2040, please refer to this documentation.

Before you can start programming the LEDs, you'll need a specific library for the RP2040. Download the WS2812 library from this GitHub link. Once downloaded, install the library in your programming environment.
Open the strandtest.ino example from the library you just installed. However, you'll need to make some modifications to the code to get it working for our setup. Here's the modified code:
Line 20,
#define LED_PIN D0Line 23,
#define LED_COUNT 60Upload the above code to your XIAO RP2040. Once uploaded, you should see the 60 LEDs on the circuit board blinking regularly, you can refer to the code for the specific rules.
Congratulations! You've successfully set up and tested the 6x10 RGB-MATRIX for XIAO. Now, it's time to dive into more exciting projects and explore the full potential of this product.
-
Q1: Do I need to solder anything when I receive the product?
-
A1: If you intend to use the board in conjunction with the XIAO main controller, you'll need to solder the provided pin headers. However, if you're using the board in a different setup, soldering might not be necessary.
-
Q2: How do I power the 6x10 RGB-MATRIX?
-
A3: The matrix can be powered through the XIAO's 5V supply or directly via the VCC solder pad with a 5V source.
-
Q3: The LEDs aren't lighting up. What should I do?
-
A4: Ensure that your soldering is done correctly, the matrix is properly connected to the XIAO main controller, and the correct code has been uploaded. If issues persist, refer to the official documentation or contact Seeed Studio support.
-
Q4: Can I integrate this matrix into wearable tech or clothing?
-
A5: Given its compact design, the 6x10 RGB-MATRIX can be integrated into various projects, including wearable tech. However, ensure that the connections are secure and the matrix is protected from excessive wear and tear.
-
Q5: Can I chain multiple expansion boards together?
-
A6: Yes, you can. However, some soldering will be required. You'll need to solder the DOUT of the preceding board to the DIN of the next board, and also connect the VCC and GND solder pads together.
- [Zip] Eagle file
- [PDF] Datasheet - WS2812B
- [GITHUB] Library for WS2812B
If you have any technical issue. submit the issue into our forum.