
This terminal app recovers the private keys of vaults by combining the shares of each TSS app backup file.
It exports a WIF for Bitcoin key import to Electrum Wallet. It will also create a wallet V3 file for importing to MetaMask and other Ethereum wallets.
For other coins and wallets, please see the specific recovery information below or on our guides page. You may be required to run another script contained in the scripts area of this repository.
Important
This app does not do ANY communication with any external host or service. It does not need an Internet connection at all.
It is recommended that you run it on a non internet connected ("air gapped") device such as a laptop not connected to any network.
You can build the code from source. Clone the repo, and make sure the latest Go is installed.
Compile from source:
makeCompile individually for Windows, Mac (Apple Silicon), Linux (x86-64 or ARM64), or FreeBSD (x86-64 or ARM64):
make build-win
make build-mac
make build-linux-amd64    # for x86-64 Linux
make build-linux-arm64    # for ARM64 Linux
make build-linux          # builds both Linux variants
make build-freebsd-amd64  # for x86-64 FreeBSD
make build-freebsd-arm64  # for ARM64 FreeBSD
make build-freebsd        # builds both FreeBSD variants
The resulting executable(s) will be in the bin/ folder. Windows may display a security warning when running the executable.
If you prefer the convenience of downloading a pre-built binary for your platform, head to the Releases area. We have pre-built binaries for:
- Linux: x86-64 (amd64) and ARM64 (aarch64)
- FreeBSD: x86-64 (amd64) and ARM64 (aarch64)
- Windows: x86-64 (amd64)
- Mac: ARM64 (Apple Silicon)
All binaries are compressed in versioned .tar.gz archives with maximum compression to reduce download size (approximately 50% smaller). The binaries in these archives already have executable permissions set, so no additional chmod commands are needed after extraction.
After downloading, extract the binary with:
tar -xzf recovery-tool-*.tar.gzNote
On Windows, you should run tar from Command Prompt.
There are some extra steps to acknowledge security warnings depending on your platform:
Run the following command before you run the tool to remove quarantine attributes:
xattr -dr com.apple.quarantine recovery-tool*Windows may display a security warning too. Just select "Run anyway" to run it when you see this popup at the next step.

You could also do this another way by:
- Right-clicking the file
- Selecting Properties
- At the bottom of the General tab, looking for a "Security" section with "This file came from another computer" message
- Checking "Unblock" and clicking OK
Alternatively, you may run this command in PowerShell to unblock the file.
Unblock-File -Path "recovery-tool.exe"Run the recovery tool.
./recovery-tool-mac sandbox/file1.json sandbox/file2.jsonYou can also provide the vault ID you want to recover, this will skip the step of choosing a vault.
./recovery-tool-mac -vault-id cl347wz8w00006sx3f1g23p4s sandbox/file1.bin sandbox/file2.binReplace mac with one of the following depending on your computer's OS and architecture:
linux-amd64- For Linux on x86-64 processorslinux-arm64- For Linux on ARM64 processors (e.g., Raspberry Pi 4, AWS Graviton)freebsd-amd64- For FreeBSD on x86-64 processorsfreebsd-arm64- For FreeBSD on ARM64 processors.exe- For Windows (just userecovery-tool.exe)
Note
The tool will try to auto-detect the optimal "reshare nonce" and "threshold/quroum" of the vault you are trying to recover.
However, if you would like to override this behavior, you may specify custom values with -nonce and -threshold flags respectively.
The tool is able to export a wallet v3 JSON file for import into MetaMask. Set the -password flag on the command line to export the wallet.json, and make sure it's saved somewhere safe.
To import it, open your MetaMask and add an account, then choose the import from file option.

The tool exports two WIFs for import into the Electrum Bitcoin wallet: one for mainnet (bc1 address), and another for testnet (tb1 address).
Choose the one depending on your vault's environment.
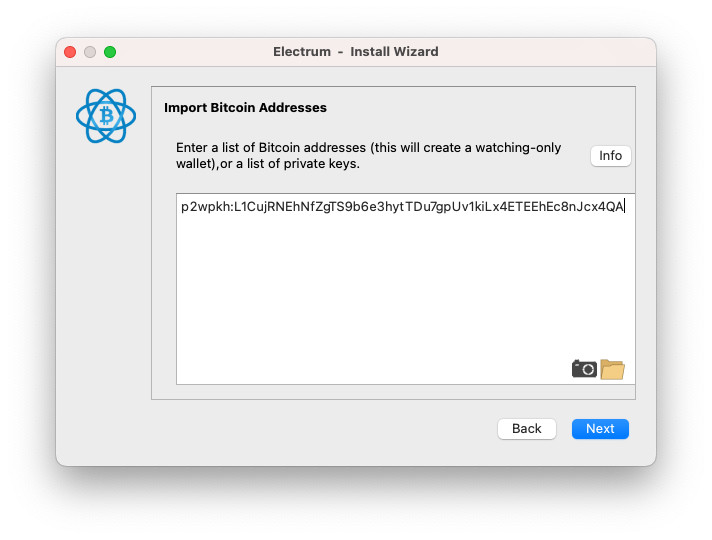
A WIF looks like: L1CujRNEhNfZgTS9b6e3hytTDu7gpUv1kiLx4ETEEhEc8nJcx4QA
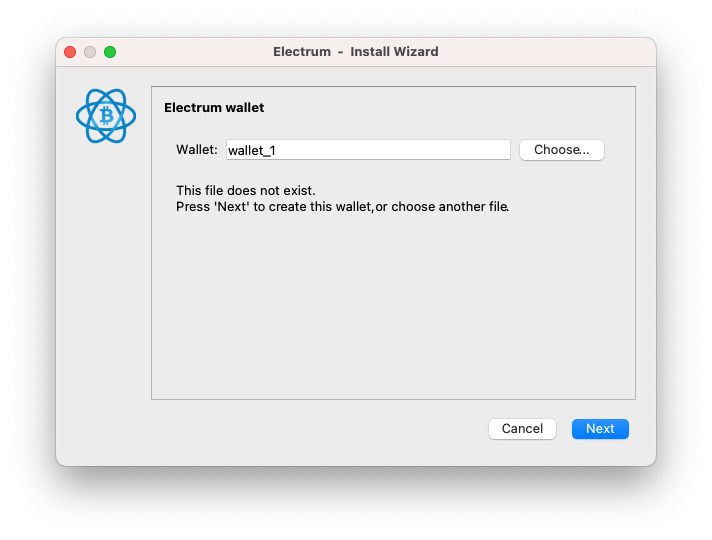
You may download Electrum wallet, and follow these steps to import a WIF:
Important
If you intend to recover a testnet key (address with tb1 prefix), you must run Electrum with the --testnet flag from your Terminal:
On a Mac, this is done as follows:
open -n /Applications/Electrum.app --args --testnet
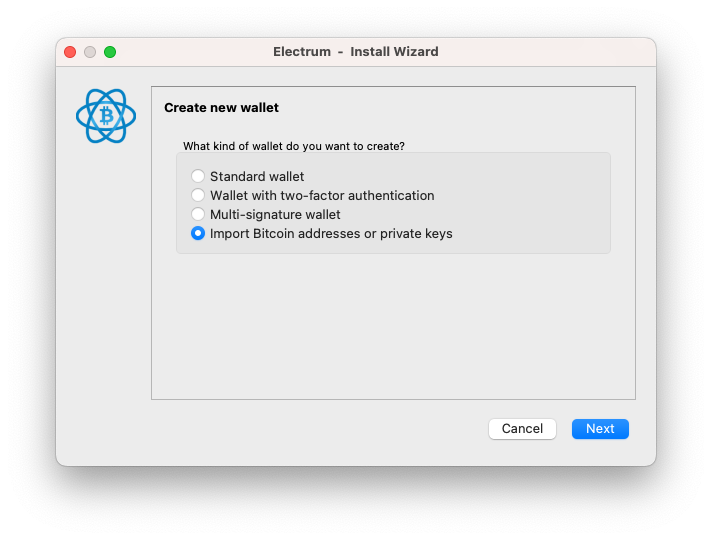
Prefix the WIF string with with p2wpkh:, then paste it into the box.
Create a password for the wallet.

After syncing up the chain (may take a while), Electrum should show your balances, and the private key is recovered.
Please use TronLink to recover Tron and Tron assets. Follow this guide and import your vault's private key output by the tool.
We use a different key format than XRPL usually uses, so there is a separate script that we must use after running the DR tool. Head to scripts/xrpl-tool; run npm i and npm start in that directory to start running the interactive tool.
Similar to the XRPL recovery procedure above, use the scripts/bittensor-tool; run npm i and npm start in that directory to start running the interactive tool.
Use the EdDSA key output for these chains that use EdDSA (Edwards / Ed25519) keys.