While working on Heaven’s Vault, we hit upon a simple yet really powerful pattern that’s made possible with a single lightweight component. It’s incredibly useful for a wide range of use cases, but we’ve been using it primarily for our dynamic text UI.
Think of the standard prefab workflow: You set up an object in your scene, let's say an Enemy Tank. You give it a model, a few gameplay components, and then convert it into a prefab so that you can spawn multiple instances via code. We drag the prefab into a Spawner object so that it can be created at runtime.
You then delete the instance from your scene, because otherwise you’d have an extra tank in your level - you want them to spawned over time - not exist as soon as you run the level.
You then realise you want to make changes to the tank. So, you drag it back into your level, make some changes, click the apply button, and delete it again. Of course, it’s possible to make quick edits directly in the prefab itself, but if they’re visual, or if the changes are deeper in the prefabs hierarchy, you have to go through the whole rigmarole again. It’s a faff!
The Prototype component does a few simple things that hugely improves this workflow. It some cases it can replace the use of prefabs, and in other cases it can be used in conjunction with them.
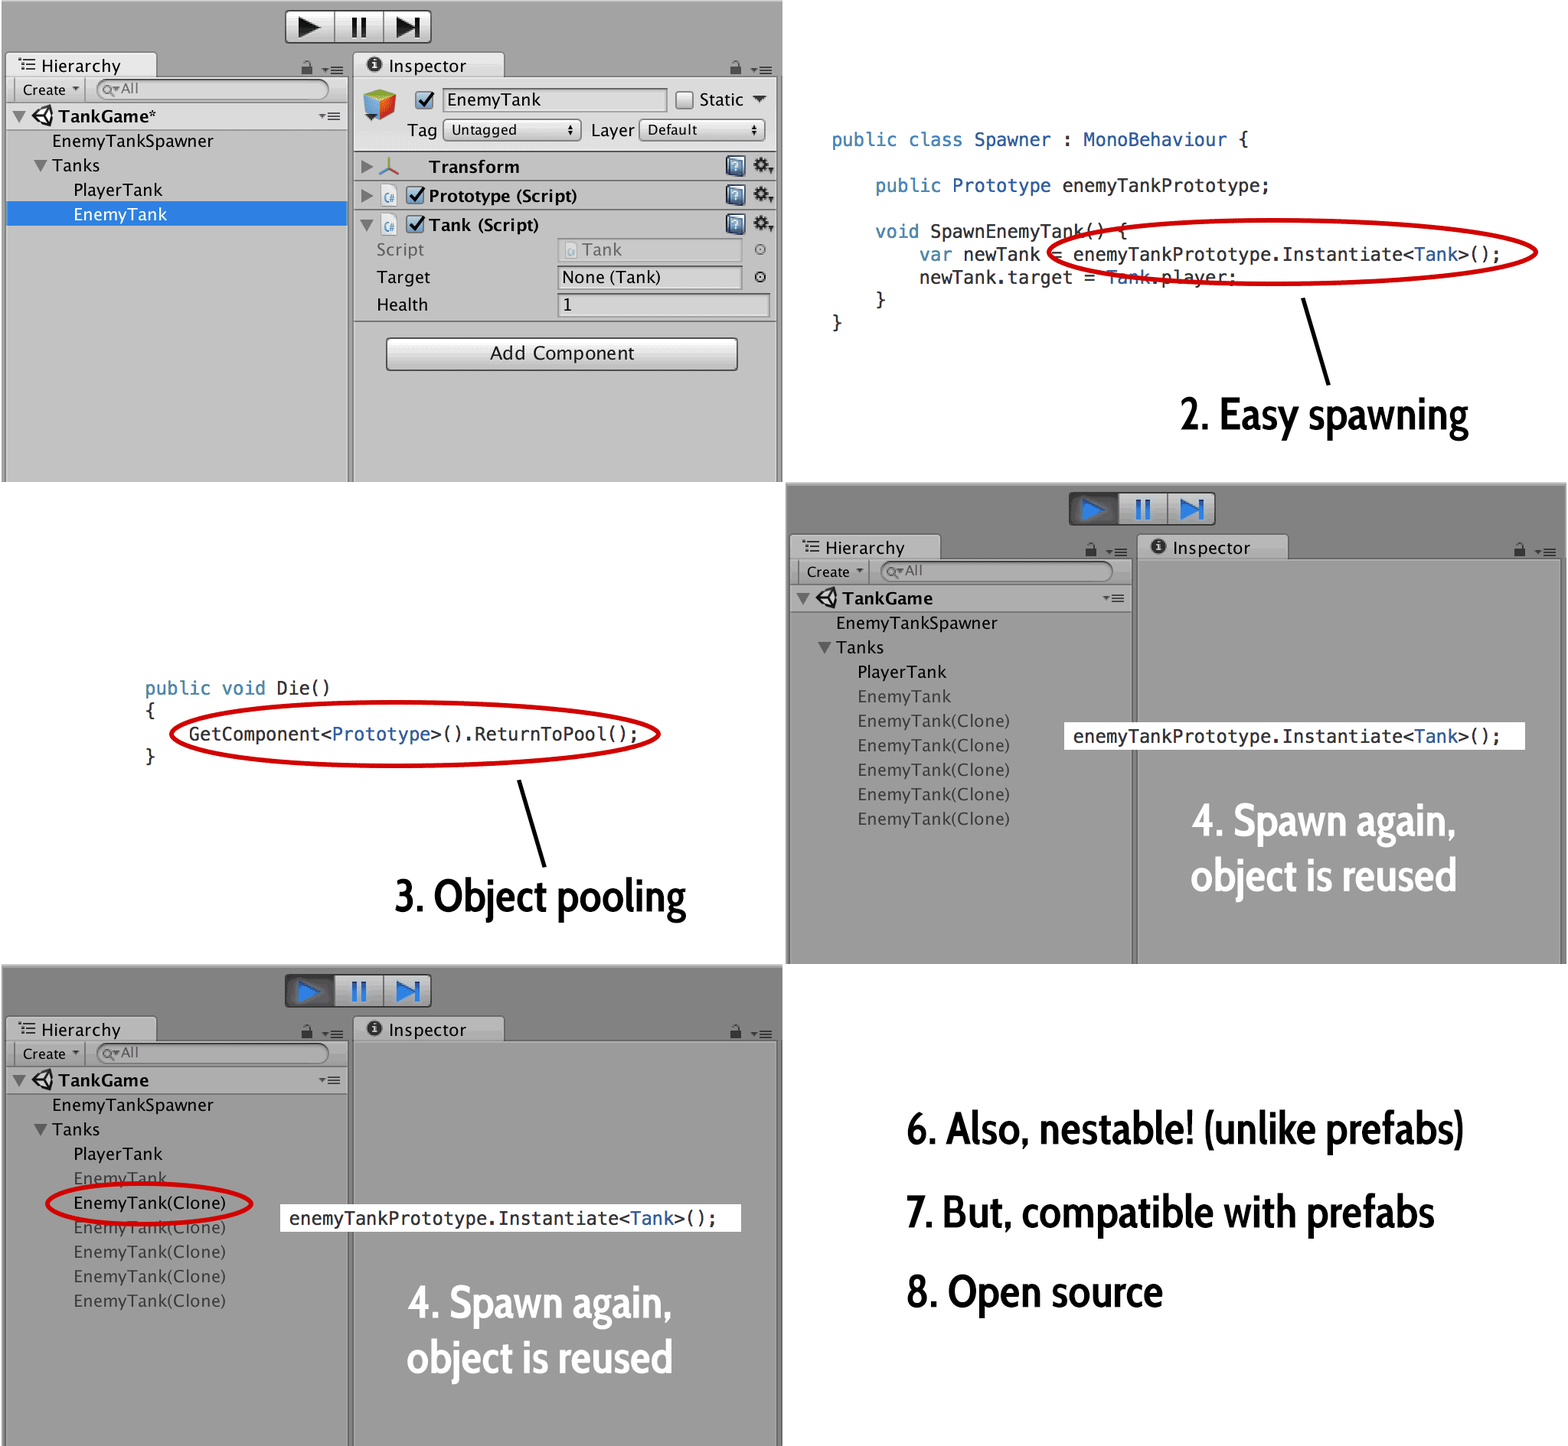
Take our enemy tank example - starting from the top: we create the model with the gameplay components in the main scene. We then add the Prototype component.
Now, when we run the scene, the first thing that the Prototype will do is deactivate our prototype instance so that we don’t have a “spare” one active in the scene.
Next, we create a reference to the Prototype in the Spawner component:
public class Spawner : MonoBehaviour {

    public Prototype enemyTankPrototype;
In order to spawn instances, the prototype class provides a handy Instantiate method to use instead of the built in Unity one. Here’s how you use it:
var newTank = enemyTankPrototype.Instantiate<Tank>();
newTank.target = player;
So, it clones the prototype as you would expect, and takes a generic parameter so you can conveniently get a particular component out while you’re doing so.
Unlike Unity’s built in Instantiate, this one will put the new instance in the same place in the hierarchy as the prototype - as a sibling. This is useful behaviour for UI especially - if you want to dynamically spawn a set of buttons, it’s useful for them to stay nested under the parent rather than jumping up to the top level. In the case of the enemy tanks, maybe it’s helpful to have them nested under a group transform so they don’t clutter up our main hierarchy.
So, right now we’ve matched our prefab behaviour with the extra advantage that we can make edits within the scene without having to apply the changes to the prefab each time and remove the existing instance.
However, if you want to reuse the same prototype between multiple scenes, or if you simply want to keep the hierarchy in a separate file (e.g. for easier scene merging in source control) you can also turn it into a prefab - the two work together just fine.
Here’s where the real magic comes in. The original prototype object also acts as an object pool for spawned instances.
When our enemy tank is destroyed, we can simply call:
newTank.GetComponent<Prototype>().ReturnToPool();
…and the tank will be deactivated. The next time you call enemyTankPrototype.Instantiate, it will instead reuse this existing tank, so you don’t have to take the hit to performance and the garbage collector of creating and destroying another instance.
You can also hook into an event that gets called when the object returns to the pool in order to reset anything you need to. For example:
void Awake()
{
    GetComponent<Prototype>().OnReturnToPool += OnReturnToPool;
}

void OnReturnToPool()
{
    health = 1.0f;
}
But wait, we’re not done yet! You can also add the Prototype component to sub-objects within the hiearchy. For example, say your enemy tank has a simple “smoke” particle effect, and you want the tank to be able to spawn them out of different positions as it gets hit. You can turn this into a Prototype too, directly in the hierarchy.
Again, this is especially useful for dynamic UI. In Heaven’s Vault, we have multiple dialogue bubbles that can get spawned. And within each dialogue bubble we spawn multiple words that each have their own transform so we can do cool animation effects on them as they transition in and out. It’s trivial to be able to create and destroy dialogue bubbles as well as the words inside them, all with automatic object pooling.
And of course, the full hierarchy exists in the main scene in edit mode, making it really easy to tweak the way they look before entering play mode again.
The Prototype class is available right here on github. It’s a really small amount of code to add to your project, but we now find it invaluable!
MIT license. We'd appreciate any feedback you have - let us know on the Issues page, or drop us a tweet!
