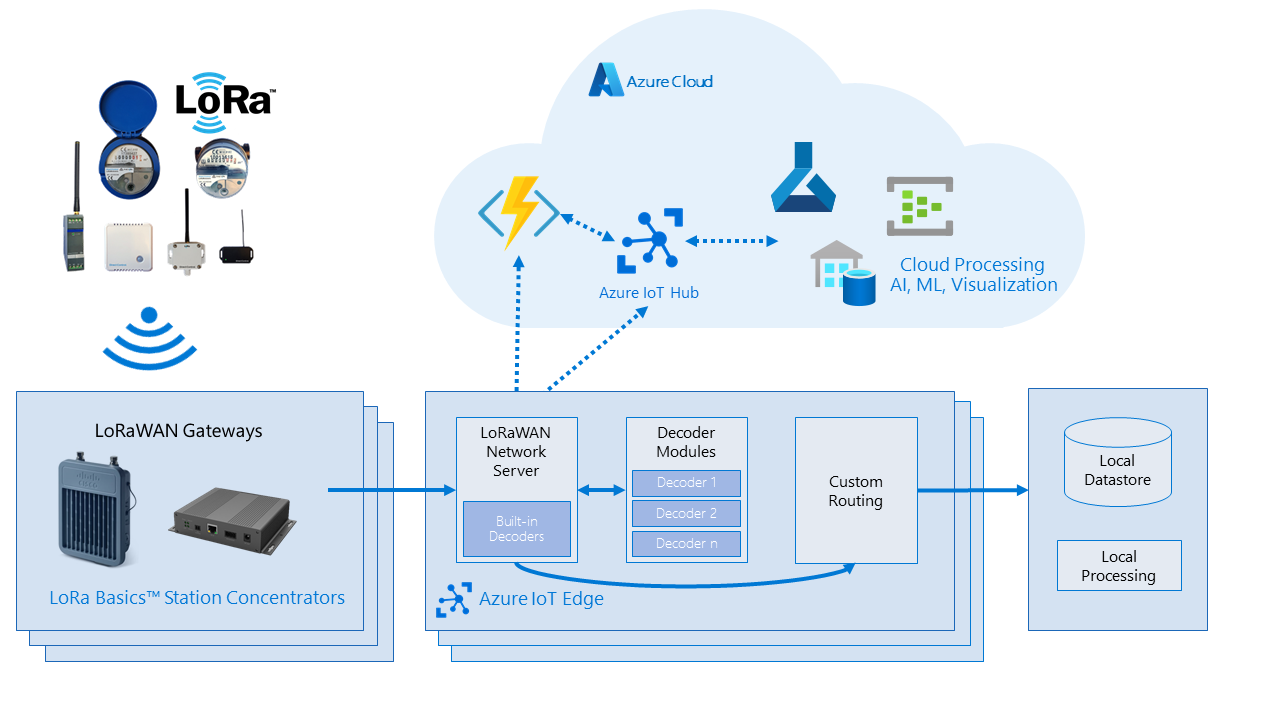
The LoRaWAN starter kit is an OSS cross platform private network implementation of the LoRaWAN specification built for connectivity to Azure IoT Hub. It enables users to setup their own LoRaWAN network that can connect to LoRa based nodes (sensors) and send decoded message packets to Azure IoT Hub for cloud based processing, analytics and other workloads. Alternatively, it allows sending commands from the cloud to the end nodes. The goal of the the project is to provide guidance and a reference for Azure IoT Edge users to experiment with LoRaWAN technology.
- Features
- Prerequisites
- Getting Started
- Known Issues and Limitations
- Tested Gateways
- Support
- Contributing
- LoRaWAN 1.0.2 implementation (see LoRaWAN Specification Support for more details)
- Device and Gateway management done completely through Azure IoT Hub.
- Bi-directional communication between LoRa end devices and Azure cloud.
- Custom packet decoding framework.
- Identity Translation for LoRa devices with caching support.
- Partial Offline and Casually connected Gateways scenarios.*
- Easy deployment and setup using Azure ARM templates.
- Small to Midsize Scalability Tests.
- Simulator for development and testing without the need to own a Gateway.
The following should be completed before proceeding with the LoRaWAN starter kit development or deployment in your environment.
- You must have an Azure subscription. Get an Azure Free account to get started.
- We are based on Azure IoT Edge so it is important that you understand the concepts and deployment model for Azure IoT Edge. Refer to Azure IoT Edge documentation to see how it works.
- Understand how LoRa and LoRaWAN works. A great primer is available at the LoRa Alliance website.
- To test the solution on a device, you need to have a LoRaWAN Device Kit Gateway and a LoRa end node. We have some recommendations in the Tested Gateways section below.
We have a variety of ways you can get started with the kit, chose the appropriate documentation based on your persona and applicability.
-
Setup a LoRaWAN Gateway: We provide an easy to use Azure ARM template and deployment guidance to get you quickly started with the LoRaWAN starter kit. Use the Quick Start to setup a LoRaWAN Gateway and connect to LoRA end nodes.
-
Upgrade an existing installation: Refer to the upgrade guide for instructions and tips for a clean upgrade.
-
Develop and debug the LoRaWAN starter kit: If you are a developer and want to contribute or customize the LoRaWAN starter kit, refer to our Developer Guidance for more details on how to build, test and deploy the kit in your dev environment. We also support a
-
Enable a gateway or device to be compatible with the starter kit: We have developed the LoRaWAN starter kit agnostic of a device manufacturer implementation and focussed on the specifics on underlying architectures (arm, x86). However, we understand that device manufacturers can have specific requirements; these could be specific to a gateway and the packet forwarders they use or to the LoRa nodes and the decoders the device may use. We have provided specific instructions on making these specialized hardware compatible with our kit. You can follow these instructions depending on your scenarios and also have your device gateway highlighted on our repo.
Refer to Known Issues for known issues, gotchas and limitations.
- Seeed Studio LoRa LoRaWAN Gateway - 868MHz Kit with Raspberry Pi 3
- AAEON AIOT-ILRA01 LoRa® Certified Intel® Based Gateway and Network Server
- AAEON Indoor 4G LoRaWAN Edge Gateway & Network Server
- AAEON AIOT-IP6801 Multi radio Outdoor Industrial Edge Gateway
- MyPi Industrial IoT Integrator Board with RAK833-SPI mPCIe-LoRa-Concentrator
- Raspberry Pi 3 with IC880A
- RAK833-USB mPCIe-LoRa-Concentrator with Raspberry Pi 3
The LoRaWAN starter kit is an open source solution, it is NOT a Microsoft supported solution or product. For bugs and issues with the codebase please log an issue in this repo.
If you would like to contribute to the IoT Edge LoRaWAN Starter Kit source code, please base your own branch and pull request (PR) off our dev branch. Refer to the Dev Guide for development and debugging instructions.
You can create a release with the following steps:
Write release notes to the release notes documentation.
Go to the Create draft release workflow and specify the release version before running the workflow.
The release workflow will create 2 branches:
-
docs/release-${RELEASE_VERSION}-${GITHUB_RUN_ID}This branch updates the Button URL. -
feature/update-version-${RELEASE_VERSION}-${GITHUB_RUN_ID}This branch updates the Starter Kit version in Bicep.
Created 2 PRs from these branches, verify the PRs look good and merge them.
Push dev branch to master
In Github, select the release created by the workflow, add a good description, and publish the release.
