This is my first attempt at writing a tutorial on the C++ STL. I created this with love ❤️, however as a beginner, there may be some inaccuracies. I welcome any feedback to improve it!
You can also download the PDF version here: STL Tutorial PDF
The C++ Standard Template Library (STL) is a powerful set of containers, algorithms, and iterators. This repository aims to provide a gentle introduction to the key components of the STL for C++ beginners, with hands-on examples and explanations. We'll cover vectors, pairs, queues, stacks, and more. While not comprehensive, it serves as a starting point to leverage templates and generic programming in your C++ projects.
The tutorials cover:
- Vectors
- Pairs
- Queues
- Stacks
- Deques
- Iterators
- Structs
The C++ STL is a collection of template classes and functions that provide a set of generic and efficient algorithms, containers, and iterators widely used in C++ programming.
STL has four major components:
- Containers
- Iterators
- Algorithms
- Function objects
So, start with containers.
If you are dealing with many elements, then you need to use some sort of container. The container can be described as objects that are used to store the collection of data. It helps in recreating and implementing complex data structures efficiently.
Now, containers are further classified into three categories:
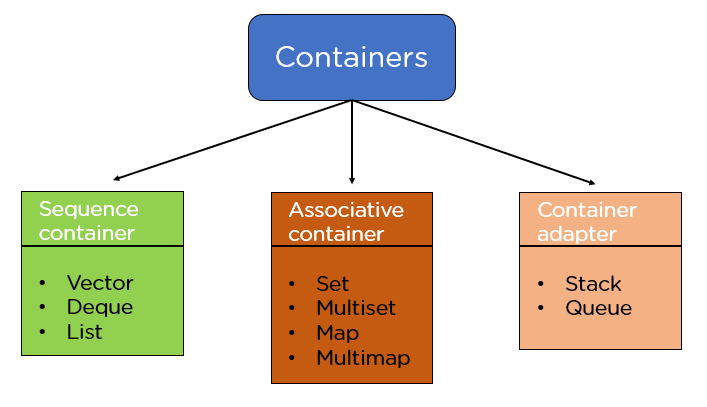
Sequence containers implement data structures that can be accessed in a sequential manner. The following sequence containers are available:
Container adaptors provide a different interface for sequential containers. The following container adaptors are available:
Associative containers implement sorted data structures that can be quickly searched with O(log n) complexity. The following associative containers are available:
Unordered associative containers implement unordered data structures that can be quickly searched. The following unordered associative containers are available (Introduced in C++11):
The Linear Container STL includes various data structures that store elements in a linear manner. Some commonly used linear containers are:
-
Vector: A dynamic array that can resize itself.
-
Queue: A container that follows the First-In-First-Out (FIFO) principle.
-
Deque: A double-ended queue that allows insertion and deletion at both ends.
-
Stack: A container that follows the Last-In-First-Out (LIFO) principle.
-
Pair: A simple container that holds two values togethe, can be used with other STL components.
-
Struct: A user-defined data type that can hold multiple values. Not an STL container.
In C++, vectors are dynamically-sized arrays. They offer a convenient and efficient way to store collections of elements of the same type. Imagine a flexible container that automatically adjusts its size as you add or remove elements, that's essentially what a vector is.
vector<int> v = {1, 2, 3}; // initializer list
vector<int> vect1{10, 20, 30}; // brace initialization
vector<int> v; // empty vector
vector<int> vect(n, 10); // size n, all values 10
vector<int> vect(10); // size 10
You can also create a vector of vectors:
vector<vector<data_type>> vec;
v2 = {1, 2, 3};
vec.push_back(v2);
// This creates a vector containing a single vector with the elements 1, 2, and 3.

// To create a 5x5 matrix with all elements set to 0, you can use:
vector<vector<int>> v(5, vector<int>(5, 0));-
Using the
at()method:vector<int> num {1, 2, 3, 4, 5}; cout << "Element at Index 0: " << num.at(0) << endl;
-
Using the
[]operator:cout << num[1];
The at() method is preferred over the [] operator because it throws an exception if you try to access an element that is out of bounds. The [] operator, on the other hand, will simply give you a garbage value.
vector<int> num {1, 2, 3};

// gives garbage value
cout << num[4];

// throws an exception
cout << num.at(4);- front(): Returns the first element of the vector.
vector<int> v = {1, 2, 3};
int first_element = v.front(); // first_element = 1- back(): Returns the last element of the vector.
vector<string> v = {"apple", "banana"};
string last_element = v.back(); // last_element = "banana"
Note: front() and back() throw an exception if the vector is empty.
The auto keyword in C++ automatically detects and assigns a data type to the variable with which it is used. This can be helpful for making your code more concise and readable.
Here are some examples of how to use the auto keyword:
auto IntegerVar = 25;   // creates integer type variable
auto FloatVar = 26.77;  // creates float type variable
auto StringVar = "Hello";  // creates string type variable
auto CharVar = "C";   // creates char type variable
You can also use auto with references:
auto number1 = 10;

auto& number2 = number1; // number2 is a reference to number1
number2 = 20; // Modifies the original value of number1The for loop is a powerful tool in C++ for iterating over a sequence of elements. However, it can be a bit verbose. The foreach loop is a more concise way to iterate over a vector:
for (data_type variable_name : container_name) {
  // operations using variable_name
}
Here's an example of how to use the foreach loop to iterate over a vector of numbers:
vector<int> numbers = {1, 2, 3, 4, 5};

// Example 1 - modifies original vector
for (auto& num : numbers) {
  num *= 2;
}

// Example 2 - doesn't modify original vector
for (auto num : numbers) {
  // do something with num
}
The foreach loop is a great way to make your code more concise and readable. It's especially useful for working with vectors.
C++ Vector Iterators : Vector iterators are powerful tools for accessing and manipulating elements within a vector. They act like pointers, but with additional functionalities specific to vector operations.
The syntax for declaring a vector iterator is:
vector<T>::iterator iteratorName;Here, T represents the type of elements stored in the vector.
Example:
// Iterator for an int vector
vector<int>::iterator iter1;

// Iterator for a double vector
vector<double>::iterator iter2;There are two main ways to initialize vector iterators:
1. Using begin() and end():
begin(): Returns an iterator pointing to the first element.end(): Points to the theoretical element after the last element.
Example:
vector<int> num = {1, 2, 3};
vector<int>::iterator iter;

// iter points to num[0]
iter = num.begin();
cout << "num[0] = " << *iter << endl;

// iter points to num[2]
iter = num.end() - 1;
2. Using Reverse Iterators:
rbegin(): Returns a reverse iterator pointing to the last element.rend(): Points to the theoretical element before the first element.
Example:
vector<int> num = {1, 2, 3};
auto iter = num.rbegin(); // iter points to num[2]

iter++; // iter points to num[1]
iter++; // iter points to num[0]

// Loop through the vector in reverse order
for (auto i = num.rbegin(); i != num.rend(); ++i) {
  cout << *i << " "; // prints 3 2 1
}Iterators are commonly used in for loops to iterate through each element in a vector.
Example:
vector<int> v = {1, 2, 3, 4, 5};

// Forward loop
for (auto i = v.begin(); i != v.end(); ++i) {
  cout << *i << " "; // prints 1 2 3 4 5
}

// Reverse loop
for (auto ir = v.rbegin(); ir != v.rend(); ++ir) {
  cout << *ir << " "; // prints 5 4 3 2 1
}
Using iterators provides more control and flexibility compared to traditional indexing. They offer functionalities like element insertion, deletion, and distance calculation, making them essential tools for working with vectors in C++.
This section explores some essential functions used to manipulate elements within a vector
- push_back(): This function adds new elements to the back of the vector. This is the most common way to add elements as it maintains the original order and is efficient for large datasets.
vector<int> v = {1, 2, 3};
v.push_back(4);
v.push_back(5);
// v now contains: 1, 2, 3, 4, 5- emplace_back(): This function constructs and adds a new element to the back of the vector. It avoids unnecessary copies compared to
push_back()and can be more efficient for large objects.
vector<string> v = {"apple", "banana"};
v.emplace_back("orange");
// v now contains: "apple", "banana", "orange"
Let's break down the differences between insert, push_back, and emplace_back functions in a beginner-friendly way.
-
Usage:
vector<int> numbers = {1, 2, 3};
numbers.push_back(4);
-
Explanation: You use
push_backwhen you want to add an element to the back (end) of the vector. It's like adding a new item to the end of a line.
-
Usage:
vector<string> names = {"Alice", "Bob"}; names.emplace_back("Charlie"); -
Explanation:
emplace_backis similar topush_back, but it directly constructs the element in place. It's like welcoming a new person into a group by constructing them right there instead of preparing them separately and then adding.
-
Purpose: Inserts elements at a specified position in the vector.
-
Usage:
vector<int> numbers = {1, 2, 3};
auto it = numbers.begin() + 1;
numbers.insert(it, 4);
-
Explanation:
insertis like adding elements at a specific point in the vector. It's like squeezing a new person into a group but not necessarily at the end – you decide where they fit.
Inserting books (Example):
- Push: This is like adding a book to the end of a specific section. It's quick and easy, like adding a new book to the "Science" section at the end of the other science books.
- Emplace: This is like building a book directly on the shelf. It's more efficient for large or complex books, like building a custom scrapbook directly on the shelf instead of bringing it from another location.
In summary, push_back is for adding to the end, emplace_back is for constructing and adding to the end.
- insert(position, value): This function inserts a new element at a specified position within the vector. The existing elements at and after the position are shifted to make room for the new element.
vector<int> v = {1, 2, 3};
v.insert(v.begin() + 1, 10); // Insert 10 at index 1
// v now contains: 1, 10, 2, 3- insert(position, n, value): This function inserts n copies of a specific value at a specified position.
vector<char> v = {'a', 'b', 'c'};
v.insert(v.begin() + 1, 2, 'x'); // Insert 2 'x' at index 1
// v now contains: 'a', 'x', 'x', 'b', 'c'- insert(position, begin, end): This function inserts a range of elements from another container (begin and end iterators) at a specified position.
vector<int> v1 = {1, 2, 3};
vector<int> v2 = {4, 5, 6};
v1.insert(v1.begin() + 2, v2.begin(), v2.end());
// v1 now contains: 1, 2, 4, 5, 6, 3- pop_back(): This function removes the element from the back of the vector. This is efficient for large datasets as it doesn't need to shift elements.
vector<string> v = {"apple", "banana", "orange"};
v.pop_back();
// v now contains: "apple", "banana"- erase(position): This function removes the element at a specified position from the vector. The remaining elements are shifted down to fill the gap.
vector<int> v = {1, 2, 3, 4};
v.erase(v.begin() + 2); // Erase element at index 2
// v now contains: 1, 2, 4

vector<string> fruits = {"apple", "banana", "orange"};
fruits.erase(fruits.end() - 1); // Remove the last element ("orange")

// Fruits now contains: {"apple", "banana"}- erase(begin, end): This function removes a range of elements from a specified position (begin and end iterators) within the vector.
vector<char> v = {'a', 'b', 'c', 'd', 'e'};
v.erase(v.begin() + 1, v.begin() + 3); // Erase elements from index 1 to 2 (exclusive)
// v now contains: 'a', 'd', 'e'The time complexity of erase depends on the operation:
- Single element: O(n), where n is the number of elements after the erased element. This is because remaining elements need to be shifted to fill the gap.
- Range of elements: O(n + m), where n is the number of elements after the erased range and m is the number of erased elements.
- Erasing the last element: O(1), as no shifting is necessary.
- swap(): This function exchanges the contents of two vectors of the same type. This is useful when swapping large datasets as it avoids copying elements.
vector<int> v1 = {1, 2, 3};
vector<int> v2 = {4, 5, 6};
v1.swap(v2);This section explores additional functions for managing vector size and accessing elements.
- size(): Returns the number of elements currently present in the vector.
vector<int> v = {1, 2, 3};
int size = v.size(); // size = 3- capacity(): Returns the size of the memory currently allocated to the vector. This may be larger than the actual number of elements.
- allocated : مخصص
vector<int> v;
v.push_back(1); // capacity might be increased
size_t capacity = v.capacity(); // capacity might be > 1- resize(n): Changes the size of the vector to n. If n is smaller than the current size, elements are removed. If it's larger, new elements are added with their default values.
vector<int> v = {1, 2, 3};
v.resize(5); // v becomes {1, 2, 3, 0, 0}- resize(n, value): Similar to
resize(n), but assigns the specified value to all new elements added.
vector<string> v = {"apple", "banana"};
v.resize(5, "orange"); // v becomes {"apple", "banana", "orange", "orange", "orange"}- shrink_to_fit(): Reduces the capacity of the vector to match its size.
vector<int> v(100); // allocated space for 100 elements
v.push_back(1); // only 1 element added
v.shrink_to_fit(); // capacity reduced to 1- reserve(n): Requests that the vector capacity be at least enough to hold n elements. This avoids reallocation when adding elements.
vector<char> v;
v.reserve(100); // ensures space for at least 100 elements- empty(): Checks if the vector contains any elements.
vector<int> v;
bool is_empty = v.empty(); // is_empty is true- assign(n, value): Replaces all elements in the vector with the specified value.
vector<int> v = { 1, 2, 3, 4, 5, 6, 7, 8, 9, 10 };

v.assign(10, 0);
deb(v); // v = {0,0,0,0,0,0,0,0,0,0}
deb(v.capacity());

v.assign(20, 0); // creates a vector of size 20 and assigns 0 to all elements
deb(v); // v = {0,0,0,0,0,0,0,0,0,0,0,0,0,0,0}
deb(v.capacity());

v.assign(5, 10); // creates a vector of size 5 and assigns 10 to all elements
deb(v); // v = {10,10,10,10,10}
deb(v.capacity()); // capacity remains same (not lowered)clear()removes all elements from the vector, but doesn't change its capacity.front()andback()are not iterators and should not be used for loop iterations.
By understanding these functions, you can effectively manage the size and content of your vectors, leading to efficient and optimized code.
- Vectors have contiguous memory allocation, which means that elements are stored in contiguous memory locations. This makes accessing elements faster compared to other containers like lists and deques. (Note that accessing elements in a vector using the [] operator is faster than using the at() function, as the at() function performs a range check.) (list and deque are not contiguous, they are linked list)
- Vectors have a dynamic size, which means that they can be resized during runtime.
- Vectors support random access, which means that elements can be accessed in constant time using an index.
- Inserting or deleting elements in the middle of a vector can be expensive, as all the elements after the insertion or deletion point have to be shifted.
- Vectors have a fixed capacity, which means that if the number of elements exceeds the capacity, the vector has to be reallocated and all the elements have to be copied to the new memory location. This can be expensive in terms of time and memory. for example, if the capacity of a vector is 10 and we try to insert the 11th element, the vector will be reallocated to a new memory location with a capacity of 20 and all the 10 elements will be copied to the new memory location.
A pair in C++ is a container that holds two heterogeneous values (can be different data types). Pairs provide a convenient way to store a simple key-value pair or return two values from a function.
The pair is a simple container that can be used with other STL components, such as associative containers and container adaptors, but it is not part of the STL itself.
To use pairs, include the utility header:
#include <utility>Pairs can be declared in several ways:
pair<type1, type2> myPair;

pair<int, string> p1;

pair<char, int> p2(‘a’, 5);

auto p3 = make_pair(true, 3.14);

pair<int, vector<int>> p4;
p4.first = 1;
p4.second = { 1, 2, 3 };The elements can be accessed using .first and .second:
pair<int, string> p = {1, "abc"};

int x = p.first;  // x = 1
string y = p.second; // y = "abc"Elements can be modified using .first and .second:
p.first = 2;
p.second = "def";Pairs support comparison operators like ==, !=, <=, >= to compare the elements lexicographically:
pair<int, int>p1 = {1, 2};
pair<int, int>p2 = {2, 1};

p1 == p2 // false
p1 != p2 // true
p1 >= p2 // falseThe swap() function can be used to swap the contents of two pairs efficiently:
p1.swap(p2);
// p1 = {2, 1}
// p2 = {1, 2}Using STL containers, inside each other allows you to create complex data structures that provide flexibility and convenience.
Pairs can be used as elements in other STL containers like vector:
vector<pair<int, string>> v;
v.push_back({1, "abc"});
v.push_back({2, "def"});

vector<pair<int, string>> students;
students.push_back({ 1, "Ahmed" });
students.push_back({ 2, "Mohamed" });
students.push_back({ 3, "Ali" });
students.push_back({ 4, "Mahmoud" });
for (auto& x : students) {
        cout << x.first << " " << x.second << el;
}
This allows creating complex data structures easily.
Overall, pairs provide a simple way to handle two elements together in situations where using a custom class would be overhead.
The queue is a linear data structure that follows the First-In-First-Out (FIFO) principle.
Elements are inserted at the back (enqueue operation) and removed from the front (dequeue operation).
To use queues, include the queue header:
#include <queue>Queues can be declared as:
queue<int> q; // empty queue of ints

queue<string> q2({"apple", "banana", "orange"});

// WRONG
queue<int> q2 = {1,2,3,4,5}; // wrong wayNew elements are added using push() or emplace():
q.push(1); // Insert 1 to back

q.emplace(2); // Construct and insert elementpush()copies the element to the back.emplace()constructs the element in-place at the back.
Front elements can be removed using pop():
q.pop(); // Remove front elementfront()- Access first element.back()- Access last element.
q.front();
q.back();
Note: Calling front() or back() on an empty queue leads to undefined behavior.
size()- Get current size.empty()- Check if queue is empty.
int num = q.size();

if(q.empty()) {
  // queue is empty
}while(!q.empty()) {
auto x = q.front();
q.pop();
// process element x
}
// you can't access the second element of the queue directly, you have to pop the first element to access the second element
queue<int> q;
q.push(1);
q.push(2);
q.push(3);

queue<int>q2;
// copy the queue
q2 = q;

// check if two queues are equal or not :
cout << (q == q2) << el;
This allows processing elements while removing them.
The queue provides a convenient FIFO data structure useful in many algorithms and applications. It saves effort over manually handling insertion and removal of elements.

The deque (double-ended queue) is a linear container that allows fast insertion and deletion at both the beginning and the end. It overcomes limitations of vectors and queues in this aspect.
#include <deque>

deque<int> dq; // Empty deque of ints
deque<int> dq2 = { 1, 2, 3, 4, 5 };- push_front(x) - Insert x at the beginning
- push_back(x) - Insert x at the end
- emplace_front(x) - Construct and insert x at the beginning
- emplace_back(x) - Construct and insert x at the end
dq.push_front(5);
dq.emplace_back(10);- pop_front() - Remove first element
- pop_back() - Remove last element
dq.pop_front();
dq.pop_back();- front() - Access first element
- back() - Access last element
dq.front();
dq.back();
cout << dq[2] << el;- size() - Number of elements
- empty() - Check if deque is empty
int num = dq.size();

if(dq.empty()) {
  // deque is empty
}for(auto x : dq) {
// process element x
}
for (int i = 0; i < dq.size(); ++i) {
cout << dq[i] << " ";
}-
Insertion and Deletion: Deque allows fast insertion and deletion at both the beginning and the end, while vector only allows efficient insertion and deletion at the end. This makes deque more suitable for scenarios where elements need to be added or removed frequently from both ends.
-
Memory Allocation: Deque uses a sequence of individually allocated fixed-size arrays, while vector uses a single dynamically allocated array. This means that deque can grow more efficiently than vector when elements are added or removed frequently.
-
Random Access: Both deque and vector support random access to elements using the
[]operator. However, deque may have slightly slower random access compared to vector due to its internal data structure.
In addition to the functions mentioned in the code snippet, here are some additional functions available in the deque container:
- insert(pos, x): Inserts element x at the specified position pos.
- erase(pos): Removes the element at the specified position pos.
- clear(): Removes all elements from the deque.
- resize(n): Resizes the deque to contain n elements.
- swap(dq2): Swaps the contents of two deques.
These functions provide more flexibility and control over the deque container.
The deque provides flexibility of vectors and queues together while enabling fast inserts and deletes at both ends. This makes it useful in algorithms requiring dynamic collections.
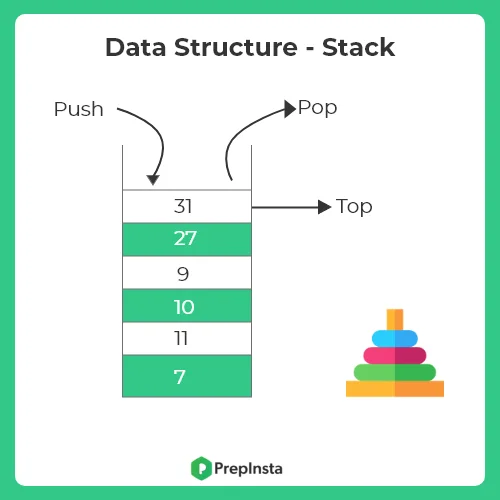
The stack is a linear data structure that follows the Last-In-First-Out (LIFO) principle. The last element inserted is the first one to be removed.
Include the stack header to use stacks:
#include <stack>Stacks can be declared as:
stack<int> s; // Empty stack of intsNew elements are added using push():
s.push(5); // Insert 5 to stack topemplace() can also be used to construct and insert:
s.emplace(10); // Construct 10 and pushTop elements can be removed using pop():
s.pop(); // Remove element from toptop() allows accessing the top element without removing:
int x = s.top(); // Access top elementsize()- Current number of elementsempty()- Check if stack is empty
int num = s.size();

if(s.empty()) {
  // stack is empty
}
The stack provides a convenient LIFO implementation for algorithms that require element access in reverse order. It handles insertion and removal from one end automatically
Reversing a String
string reverseString(string str) {

  stack<char> letters;

  for(char ch : str) {
    letters.push(ch);
  }

  string result;

  while(!letters.empty()) {
    result += letters.top();
    letters.pop();
  }

  return result;
}

string name = "John";
string rev = reverseString(name); // rev = "nhoJ"
Pushes characters onto stack, then pops them back off to build reversed string.
Checking Balanced Parentheses
bool isBalanced(string exp) {

  stack<char> parentheses;

  for(char ch : exp) {
    if(ch == '(' || ch == '[') {
      parentheses.push(ch);
    }
    else if(ch == ')' || ch == ']') {
      if(parentheses.empty()) {
        return false;
      }

      if(ch == ')' && parentheses.top() != '(') {
        return false;
      }

      if(ch == ']' && parentheses.top() != '[') {
        return false;
      }

      parentheses.pop();
    }
  }

  return parentheses.empty();
}

string statement = "[code](inside)parenthesis";

if(isBalanced(statement)) {
  // balanced
}
else {
  // not balanced
}A struct in C++ is a user-defined data type that allows grouping together data items of different types. It can contain members that can be accessed through dot notation.
struct Student {
  string name;
  int age;
  int id;

  // Default Constructor
  Student() {
    name = "";
    age = 0;
    id = 0;
  }

  // Parameterized Constructor
  Student(string n, int a, int i) {
    name = n;
    age = a;
    id = i;
  }
  void  print() {
      cout << "Name : " << name << endl;
      cout << "Age : " << age << endl;
      cout << "ID : " << id << endl;
   }
};

// Usage
Student s1; // invokes default constructor, members initialized

Student s2("Ahmed", 20, 1); // invokes parameterized constructor
This declares a Student struct.
Student s1("Ahmed", 20, 1);

Student s2; // Default constructor
s2.name = "Sarah";
Access members using dot . operator.
Structs can also be used inside other containers:
vector<Student> database;

database.push_back(Student("Ahmed", 20, 1));

for(auto s : database) {
  // access struct members
}

  pair<Student, int> p;
    Student s2;
    s2.name = "Mohamed";
    s2.age = 21;
    s2.id = 456;
    p.first = s2;
    p.second = 100;
    cout << p.first.name << endl;
cout << p.second << endl;- Members and base classes in structs are public by default while private in classes.
- Structs can't inherit other structs/classes (no hierarchy) while classes can.
Good for simple data holders without encapsulation needs.
Overall, structs allow customizing and reusing complex data types conveniently.