This utility allows you to observe MIDI Control Change and NOTE messages from every channel in real-time, and associate rules and actions with them. It also features midi port mapping, and a websocket interface. Each Channel/CC# is treated as in individual "Control" so this application can be thought of as an "omni" mode midi input.
Each "Control" can have rules associated with it that will execute "Actions" based on the type of change made to the Control. For instance you can have a rule that will execute whenever the value of a knob or slider increases.
Features
- Fully functional MIDI router (create virtual connections between midi devices)
- JACK Midi Support (jackaudio.org)
- Plugin support for controlling popular hardware via MIDI (Philips Hue Plugin available)
- All OS compatable game controllers (Xbox Controller, 8Bitdo, etc) recognized as MIDI inputs
- RTP MIDI support for use with Apple's network MIDI implementation
- Detailed MIDI logging for troubleshooting issues with MIDI devices
- Media Canvas feature lets you create audio/visual content triggered by MIDI messages
- Mobile friendly remote control interface
- Internal MIDI file player with virtual device for mappings
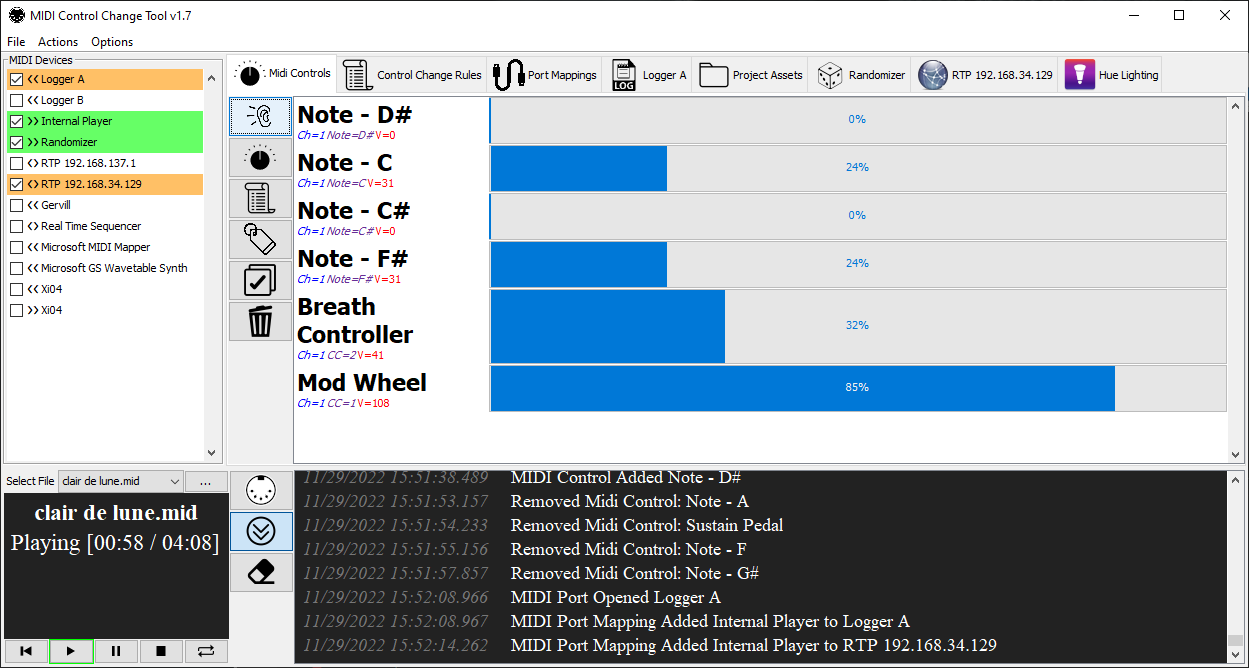
Simply launch the app and check off what MIDI devices you want to use. Then toggle the ear on the MIDI Controls tab, as you play with the physical controls on your device, those controls will appear in the "Midi Controls" section. Each control represents a channel and a control change number. In order to create a rule for a control, select control by clicking on it. Then click the "script" button (third one on the left of the midi controls tab)
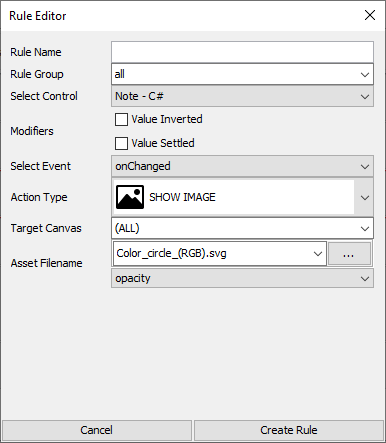
"Rules" are a way to create mappings from your MIDI Controls to an event
- Rule Name - This is just a label for the rule
- Rule Group - The group this rule belongs to (optional)
- Select Control - Midi Control to listen for events on (A control represents a channel and cc#)
- Modifiers
- Value Inverted - reverse the value from 0-127 to 127-0
- Value Settled - Wait for the value to finish changing before triggering the rule
- Select Event - When should this rule trigger?
- onChange - Whenever there is a change in value, best option if you are looking to detect any change in the slider or knob
- onChangedIncrease - whenever the value goes higher then the previous value
- onChangedDecrease - whenever the value goes lower then the previous value
- onChangedHigh (64+) - whenever the value changes above the middle of its range in the upperbound direction
- onChangedLow (63-) - whenever the value changes above the middle of its range in the lowerbound direction
- onEnteredHigh (64+) - whenever the value changes and passes the middle of its range in the upperbound direction
- onEnteredLow (63-) - whenever the value changes and passes the middle of its range in the lowerbound direction
- onEnteredHighOrLow - whenever the value changes and passes the middle of its range in the either direction
- onChangeBottomThird (0-42) - whenever the value changes below 42
- onChangeMiddleThird (43-85) - whenever the value changes above 42 below 86
- onChangeTopThird (86-127) - whenever the value changes above 85
- onEnteredBottomThird (0-42) - whenever the value enteres a range below 42
- onEnteredMiddleThird (43-85) - whenever the value enteres a range above 42 below 86
- onEnteredTopThird (86-127) - whenever the value enteres a range above 85
- Action Type - What Kind of action do you want to take?
- CALL URL - Make a request to a URL (response is ignored)
- PLUGIN - Make a call to a MidiTools Plugin
- Action Type: specify a url http://www.domain.com/program.php?v={{value}}
- RUN PROGRAM - Execute a program Action Type: specify a program c:\program.exe {{value}}
- PLAY SOUND - Play a wav file (volume will adjust with value)
- PLUGIN - Send message/event to a plugin Action Type: you may specify a url or local path to a wav file
- TRANSMIT CONTROL CHANGE - Send a Control Change MIDI Message Action Type: Device Name,channel#,cc#,{{value}}
- TRANSMIT NOTE ON - Send a NOTE ON/OFF MIDI Message Action Type: Device Name,channel#,note#,{{value}} (a value of 0 will become a note off message)
- TRANSMIT NOTE OFF - Send a NOTE OFF MIDI Message Action Type: Device Name,channel#,note#,{{value}}
- ENABLE RULE GROUP - Enable a group of rules
- DISABLE RULE GROUP - Disable a group of rules
- TOGGLE RULE GROUP - Toggle a group of rules if the value >= 64 the group is enabled otherwise its disabled.
- LOGGER A MESSAGE - Add some text to Logger A
- LOGGER B MESSAGE - Add some text to Logger B
- SHOW IMAGE - Change the image displayed on the Canvas and apply effects
- EFFECT IMAGE - Change the effects on an image if its presently visible on the canvas
- MAPPING ENABLE - Enable a port mapping
- MAPPING DISABLE - Disable a port mapping
- MAPPING TOGGLE - Toggle a Port Mapping if the value >= 64 the mapping is enabled otherwise its disabled.
- Target Canvas - Specify the canvas this action should take place, this applies to PLAY SOUND and SHOW IMAGE. Canvas names can be made up on the fly!
- Action Value - Specify the parameters to an Action Type (variables below)
- {{value}} - The value(third byte) of the MIDI Control Change Event (0-127)
- {{value.inv}} - The inverted value of the MIDI Event
- {{value.old}} - The value previously held by the midi control
- {{value.old.inv}} - The inverted value previously held by the midi control
- {{value.change}} - The amount the controls value has changed
- {{value.map(min,max)}} - Remaps the 0-127 value to a new range specified by min/max think of it like the arduino map function
- {{cc}} - Control change number of the event
- {{note}} - Note # that was triggered
- {{note.name}} - Name of triggered note
- {{channel}} - Channel number of the event
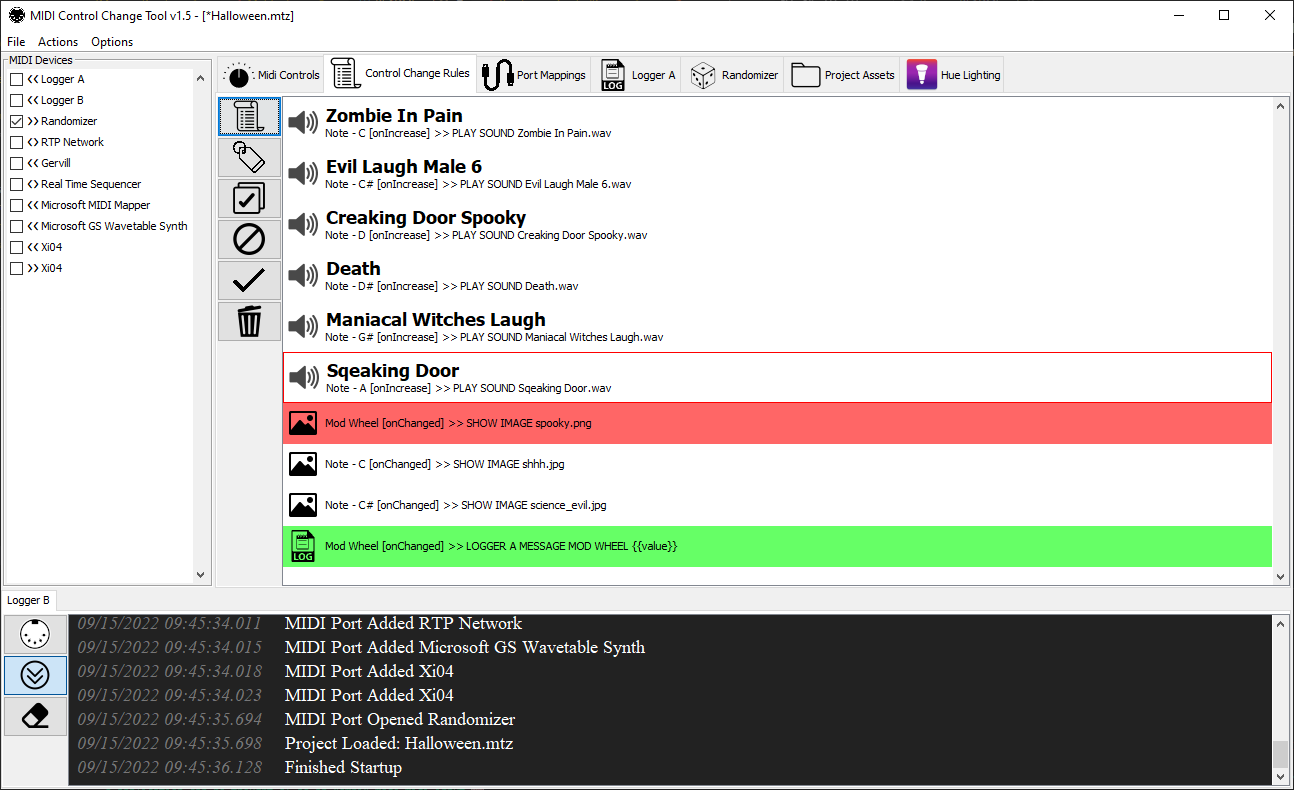
The Rules tab allows you to manage your rules and see their state. When a rule is triggered by a MIDI event it will either turn green(it worked) or red(something failed) for a moment. When a rules fails its because the action could not be performed. In the case of a SHOW IMAGE or PLAY SOUND event the targeted canvas may not be open. Where as a CALL URL might fail due to a bad URL.
You can edit a rule at any time by clicking on the rule and using the Edit button (second one down) to change its parameters. Once you hit "save" the changes take effect immediately.
NOTE: If you wish to temporarily disable a rule, you can double click on it and it should turn gray.
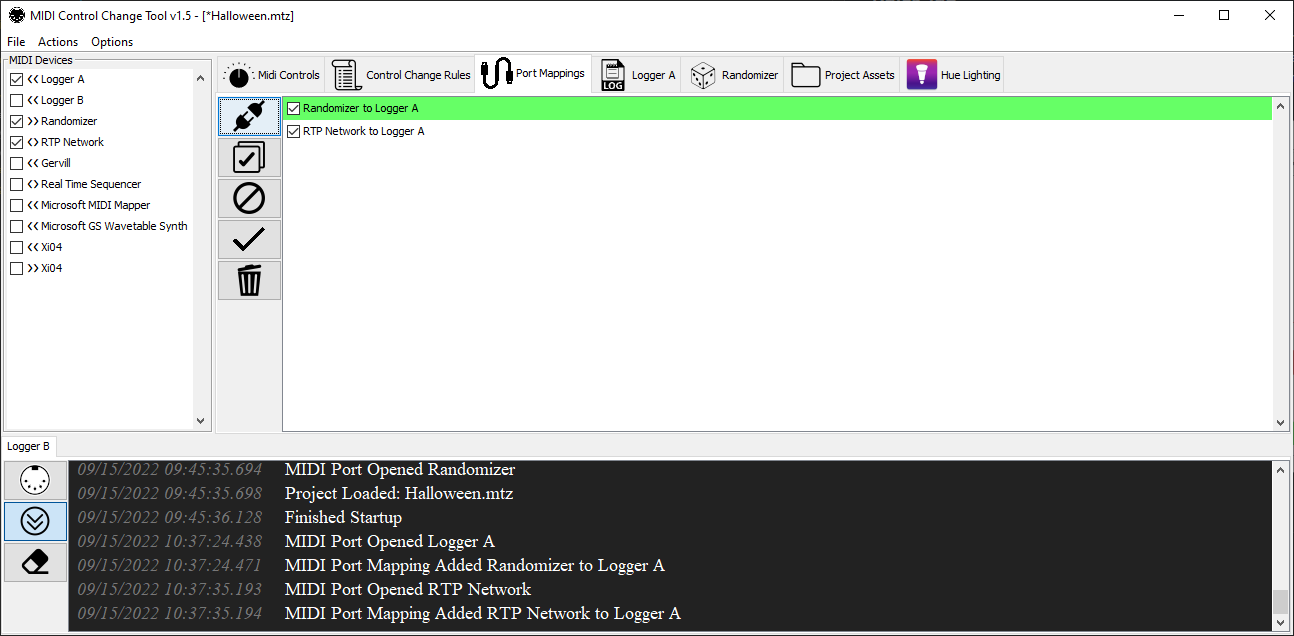
The Port Mappings tab allows you to create virtual connections between MIDI devices. Think of it like a virtual MIDI cable, allowing a connection between a device's MIDI OUT and another devices MIDI IN. Whenever data is flowing over the mapping it will turn green to let you know its working. To create a port mapping click the "plug" button on the left hand side.
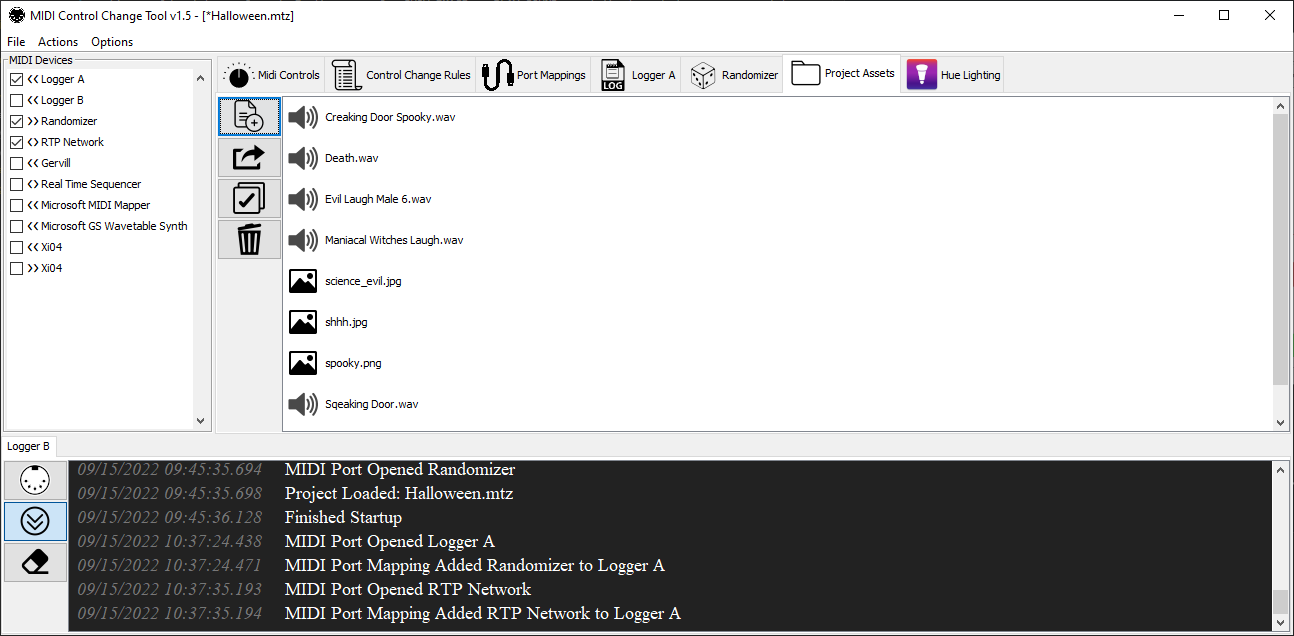
The Project Assets tab is for adding media and additional files to your project. These assets will be available to your rules and are saved as part of the project file. To add an asset simply drag and drop the file into this tab, or click on the "Add File" button on the left hand side.
Supported Assets include:
- Images (gif/jpeg/png/webp/svg)
- Sound clips (wav files only)
- Sound Fonts (sf2)
- Shell Scripts (cmd/bat/sh)
- MIDI Files (mid)
However any file type may be added, and will be available using the internal web server at http://127.0.0.1:6123/assets/ allowing external tools to access them via HTTP
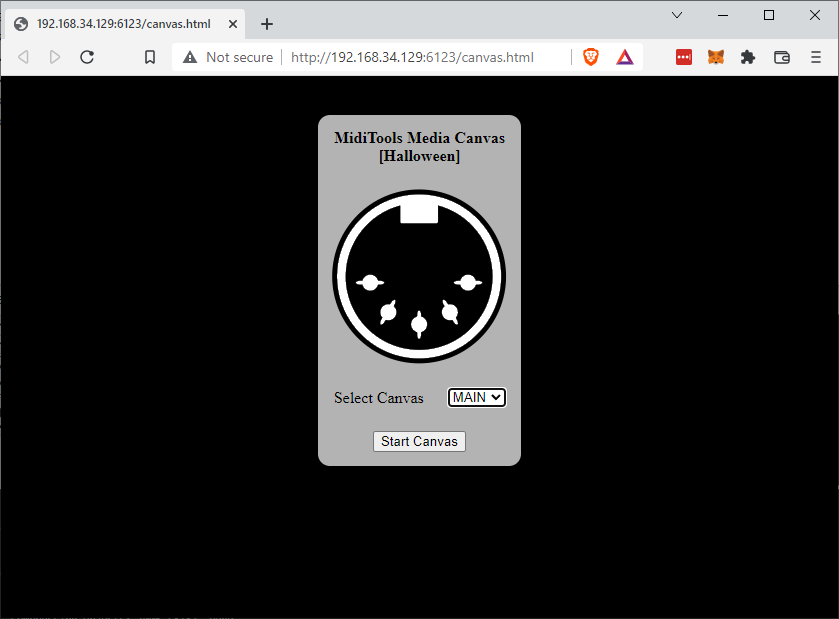
The media canvas is a great way to create visual effects using a monitor or projector. The media canvas is a webapp that can be easily opened in any modern browser (Chrome/Safari/Brave). When creating rules there are two types of rules that use the media canvas. In order to use this feature the "API Server" must be enabled in options.
- SHOW IMAGE - Shows an image at the time the event is fired, the images effect (rotate, opacity, scale) will be determined by the CC Value or note pressure. Whenever a show image event is fired on a canvas, the previous image is removed and the most recent image is shown.
- PLAY SOUND - Plays a sound clip using the CC value or note pressure to determine value (much like a sampler/sound board)
When creating these types of rules you can specify a canvas target, this is the canvas you want to present the media. Canvas names are made up on the fly and Midi Tools will show the available canvas names when launching a media canvas. Ideally once you've started the canvas you can press F11 to full screen it, giving it full control over the display. Since media canvas's are just webpages, you can use a variety of devices to display them, the only requirement is that all the devices are on the same network with an acceptable latency.
To open a media canvas, simply go to the "Actions" menu and click on "open a media canvas". You can also go to options and enable the media canvas QR code to scan the url from a handheld device.
Also a couple things to be aware of!
- The background of a media canvas is always black, this is on purpose since this feature is primarily for lighting effect. Your images background should be transparent or also black.
- Images will be stretched to fill the canvas since display sizes may vary.
- It is very possible to create a seizure effect with flashing/changing images. Please take precautions accordingly!
- The responsiveness greatly depends on your network environment, I've tested this on a rather busy gigabit ethernet network and the delay is never more then 10ms from the event trigger.
