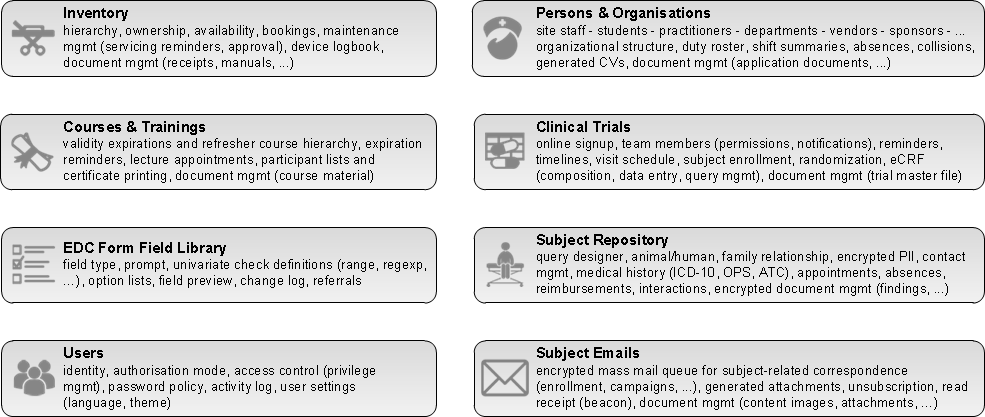
Phoenix CTMS is a large web application combining capabilities of database software used in clinical research in one modular system.
- PRS (Patient Recruitment System)
- CTMS (Clinical Trial Management System)
- CDMS (Clinical Data Management System)
This unmatched feature set is geared to support all operational and regulatory requirements of the clinical front end in academic research, at CROs (Contract Research Organisations) and hospitals conducting clinical studies of any phase.
After years of collaborative development with trial sites at the Medical University of Graz, the Phoenix CTMS now becomes publicly available (LGPL 2.1). It could be the perfect choice if you e.g.
- need a private, encrypted subject database for PII (personally identifyable information), to complement your existing CDMS
- need a solution to comply with upcoming EU-GDPR (General Data Protection Regulation)
- want to operate a secure online signup portal for subject candidates
- want a CDMS that gives you unlimited Javascript form scripting support (server- and browserside)
- need to deal with large eCRFs (electronic case report forms)
- want to try a serious open source alternative for eCRFs
- need to formulate complex ad-hoc database queries to list matching subject candidates using set operations
- conduct several trials in parallel and need to organize site staff and resources
- need a software to implement various processes for ICH GCP (good clinical practice) compliance
- want a turn-key system that’s operational out-of-the-box, instead of integrating multiple systems
This GitHub repository contains all tiers of the main JEE web application. Transient artifacts generated using AndroMDA are excluded.
- Prepare a vanilla Debian Bullseye Linux instance (ie. from debian-11.2.0-amd64-netinst.iso):
- 2 vCPUs, 4-8 GB RAM and 10-20 GB disk should be fine for a test environment
- Select basic packages only (no database or webserver)
- The procedure was also successfully tested with latest Ubuntu
-
Open a terminal and run the installer to automatically download, build and configure your Phoenix CTMS:
sudo apt-get -y install wget ca-certificates
wget https://raw.githubusercontent.com/phoenixctms/install-debian/master/install.sh -O ~/install.sh
chmod 755 ~/install.sh
sudo ~/install.sh
The procedure will require internet connectivity to download from debian, maven, cpan mirros and github. It will take around 1-2 hours to complete.
-
You can now open a browser and log into the system using the link and credentials printed at last.
-
If desired, populate the system with demo data:
sudo -u ctsms /ctsms/dbtool.sh --load_demo_data
The following was tested on a vanilla Windows 10 VM.
- Prerequisites:
- download and install a recent Java JDK (eg. Oracle JDK1.8.0 u201 64bit)
- download and install git
- download a recent Apache Maven (eg. apache-maven-3.6.0-bin.zip, extract to C:\apache-maven-3.6.0)
- Setup environment variables:
- add C:\Program Files\Java\jdk1.8.0_201\bin and C:\apache-maven-3.6.0\bin to "Path" variable
- add new environment variable "JAVA_HOME" and set it to C:\Program Files\Java\jdk1.8.0_201
- Clone the Phoenix CTMS java webapp source code:
- create folder C:\workspaces
- open Command Prompt, change to C:\workspaces and run
git clone https://github.com/phoenixctms/ctsms.git
- change to C:\workspaces\ctsms and run
mvn install -DskipTests
- Eclipse IDE:
- download and run Eclipse Installer (eg. 2020-06), choose flavour "Eclipse IDE for Java EE Developers"
- launch Eclipse IDE and select workspace C:\workspaces
- goto Window -> Preferences -> Installed JRE and add and select JDK -JRE (=JAVA_HOME)
- goto File -> Import... -> Maven -> Existing Maven Project select C:\workspaces\ctsms folder and press "Finish"
- done. you can now start debugging, ie. select DBTool.java and goto Run -> Debug
