- 原文链接 : Effective OkHttp
- 原文作者 : Michael Parker
- 译文出自 : 开发技术前线 www.devtf.cn。本译文已授权开发者头条(链接:http://toutiao.io/download)享有独家转载权,未经允许,不得转载!
- 译者 : Damonzh
- 校对者: 这里校对者的github用户名
- 状态 : 未完成 / 校对中 / 完成
OkHttp was an invaluable library when developing the Android app for Khan Academy. While its default configuration offers significant utility, below are some steps we took for increasing the resourcefulness and introspective power of OkHttp:
当我为可汗学院开发Android app的时候,OkHttp是一个十分有用的第三方库。虽然它的默认设置已经提供了很大的便利,但我们还是采取了以下的步骤来提升OkHttp resourcefulness and introspective的能力:
By default, OkHttp does not cache responses that permit caching by including such a HTTP Cache-Control header. Therefore your client may be wasting time and bandwidth by requesting the same resource again and again, as opposed to simply reading a cached copy after the initial response.
允许缓存响应数据时需要往请求头里加入Cache-Control,默认情况下OkHttp不会缓存响应数据。所以,客户端就会浪费时间和流量去多次请求同样的数据。相反的,如果缓存了响应数据,只需要在第一次请求的时候从网络获取,以后就可以直接从缓存文件中获取数据。
To enable caching of responses on the filesystem, configure a com.squareup.okhttp.Cache instance and pass it to the setCache method of your OkHttpClient instance. You must instantiate the Cache with a File representing a directory, and a maximum size in bytes. Responses that can be cached are written to the given directory. If the caching of a response causes the directory contents to exceed the given size, responses are evicted while adhering to a LRU policy.
为了开启缓存响应数据功能,你需要创建一个com.squareup.okhttp.Cache对象并将其作为参数传给OkHttpClient的setCache方法。在创建Cache对象的时候,你必须为其指定一个File参数和以byte为单位的最大容量参数,这个File代表了缓存的路径。缓存的数据会被存储在这个路径中。当缓存的大小超过指定的最大容量时,OkHttp会根据LRU算法对缓存数据进行清理操作。
As recommended by Jesse Wilson, we cache responses in a subdirectory of context.getCacheDir():
// Base directory recommended by http://stackoverflow.com/a/32752861/400717.
// Guard against null, which is possible according to
// https://groups.google.com/d/msg/android-developers/-694j87eXVU/YYs4b6kextwJ and
// http://stackoverflow.com/q/4441849/400717.
final @Nullable File baseDir = context.getCacheDir();
if (baseDir != null) {
  final File cacheDir = new File(baseDir, "HttpResponseCache");
  okHttpClient.setCache(new Cache(cacheDir, HTTP_RESPONSE_DISK_CACHE_MAX_SIZE));
}根据Jesse Wilson的推荐,我们把缓存的数据存放在context.getCacheDir()的子目录中:
// Base directory recommended by http://stackoverflow.com/a/32752861/400717.
// Guard against null, which is possible according to
// https://groups.google.com/d/msg/android-developers/-694j87eXVU/YYs4b6kextwJ and
// http://stackoverflow.com/q/4441849/400717.
final @Nullable File baseDir = context.getCacheDir();
if (baseDir != null) {
  final File cacheDir = new File(baseDir, "HttpResponseCache");
  okHttpClient.setCache(new Cache(cacheDir, HTTP_RESPONSE_DISK_CACHE_MAX_SIZE));
}
In the Khan Academy application, we specify HTTP_RESPONSE_DISK_CACHE_MAX_SIZE as 10 * 1024 * 1024, or 10 MB.
在可汗学院App中,我们指定HTTP_RESPONSE_DISK_CACHE_MAX_SIZE的值为10 * 1024 * 1024,即10MB。
Stetho is a lovely library by Facebook that allows you to inspect your Android application using the Chrome Developer Tools feature of Chrome.
In addition to allowing you to inspect the SQLite databases and view hierarchies of your application, Stetho allows you to inspect each request and response made by OkHttp:
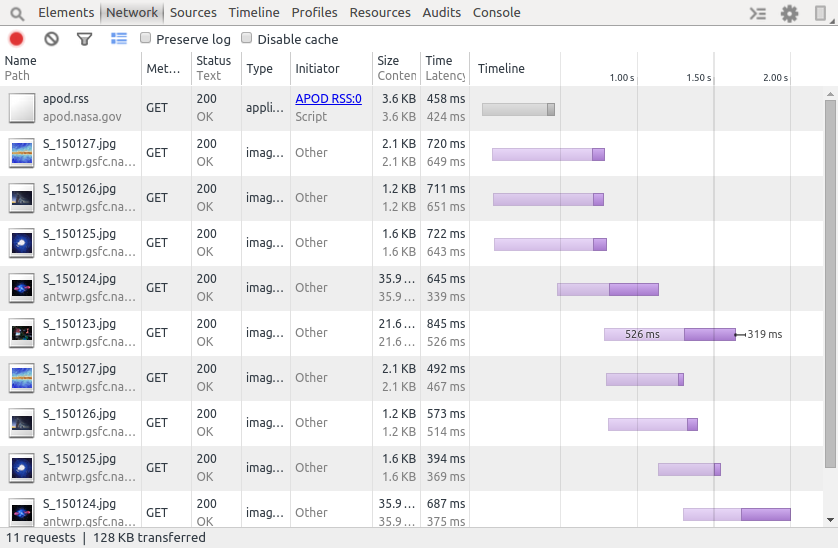
Stetho是由Facebook开发的一个实用的库,它可以让你使用Chrome提供的Chrome Developer Tools来审查你的Android应用的代码。
除了可以让你审查应用中的SQLite数据库和View的继承层次外,Stetho也可以审查OkHttp发起的每一个请求和收到的每一个响应:
This introspection is very useful for ensuring that the server is returning the HTTP headers that permit caching of resources, as well as verifying that no requests are made when cached resources should exist.
To enable Stetho, simply add a StethoInterceptor instance to the list of network interceptors:
okHttpClient.networkInterceptors().add(new StethoInterceptor());Then, after running your application, open Chrome and navigate to chrome://inspect. The device and application identifier of the application should be listed. Visit its “inspect” link to open the Developer Tools, and then open the Network tab to begin monitoring requests by OkHttp.
这个拦截器可以确保服务端返回的HTTP头允许缓存相关数据,而且也可以保证如果有缓存数据的话不会进行网络请求。
使用Stetho也很简单,往网络拦截器列表中添加一个StethoInterceptor对象就可以了:
okHttpClient.networkInterceptors().add(new StethoInterceptor());然后运行你的应用并且打开Chrome,导航到chrome://inspect。
这时应该就会有一个设备和应用id的列表。点击'inspect'链接来打开Developer Tools,然后打开NetWork标签就可以观察OkHttp的请求了。
If you are like us, you might use Picasso to load images over the network, or use Retrofit to simplify issuing requests and decoding responses. By default, these libraries will implicitly create their own OkHttpClient for internal use if you do not explicitly specify one. From the OkHttpDownloader class of version 2.5.2 of Picasso:
private static OkHttpClient defaultOkHttpClient() {
  OkHttpClient client = new OkHttpClient();
  client.setConnectTimeout(Utils.DEFAULT_CONNECT_TIMEOUT_MILLIS, TimeUnit.MILLISECONDS);
  client.setReadTimeout(Utils.DEFAULT_READ_TIMEOUT_MILLIS, TimeUnit.MILLISECONDS);
  client.setWriteTimeout(Utils.DEFAULT_WRITE_TIMEOUT_MILLIS, TimeUnit.MILLISECONDS);
  return client;
}
Retrofit has a similar factory method for creating its own OkHttpClient.
如果你也像我们一样使用Picasso加载网络图片,或者使用Retrofit简化网络请求和数据解析。在你没有明确指定一个OkHttpClient的情况下,这些库会自己创建一个默认的供内部使用。比如2.5.2的Picasso中OkHttpDownloader类是如下这样:
private static OkHttpClient defaultOkHttpClient() {
  OkHttpClient client = new OkHttpClient();
  client.setConnectTimeout(Utils.DEFAULT_CONNECT_TIMEOUT_MILLIS, TimeUnit.MILLISECONDS);
  client.setReadTimeout(Utils.DEFAULT_READ_TIMEOUT_MILLIS, TimeUnit.MILLISECONDS);
  client.setWriteTimeout(Utils.DEFAULT_WRITE_TIMEOUT_MILLIS, TimeUnit.MILLISECONDS);
  return client;
}Retrofit有一个类似的工厂方法来创建自己的OkHttpClient。
Images are some of the largest resources that your application will load. While Picasso maintains its own LRU cache for images, it is strictly in-memory. If the client attempts to load an image using Picasso, and Picasso does not find that image in its in-memory cache, then it will delegate loading that image to its internal OkHttpClient instance. And by default that instance will always load the image from the server, as the defaultOkHttpClient method above does not configure it with a response cache on the filesystem.
图片是一个应用中比较大的资源。Picasso使用LRU算法对图片进行了缓存,严格来说是内存缓存。如果客户端试图使用Picasso加载一张图片,但是Picasso没有在内存缓存中找到这张图片。那么它就会委托内部的OkHttpClient来加载这张图片。默认情况下它总是会从网络加载图片,因为上文提到的defaultOkHttpClient并没有配置缓存响应数据到文件系统。
Specifying your own OkHttpClient instance allows for returning a cached response from the filesystem. No image is loaded from the server. This is especially important after the app is first launched. At this time Picasso’s in-memory cache is cold, and so it will delegate loading images to the OkHttpClient instance frequently.
指定你自己的OkHttpClient可以让你从文件系统中获得缓存的响应数据,而不用每次都从服务端去获取数据。在App完成第一次启动后,这个特性特别重要。这个时候Picasso还没有内存缓存,所以它会频繁的让OkHttpClient去加载图片。
To do this, simply wrap the OkHttpClient instance in an OkHttpDownloader, and pass that to the downloader method of your Picasso.Builder instance:
final Picasso picasso = new Picasso.Builder(context)
    .downloader(new OkHttpDownloader(okHttpClient))
    .build();

// The client should inject this instance whenever it is needed, but replace the singleton
// instance just in case.
Picasso.setSingletonInstance(picasso);为了实现上面说的,你只需要用OkHttpDownloader对OkHttpClient进行包裹,并把它作为参数传给Picasso.Builder的downloader方法:
final Picasso picasso = new Picasso.Builder(context)
    .downloader(new OkHttpDownloader(okHttpClient))
    .build();

// The client should inject this instance whenever it is needed, but replace the singleton
// instance just in case.
Picasso.setSingletonInstance(picasso);
To use your OkHttpClient instance with a RestAdapter in Retrofit 1.9.x, wrap the OkHttpClient in an OkClient instance, and pass that to the setClient method of your RestAdapter.Builder instance:
restAdapterBuilder.setClient(new OkClient(httpClient));In Retrofit 2.0, simply pass the OkHttpClient instance to the client method of your Retrofit.Builder instance.
为了在Retrofit 1.9.x中结合RestAdapter使用OkHttpClient,把OkHttpClient包裹在OkClient中,再把它作为RestAdapter.Builder的setClient方法的参数传进去尽可以了:
restAdapterBuilder.setClient(new OkClient(httpClient));在Retrofit 2.0中就更简单了,直接把OkHttpClient作为Retrofit.Builder的client方法的参数传递进去就行了。
In the Khan Academy application, we leverage Dagger to ensure that we have only one OkHttpClient instance, and that it is used by both Picasso and Retrofit. We create a provider for the OkHttpClient instance with the @Singleton annotation:
@Provides
@Singleton
public OkHttpClient okHttpClient(final Context context, ...) {
  final OkHttpClient okHttpClient = new OkHttpClient();
  configureClient(okHttpClient, ...);
  return okHttpClient;
}
This OkHttpClient is then injected with Dagger into the other providers that create our RestAdapter and Picasso instances.
在可汗学院App中,我们借助Dagger来确保只有一个OkHttpClient的实例。这个实例被Picasso和Retrofit共同使用。我们使用@Singleton注解为OkHttpClient实例创建了一个提供者:
@Provides
@Singleton
public OkHttpClient okHttpClient(final Context context, ...) {
  final OkHttpClient okHttpClient = new OkHttpClient();
  configureClient(okHttpClient, ...);
  return okHttpClient;
}然后使用Dagger将OkHttpClient注入到其他的提供者当中。这些提供者又创建了RestAdapter和Picasso实例。
Log files and analytics are much more informative when clients provide a detailed User-Agent header value in every request. By default, OkHttp includes a User-Agent value that specifies only the version of OkHttp. To specify your own user agent, first create an interceptor that replaces the value, following this suggestion on StackOverflow:
public final class UserAgentInterceptor implements Interceptor {
  private static final String USER_AGENT_HEADER_NAME = "User-Agent";
  private final String userAgentHeaderValue;

  public UserAgentInterceptor(String userAgentHeaderValue) {
    this.userAgentHeaderValue = Preconditions.checkNotNull(userAgentHeaderValue);
  }

  @Override
  public Response intercept(Chain chain) throws IOException {
    final Request originalRequest = chain.request();
    final Request requestWithUserAgent = originalRequest.newBuilder()
        .removeHeader(USER_AGENT_HEADER_NAME)
        .addHeader(USER_AGENT_HEADER_NAME, userAgentHeaderValue)
        .build();
    return chain.proceed(requestWithUserAgent);
  }
}当用户在每个请求里指定一个详细的User-Agent请求头的值的时候,日志文件和日志分析就变得更加有用了。默认情况下,OkHttp包含了一个User-Agent的请求头,但这个头仅仅标识出了OkHttp的版本信息。你可以创建一个自定义个拦截器来取代这个默认值,以下是StackOverflow上的一段可供参考的代码:
public final class UserAgentInterceptor implements Interceptor {
  private static final String USER_AGENT_HEADER_NAME = "User-Agent";
  private final String userAgentHeaderValue;

  public UserAgentInterceptor(String userAgentHeaderValue) {
    this.userAgentHeaderValue = Preconditions.checkNotNull(userAgentHeaderValue);
  }

  @Override
  public Response intercept(Chain chain) throws IOException {
    final Request originalRequest = chain.request();
    final Request requestWithUserAgent = originalRequest.newBuilder()
        .removeHeader(USER_AGENT_HEADER_NAME)
        .addHeader(USER_AGENT_HEADER_NAME, userAgentHeaderValue)
        .build();
    return chain.proceed(requestWithUserAgent);
  }
}
To construct the User-Agent header value that is passed into the constructor of UserAgentInterceptor, use whatever values you would find informative. We use:
- an
osvalue ofAndroidto clearly communicate that this is an Android device Build.MODEL, or the “end-user-visible name for the end product”Build.BRAND, or the “consumer-visible brand with which the product/hardware will be associated”Build.VERSION.SDK_INT, or the “user-visible SDK version of the [Android] framework”BuildConfig.APPLICATION_IDBuildConfig.VERSION_NAMEBuildConfig.VERSION_CODE
你可以使用任何你觉得有用的信息作为参数传递到UserAgentInterceptor的构造方法中来构造User-Agent头的值。我们使用了一下的信息:
Android系统的os值,用它来明确额标识出这是来自Android设备的请求Build.MODEL, 或“终端用户可见的产品名称”Build.BRAND, 或“消费者可见的产品或者硬件品牌名”Build.VERSION.SDK_INT, 或“用户可见的AndroidSDK版本号”BuildConfig.APPLICATION_IDBuildConfig.VERSION_NAMEBuildConfig.VERSION_CODE
The last three values are specified by the applicationId, versionCode, and versionName values in our Gradle build script. For more information, consult the documents on versioning your applications, and on configuring your applicationId with Gradle.
Note that if your application uses a WebView, you can configure it to use the same User-Agent header value that you constructed the UserAgentInterceptor with:
WebSettings settings = webView.getSettings();
settings.setUserAgentString(userAgentHeaderValue);最后三个参数我们通过Gradle构建脚本里的applicationId, versionCode和versionName来指定。你可以查看这里和这里的文档来获取更多的信息。
需要注意的是,如果你的App中用到了WebView,你可以配置你的WebView使用与UserAgentInterceptor的构造参数相同的User-Agent的值:
WebSettings settings = webView.getSettings();
settings.setUserAgentString(userAgentHeaderValue);Before version 2.5.0, OkHttp requests defaulted to never timing out. Starting with version 2.5.0, a request times out if establishing a connection, reading the next byte from a connection, or writing the next byte to a connection takes more than 10 seconds to complete. Doing nothing more than updating to version 2.5.0 revealed bugs in our own code, simply because we began exercising certain error paths for the first time. To override these default values, invoke setConnectTimeout, setReadTimeout or setWriteTimeout respectively.
在2.5.0之前,OkHttp的请求默认不会超时。从2.5.0开始,如果一个请求建立连接后从这个连接中读取数据或者向这个连接写入数据超过10秒钟就认为超时。更新到2.5.0之后,我们的代码中出现了一些bug,因为一开始想要确定出错的具体位置。要覆盖这些默认行为,只需要对应的去调用setConnectTimeout、setReadTimeout 或者 setWriteTimeout方法即可。
Note that Picasso and Retrofit specify different timeout values for their default OkHttpClientinstances. By default, Picasso specifies:
- A connect timeout of 15 seconds.
- A read timeout of 20 seconds.
- A write timeout of 20 seconds.
Whereas Retrofit specifies:
- A connect timeout of 15 seconds.
- A read timeout of 20 seconds.
- No write timeout.
By configuring Picasso and Retrofit with your own OkHttpClient instance, you can ensure consistent timeouts by all requests.
需要注意的是Picasso和Retrofit的默认OkHttpClient的超时时间是不同的。Picasso的默认值分别是:
- 连接超时15秒
- 读数据超时20秒
- 写数据超时20秒
而Retrofit的默认值是:
- 连接超时15秒
- 读数据超时20秒
- 写数据不会超时
你可以使用自定义的OkHttpClient来配置Picasso和Retrofit,这样就可以保证所有的请求超时时间都是统一的。
Again, the default configuration of OkHttp offers significant utility. By adopting the steps above, you can increase its resourcefulness and introspective power, and improve the quality of your application.
再次声明,默认的OkHttp的配置方式已经提供了很大的便利。但是通过以上步骤你可以提高它的resourcefulness and introspective能力,从而提升你的App质量。