-
Notifications
You must be signed in to change notification settings - Fork 1
/
Copy path05-server-reactive-programming-ii.qmd
1239 lines (1031 loc) · 43 KB
/
05-server-reactive-programming-ii.qmd
1
2
3
4
5
6
7
8
9
10
11
12
13
14
15
16
17
18
19
20
21
22
23
24
25
26
27
28
29
30
31
32
33
34
35
36
37
38
39
40
41
42
43
44
45
46
47
48
49
50
51
52
53
54
55
56
57
58
59
60
61
62
63
64
65
66
67
68
69
70
71
72
73
74
75
76
77
78
79
80
81
82
83
84
85
86
87
88
89
90
91
92
93
94
95
96
97
98
99
100
101
102
103
104
105
106
107
108
109
110
111
112
113
114
115
116
117
118
119
120
121
122
123
124
125
126
127
128
129
130
131
132
133
134
135
136
137
138
139
140
141
142
143
144
145
146
147
148
149
150
151
152
153
154
155
156
157
158
159
160
161
162
163
164
165
166
167
168
169
170
171
172
173
174
175
176
177
178
179
180
181
182
183
184
185
186
187
188
189
190
191
192
193
194
195
196
197
198
199
200
201
202
203
204
205
206
207
208
209
210
211
212
213
214
215
216
217
218
219
220
221
222
223
224
225
226
227
228
229
230
231
232
233
234
235
236
237
238
239
240
241
242
243
244
245
246
247
248
249
250
251
252
253
254
255
256
257
258
259
260
261
262
263
264
265
266
267
268
269
270
271
272
273
274
275
276
277
278
279
280
281
282
283
284
285
286
287
288
289
290
291
292
293
294
295
296
297
298
299
300
301
302
303
304
305
306
307
308
309
310
311
312
313
314
315
316
317
318
319
320
321
322
323
324
325
326
327
328
329
330
331
332
333
334
335
336
337
338
339
340
341
342
343
344
345
346
347
348
349
350
351
352
353
354
355
356
357
358
359
360
361
362
363
364
365
366
367
368
369
370
371
372
373
374
375
376
377
378
379
380
381
382
383
384
385
386
387
388
389
390
391
392
393
394
395
396
397
398
399
400
401
402
403
404
405
406
407
408
409
410
411
412
413
414
415
416
417
418
419
420
421
422
423
424
425
426
427
428
429
430
431
432
433
434
435
436
437
438
439
440
441
442
443
444
445
446
447
448
449
450
451
452
453
454
455
456
457
458
459
460
461
462
463
464
465
466
467
468
469
470
471
472
473
474
475
476
477
478
479
480
481
482
483
484
485
486
487
488
489
490
491
492
493
494
495
496
497
498
499
500
501
502
503
504
505
506
507
508
509
510
511
512
513
514
515
516
517
518
519
520
521
522
523
524
525
526
527
528
529
530
531
532
533
534
535
536
537
538
539
540
541
542
543
544
545
546
547
548
549
550
551
552
553
554
555
556
557
558
559
560
561
562
563
564
565
566
567
568
569
570
571
572
573
574
575
576
577
578
579
580
581
582
583
584
585
586
587
588
589
590
591
592
593
594
595
596
597
598
599
600
601
602
603
604
605
606
607
608
609
610
611
612
613
614
615
616
617
618
619
620
621
622
623
624
625
626
627
628
629
630
631
632
633
634
635
636
637
638
639
640
641
642
643
644
645
646
647
648
649
650
651
652
653
654
655
656
657
658
659
660
661
662
663
664
665
666
667
668
669
670
671
672
673
674
675
676
677
678
679
680
681
682
683
684
685
686
687
688
689
690
691
692
693
694
695
696
697
698
699
700
701
702
703
704
705
706
707
708
709
710
711
712
713
714
715
716
717
718
719
720
721
722
723
724
725
726
727
728
729
730
731
732
733
734
735
736
737
738
739
740
741
742
743
744
745
746
747
748
749
750
751
752
753
754
755
756
757
758
759
760
761
762
763
764
765
766
767
768
769
770
771
772
773
774
775
776
777
778
779
780
781
782
783
784
785
786
787
788
789
790
791
792
793
794
795
796
797
798
799
800
801
802
803
804
805
806
807
808
809
810
811
812
813
814
815
816
817
818
819
820
821
822
823
824
825
826
827
828
829
830
831
832
833
834
835
836
837
838
839
840
841
842
843
844
845
846
847
848
849
850
851
852
853
854
855
856
857
858
859
860
861
862
863
864
865
866
867
868
869
870
871
872
873
874
875
876
877
878
879
880
881
882
883
884
885
886
887
888
889
890
891
892
893
894
895
896
897
898
899
900
901
902
903
904
905
906
907
908
909
910
911
912
913
914
915
916
917
918
919
920
921
922
923
924
925
926
927
928
929
930
931
932
933
934
935
936
937
938
939
940
941
942
943
944
945
946
947
948
949
950
951
952
953
954
955
956
957
958
959
960
961
962
963
964
965
966
967
968
969
970
971
972
973
974
975
976
977
978
979
980
981
982
983
984
985
986
987
988
989
990
991
992
993
994
995
996
997
998
999
1000
---
title: "Server: Reactive programming II"
code-annotations: hover
code-link: true
---
```{r include=FALSE}
library(shiny)
```
- Learning outcomes
- Become familiar with reactive functions and observers
- Understand how to change the UI reactively through updaters
- Control the reactive graph through events, isolation, and truthiness
- Let Shiny's reactive flow work for, not against you
# Basics
- In the last section, you learned about what reactivity means in Shiny
- Recall:
- The programmer provides R with a "recipe"
- R creates an order of expressions under the hood (or "reactive graph")
- R executes these expressions whenever an input changes
- So far we have worked with inputs (e.g. `input$slider`), outputs (e.g. `output$plot`), and reactive functions (e.g. `reactive(input$slider + 1)`)
- In a Shiny app, these three elements are by far the most widely used
- In this section, you will learn about new mechanisms to control the reactive graph:
- **Observers**: Reactively perform side effects
- **Updaters**: Change inputs
- **Events**: Control when reactive elements are executed
- **Isolation**: Sever expressions from the reactive graph
- **Truthiness**: Stop reactivity based on arbitrary conditions
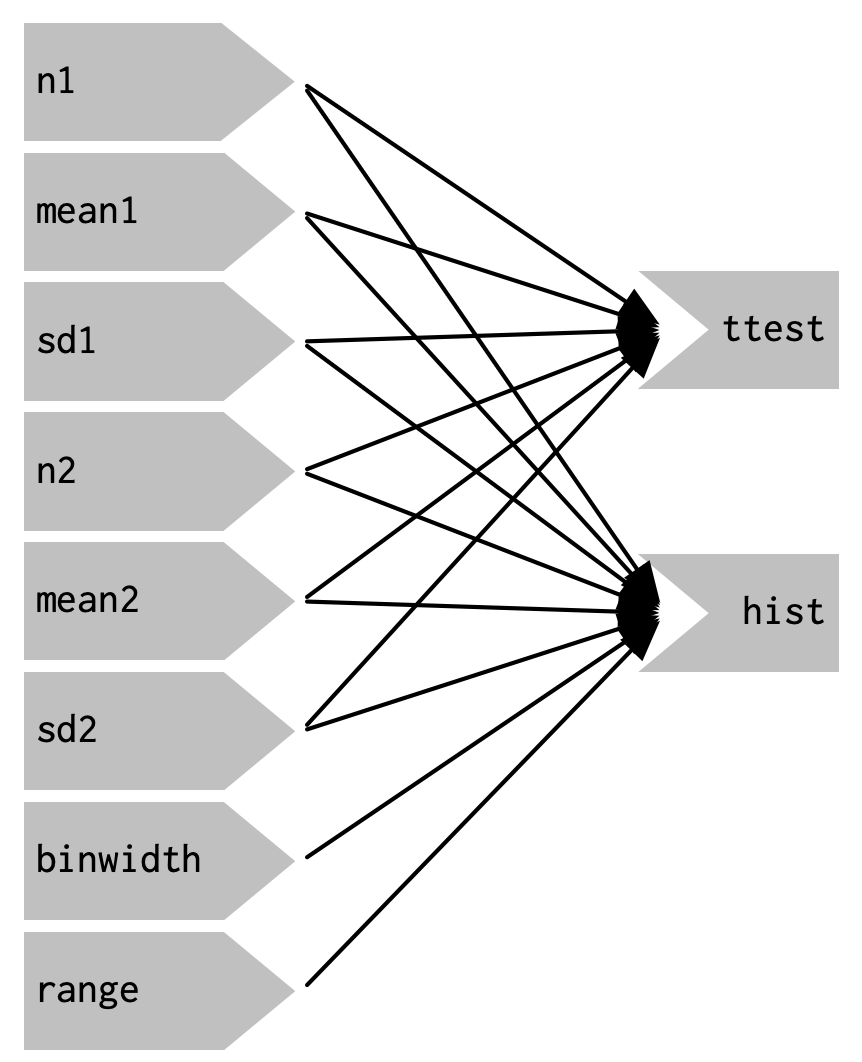
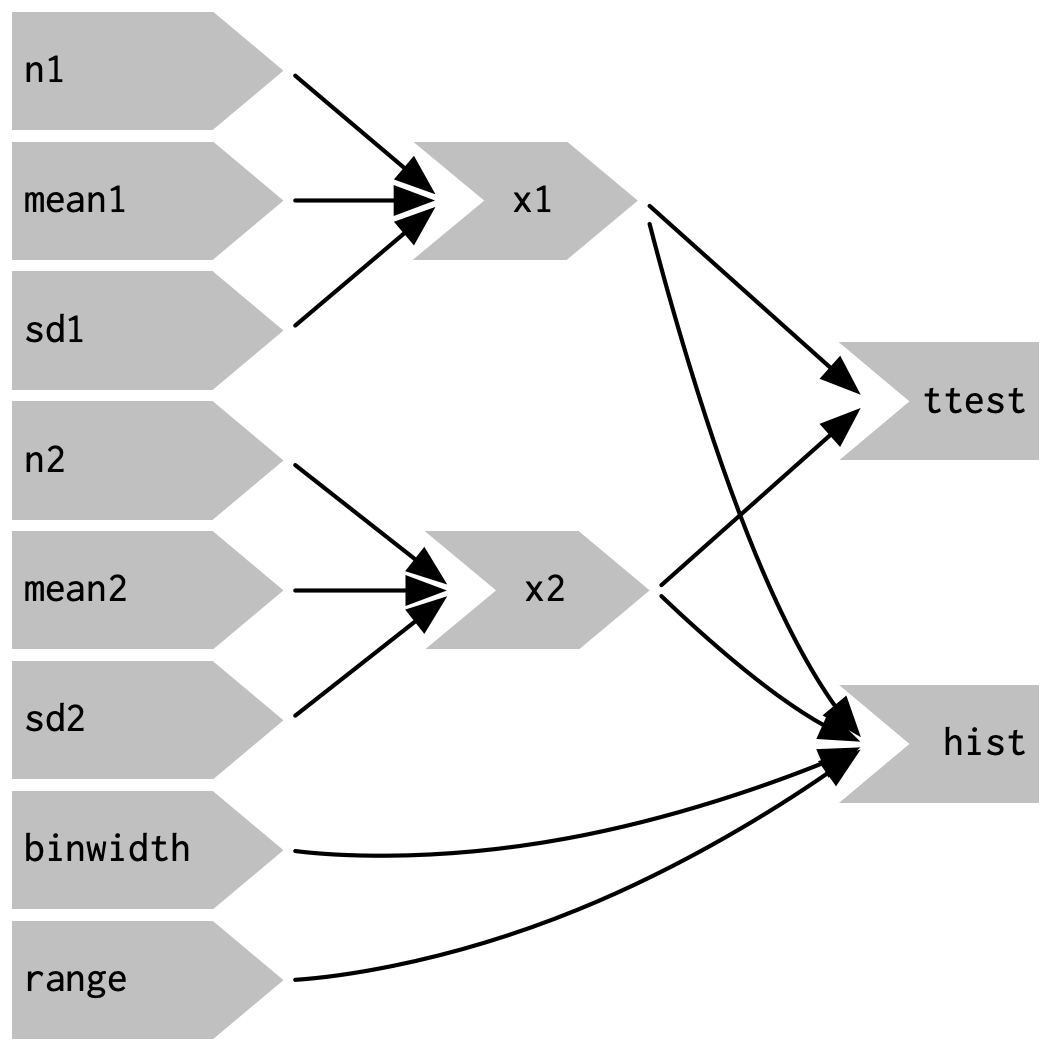
# Overview of the reactivity workflow
- This workflow chart is an overview of the most important mechanisms of Shiny's server function
- We do not address all elements on this map, but at the end of the workshop you should get the general idea of what is going on here

# Reactives versus observers
## Reactive
- Reactives (`reactive()`) wrapped up:
- Reactives wrap an R expression to create a reactive expression
- They "react" to an input, i.e. are evaluated when an input changes.
- They are both reactive producers and consumer. They take reactive values and return a reactive value.
- They **must be assigned** to a name. They can be referred to by other reactive consumers by being called like a function.
- They are evaluated **lazily**, i.e. they only run if they are forced to, for example when they are called by another reactive.
- They are **cached**, i.e. when called back-to-back, without any dependency changing, then they return the same value twice
- Reactives have two clear uses:
- They reduce the amount of computation that needs to be done by Shiny
- They reduce the mental strain in trying to understand complex Shiny code
```{r}
val <- reactive({
num <- input$number
num + 1
})
```
::: callout-tip
Conceptually and technically, reactives may be compared to traditional R functions. Functional programming follows the ["rule of three"](https://en.wikipedia.org/wiki/Rule_of_three_(computer_programming)): If code would be duplicated three times, wrap it in a function. Shiny follows the rule of two. This is because reactives not only simplify code for humans but also for machines: R only evaluates reactives if it has to. This can dramatically speed up an application.
Also, reactives *literally* are functions:
```{r}
is.function(reactive({}))
```
:::
+----------------------------------------------------------------------------------------------------------------------------------------------------------------------+-----------+-------------------------------------------------------------------------------------------------------------------------------------------------------------------+
|  | |  |
+======================================================================================================================================================================+===========+===================================================================================================================================================================+
| Reactive graph without reactives | | Reactive graph with reactives |
+----------------------------------------------------------------------------------------------------------------------------------------------------------------------+-----------+-------------------------------------------------------------------------------------------------------------------------------------------------------------------+
## Observers
- Observers (`observe()`) are similar to reactives:
- They also take an arbitrary R expression.
- They also react to an input.
- But they also carry important differences:
- They are **not assigned** to a name, thus they cannot be referred to from other reactive consumers and their return value is simply discarded. This also means they are terminal nodes (reactive consumers) in the reactive graphs -- just like outputs.
- They are evaluated **eagerly**, i.e. they run as soon as possible and do not wait for their dependencies.
- They are **forgetful**, their previous output is not cached.
- Since they are terminal nodes but do not produce a visible output, they are something between a reactive and an output
- Their uses are manifold, but here are some examples:
- Logging to the R console
- Updating inputs (see below)
- Reactively changing the UI
- Communicating with a remote storage (e.g. a database or a cloud)
- Essentially everything that does not require assigning to a name
::: callout-tip
Conceptually, observers may be compared to the tidyverse function [`purrr::walk`](https://www.tidyverse.org/blog/2023/05/purrr-walk-this-way/), which iterates over a list or a vector and performs "side-effects" like writing to files. Unlike `purrr::walk`, though, `observe` is probably much more common-place.
:::
```{r, eval=FALSE}
#| code-summary: Observers and reactives in the server function
#| source-line-numbers: "32-36"
# the reactive takes the inputs and produces a reactive value
# which can be re-used in other reactive expressions
filtered <- reactive({
xvar <- input$xvar
yvar <- input$yvar
range <- input$range
# select country
if (!is.null(input$countries)) {
ess <- ess[ess$country %in% input$countries, ]
}
# select variable
ess[c("idno", "country", xvar, yvar)]
})
# the plot output is a "reactive consumer" that takes
# the reactive value and makes a plot out of it
output$plot <- renderPlot({
xvar <- input$xvar
yvar <- input$yvar
plot_data <- filtered() %>%
drop_na() %>%
mutate(across(where(is.numeric), .fns = as.ordered))
ggplot(plot_data) +
aes(x = .data[[xvar]], y = .data[[yvar]], group = .data[[xvar]]) +
geom_violin(fill = "lightblue", show.legend = FALSE) +
theme_classic()
})
# the observer also takes the reactive value and prints it to the console
# it is also a reactive consumer and does not return anything
observe({
print(filtered())
})
```
```{r, eval=FALSE, file="shinyapps/example/05-observe.R"}
#| code-fold: true
#| code-summary: "Complete code"
#| source-line-numbers: "116-120"
```
# Events
- We talk about an *event* when a reactive expression is triggered
- For example:
- A user clicks a button
- The Shiny session initializes
- An input is updated (see below)
- We are dealing with Shiny events all the time, but it is important to realize how to control them
## `bindEvent`
- The `bindEvent` function binds a reactive expression to one or multiple events
- The reactive expression is evaluated if *and only if* the event is triggered
- `bindEvent` *locks up* a reactive expression unless a specific event is triggered
- You can use `bindEvent` on all sorts of reactive expressions: reactives, observers, and output renderers
```{r, eval=FALSE}
reactive({
# do something
}) %>%
bindEvent(input$button)
```
## Arguments to `bindEvent`
- `bindEvent` takes three arguments:
- `ignoreNULL`: By default, every event is an event, even if it is `NULL`. An unpressed button would then also count as an event. If you need your plot to render only before pressing that button, then ignoring `NULL` is the right choice.
- `ignoreInit`: By default, events are triggered when the reactive expressions are first initialized. This can be bad news for dynamically created UI elements (which are beyond this workshop).
- `once`: If used on an observer, this argument can be used to destroy that observer after its first use.
## Example
- To exemplify we will add an action button, that serves the following role:
- If the inputs are changed, nothing should happen to the plot
- Only if the button is pressed, shall the plot data be recalculated
In the UI:
```{r, eval=FALSE}
actionButton(
"button",
label = "Update parameters",
icon = icon("refresh")
)
```
In the server function:
```{r, eval=FALSE}
#| code-summary: Event binding on the server-side
#| source-line-numbers: "13-14,22-23"
filtered <- reactive({
xvar <- input$xvar
yvar <- input$yvar
range <- input$range
# select country
if (!is.null(input$countries)) {
ess <- ess[ess$country %in% input$countries, ]
}
# select variable
ess[c("idno", "country", xvar, yvar)]
}) %>%
bindEvent(input$button, ignoreNULL = FALSE)
output$plot <- renderPlot({
plot_data <- filtered() %>%
drop_na() %>%
mutate(across(where(is.numeric), .fns = as.ordered))
xvar <- names(plot_data)[[3]]
yvar <- names(plot_data)[[4]]
ggplot(plot_data) +
aes(x = .data[[xvar]], y = .data[[yvar]], group = .data[[xvar]]) +
geom_violin(fill = "lightblue", show.legend = FALSE) +
theme_classic()
})
```
```{r, eval=FALSE, file="shinyapps/example/05-bindevent.R"}
#| code-fold: true
#| code-summary: "Complete code (important lines are highlighted)"
#| source-line-numbers: "55-59,101-102,114-115,118"
```
# Updaters
- Updaters are one of the more common uses of observers
- They update the values and appearance of input widgets
- There are update functions for most input widgets -- and if there is not, updating becomes much more difficult
- Some examples:
- [`updateSelectInput`](https://shiny.posit.co/r/reference/shiny/0.14/updateselectinput): Updating an input selection can update a palette selection to match varying data types -- continuous, categorical, divering.
- [`updateTabsetPanel`](https://shiny.posit.co/r/reference/shiny/0.11/updatetabsetpanel): Updating a tabset panel can automatically switch between tabs.
- [`updateActionButton`](https://shiny.posit.co/r/reference/shiny/0.14/updateactionbutton): Updating an action button can simulate a button click, without the user needing to physically click on the button.
## Implementation
- Updaters are usually found in an **observer**.
- Because they often do not depend on any input, they are best coupled with `bindEvent`.
- It can also be useful to combine them with `freezeReactiveValue`
- Updating a value triggers an event
- Freezing can prevent the event from triggering twice: when changing the input and when updating.
```{r, eval=FALSE}
observe({
freezeReactiveValue(input, "id_of_input") # <1>
updateSelectInput(
session = session, # <2>
inputId = "id_of_input", # <3>
choices = c("a", "b", "c") # <4>
selected = "b" # <4>
) %>%
bindEvent(input$button) # <5>
})
```
1. Freeze `id_of_input` to prevent it from triggering an event twice, first when clicking on the button, and second when updating the input.
2. The `session` object of the server function has to be passed to every update function. This has no deeper meaning.
3. The `inputId` argument takes the ID of the widget that is to be updated
4. Every update function has different arguments to alter different parts of the input widget
5. Bind the observer to an input that should trigger the input update
## Example
- To exemplify, we add a new slider to the app:
```{r, eval=FALSE}
sliderInput(
"slider",
label = "Select a range for the independent variable",
min = min(ess$left_right, na.rm = TRUE),
max = max(ess$left_right, na.rm = TRUE),
value = range(ess$left_right, na.rm = TRUE),
step = 1
)
```
- Note that min, max, and value are fixed
- ..., but the independent variable is not: we can select a different variable with a different range
- We can thus implement an updater that dynamically updates the slider with new ranges:
```{r, eval=FALSE}
#| source-line-numbers: "1-14,26-30"
observe({
yvar <- input$yvar
freezeReactiveValue(input, "slider")
updateSliderInput(
session = session,
inputId = "slider", # <1>
min = min(ess[[yvar]], na.rm = TRUE), # <2>
max = max(ess[[yvar]], na.rm = TRUE), # <2>
value = range(ess[[yvar]], na.rm = TRUE) # <2>
)
}) %>%
bindEvent(input$yvar) # <3>
filtered <- reactive({
xvar <- input$xvar
yvar <- input$yvar
# select country
ess <- ess[ess$country %in% input$countries, ]
# apply range
ess <- ess[ # <4>
ess[[yvar]] > input$slider[1] & # <4>
ess[[yvar]] < input$slider[2], # <4>
] # <4>
# select variable
ess[c("idno", "country", xvar, yvar)]
})
```
1. The updater references the ID of the input that needs to change
2. Min, max, and value are adapted to the select Y variable
3. The updater only triggers when a new Y variable is selected
4. The dataset is filtered according to the slider
```{r, eval=FALSE, file="shinyapps/example/05-update.R"}
#| code-fold: true
#| code-summary: "Complete code (important lines are highlighted)"
#| source-line-numbers: "55-62,96,101-105,131-142"
```
# Truthiness
- Truthiness is Shiny's flavor of logical or boolean values.
- Shiny interprets truthiness much more liberally than base R
- Truthiness answers questions such as:
- Is this value missing or available?
- Has the user provided an answer?
- Has the button been clicked?
- Concretely, a value is truthy *unless* it is:
- `FALSE`
- `NULL`
- An empty character string (`""`)
- An empty vector (e.g. `numeric(0)`)
- A vector full of `NA` (e.g. `c(NA, NA, NA)`)
- A vector full of `NA` or `FALSE` (e.g. `c(NA, FALSE, NA)`)
- A try-error (e.g. `try(stop("an error"))`)
- An unclicked action button
```{r}
isTruthy(NULL)
isTruthy("")
isTruthy(0)
```
## Required values (`req`)
- Truthiness is useful for Shiny's `req` function
- `req` is equivalent to `if` statements in R with two exceptions:
- They test for truthiness (instead of `TRUE`/`FALSE`)
- They raise a "silent" exception, i.e. they cancel any ongoing computation without logging or displaying an error
- `req` is useful to stop reactive behavior when certain conditions are not met
## Example
- In our Shiny app, we can use req to cancel plotting when no country is specified
- `selectizeInput`, which is used to select a country, returns `NULL` when no value is specified
- Now, if we do not specify a country, the plot simply will not render
```{r, eval=FALSE}
#| source-line-numbers: "2"
filtered <- reactive({
req(input$countries, cancelOutput = TRUE)
xvar <- input$xvar
yvar <- input$yvar
range <- input$range
# select country
ess <- ess[ess$country %in% input$countries, ]
# select variable
ess[c("idno", "country", xvar, yvar)]
}) %>%
bindEvent(input$button, ignoreNULL = FALSE)
```
```{r, eval=FALSE, file="shinyapps/example/05-req.R"}
#| code-fold: true
#| code-summary: "Complete code (important lines are highlighted)"
#| source-line-numbers: "90"
```
## One step further: Validation
- `req()` is useful for simply controlling reactivity in general
- `validate()` is useful for also providing a user with feedback
- `validate()` is fed with `need()` conditions which take two arguments:
- An expression that is tested for truthiness
- A message that is shown to the user if the expression is not truthy
- `validate()` is very bare-bones! For more sophisticated input validation, check out [`shinyFeedback`](https://merlinoa.github.io/shinyFeedback/)
- Input validation is but one of many techniques in [defensive programming](https://medium.com/@arumukherjee121/the-art-of-defensive-programming-62c6f22b2758) which is a good principle for making Shiny apps
```{r, eval=FALSE}
#| source-line-numbers: "2-4"
filtered <- reactive({
validate(
need(input$countries, message = "At least one country must be specified.")
)
xvar <- input$xvar
yvar <- input$yvar
range <- input$range
# select country
ess <- ess[ess$country %in% input$countries, ]
# select variable
ess[c("idno", "country", xvar, yvar)]
}) %>%
bindEvent(input$button, ignoreNULL = FALSE)
```
```{r, eval=FALSE, file="shinyapps/example/05-validate.R"}
#| code-fold: true
#| code-summary: "Complete code (important lines are highlighted)"
#| source-line-numbers: "90-92"
```
# Other important concepts
- Shiny's reactivity is easy to learn and hard to master
- We have started with basic concepts (inputs, outputs, reactive graphs)
- ... and ended with more advanced concepts (observers, events, updaters, truthiness)
- Nonetheless, there is still much to be explored that reaches far beyond this workshop
- Here we provide a non-exhaustive list of concepts, functions, and extensions that might serve useful when dealing with Shiny's reactivity
- A more exhaustive list was created by Shiny developer Nan Xiao: [Awesome Shiny extensions](https://github.com/nanxstats/awesome-shiny-extensions)
- Base Shiny:
- Dynamic UI
- Add, manipulate, and remove UI elements from the server function
- [`insertUI`](https://shiny.posit.co/r/reference/shiny/latest/insertui) and [`removeUI`](https://shiny.posit.co/r/reference/shiny/latest/insertui)
- [`shinyjs`](https://deanattali.com/shinyjs/) package for advanced control
- See also this [blog article](https://shiny.posit.co/r/articles/build/dynamic-ui/) on dynamic UIs
- Isolation
- Sever reactive values from the reactive graph
- [`isolate`](https://shiny.posit.co/r/reference/shiny/0.11/isolate.html)
- See also this [blog article](https://shiny.posit.co/r/articles/build/isolation/)
- Freezing
- Prevent an event from triggering until the next flush
- [`freezeReactiveValue`](https://shiny.posit.co/r/reference/shiny/1.4.0/freezereactivevalue)
- We have introduced this briefly in the section about updaters
- Reactive values
- Values or list-likes that are able to take dependencies in reactive expressions
- [`reactiveVal`](https://shiny.posit.co/r/reference/shiny/latest/reactiveval) and [`reactiveValues`](https://shiny.posit.co/r/reference/shiny/latest/reactivevalues)
- Reactive values are essentially a bare-bones version of `reactive()`, but for a short introduction, see [chapter 15.1](https://mastering-shiny.org/reactivity-objects.html#reactive-values) of Mastering Shiny
- Flush events
- Execute code after / before the reactive graphs finishes / starts
- [`onFlush`](https://shiny.posit.co/r/reference/shiny/0.14/onflush)
- See also this [blog article](https://shiny.posit.co/r/articles/build/execution-scheduling/) about execution scheduling
- Caching
- Temporarily store computationally intensive results to improve performance
- [`bindCache`](https://shiny.posit.co/r/reference/shiny/latest/bindcache)
- Data storage
- Improve input/output of large data using local or remote databases (e.g. SQLite, Google Sheets, Dropbox, Amazon S3)
- See this [blog article](https://shiny.posit.co/r/articles/build/overview/)
- Scheduled invalidation
- Invalidate reactive expressions after some time has passed
- [`invalidateLater`](https://shiny.posit.co/r/reference/shiny/latest/invalidatelater)
- Input validation
- A more sophisticated alternative to `req` allowing multiple tests and more flexible conditions.
- [`validate`](https://shiny.posit.co/r/reference/shiny/latest/validate.html)
- Safe execution
- Notify the user when something gone wrong with useful error messages instead of plain R errors
- [`base::tryCatch`](https://rdrr.io/r/base/conditions.html) and [`base::withCallingHandlers`](https://rdrr.io/r/base/conditions.html) provide mechanisms to implement safe errors
- [`shinyWidgets::execute_safely`](https://dreamrs.github.io/shinyWidgets/reference/execute_safely.html) and [`shinyvalidate`](https://rstudio.github.io/shinyvalidate/index.html) are implementations found in the wild
- See also [chapter 6: UX Matters](https://engineering-shiny.org/ux-matters.html) of Colin Fay's Engineering Production-Grade Shiny Apps
- Modularization
- Package large Shiny apps into isolated modules to increase maintainability
- [`moduleServer`](https://shiny.posit.co/r/reference/shiny/1.7.0/moduleserver)
- See also this [blog article](https://shiny.posit.co/r/articles/improve/modules/)
- Testing server logics
- Set up a mocked Shiny server to use in unit tests
- [`testServer`](https://shiny.posit.co/r/reference/shiny/latest/testserver)
- Particularly useful for making a robust Shiny package
- Advanced approaches also exist, e.g. [`shinytest2`](https://github.com/rstudio/shinytest2) or [`reactor`](https://github.com/yonicd/reactor)
- Javascript
- Shiny apps can be built without ever seeing a single line of Javascript -- but Javascript can still come in handy for that last mile of customization
- See [chapter 17](https://engineering-shiny.org/using-javascript.html) of Engineering Production-Grade Shiny Apps and [chapter 10](https://unleash-shiny.rinterface.com/survival-kit-javascript) of Outstanding User Interfaces with Shiny for useful primers on Javascript in Shiny
- Shiny extensions
- Event-based reactivity
- [`gargoyle`](https://cran.r-project.org/web/packages/gargoyle/)
- Create and trigger custom events to control the reactivity flow
- Shiny event tracking
- [`shinylogs`](https://cran.r-project.org/web/packages/shinylogs/index.html) or [`shiny.telemetry`](https://github.com/Appsilon/shiny.telemetry)
- Track inputs, outputs, errors and session events and optionally use them for logging
- Parallelization and asynchronous programming
- [`shiny.worker`](https://appsilon.github.io/shiny.worker/)
- Delegate heavy computation tasks to seperate processes to keep Shiny app responsive
- URL routing
- Route to specific parts of a Shiny app by modifying the URL path
- [`shiny.router`](https://appsilon.github.io/shiny.router/) and [`scenes`](https://github.com/shinyworks/scenes?tab=readme-ov-file)
- [`updateQueryString`](https://shiny.posit.co/r/reference/shiny/latest/updatequerystring) and [`getQueryString`](https://shiny.posit.co/r/reference/shiny/latest/getquerystring) in base Shiny
- Example: `https://shinyapp.com/plot` to access a plot
- Reactivity logging
- [`reactlog`](https://rstudio.github.io/reactlog/)
- Interactively supervise reactivity a posteriori
- Flame graphs
- [`profvis`](https://rstudio.github.io/profvis/)
- Interactively understand bottlenecks of a Shiny app
# Exercises
## Observers and reactives
::: callout-note
#### Exercise 1.1
Imagine you need to implement the following features in a Shiny app. In principle, would you rather use a reactive or an observer (or both) for these tasks?
1. Filtering a dataset as input for both `lm()` and `ggplot()`.
2. Reading from a database.
3. Writing to a database.
4. Update an input selection with new selection values.
5. Collect the results of a linear regression done in the Shiny app.
6. Display a password prompt and check if the credentials are correct.
:::
::: {.callout-warning collapse="true"}
#### Solution 1.1
1. Filtering a dataset for two different operations is a good use case for `reactive()` as its output value can be cached.
2. Reading from a file or a database is generally a task for `reactive()` as the data read in R must be stored. This cannot be done using observers.
3. Writing to a database, however, should be done in an observer because the return value does not matter for writing.
4. Updating the UI is usually done in an observer due to their eager evaluation.
5. Results of a calculation in Shiny are often used for further operations down the line (e.g. visualization). They are thus best handled by a reactive.
6. Ideally, passwords should stay in the R session for as short as possible. Thus they should not be handled by a reactive because reactive values are cached until the next invalidation. Additionally, proper password checks are performed using external databases which calls for observers.
:::
::: callout-note
#### Exercise 1.2
The following code contains two observers. Both observers depend on the same input (`input$button`), so their execution order can only be determined by their position in the code. Thus, `"2nd observer"` is printed before `"1st observer"`. Study the documentation of `?observe` and fix the app such `"1st observer"` is always printed first.
```{r, eval=FALSE}
ui <- fluidPage()
server <- function(input, output, session) {
observe({
input$button
print("2nd observer")
})
observe({
input$button
print("1st observer")
})
}
shinyApp(ui = ui, server = server)
```
:::
::: {.callout-warning collapse="true"}
#### Solution 1.2
`observe()` features an argument called `priority` which allows you to control the execution order. A higher value indicates a higher priority. Setting `priority = 1` makes the "1st observer" run before the "2nd observer" which has a default priority of 0.
```{r, eval=FALSE}
ui <- fluidPage()
server <- function(input, output, session) {
observe({
print("2nd observer")
})
observe({
print("1st observer")
}, priority = 1)
}
shinyApp(ui = ui, server = server)
```
:::
::: callout-note
#### Exercise 1.3
Taking the Shiny app below, gradually enter letters to the text input. Observe the printed messages in your R console. Why is the code in `reactive()` never run but the code in `observe()` is? Fix the example such that the code in `reactive()` is executed as well.
```{r, eval=FALSE}
ui <- fluidPage(
textInput("text", "enter a text")
)
server <- function(input, output, server) {
val <- reactive({
print("reactive is executed")
input$text
})
observe({
print("observer is executed")
input$text
})
}
shinyApp(ui, server)
```
:::
::: {.callout-tip collapse="true"}
Recall one of the main differences between `observe()` and `reactive()`: Reactives are lazy, observers are eager. Eagerly evaluated code triggers every time a dependency is invalidated, lazily evaluated triggers only when it is called from outside.
:::
::: {.callout-warning collapse="true"}
#### Solution 1.3
The code in `observe()` is run because the code takes a dependency on `input$text`. Whenever the text input is changed, the observer is re-run. The code in `reactive()` also takes a dependency on `input$text`, but since reactives are evaluated lazily, `reactive()` does not changes in the input. It only executes when it is called by a reactive consumer such as `observe()` or a render function. To make the code in `reactive()` run, we can let the observer call it:
```{r, eval=FALSE}
ui <- fluidPage(
textInput("text", "enter a text")
)
server <- function(input, output, server) {
val <- reactive({
print("reactive is executed")
input$text
})
observe({
print("observer is executed")
val()
})
}
shinyApp(ui, server)
```
:::
::: callout-note
#### Exercise 1.4
Given the code below, which takes a variable and plots a histogram, print the summary of the selected variable each time a new variable is selected. How can this task be done without duplicating code?
```{r, eval=FALSE}
ess <- readRDS("ess_trust.rds")
ui <- fluidPage(
selectInput(
"var",
"Select a variable",
names(ess)[startsWith(names(ess), "trust")]
),
selectInput(
"country",
"Select a country",
unique(ess$country)
),
plotOutput("plot")
)
server <- function(input, output, session) {
output$plot <- renderPlot({
ess <- ess[ess$country %in% input$country, ]
ggplot(ess) +
aes(.data[[input$var]]) +
geom_histogram()
})
}
shinyApp(ui, server)
```
:::
::: {.callout-warning collapse="true"}
#### Solution 1.4
To print the summary, implement an observer that prints the `summary()` of the selected variable. However, because the `ess` object is also filtered by the selected country, we would need to copy the filtering process to the observer as well, thus duplicating code. To avoid duplicating code, we can add a `reactive()` that performs the country filtering. The return value can then be forwarded to both `observe()` and `renderPlot()`.
```{r, eval=FALSE}
ui <- fluidPage(
selectInput(
"var",
"Select a variable",
names(ess)[startsWith(names(ess), "trust")]
),
selectInput(
"country",
"Select a country",
unique(ess$country)
),
plotOutput("plot")
)
server <- function(input, output, session) {
ess_country <- reactive({
ess[ess$country %in% input$country, ]
})
observe({
print(summary(ess_country()[[input$var]]))
})
output$plot <- renderPlot({
ggplot(ess_country()) +
aes(.data[[input$var]]) +
geom_histogram()
})
}
shinyApp(ui, server)
```
:::
## Updates and events
::: callout-note
#### Exercise 2.1
The code below implements a UI that contains checkboxes with four European regions (Central, Eastern, Southern, Northern) and an input selection for the country. Change the app such that `selectizeInput()` only shows those countries belonging to a region selected in `checkboxGroupInput()`.
```{r, eval=FALSE}
regions <- list(
Central = c("AT", "BE", "CH", "DE", "NL", "PL", "CZ"),
Eastern = c("BG", "EE", "HR", "HU", "LT", "LV", "PL", "SI", "SK"),
Southern = c("ES", "IT", "PT", "RS", "ME"),
Northern = c("IS", "SE", "FI", "GB", "IE", "DK")
)
ui <- fluidPage(
checkboxGroupInput(
"region",
label = "Select a European region",
choices = names(regions)
),
selectizeInput(
"country",
label = "Select a country",
choices = regions
)
)
server <- function(input, output, session) {
}
shinyApp(ui, server)
```
:::
::: {.callout-tip collapse="true"}
The function you need to update the input selection is called `updateSelectizeInput()`.
:::
::: {.callout-warning collapse="true"}
#### Solution 2.1
In the solution, I add an observer with `updateSelectizeInput()` that updates `selectizeInput()`. The updated values correspond to the countries of the selected region in the `regions` list.
```{r, eval=FALSE}
regions <- list(
Central = c("AT", "BE", "CH", "DE", "NL", "PL", "CZ"),
Eastern = c("BG", "EE", "HR", "HU", "LT", "LV", "PL", "SI", "SK"),
Southern = c("ES", "IT", "PT", "RS", "ME"),
Northern = c("IS", "SE", "FI", "GB", "IE", "DK")
)
ui <- fluidPage(
checkboxGroupInput(
"region",
label = "Select a European region",
choices = names(regions)
),
selectizeInput(
"country",
label = "Select a country",
choices = regions
)
)
server <- function(input, output, session) {
observe({
updateSelectizeInput(
inputId = "country",
choices = regions[input$region]
)
})
}
shinyApp(ui, server)
```
:::
::: callout-note
#### Exercise 2.2
Looking at the app from exercise 2.1, `selectizeInput()` is updated every time a European region is selected. In this case, this is probably what we expect from the app. To get a little more control of the reactivity flow, implement an action button that needs to be pressed in order for `selectizeInput()` to be updated.
```{r, eval=FALSE}
#| code-fold: true
#| code-summary: "Code from exercise 2.1"
regions <- list(
Central = c("AT", "BE", "CH", "DE", "NL", "PL", "CZ"),
Eastern = c("BG", "EE", "HR", "HU", "LT", "LV", "PL", "SI", "SK"),
Southern = c("ES", "IT", "PT", "RS", "ME"),
Northern = c("IS", "SE", "FI", "GB", "IE", "DK")
)
ui <- fluidPage(
checkboxGroupInput(
"region",
label = "Select a European region",
choices = names(regions)
),
selectizeInput(
"country",
label = "Select a country",
choices = regions
)
)
server <- function(input, output, session) {
observe({
updateSelectizeInput(
inputId = "country",
choices = regions[input$region]
)
})
}
shinyApp(ui, server)
```
:::
::: {.callout-warning collapse="true"}
#### Solution 2.2
In the solution, I add an observer with `updateSelectizeInput()` that updates `selectizeInput()`. The updated values correspond to the countries of the selected region in the `regions` list.
```{r, eval=FALSE}
regions <- list(
Central = c("AT", "BE", "CH", "DE", "NL", "PL", "CZ"),
Eastern = c("BG", "EE", "HR", "HU", "LT", "LV", "PL", "SI", "SK"),
Southern = c("ES", "IT", "PT", "RS", "ME"),
Northern = c("IS", "SE", "FI", "GB", "IE", "DK")
)
ui <- fluidPage(
checkboxGroupInput(
"region",
label = "Select a European region",
choices = names(regions)
),
selectizeInput(
"country",
label = "Select a country",
choices = regions
),
actionButton(
"button",
label = "Update",
icon = icon("refresh")
)
)
server <- function(input, output, session) {
observe({
updateSelectizeInput(
inputId = "country",
choices = regions[input$region]
)
}) %>%
bindEvent(input$button)
}
shinyApp(ui, server)
```
:::
::: callout-note
#### Exercise 2.3
The (admittedly quite useless) Shiny app below implements two buttons, each of which adds 1 to either tab A or tab B. Right now, to see the result in either tab, you would need to manually click on the tabs. Change the app such that changing button A or B automatically opens the corresponding tab.
```{r, eval=FALSE}
ui <- fluidPage(
sidebarLayout(
id = "tabset_panel",
sidebarPanel(
actionButton("button_a", "Add to A"),
br(),
actionButton("button_b", "Add to B")
),
mainPanel(
tabsetPanel(
tabPanel(
title = "Tab A",
verbatimTextOutput("tab_a")
),
tabPanel(
title = "Tab B",
verbatimTextOutput("tab_b")
)
)
)
)
)
server <- function(input, output, session) {
output$tab_a <- renderPrint(as.vector(input$button_a))
output$tab_b <- renderPrint(as.vector(input$button_b))
}
shinyApp(ui, server)
```
:::
::: {.callout-tip collapse="true"}
The function that you need to update a tabset panel is called `updateTabsetPanel()`. It requires the ID assigned to `tabsetPanel()`.
While there are technically many ways to solve this task, the most obvious one at this point requires two observers. If you want to implement the solution using only a single observer, consider using super assignment (see `?"<<-"` or [here](https://adv-r.hadley.nz/environments.html#super-assignment--)).
:::
::: {.callout-warning collapse="true"}
#### Solution 2.3
In the server function, I add two observers. The first only triggers when `tab_a` is pressed, the second one when `tab_b` is pressed. Within each observer, the tabset panel is updated using `updateTabsetPanel()`. `inputId` takes `"tabset_panel"`, the ID assigned to `tabsetPanel()` in the UI. `selected` takes the label of the tab that should be selected.
It is also possible to implement a solution with only a single observer, but this is much trickier. The code chunk below implements such a solution using the super assignment operator `<<-`. Since reactive expressions are technically functions, you can use `<<-` to conveniently store non-reactive values in the session.
```{r, eval=FALSE}
ui <- fluidPage(
sidebarLayout(
sidebarPanel(
actionButton("button_a", "Add to A"),
br(),
actionButton("button_b", "Add to B")
),
mainPanel(
tabsetPanel(
id = "tabset_panel",
tabPanel(
title = "Tab A",
verbatimTextOutput("tab_a")
),
tabPanel(
title = "Tab B",
verbatimTextOutput("tab_b")
)
)
)
)
)
server <- function(input, output, session) {
output$tab_a <- renderPrint(as.vector(input$button_a))
output$tab_b <- renderPrint(as.vector(input$button_b))
observe({
updateTabsetPanel(inputId = "tabset_panel", selected = "Tab A")
}) %>%
bindEvent(input$button_a)
observe({
updateTabsetPanel(inputId = "tabset_panel", selected = "Tab B")
}) %>%
bindEvent(input$button_b)
}
shinyApp(ui, server)
```
```{r, eval=FALSE}
#| code-fold: true
#| code-summary: "Alternative solution"
ui <- fluidPage(
sidebarLayout(
sidebarPanel(
actionButton("button_a", "Add to A"),
br(),
actionButton("button_b", "Add to B")
),
mainPanel(
tabsetPanel(
id = "tabset_panel",
tabPanel(
title = "Tab A",
verbatimTextOutput("tab_a")
),
tabPanel(
title = "Tab B",
verbatimTextOutput("tab_b")
)
)