Calling the SAP Jam API from Python is not too complex, but it can get tricky. Hence this project that puts all the pieces together:
- Generating keys and registering them with SAP Jam.
- Generating SAML assertion documents.
- Signing the above as a SAML identity provider would.
- Submitting an assertion to the server and getting back an OAuth SAML bearer token.
- Authenticating API calls using the SAML bearer token.
We are using 2048-bit RSA keys, generated with openssl:
# generate private key
openssl genrsa -out jam-private.pem 2048

# export public X509 certificate
openssl req -new -x509 -key jam-private.pem -out jam-public.cer -days 3650
Or just run the generate_keys.sh script. Do this once and keep the files. You will need them when registering your OAuth application.
We'll do this in the "Jam Admin" area. We need two pieces: an OAuth application and a trusted SAML identity provider.
The OAuth Application is pretty straightforward. Register your domain and application URLs and don't set up an X509 certificate.

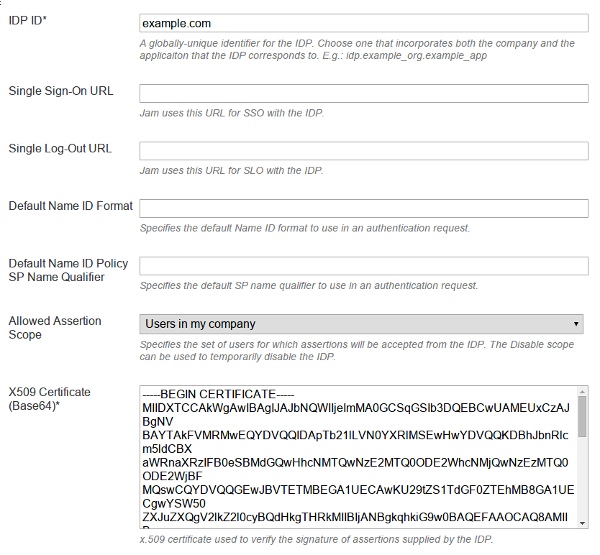
Then we register a SAML Identity Provider (IdP). Note the IDP ID, Allowed Assertion Scope and X509 certificate fields:
According to Wikipedia, the Security Assertion Markup Language (SAML) is an XML-based standard that lets different services handle authentication and authorization together. It is typically used to implement single sign-on (SSO) scenarios.
To use SAML with SAP Jam, you need to generate an assertion XML document describing the user you want to impersonate, yourself as the issuer, and some extra data such as validity periods. Now the full list:
- Issuer. Typically a domain name such as example.com. You must use the one you provided when you registered the trusted IdP in the Jam admin area.
- Subject. This is your user. SAML defines many ways to specify users, some allowing apps to use temporary opaque user ID's. We'll use the
urn:oasis:names:tc:SAML:1.1:nameid-format:emailAddressname ID format and just pass the user email address. - Validity. We set up the proper
SubjectConfirmationData,AuthStatement, andConditionselement with the correct authentication timestamp and andNotBeforeandNotOnOrAfterpoints in time. - OAuth client ID. We pass our OAuth application's client ID.
- Audience. Hardcoded to
cubetree.com.
Here is how our full XML generation template looks like:
<Assertion xmlns="urn:oasis:names:tc:SAML:2.0:assertion"
xmlns:ns2="http://www.w3.org/2000/09/xmldsig#"
xmlns:ns3="http://www.w3.org/2001/04/xmlenc#" ID="bo.ilic.test.idp"
IssueInstant="{issue_instant}" Version="2.0">
  <Issuer>{issuer}</Issuer>
  <Subject>
    <NameID Format="urn:oasis:names:tc:SAML:1.1:nameid-format:emailAddress">{user_id}</NameID>
    <SubjectConfirmation Method="urn:oasis:names:tc:SAML:2.0:cm:bearer">

      <SubjectConfirmationData NotOnOrAfter="{not_valid_after}"
        Recipient="{jam_root_url}/api/v1/auth/token" />
    </SubjectConfirmation>
  </Subject>
  <Conditions NotBefore="{not_valid_before}"
  NotOnOrAfter="2014-04-15T14:36:22.235Z">
    <AudienceRestriction>
      <Audience>{audience}</Audience>
    </AudienceRestriction>
  </Conditions>
  <AuthnStatement AuthnInstant="{auth_instant}"
  SessionIndex="mock_session_index">
    <AuthnContext>
      <AuthnContextClassRef>
      urn:oasis:names:tc:SAML:2.0:ac:classes:PasswordProtectedTransport</AuthnContextClassRef>
    </AuthnContext>
  </AuthnStatement>
  <AttributeStatement>
    <Attribute Name="client_id">
      <AttributeValue xmlns:xs="http://www.w3.org/2001/XMLSchema"
      xmlns:xsi="http://www.w3.org/2001/XMLSchema-instance"
      xsi:type="xs:string">{client_id}</AttributeValue>
    </Attribute>
  </AttributeStatement>
  <Signature xmlns="http://www.w3.org/2000/09/xmldsig#">
    <SignedInfo>
      <CanonicalizationMethod Algorithm="http://www.w3.org/TR/2001/REC-xml-c14n-20010315" />
      <SignatureMethod Algorithm="http://www.w3.org/2000/09/xmldsig#rsa-sha1" />
      <Reference URI="">
        <Transforms>
          <Transform Algorithm="http://www.w3.org/2000/09/xmldsig#enveloped-signature" />
        </Transforms>
        <DigestMethod Algorithm="http://www.w3.org/2000/09/xmldsig#sha1" />
        <DigestValue></DigestValue>
      </Reference>
    </SignedInfo>
    <SignatureValue/>
  </Signature>
</Assertion>You might have already noticed the <Signature> element in the assertion document above, and most importantly its <SignatureValue> child node. This is, well, where our signature has to go.
Signing text messages is easy - the message content has a single representation that can be used to compute the signature. Unfortunately, that is not the case with XML. For example, those two documents look different, yet are completely equivalent:
<user name="John" email="[email protected]" />and
<user
    email="[email protected]"
    name="John"></user>
To solve this problem we need a way to normalize or canonicalize XML documents that will guarantee that, when applied to the two documents above, will yield the same results for both of them. That will make it possible for us to sign XML documents and verify signatures. And, of course, there are such algorithms. For details, check Wikipedia's article on Canonical XML.
Implementing XML canonicalization isn't a simple task, but well, this is Python and most of the time people have already solved problems like that before. The trick is to get the xmlsec package off PyPI and use it to sign our assertions. To save you the trouble of figuring that one for yourself, I'll just give you the code:
def sign_assertion(xml_string, private_key):
    root = etree.fromstring(xml_string)

    signature_node = xmlsec.tree.find_node(root, xmlsec.Node.SIGNATURE)
    key = xmlsec.Key.from_file(private_key, xmlsec.KeyFormat.PEM)

    sign_context = xmlsec.SignatureContext()
    sign_context.key = key
    sign_context.sign(signature_node)

    return etree.tostring(root)
Note that the code above assumes your XML string already contains a <Signature> node.
Now that we have our assertion nicely signed, we need to pass it to the Jam server. We do that by base64-encoding the assertion document and getting rid of all whitespace, so that everything fits on a single line. We then issue a HTTP POST request to /api/v1/auth/token:
def request_token(self, assertion):
    encoded_assertion = re.sub(r'\s', '', assertion.encode('base64'))
    post_params = dict(
        client_id=self.client_id,
        client_secret=self.client_secret,
        grant_type="urn:ietf:params:oauth:grant-type:saml2-bearer",
        assertion=encoded_assertion,
    )

    token_url = self.url_for("/api/v1/auth/token")
    response = requests.post(token_url, data=post_params)
    response.raise_for_status()
    return response.json()['access_token']
Note the saml2-bearer grant type above and the client_id and client_secret values. Again, you'll get the last two from your registered OAuth application settings in the Jam admin:
Once you've gotten hold of the token, you can issue API requests, by passing the token in an Authorization header. Here's the code that does that:
headers["authorization"] = 'OAuth {}'.format(self.access_token)Note the mandatory 'OAuth' prefix!
Wrapping assertion generation, signing, and obtaining tokens in a simple JamSession class, we can now get our profile details, by issuing a HTTP GET request for /api/v1/members:
session = JamSession(server_url=JAM_URL,
                     issuer=JAM_IDP_DOMAIN,
                     private_key=JAM_SAML_PRIVATE_KEY,
                     client_id=JAM_OAUTH_CLIENT_ID,
                     client_secret=JAM_OAUTH_CLIENT_SECRET,
                     jam_access_email=JAM_EMAIL)
response = session.get('/api/v1/members')
pprint(response.json())
And here's the result we get back:
{u'assistant_ids': [],
 u'company-name': u'Ace',
 u'country_code': u'United States',
 u'created-at': 1378332130,
 u'current-status': {u'created-at': 1403259039,
                     u'id': 4452,
                     u'member-id': 98390,
                     u'source': u'Web',
                     u'status': u'<a href="dsasda">dsa</a>',
                     u'updated-at': 1403259039},
 u'direct_report_ids': [],
 u'email-addresses': [{u'address': u'[email protected]',
                       u'location': u'Primary'}],
 u'first-name': u'Admin',
 u'handle': u'admin',
 u'id': 98390,
...
}Things of interest in the project dir:
- requirements.txt to set up your virtualenv.
- generate_keys.sh to, well, generate RSA keys.
- jam_saml.py generates and signs SAML assertions.
- sap_jam.py authenticates and makes requests to the Jam API.
- get_jam_member.py makes a sample API call that retrieves member details.