Akeneo is a popular PIM used by several organizations to store, manage and enrich the information about their products.
With this integration between ImageKit and Akeneo, you can access the images, and other non-media files (PDFs, docs, etc.) stored in your PIM and deliver optimized and transformed versions of them in real-time.
ImageKit supports three kinds of media files from Akeneo.
{% hint style="info" %} ImageKit does not copy files from your PIM to its Media Library. Like all other external storage integrations, this integration accesses Akeneo on-demand when you request a file through ImageKit, and the file is unavailable in the cache. {% endhint %}
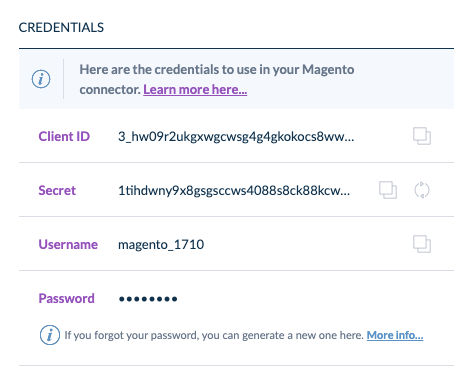
We need to create a connection in Akeneo that will give us values for client ID, secret, username and password. These values will then be used to connect Akeneo to ImageKit. You can find the latest instructions for creating a connection in different versions of Akeneo on their official documentation.
- The flow type will be "Destination connection" flow (data is flowing out of Akeneo).
- Ensure that you set the appropriate permissions for this connection as defined here. ImageKit only needs access to be able to get your media files, and to generate the necessary authentication token for the same.
Once the connection is created, you can copy the credentials generated. The password is only shown once to you after the connection creation. So, make sure you save it somewhere.
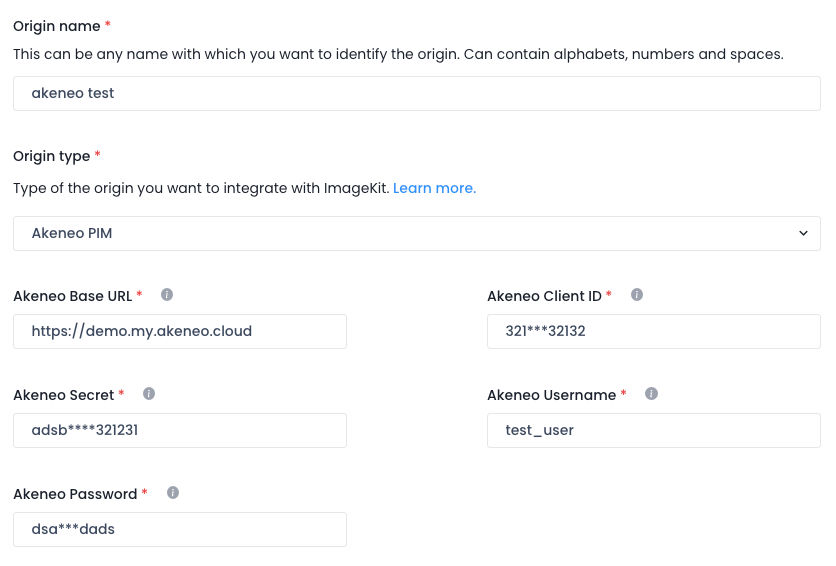
Use the credentials generated in step 1 to add an external storage of type "Akeneo PIM" in the ImageKit dashboard.
- Go to the external storage section in your ImageKit.io dashboard, and under the Origins section, click on the "Add origin" button.
- Choose Akeneo PIM from the origin type dropdown.
- Give your origin a name, it will appear in the list of origins you have added. For example - My Akeneo PIM.
- Provide the Base URL or the endpoint of the Akeneo PIM instance you want to access. Add the other credential values in the corresponding fields.
- Leave the advanced options as it is for now.
- Click on the Submit button.
When you add your first origin in the dashboard, the origin is by default made accessible through the default URL-endpoint of your ImageKit.io account. For subsequent origins, you can either create a separate URL-endpoint or edit the existing URL-endpoint (including default) and make this newly added origin accessible by editing the origin preference list.
Every media file in Akeneo has a data or a code value that looks like this f/d/1/d/fd1d_myimagefilename.png. To access a file, you need to create a URL using this data or code value, along with the media file type (media-file, asset-media-file, or reference-entities-media-file) and the URL endpoint. For example, for the above code, you can access the file as shown below.
- If it is a product media file
https://ik.imagekit.io/your_imagekit_id/media-files/f/d/1/d/fd1d_myimagefilename.png - If it is an asset media file
https://ik.imagekit.io/your_imagekit_id/asset-media-files/f/d/1/d/fd1d_myimagefilename.png - If it is a reference entity media file
https://ik.imagekit.io/your_imagekit_id/reference-entities-media-files/f/d/1/d/fd1d_myimagefilename.png
For any of the three media types above, you can transform them by adding the transformation string like you would usually do for any other image origin.
- Transforming an image to 300 x 200 dimension
https://ik.imagekit.io/your_imagekit_id/tr:w-300,h-200/media-files/f/d/1/d/fd1d_myimagefilename.png
{% tabs %} {% tab title="URL structure" %}
            URL-endpoint                transformation  media type     data or code
┌─────────────────────────────────────┐┌─────────────┐┌───────────┐┌───────────────────┐
https://ik.imagekit.io/your_imagekit_id/tr:w-300,h-300/media-files/rest-of-the-path.jpg
{% endtab %} {% endtabs %}
If you get a "Not found" error while accessing the image, check out this troubleshooting guide.
{% hint style="info" %} :man_mage:Tips: You can also use a custom domain like images.example.com. {% endhint %}
Now start using ImageKit.io URL endpoint in your application to accelerate image loading.
Get started with our quick start guides and SDKs:
{% content-ref url="../../getting-started/quickstart-guides/" %} quickstart-guides {% endcontent-ref %}
{% content-ref url="../../api-reference/api-introduction/sdk.md" %} sdk.md {% endcontent-ref %}
Learn about real-time image resizing:
{% content-ref url="../../features/image-transformations/" %} image-transformations {% endcontent-ref %}
When enabled, the image response contains a Link header with the appropriate URL and rel=canonical. You will have to specify the base URL for the canonical header.
For example, if you set https://www.example.com as the base URL for canonical header, then the image response for URL https://ik.imagekit.io/your_imagekit_id/rest-of-the-path.jpg will have a Link header like this:
Link: <https://www.example.com/rest-of-the-path.jpg>; rel="canonical"
