In this and the next several sessions, we'll build a project management app with an Ember frontend and Rails API backend.
Tools we'll be using:
- ember-cli (website, github)
- rails-api
- ActiveModel serializers
-
Day 1:
- Overview of Ember
- Get setup
- Backend:
- Overview of APIs and JSON
- Add project model, serializer, controller with index & show actions, routes
- Frontend:
- Overview of Ember
- Add projects index page
- On your own: Add projects show page
-
Day 2:
- Adding a project
- Display tasks on project show page
-
Day 3:
- Adding a task
- Marking a task complete
-
Day 4:
- Testing?
[Maybe we give them acceptance and controller tests for the projects CRUD actions.]
# make sure Homebrew is up to date
brew update

# install node via Homebrew
# (this also installs npm, the node package manager,
# which we will use to install other tools we need)
brew install node

# install watchman
brew install watchman

# install bower
npm install -g bower

# install ember-cli
npm install -g ember-cli

# install rails-api gem
gem install rails-api
To start our app, we need to generate both a rails-api app and an ember app inside our app's top-level directory. Since we'll work on the Rails side first, let's start out by adding a new rails-api app:
-
Create the top-level app directory:
mkdir project-planner cd project-planner -
Create the rails-api app using Postgres. Rename it
backend/.rails-api new project-planner -T --database=postgresql mv project-planner backend -
Initialize a git repo in your top-level app directory:
git init git add -A git commit -m "Initial commit." -
Create your database:
cd backend
rake db:create
-
Add
active_model_serializersgem and testing and debugging gems, run RSpec generator, and bundle. Commit your changes. Make sure to specify version 0.8.3 for active_model_serializers if you're using Rails 4.2! (which you should be).# Gemfile gem 'active_model_serializers', '0.8.3' group :test do gem 'shoulda-matchers', require: false end group :development, :test do gem 'factory_girl_rails' gem 'faker' gem 'pry-rails' gem 'rspec-rails', '~> 3.0.0' end
bundle install rails g rspec:install -
Add
shoulda-matchersto yourspec/rails_helper.rbfile.require 'rspec/rails' require 'shoulda/matchers'
-
Commit your changes.
git add -A
git commit -m "Add active_model_serializers, debugging and testing gems."
NOTE: Make sure you're inside of your
backend/directory when runningbundle,rails server, and other rails commands.
Start your rails server and navigate to localhost:3000. You should see the standard Rails welcome page.
[Eric's sweet slides. Build index & show actions for projects.]
[More Eric keynoting.]
Now that we have a Rails API to serve up projects information, we can start building out our frontend.
Make sure you're in your top-level app directory.
-
Create the Ember app inside your app directory. Rename it
frontend/.ember new project-planner --skip-git mv project-planner frontend -
Test out that your app is running by running the rails server and the ember server in separate terminal shells.
Start the Rails server in one shell:
cd backend
rails server
Start the Ember server in the second shell:
cd frontend
ember server --proxy http://localhost:3000
Your Ember app should now be running on port 4200, and will send any requests for data to our Rails server. Navigating to localhost:4200, you should see the message "Welcome to Ember.js".
Before we move on, let's tell our Ember app that it'll be using the ActiveModel adapter [ERIC TALK ABOUT THIS], and that all of its requests to our Rails app should be namespaced to api/v1. This means that navigating to localhost:4200/projects will make a GET request to localhost:3000/api/v1/projects instead of localhost:3000/projects, for example.
- Create a file called
frontend/app/adapters/application.jsand add the following:
import DS from 'ember-data';

export default DS.ActiveModelAdapter.extend({
  namespace: 'api/v1'
});
NOTE: You'll need to create the
frontend/app/adapters/directory.
When we navigate to localhost:4200/projects, the first thing Ember will do is to look for a corresponding entry in the router. Let's add that:
// frontend/app/router.js

Router.map(function() {
  // add these lines
  this.resource('projects', function() {
    // generates an entry for projects index for you
  });
});
This is kind of like adding
resources :projects, only: :indexin your Rails app'sroutes.rbfile.
Once it finds the right entry in the router, it will look for a route matching that entry. (Yes, this is confusing. In Ember, there's a router and there are routes and they are different things. The job of the router is to map browser requests to routes in our app. The primary job of each route is to grab the data from the Rails API that we will need for the /projects page.)
Let's add that route:
$ ember g route projects/index
version: 0.1.7
installing
  create app/routes/projects/index.js
  create app/templates/projects/index.hbs
installing
  create tests/unit/routes/projects/index-test.js
As you can see, this command generated a route at frontend/app/routes/projects/index.js, as well as a template that will be rendered when we navigate to localhost:4200/projects and a test file taht we won't worry about right now.
For our route to retrieve the projects data we need, we'll need to add a model hook:
// frontend/app/routes/projects/index.js

import Ember from 'ember';

export default Ember.Route.extend({
  // add these lines
  model: function() {
    return this.store.find('project');
  }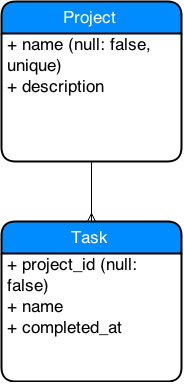
});For the model hook in our route to work, we need a project model in our Ember app that mirrors the Project model in our Rails app:
$ ember g model project
version: 0.1.7
installing
  create app/models/project.js
installing
  create tests/unit/models/project-test.js
This generated a basic project model without any attributes. We need to set the right attributes on our project model so that we can access them in our template later.
// frontend/app/models/project.js

import DS from 'ember-data';

export default DS.Model.extend({
  // add these two lines:
  name: DS.attr('string'),
  description: DS.attr('string')
});Almost done. All we need to do now is modify the template that was created when we ran ember g route projects/index so that it's displaying the correct information.
Currently, it looks like this:
// frontend/app/templates/projects/index.hbs

{{outlet}}
Let's replace that {{outlet}} with the following:
// frontend/app/templates/projects/index.hbs

<h3>All Projects</h3>

<ul>
  {{#each project in model}}
    <li>{{project.name}}</li>
  {{/each}}
</ul>
This looks kind of like
erb, right?modelis essentially an array of project objects, and we're iterating over that array using the Handlebarseachhelper to create list items for each project. Handlebars provides other helpers, likelink-to, that we'll use later.
Navigate to localhost:4200/projects and you should see a nice list of the projects in our database.
Chrome has an awesome extension called Ember Inspector that will be super useful for debugging your ember apps. Add it to your browser. Now if you open your JavaScript console using cmd + alt + J, you should see a tab called "Ember":

There's a whole bunch of cool stuff in here, but for now just check to see that your projects have been loaded by selecting the "Data" option on the left and clicking on "projects" under "Model Types". You should see a list of all your projects on the right. Clicking on "Routes" will show you all of the routes in your app. It's kind of like Ember's equivalent of rake routes. You should see an entry for the route you just added, projects.index.
To add a project show page, we have to go through more or less the same steps we did for the index page, except we don't need to generate the project model.
Let's start by adding links to the project show pages on our project index page using Handlebars' link-to helper:
// frontend/app/templates/projects/index.hbs


<h3>All Projects</h3>

<ul>
  {{#each project in model}}
    <li>{{link-to project.name 'projects.show' project}}</li>
  {{/each}}
</ul>// frontend/app/router.js
Router.map(function() {
this.resource('projects', function(){
// add this line
this.route('show', {path: ':id'});
});
});$ ember g route projects/show
version: 0.1.7
installing
create app/routes/projects/show.js
create app/templates/projects/show.hbs
installing
create tests/unit/routes/projects/show-test.js
Now we need to add a model hook to our route. This one will be slightly different from our index routes's model hook, in that it will need to know the id of the specific project. We can specify the project's id by passing params to our model function and passing a second argument, params.id, to our find function call:
// frontend/app/routes/projects/show.js

import Ember from 'ember';

export default Ember.Route.extend({
  // add these lines
  model: function(params) {
    return this.store.find('project', params.id);
  }
});Update the show.hbs template to display the project's name and description. You can access the project model's attributes by simply calling the attribute name inside of Handlebars moustaches:
{{name}}// frontend/app/templates/projects/show.hbs
<h3>{{name}}</h3>
<div id="description">
Description: {{description}}
</div>Test it out in your browser and make sure you can navigate from the projects index page to a project's show page.