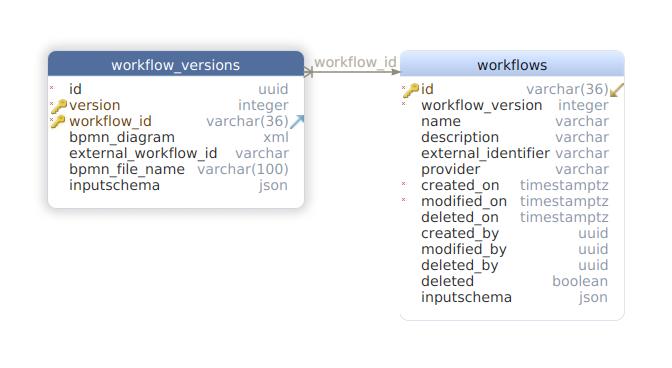
A Loopback Microservice for handling BPMN workflows using engines like Camunda. NOTE: The microservice currently works with only one workflow definition for a single diagram. It provides -
- Deployment and management of Workflows in a BPMN engine.
- Process Versioning.
- Executing Workflow using an endpoint, validate inputs before starting an execution.
The sandbox example provides a use of this microservice with the Camunda BPMN engine.
It uses camunda-external-task-client-js to implement external task workers, that are triggered on executing a workflow. The flow of control is shown in the diagram below -
npm i @sourceloop/bpmn-service- Create a new Loopback4 Application (If you don't have one already)
lb4 testapp - Install the bpmn service
npm i @sourceloop/bpmn-service - Set the environment variables.
- Run the migrations.
- Bind the BPMN Config to
WorkflowServiceBindings.Configkey-this.bind(WorkflowServiceBindings.Config).to({ useCustomSequence: true, workflowEngineBaseUrl: process.env.CAMUNDA_URL, // url for the rest engine in case of Camunda });
- Implement
WorkflowProvider(refer this) and bind it toWorkflowServiceBindings.WorkflowManagerkey -this.bind(WorkflowServiceBindings.WorkflowManager).toProvider( WorkflowProvider, );
- Add the
WorkflowServiceComponentto your Loopback4 Application (inapplication.ts).// import WorkflowServiceComponent import {WorkflowServiceComponent} from '@sourceloop/bpmn-service'; // add Component for WorkflowService this.component(WorkflowServiceComponent);
- Set up a Loopback4 Datasource with
dataSourceNameproperty set toWorkflowCacheSourceName. You can see an example datasource here. - Start the application
npm start
Here is a sample Implementation DataSource implementation using environment variables and PostgreSQL as the data source.
import {inject, lifeCycleObserver, LifeCycleObserver} from '@loopback/core';
import {juggler} from '@loopback/repository';
import {WorkflowCacheSourceName} from '../types';

const config = {
  name: WorkflowCacheSourceName,
  connector: 'postgresql',
  host: process.env.DB_HOST,
  port: process.env.DB_PORT,
  user: process.env.DB_USER,
  password: process.env.DB_PASSWORD,
  database: process.env.DB_DATABASE,
  schema: process.env.DB_SCHEMA,
};

@lifeCycleObserver('datasource')
export class BpmnDbDataSource
  extends juggler.DataSource
  implements LifeCycleObserver
{
  static dataSourceName = WorkflowCacheSourceName;
  static readonly defaultConfig = config;

  constructor(
    @inject('datasources.config.BpmnDb', {optional: true})
    dsConfig: object = config,
  ) {
    super(dsConfig);
  }
}The service comes with a default DataSource using PostgreSQL, if you intend to use this, you have to provide the following variables in the environment -
| Name | Required | Default Value | Description |
|---|---|---|---|
DB_HOST |
Y | Hostname for the database server. | |
DB_PORT |
Y | Port for the database server. | |
DB_USER |
Y | User for the database. | |
DB_PASSWORD |
Y | Password for the database user. | |
DB_DATABASE |
Y | Database to connect to on the database server. | |
DB_SCHEMA |
Y | Database schema used for the data source. In PostgreSQL, this will be public unless a schema is made explicitly for the service. |
A sample implementation of a DataSource using environment variables and PostgreSQL is included with the service, you can provide your own using the BpmnDbSourceName variable. Implementation of the sample DataSource can be seen here.
To use the services, you need to implement a provider and bind it to the BPMNBindings.BPMNProvider key. The provider returns a value containing the 5 methods - getWorkflowById, startWorkflow, createWorkflow, updateWorkflow and deleteWorkflowById. These methods are responsible for performing their respective tasks in the workflow engine. Here is the default implementation of this provider -
import {bind, /* inject, */ BindingScope, Provider} from '@loopback/core';
import {HttpErrors} from '@loopback/rest';
import {WorflowManager} from '../types';

@bind({scope: BindingScope.TRANSIENT})
export class WorkflowProvider implements Provider<WorflowManager> {
  value() {
    return {
      getWorkflowById: async () => {
        throw new HttpErrors.BadRequest(
          'getWorkflowId function not implemented',
        );
      },
      startWorkflow: async () => {
        throw new HttpErrors.BadRequest(
          'startWorkflow function not implemented',
        );
      },
      createWorkflow: async () => {
        throw new HttpErrors.BadRequest(
          'createWorkflow function not implemented',
        );
      },
      updateWorkflow: async () => {
        throw new HttpErrors.BadRequest(
          'updateWorkflow function not implemented',
        );
      },
      deleteWorkflowById: async () => {
        throw new HttpErrors.BadRequest(
          'deleteWorkflowById function not implemented',
        );
      },
    };
  }
}Your workers are automatically initiated once a workflow is executed, to provide the implementation details of workers, you need to give an implementation template of one such worker using the WorkflowServiceBindings.WorkerImplementationFunction, a default implementation is provided here. You also need to register individual worker commands using the WorkflowServiceBindings.RegisterWorkerFunction function;
If you need to validate the inputs of a workflow execution, you can bind a custom validation provider using WorkflowServiceBindings.ExecutionInputValidatorFn key. The microservice comes with a default implementation using AJV.
The migrations required for this service are processed during the installation automatically if you set the WORKFLOW_MIGRATION or SOURCELOOP_MIGRATION env variable. The migrations use db-migrate with db-migrate-pg driver for migrations, so you will have to install these packages to use auto-migration. Please note that if you are using some pre-existing migrations or databases, they may be affected. In such a scenario, it is advised that you copy the migration files in your project root, using the WORKFLOW_MIGRATION_COPY or SOURCELOOP_MIGRATION_COPY env variables. You can customize or cherry-pick the migrations in the copied files according to your specific requirements and then apply them to the DB.
This project includes no migrations to seed your BPMN engine. If you are using Camunda BPM Run, you can use either the resources folder to seed a model, or you can config it to use a custom DB where you can seed your data. The steps to config Platform Run are given here.
Authorization: Bearer where is a JWT token signed using JWT issuer and secret.
Content-Type: application/json in the response and in request if the API method is NOT GET
{version}: Defines the API Version
200: Successful Response. Response body varies w.r.t API 401: Unauthorized: The JWT token is missing or invalid 403: Forbidden : Not allowed to execute the concerned API 404: Entity Not Found 400: Bad Request (Error message varies w.r.t API) 201: No content: Empty Response
Visit the OpenAPI spec docs
-@2x.png)


