| description |
|---|
Enable and configure Omnichannel |
Omnichannel adds the ability to receive conversations from a pop-up Live Chat support on your website or your business Facebook chat or any other media directly in Rocket.chat.
Enabling and using Rocket.Chat Omnichannel gives seamless, effortless and high-quality customer experiences all within a defined channel on your Rocket.Chat workspace.
To enable the Omnichannel feature on your Rocket.Chat instance:
Go to Administration > Workspace > Settings > Omnichannel
Please enable it.
Now the admin will have access to Omnichannel Panel Settings through a new menu called Omnichannel, as shown below:
- Enable Omnichannel on your Rocket.Chat instance
- Enable/Disable request comment from the agent when closing a conversation
- Enable/Disable acceptance of new Omnichannel requests when the agent is idle
- Enable/Disable continuous sound notification for new Omnichannel room/conversation
- Enable/Disable file uploads in the Live Chat widget
- Enable/Disable asking the visitor if they would like a transcript of the conversation.
- Enter the message to show when asking for a transcript.
The feature turns on the Omnichannel toggle for the set business hours automatically. And you will be able to receive Omnichannel conversations after. The toggle will be turned off during off-hours. The enterprise workspaces can set up multiple business hours according to different time zones and their business needs. Community workspaces can only set up one set of business hours.
- Enable business hours
- Choose multiple business hours according to your enterprise needs
Please follow the steps given here.
If you have an app that you want to integrate with Rocket.Chat and use that app to embed an iFrame in Rocket.Chat to interact with your CRM. You can do so using External Frame.
- Enable external frame
- Add the URL of your external frame
- Enter the encryption key, as shown below:
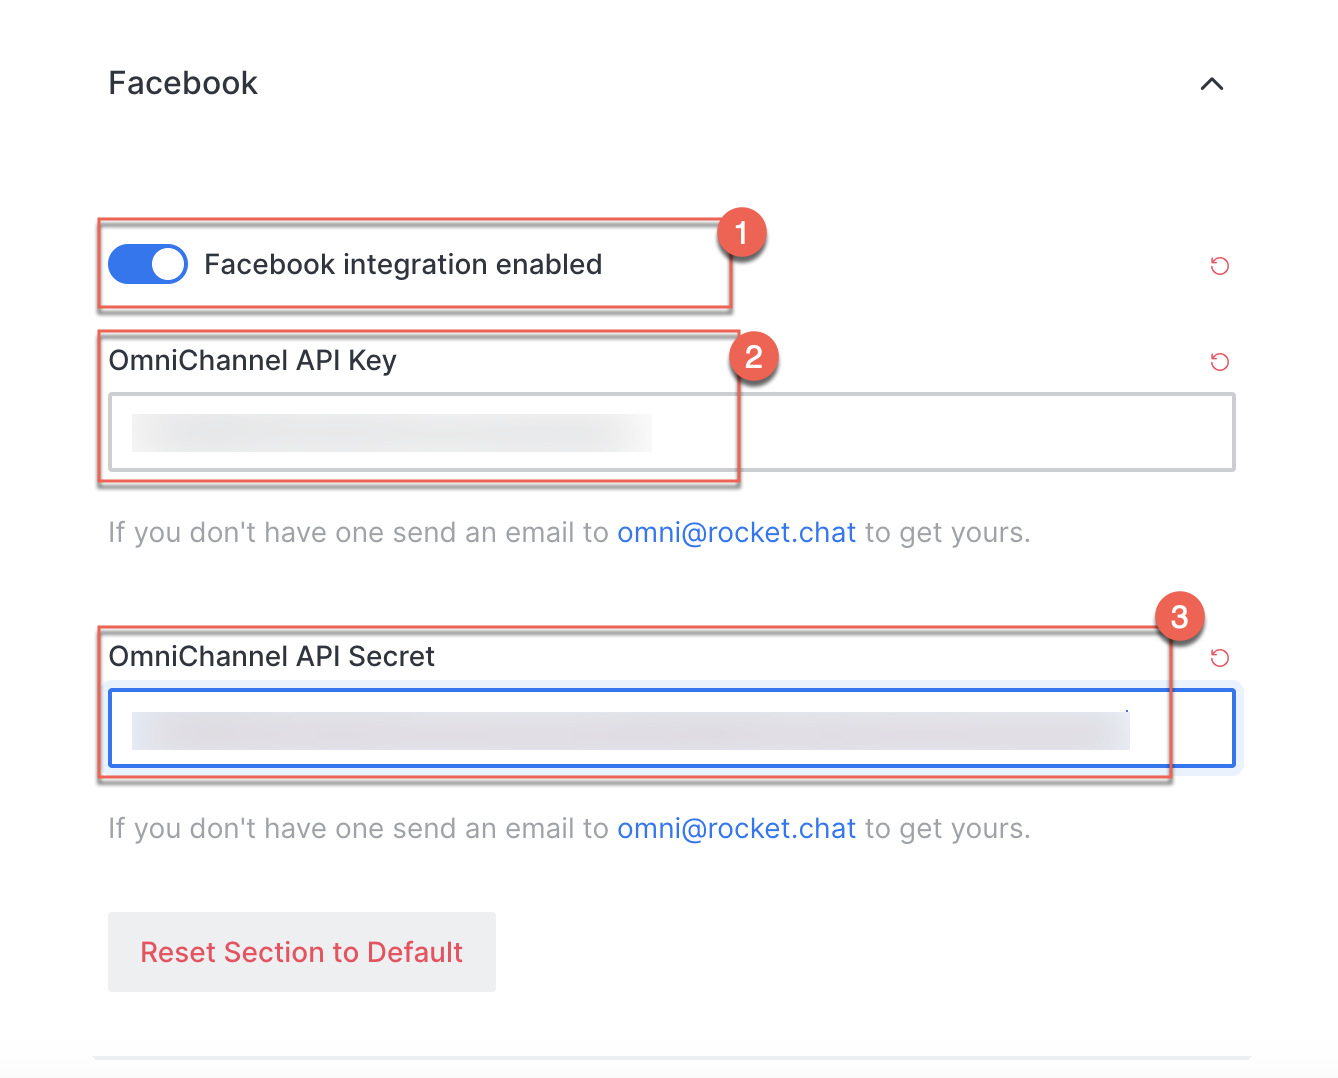
If your organization wishes to communicate with users of Facebook, you can enable integration within Rocket.Chat to do so.
First, you will need to request an API key from Rocket.Chat Support then set it up within your Administration area.
Send an email to [email protected] to request an API key. These are processed as time allows, and may take a few days, but you should have your key and secret soon enough.
- Enable Facebook integration
- Enter your OmniChannel API Key
- Enter OmniChannel API Secret. Save the changes
If you are a GDPR compliant company and want to allow your visitors to request to remove their data, Rocket.chat allows you to do that for all your incoming chats, as shown below:
- Set the title of your widget
- Set the color of the title bar of your widget
- Enable message character limit
- Set the allowed message character length
- Display offline form
- Validate email address
as shown below:
Now customize the appears of your Live Chat widget here for the hours when none of your agents are online/working.
- Set Offline Form Unavailable Message, if any
- Set Offline Tittle
- Set title bar Color for the offline widget
- Give instructions, if any
- Set the email address where you want to receive your offline messages
- Set success message to display to the visitor when they have sent their message offline
as shown below:
Some more settings that you can customize according to your needs are shown below:
This is a CRM integration with RD Station.
We set up your token, and when a new Live Chat conversation starts, your visitor information is sent to the RD station.
Routing allows you to define the behavior of your Live Chat queues.
Detail of every setting is listed below:
- Select your preferred routing method (Please refer to this article for information on types of routing methods used in rocket chat)
- Enable acceptance of incoming Omnichannel requests even if there are no online agents if you want
- Enable if you want the routing system to attempt to find a bot agent before addressing new conversations to a human agent
- Set the limit of Max number of items displayed in the queue if you want
- Enable if you want to show the Live Chat queue to all the agents
- Mention your External Queue Service URL if your Omnichannel Routing Method is External Service
- Enter Secret Token
- Enable the Waiting queue if you want
- Enter the max. number of simultaneous chats that you want your agents to attend
- The Number of recent chats to calculate estimated wait time defines the number of last served rooms that will be used to calculate queue wait times
- Enable The Last-Chatted Agent Prefered setting allocates chats to the agent who previously interacted with the same visitor if the agent is available when the chat starts
Sessions allow you to decide how you want to handle your chat sessions when an agent goes offline:
- You can either forward the chat to another agent, close it or do nothing
- Mention the amount of time in seconds that you want to wait before you want to consider that the agent has abandoned the chat
- Enter the message to display to the visitor on closing the session
- Mention the time you want to wait to consider visitor abandonment
- Enable automatic closing of rooms abandoned by the visitor if you want
- Enter the message to display to the visitor when the room is automatically closed by visitor inactivity
As shown below:
Make Jitsi, your Omnichannel call provider by going to Administration > Workspace > Setting > Omnichannel > Video and Audio Call > Call Provider > Jitsi
.png)
.png)
.png)
.png)

%20(1).png)
.png)
.png)
.png)
.png)
.png)
.png)