Be sure to follow the pre-requisites guidance in the this document: PREREQUISITES.md
This step entails the deployment of the Azure SQL database, an Azure Data Factory for ingesting inputs, a Machine Learning batch processingenvironment, and reporting functionality. Please follow these steps for
- Make sure that URL used in above button is URL Encoded. This is the only raw git URL that needs to be encoded.
- free encooding website https://www.urlencoder.org/
This step entails the deployment of the IotHub "Simulator" resources; namely an IotHub with (4) devices, along with supporting Azure Functions, Logic Apps and an Azure Stream Anlytics job - which all work together to produce simulated temperature and HVAC cooling information readings for a representative "Smart Space".
This deployment step relies on the Azure SQL Database that was provisioned in Step #1 above.
Please make sure to review and confirm the Azure SQL database name and associated credentials are correctly specified in the #2 deployment script.
You can confirm these settings by retrieving the following Key Valut Secret: sqlConnectString Once you have displayed and copied this value, you can paste the contents into your favorite editor (or notepad) and then look for the following properties in the SQL Connection string:
- Server=
- Database=
- Uid=
- Pwd=
You will need these values for the steps below.
Click the link below to automatically navigate to the Azure Custom deployment template editor:
Once in the Azure Custom deployment template editor:
- Click on the EDIT TEMPLATE icon
- Click to expand the VARIABLES section of the deployment.
- SCROLL down to the "serverName" variable.
- UPDATE THE VALUES FOR THE BELOW VARIABLES:
- "serverName": "",
- "sqlDBName": "",
- "administratorLogin": "",
- "administratorLoginPassword": "",
Now you can complete the deployment by selecting the appropriate deployment settings for your Azure environment.
Note: The resources that are provisioned in this script should be deployed into the SAME resource group as Step #1 above.
- When done - click on "Review + create" icon in the lower left of the web form.
- Next, the script will display the status "Running final validation".
- Next, you will see a message displayed " You will need to Agree to the terms of service below to create this resource successfully."
- Click on the "Create" icon and the deployment process will begin.
- This script will then automatically deploy the following Azure resources into your Azure subscription:
- (1) IoT Hub
- (1) IoT Hub - Managed Identity
- (1) Script Container
- (1) Deployment script
- (4) TOTHub Devices
- (3) App Service Plans
- (3) Application Insights
- (3) Azure Functions
- (6) Logic Apps
- (1) Stream Analytics job
- Please wait for the previous step to complete before running this next step.
- This step entails navigating to the Azure Portal in a web browser, and then clicking on the "Cloud Shell" icon in the upper right-hand corner or the Azure Portal screen.
Below is an image of the "cloud Shell" in the navigation bar:
-
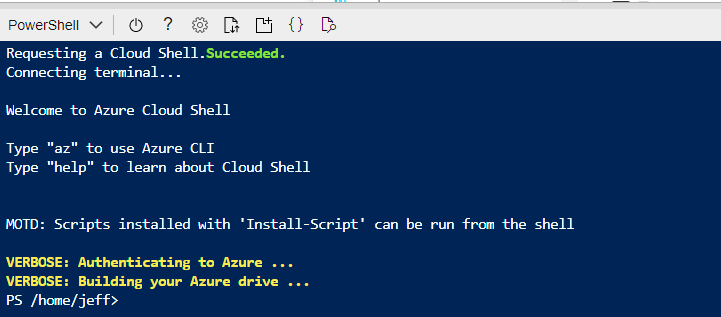
Once you click on the "cloud Shell " icon, the screen will split - and you will see a blue screen in the bottom portion of the Azure Portal web page
-
Below is an image of the "cloud Shell" after it has been opened in the Azure Portal:
-
The next step is to load the following text into your favorite text editor: https://raw.githubusercontent.com/MSUSSolutionAccelerators/Smart-Spaces-Sustainability-Solution-Accelerator/main/scripts/IOTHub_CLI_SCRIPT.txt
-
Next, modify the variables below to match YOUR azure environment. (These variables can be found at the top of the script):
- $IOTHubName = 'accelIoTHub'
- $RGP = 'Accel-Smart-Spaces'
- $KVName = "keyVaultxyz"
- $FuncHVACName = "Accel-Smart-Spaces-FuncSMARTSPACE-HVAC"
- $FuncSmartSpaceName = "Accel-Smart-Spaces-FuncSMARTSPACE"
-
Then COPY the updated script and PASTE the contents into the Azure Portal CLOUD SHELL Window (in BLUE).
-
Press the ENTER Key.
-
The script should start running and will perform the following steps: (1) Initialize IOTHub Device Twin Properties for (4) Devices. (2) Retrieve IOTHub Connection Strings (3) Retrieve IOTHub Device Connection Strings (4) SET Key Vault Secrets (5) GET URI's of Key Vault Secrets (6) SET Key Vault URI Variables (7) CREATE / UPDATE FUNCTION APP SETTINGS (8) Get Function App Principal ID + App Id (9) Set Key Vault Access Policy - so secrets can be read from Azure Function App
To confirm a successful deployment, perform the following Steps:
This step will confirm the IOTHub deployment and coresponding simulation functionality.
- Download/Open the POSTMan DESKTOP Tool : https://www.postman.com/
- Navigate to your installation of the Azure Function App named: Accel-Smart-Spaces-FuncSMARTSPACE-HVAC
- On the left-hand navigation menu, click on the "Functions" icon.
- Click on the NAME of the deployed function. It should be named "FuncSMARTSPACE-HVAC".
- Once loaded, Click on the "Get Function Url" icon.
- Click on the "Copy to clipboard" LINK.
- PASTE the Azure Function URL into the POSTMan tool URL address bar.
- Select "POST" as the HTTP Operation.
- Enter the following JSON string as the RAW BODY Contents: {"DeviceID":"smartspace-HVAC01-iotdevice"}
- Click "SEND" in the POSTMan tool and wait for a response.
A successful HTTP reponse message would be "200 OK".
This step will confirm the "back-end" deployment, the "front-end" IOTHub deployment, and all the corresponding simulation functionality.
- Download/Open the SQL Server Management Studio (SSMS) Tool: https://docs.microsoft.com/en-us/sql/ssms/download-sql-server-management-studio-ssms?view=sql-server-ver16
- CONNECT to your newly installed Azure SQL Server Database instance: Server Type: Database Engine Server Name: .database.windows.net Login: Password:
- RIGHT-CLICK on the table: [dbo].[HVACUnitIntermediate] and select "Select top 1000 rows".
- A new Query window will open and display the query results.
- You may wish to add the following SQL to the end of the query to see the most current records: ORDER BY [DateTimeUTC] DESC
A successful deployment will display newly added records to the Azure SQL table -> [dbo].[HVACUnitIntermediate]

