

简体中文 | English
Intel Distribution OpenVINO™ tool kit is developed based on the oneAPI, which can accelerate the development speed of high-performance computer vision and deep learning visual applications. It is suitable for various Intel platforms from the edge to the cloud, helping users deploy more accurate real-world results into production systems faster. By simplifying the development workflow, OpenVINO ™ Enable developers to deploy high-performance applications and algorithms in the real world.
C# is a secure, stable, simple, and elegant object-oriented programming language derived from C and C++. C# combines the simple visual operations of VB with the high running efficiency of C++, making it the preferred language for. NET development with its powerful operational capabilities, elegant syntax style, innovative language features, and convenient support for component oriented programming. However, OpenVINO™ No C# language interface provided, which is beneficial for using OpenVINO™ in C # This has caused a lot of trouble. In our previous work, we launched OpenVinoSharp to promote OpenVino™ The application in the C # field has been successfully implemented and used on the Window platform. In this article, we will introduce how to implement OpenVinoSharp on an AIxBoard development board based on a Linux system.
The code used in the project has been uploaded to the OpenVinoSharp repository, and the GitHub website is:
https://github.com/guojin-yan/OpenVINOSharp/blob/openvinosharp3.0/tutorial_examples/AlxBoard_deploy_yolov8/Program.cs
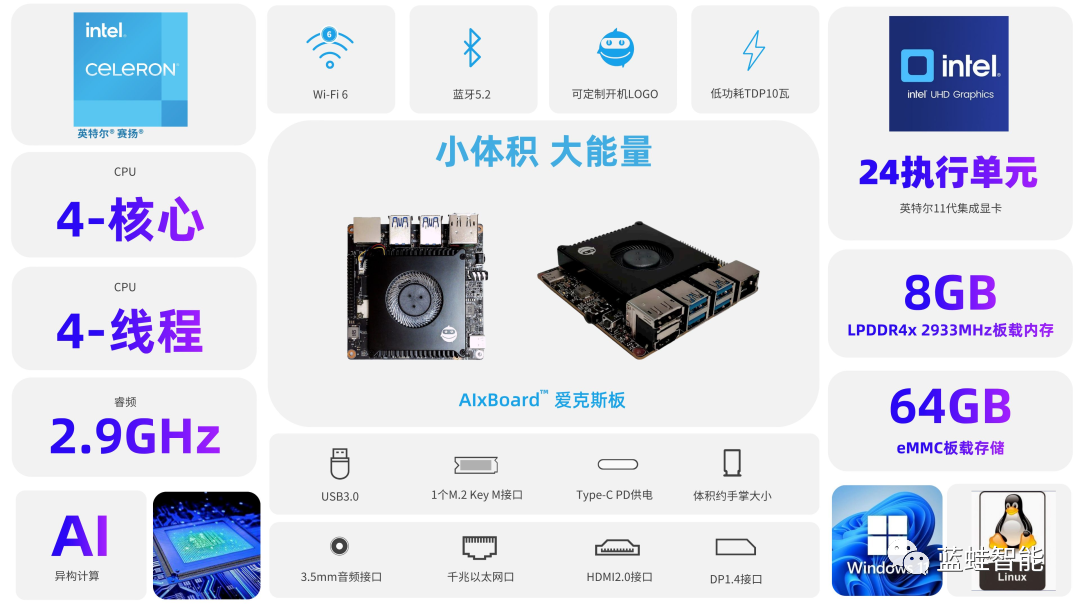
AIxBoard is a member of the official Intel Development Suite series, designed specifically for entry-level artificial intelligence applications and edge intelligence devices. The Aix board can perfectly surpass different application scenarios such as artificial intelligence learning, development, practical training, and application. This suite comes pre installed with Intel OpenVINO ™ Tool kits, model repositories, and demonstration cases make it easy and fast for you to start application development
The main interface of the kit is compatible with the Jetson Nano board, GPIO is compatible with Raspberry Pi, and can maximize the reuse of mature ecological resources. This enables the suite to serve as a edge computing engine, providing strong support for AI product verification and development; At the same time, it can also serve as the core of domain control, providing technical support for the development of robot products.
Using the AIxBoard development kit, you will be able to build an excellent artificial intelligence application in a short period of time. Whether used in scientific research, education, or business fields, Aikesban can provide you with good support. With OpenVINO ™ The tool kit, CPU, and iGPU all have strong AI inference capabilities, supporting parallel operation of multiple neural networks in applications such as image classification, object detection, segmentation, and speech processing.
| Master Control | Intel Celeron N5105 2.0-2.9GHz (formerly Jasper Lake) |
|---|---|
| Memory | LPDDR4x 2933MHz, 4GB/6GB/8GB |
| Storage | 64GB eMMC |
| Storage Expansion | 1个M.2 Key-M 2242 expansion slot, supports SATA&NVME protocol |
| BIOS | AMI UEFI BIOS |
| System | Ubuntu20.04 LTS |
| Winodws 10/11 |
With the help of OpenVINO tool, it is possible to achieve CPU+iGPU heterogeneous computing inference, with an IGPU computing power of approximately 0.6 TOPS.
| CPU | INT8/FP16/FP32 |
|---|---|
| iGPU | INT8/FP16 0.6TOPS |
| GNA | Gaussian and neural accelerator |
. NET is a free cross platform open source developer platform for building multiple applications. The following will demonstrate how AIxBoard can install the. NET environment on Ubuntu 20.04, supporting the. NET Core 2.0-3.1 series and. NET 5-8 series. If your AIxBoard is using another Linux system, you can refer to Install .NET on Linux distributions - .NET | Microsoft Learn
The installation using APT can be completed through several commands. Before installing. NET, please run the following command to add the Microsoft package signing key to the trusted key list and add the package repository.
Open the terminal and run the following command:
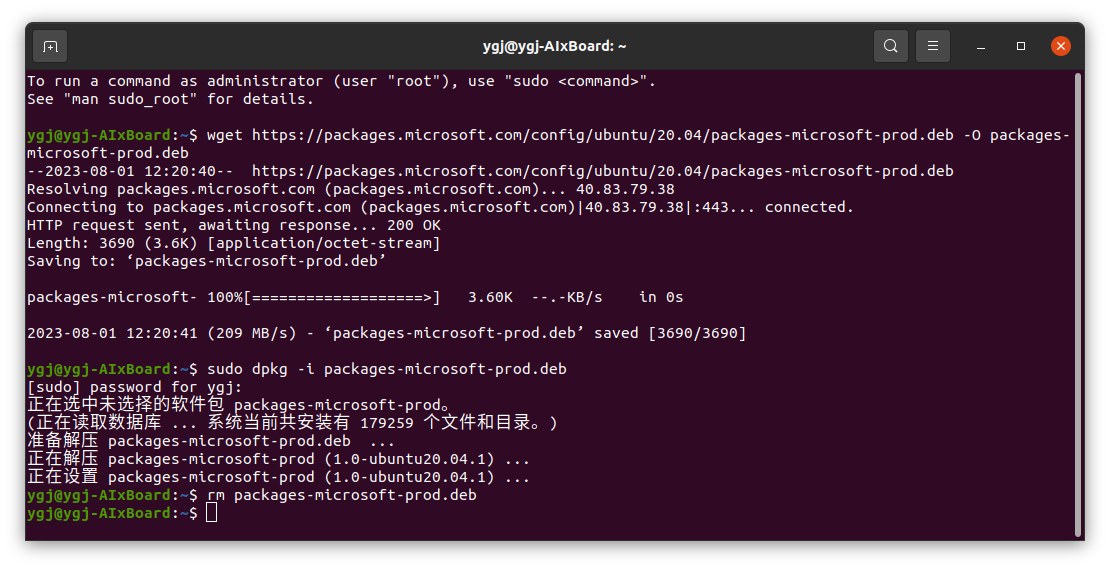
wget https://packages.microsoft.com/config/ubuntu/20.04/packages-microsoft-prod.deb -O packages-microsoft-prod.deb
sudo dpkg -i packages-microsoft-prod.deb
rm packages-microsoft-prod.deb
The following figure shows the output of the console after entering the above command:
The. NET SDK allows you to develop applications through. NET. If you install the. NET SDK, you do not need to install the corresponding runtime. To install the. NET SDK, run the following command:
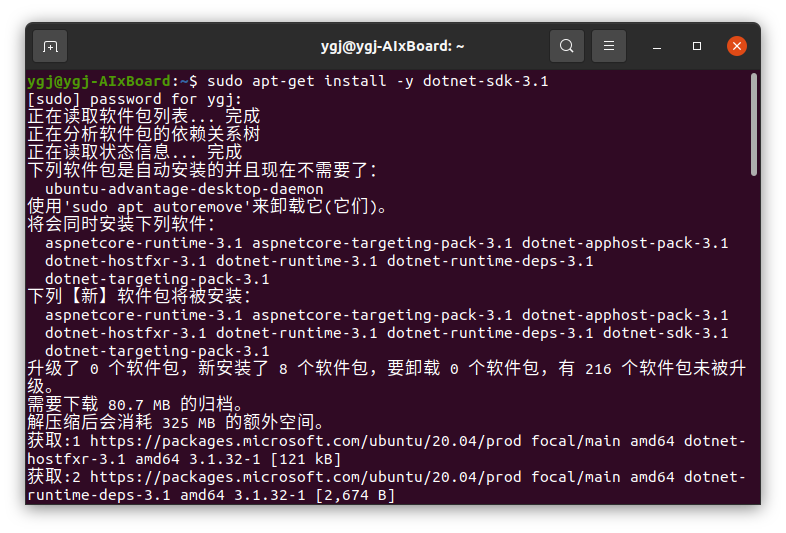
sudo apt-get update
sudo apt-get install -y dotnet-sdk-3.1
The following figure shows the output of the console after entering the above command:
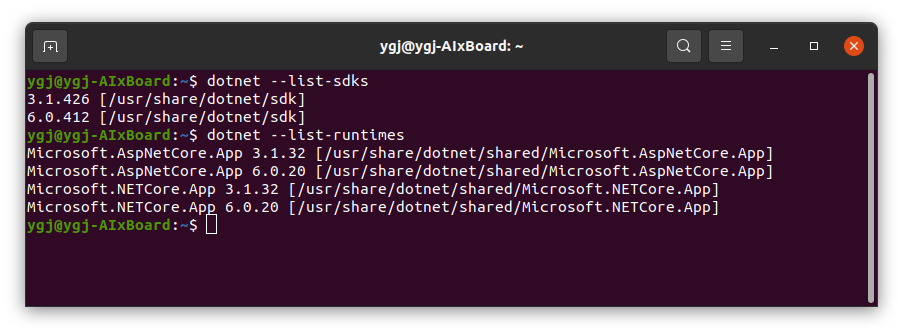
You can check the SDK version and runtime version through the command line.
dotnet --list-sdks
dotnet --list-runtimes
The following figure shows the output of the console after entering the above command:
In the Linux environment, we can create and compile projects using the dotnet command. The project creation command is:
dotnet new <project_type> -o <project name>
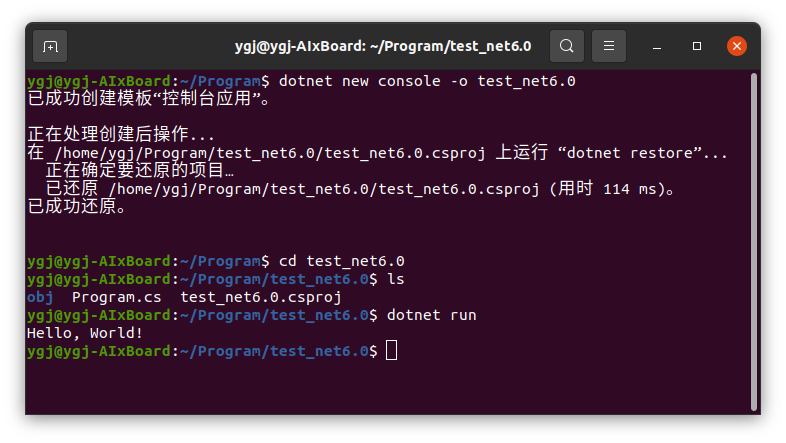
Here we create a simple test console project:
dotnet new console -o test_net6.0
cd test_net6.0
dotnet run
The following figure shows the output of the console and the file status of the project folder after entering the test command. The C # project will automatically create a **Program. cs ** program file, which contains the main function of the program runtime entry. At the same time, it will also create a ***. csproj ** file, which is responsible for specifying some configurations in the project compilation.

The above are the configuration steps for the. NET environment. If your environment does not match this article, you can obtain more installation steps through .NET documentation | Microsoft Learn.
OpenVINO™ have two installation methods: OpenVINO Runtime and OpenVINO Development Tools. The OpenVINO Runtime contains a core library for running model deployment inference on processor devices. OpenVINO Development Tools is a set of tools used to process OpenVINO and OpenVINO models, including model optimizer, OpenVINO runtime, model downloader, and more. We only need to install OpenVINO Runtime here.
Visit the Download the Intel Distribution of OpenVINO Toolkit page and follow the process below to select the corresponding installation options. On the download page, as our device is using **Ubuntu 20.04 **, download according to the specified compiled version.
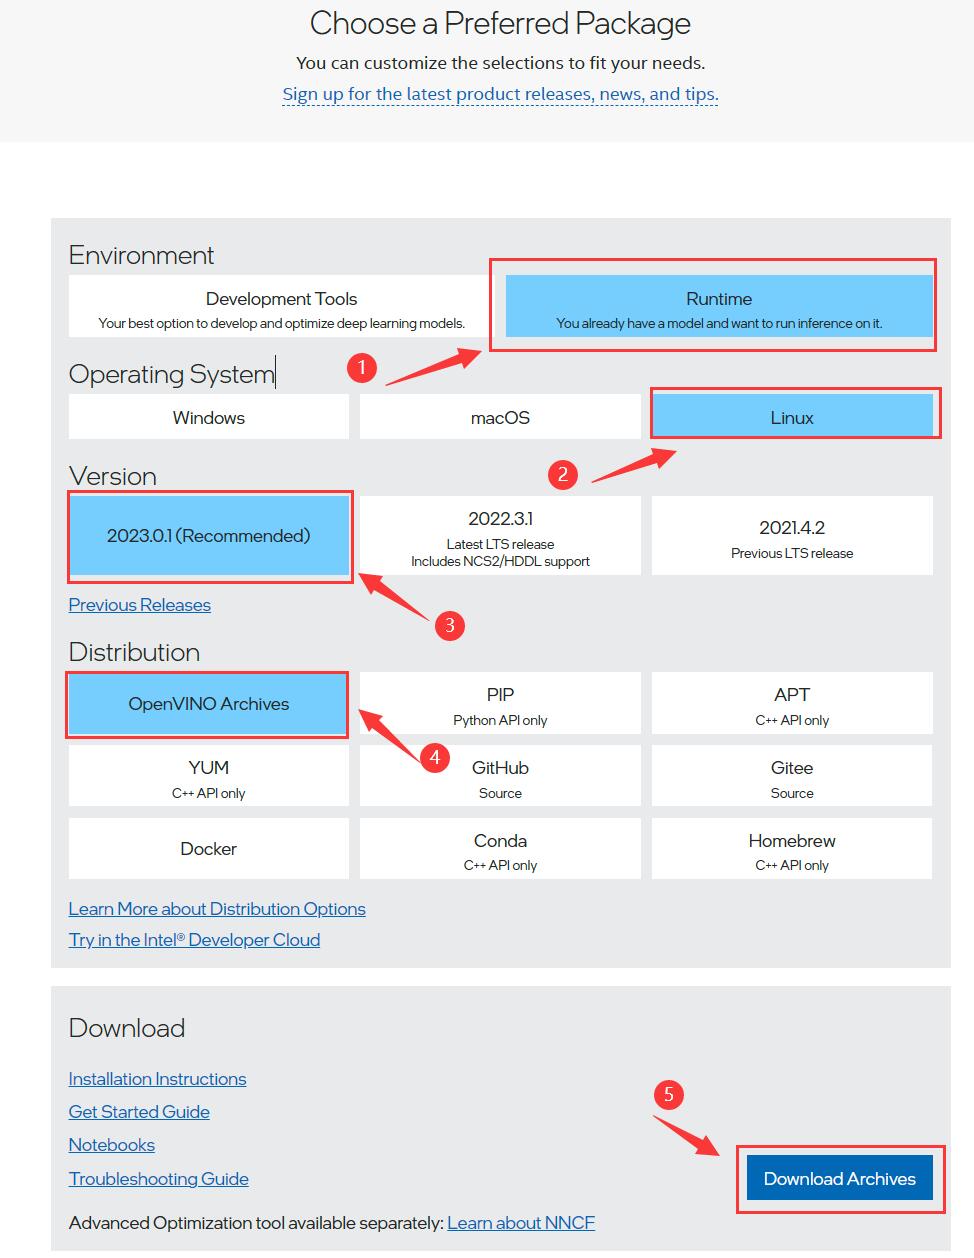

The OpenVINO Runtime we downloaded is essentially a C++dependency package, so we placed it in our system directory so that dependencies can be obtained during compilation based on the set system variables. First, create a folder under the system folder:
sudo mkdir -p /opt/intelThen extract the installation files we downloaded and move them to the specified folder:
tar -xvzf l_openvino_toolkit_ubuntu20_2023.0.1.11005.fa1c41994f3_x86_64.tgz
sudo mv l_openvino_toolkit_ubuntu20_2023.0.1.11005.fa1c41994f3_x86_64 /opt/intel/openvino_2022.3.0Next, we need to install the dependencies required by the OpenVINO Runtime. Enter the following command from the command line:
cd /opt/intel/openvino_2022.3.0/
sudo -E ./install_dependencies/install_openvino_dependencies.sh
After the installation is completed, we need to configure the environment variables to ensure that the system can obtain the corresponding files when calling. Enter the following command from the command line:
source /opt/intel/openvino_2022.3.0/setupvars.shThe above are the configuration steps for the OpenVINO Runtime environment. If your environment does not match this article, you can obtain more installation steps through Install OpenVINO™ Runtime — OpenVINO™ documentation — Version(2023.0).
The code used in the project has been placed in the GitHub repository AlxBoard_deploy_yolov8, and you can download and use it according to your situation. Below, I will build the AlxBoard step by step from scratch_ Deploy_ Yolov8 project.
In this project, we need to use OpenCvSharp, which currently supports up to. NET Core 3.1 on the Ubutun platform. Therefore, we will create a project for. NET Core 3.1 and use Terminal to enter the following command to create and open the project file:
dotnet new console --framework "netcoreapp3.1" -o AlxBoard_deploy_yolov8
cd AlxBoard_deploy_yolov8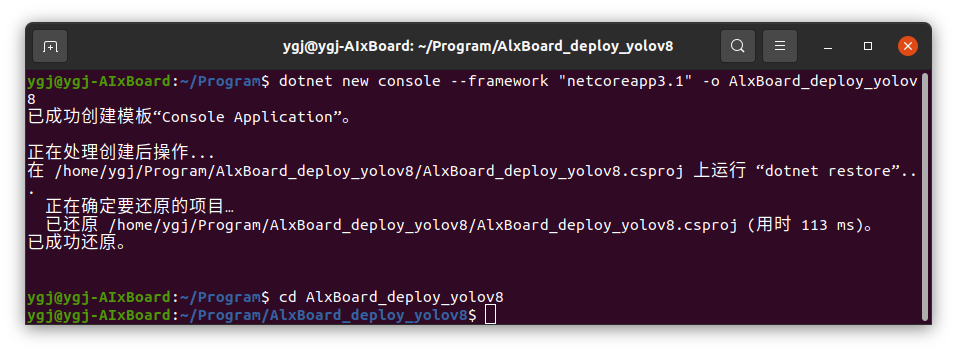
创建完项目后,将AlxBoard_deploy_yolov8的代码内容替换到创建的项目中的Program.cs文件中.
Due to the fact that OpenVINOSharp is currently in the development phase and has not yet created a Linux version of NuGet Package, it is necessary to use it as a project reference by downloading the project source code.
-
Download source code
Download the project source code through Git, create a new Terminal, and enter the following command to clone the remote repository and place the project on AlxBoard_ Deploy_ Under the same level directory as yolov8.
git clone https://github.com/guojin-yan/OpenVINOSharp.git
cd OpenVINOSharp
The project directory for this article is:
Program-- |-AlxBoard_deploy_yolov8 |-OpenVINOSharp -
Modify OpenVINO ™ Dependency
Due to the OpenVINO™ dependency of the project source code being different from the settings in this article, it is necessary to modify the path of the OpenVINO™ dependency, mainly by modifying the
OpenVINOSharp/src/OpenVINOSharp/native_methods/ov_base.cs. The modifications are as follows:private const string dll_extern = "./openvino2023.0/openvino_c.dll"; ---Modify to---> private const string dll_extern = "libopenvino_c.so"; -
Add Project Dependency
Enter the following command in Terminal to add OpenVINOSharp to AlxBoard_ Deploy_ Yolov8 project reference.
dotnet add reference ./../OpenVINOSharp/src/OpenVINOSharp/OpenVINOSharp.csproj -
Add environment variables
This project requires calling the OpenVINO dynamic link library, so it is necessary to add the OpenVINO dynamic link library path in the current environment:
export LD_LIBRARY_PATH=/opt/intel/openvino_2023.0/runtime/lib/intel64
-
Install NuGet Package
OpenCvSharp can be installed through NuGet Package by simply entering the following command in Terminal:
dotnet add package OpenCvSharp4_.runtime.ubuntu.20.04-x64 dotnet add package OpenCvSharp4 -
Add environment variables
Add the following path to the environment variable:
export LD_LIBRARY_PATH=/home/ygj/Program/OpenVINOSharp/tutorial_examples/AlxBoard_deploy_yolov8/bin/Debug/netcoreapp3.1/runtimes/ubuntu.20.04-x64/native/bin/Debug/netcoreapp3.1/runtimes/ubuntu.20.04-x64/nativeis AlxBoard_ Deploy_ The path generated after Yolov8 compilation contains thelibOpenCvSharpExtern. sofile, which mainly encapsulates various interfaces in OpenCV. You can also copy the file to the project running path. -
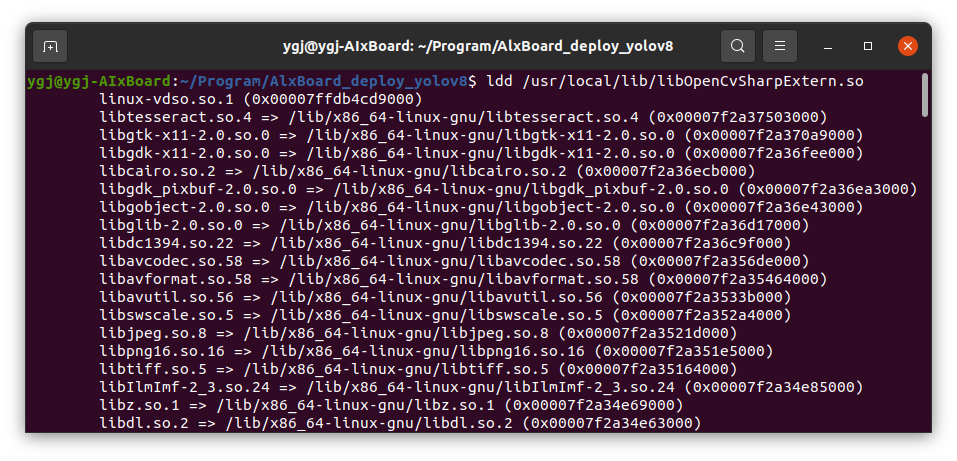
Detect
libOpenCvSharpExterndependencyDue to the fact that
libOpenCvSharpExtern.sois a dynamic link library compiled in other environments, the local computer may lack corresponding dependencies, so it can be detected through thelddcommand.ldd libOpenCvSharpExtern.so
If there is no 'no found' in the output content, it indicates that there is no missing dependency. If there is, the missing dependency needs to be installed in order to function properly.
After adding project dependencies and NuGet Package, the configuration file content of the project is:
<Project Sdk="Microsoft.NET.Sdk">

  <ItemGroup>
    <ProjectReference Include="..\OpenVINOSharp\src\OpenVINOSharp\OpenVINOSharp.csproj" />
  </ItemGroup>

  <ItemGroup>
    <PackageReference Include="OpenCvSharp4" Version="4.8.0.20230708" />
    <PackageReference Include="OpenCvSharp4_.runtime.ubuntu.20.04-x64" Version="4.8.0.20230708" />
  </ItemGroup>

  <PropertyGroup>
    <OutputType>Exe</OutputType>
    <TargetFramework>netcoreapp3.1</TargetFramework>
  </PropertyGroup>

</Project>The models and files used in the project testing can be found in OpenVINOSharp, so we will test them using the models and files in the OpenVINOSharp repository.
To run through Dotnet, simply run the following command
dotnet run <args><args>refers to the model prediction type, model path, and image file path parameters. The prediction type input includes four types: 'det', 'seg', 'pose', and 'cls'; The default inference device is set to 'AUTO', and for 'det' and 'seg' predictions,Parameter. If set, the result will be plotted on the image. If not set, it will be printed through the console.
The compile and run commands are:
dotnet run det /home/ygj/Program/OpenVINOSharp/model/yolov8/yolov8s.xml /home/ygj/Program/OpenVINOSharp/dataset/image/demo_2.jpg GPU.0 /home/ygj/Program/OpenVINOSharp/dataset/lable/COCO_lable.txt
The output result of model inference is:
---- OpenVINO INFO----
Description : OpenVINO Runtime
Build number: 2023.0.1-11005-fa1c41994f3-releases/2023/0
Set inference device GPU.0.
[INFO] Loading model files: /home/ygj/Program/OpenVINOSharp/model/yolov8/yolov8s.xml
[INFO] model name: torch_jit
[INFO] inputs:
[INFO] input name: images
[INFO] input type: f32
[INFO] input shape: Shape : [1, 3, 640, 640]
[INFO] outputs:
[INFO] output name: output0
[INFO] output type: f32
[INFO] output shape: Shape : [1, 84, 8400]
[INFO] Read image files: /home/ygj/Program/OpenVINOSharp/dataset/image/demo_2.jpg
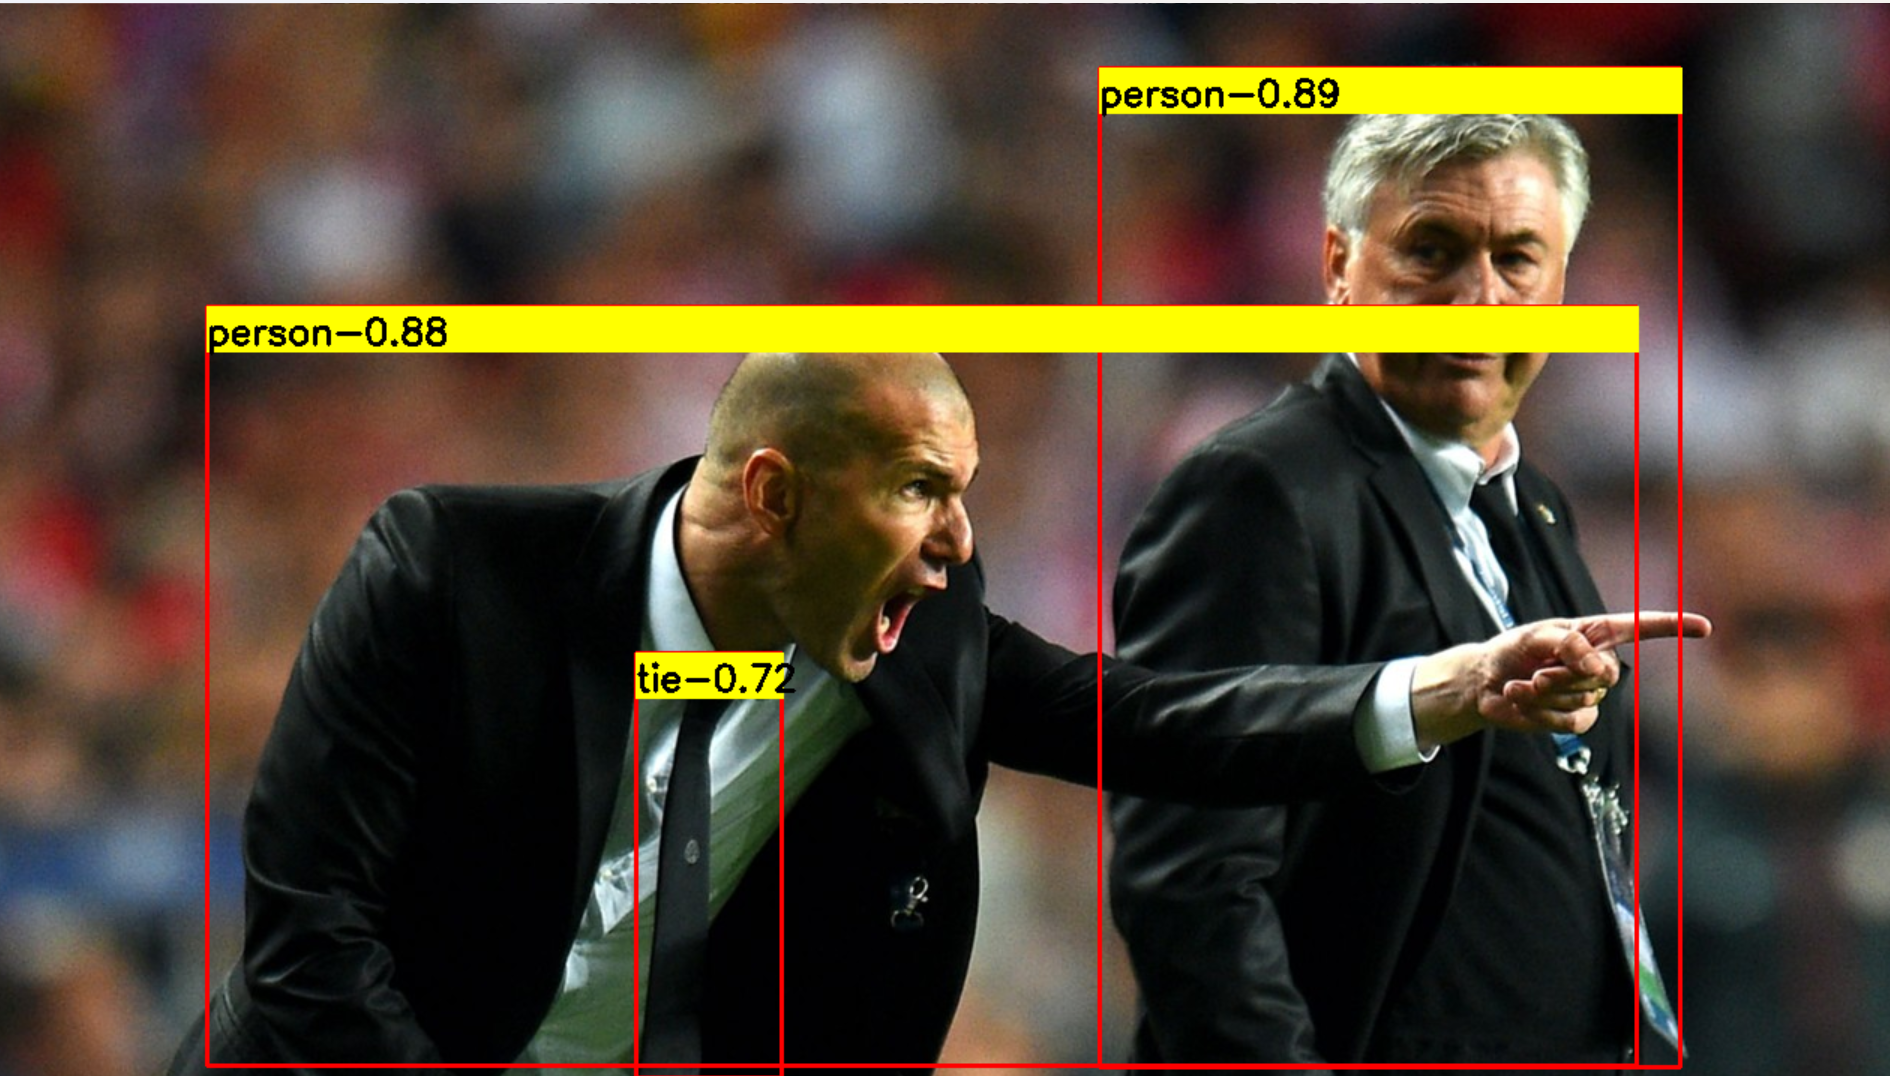
Detection result :
1: 0 0.89 (x:744 y:43 width:388 height:667)
2: 0 0.88 (x:149 y:202 width:954 height:507)
3: 27 0.72 (x:435 y:433 width:98 height:284)
The compile and run commands are:
dotnet run cls /home/ygj/Program/OpenVINOSharp/model/yolov8/yolov8s-cls.xml /home/ygj/Program/OpenVINOSharp/dataset/image/demo_7.jpg GPU.0
The output result of model inference is:
---- OpenVINO INFO----
Description : OpenVINO Runtime
Build number: 2023.0.1-11005-fa1c41994f3-releases/2023/0
Set inference device  GPU.0.
[INFO] Loading model files: /home/ygj/Program/OpenVINOSharp/model/yolov8/yolov8s-cls.xml
[INFO] model name: torch_jit
[INFO]    inputs:
[INFO]      input name: images
[INFO]      input type: f32
[INFO]      input shape: Shape : [1, 3, 224, 224]
[INFO]    outputs:
[INFO]      output name: output0
[INFO]      output type: f32
[INFO]      output shape: Shape : [1, 1000]
[INFO] Read image  files: /home/ygj/Program/OpenVINOSharp/dataset/image/demo_7.jpg


 Classification Top 10 result :

classid probability
------- -----------
294     0.992173
269     0.002861
296     0.002111
295     0.000714
270     0.000546
276     0.000432
106     0.000159
362     0.000147
260     0.000078
272     0.000070
The compile and run commands are:
dotnet run pose /home/ygj/Program/OpenVINOSharp/model/yolov8/yolov8s-pose.xml /home/ygj/Program/OpenVINOSharp/dataset/image/demo_9.jpg GPU.0
The output result of model inference is:
---- OpenVINO INFO----
Description : OpenVINO Runtime
Build number: 2023.0.1-11005-fa1c41994f3-releases/2023/0
Set inference device GPU.0.
[INFO] Loading model files: /home/ygj/Program/OpenVINOSharp/model/yolov8/yolov8s-pose.xml
[INFO] model name: torch_jit
[INFO] inputs:
[INFO] input name: images
[INFO] input type: f32
[INFO] input shape: Shape : [1, 3, 640, 640]
[INFO] outputs:
[INFO] output name: output0
[INFO] output type: f32
[INFO] output shape: Shape : [1, 56, 8400]
[INFO] Read image files: /home/ygj/Program/OpenVINOSharp/dataset/image/demo_9.jpg
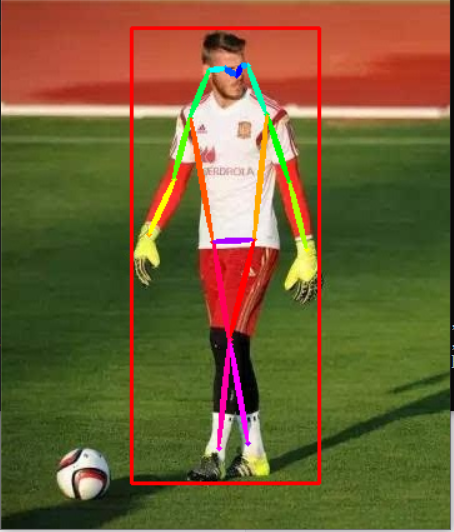
Classification result :
1: 1 0.94 (x:104 y:22 width:152 height:365) Nose: (188 ,60 ,0.93) Left Eye: (192 ,53 ,0.83) Right Eye: (180 ,54 ,0.90) Left Ear: (196 ,53 ,0.50) Right Ear: (167 ,56 ,0.76) Left Shoulder: (212 ,92 ,0.93) Right Shoulder: (151 ,93 ,0.94) Left Elbow: (230 ,146 ,0.90) Right Elbow: (138 ,142 ,0.93) Left Wrist: (244 ,199 ,0.89) Right Wrist: (118 ,187 ,0.92) Left Hip: (202 ,192 ,0.97) Right Hip: (168 ,193 ,0.97) Left Knee: (184 ,272 ,0.96) Right Knee: (184 ,276 ,0.97) Left Ankle: (174 ,357 ,0.87) Right Ankle: (197 ,354 ,0.88)
The compile and run commands are:
dotnet run seg /home/ygj/Program/OpenVINOSharp/model/yolov8/yolov8s-seg.xml /home/ygj/Program/OpenVINOSharp/dataset/image/demo_2.jpg GPU.0 /home/ygj/Program/OpenVINOSharp/dataset/lable/COCO_lable.txt
The output result of model inference is:
---- OpenVINO INFO----
Description : OpenVINO Runtime
Build number: 2023.0.1-11005-fa1c41994f3-releases/2023/0
Set inference device GPU.0.
[INFO] Loading model files: /home/ygj/Program/OpenVINOSharp/model/yolov8/yolov8s-seg.xml
47
[INFO] model name: torch_jit
[INFO] inputs:
[INFO] input name: images
[INFO] input type: f32
[INFO] input shape: Shape : [1, 3, 640, 640]
[INFO] outputs:
[INFO] output name: output0
[INFO] output type: f32
[INFO] output shape: Shape : [1, 116, 8400]
[INFO] Read image files: /home/ygj/Program/OpenVINOSharp/dataset/image/demo_2.jpg
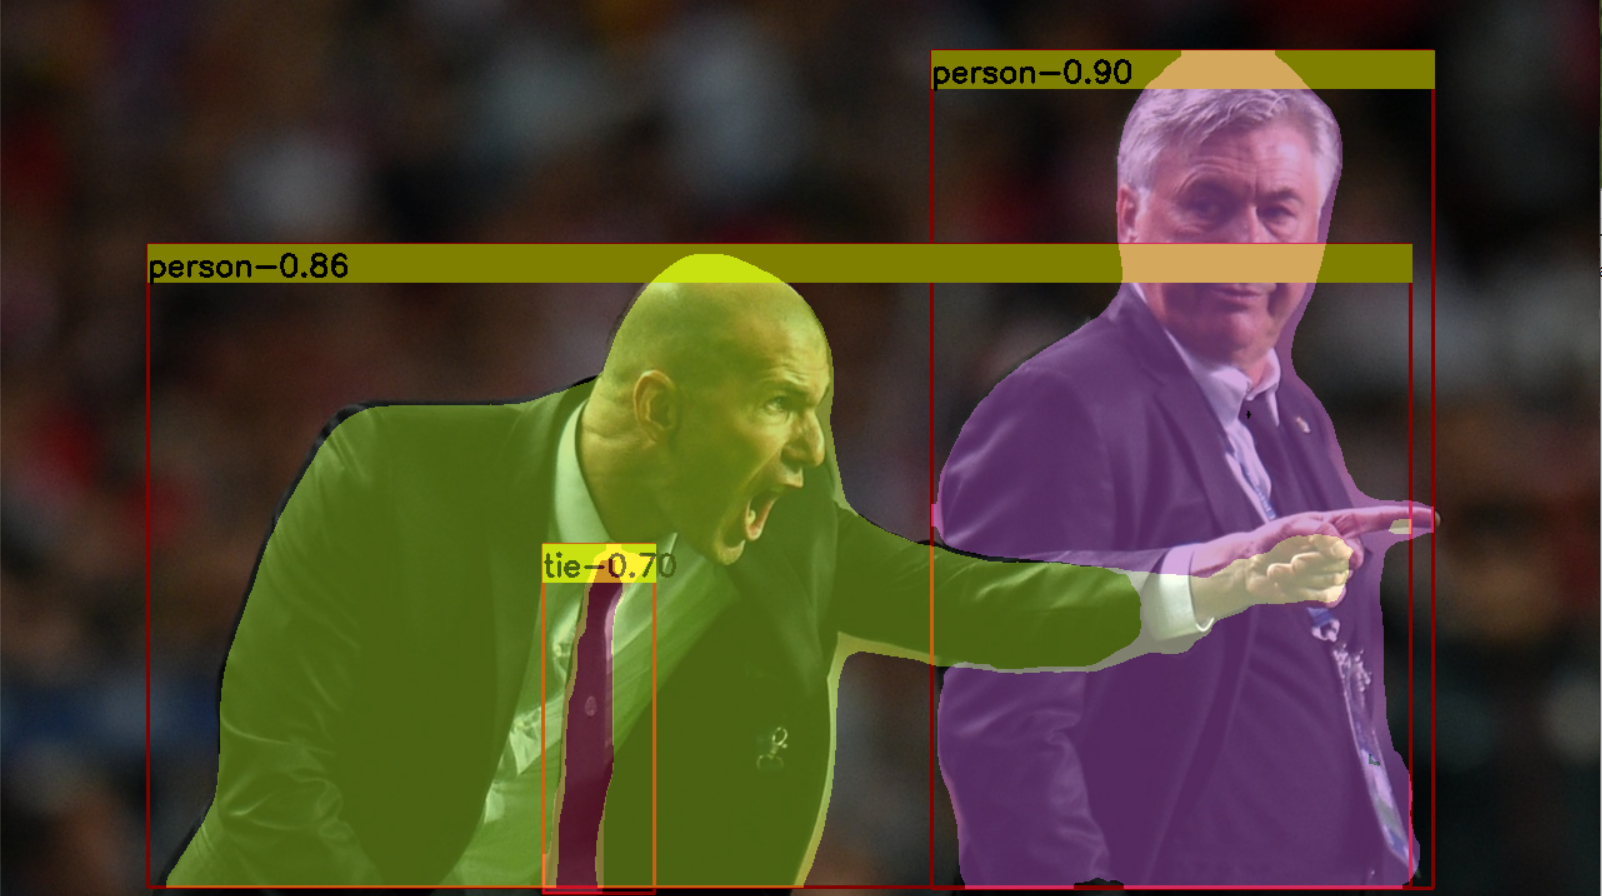
Segmentation result :
1: 0 0.90 (x:745 y:42 width:403 height:671)
2: 0 0.86 (x:121 y:196 width:1009 height:516)
3: 27 0.69 (x:434 y:436 width:90 height:280)
The AIxBoard development board is equipped with the Intel Celeron N5105 CPU and Intel 11th generation integrated graphics card. Here, a simple test was conducted on the inference performance of the CPU and GPU, mainly detecting the model inference time. Synchronous testing was conducted using Intel Phantom Canyon, and the test results are shown in the table
| Device | CPU: N5105 | GPU: Intel 11th 集显 | CPU: i7-1165G7 | GPU: lntel(R) Iris(R) Xe Graphics |
|---|---|---|---|---|
| Yolov8-det | 586.3ms | 83.1ms | 127.1ms | 19.5ms |
| Yolov8-seg | 795.6ms | 112.5ms | 140.1ms | 25.0ms |
| Yolov8-pose | 609.8ms | 95.1ms | 117.2ms | 23.3ms |
| Yolov8-cls | 33.1ms | 9.2ms | 6.1ms | 2.7ms |
It can be seen that the Intel Celeron N5105 CPU has very powerful model inference performance, and paired with the Intel 11th generation integrated graphics card, it has increased the inference speed by about 6 times. For the Yolov8 model, the average processing speed can reach 10FPs. Compared to the inference speed of Phantom Canyon, the inference performance of the AIxBoard development board is about one-fifth of that, which is still very powerful compared to ordinary development boards.
In this project, we successfully implemented the call to OpenVINO in the C # environment based on the Ubutton 20.04 system ™ Deploying a deep learning model has verified the feasibility of the OpenVINOSharp project in the Linux environment, which is of great significance for the future development of OpenVINOSharp in the Linux environment.
In addition, we also used OpenVINOSharp to test the model inference ability of the AIxBoard development board. For the Yolov8 model, the average processing speed can reach 10FPS, which has already reached a high inference speed for most current development boards. I will continue to use OpenVINOSharp to deploy more deep learning models on the AIxBoard development board in the future.